


Thinking about skipping the standard fir this holiday season? That feeling makes total sense.
Sometimes a fresh perspective is exactly what the season calls for. Maybe you’re longing for something that reflects your personality more, a contemporary Christmas tree that shouts originality from every branch.
You’ve landed in exactly the right spot.
This year, let’s dive into some brilliant DIY Christmas tree concepts together. Picture simple, inventive, and completely personalized Christmas tree crafts that will turn your home into the object of every holiday visitor’s envy.
Prepare to unleash your inner creative spirit!
DIY Ladder Wall Christmas Tree with Dried Citrus Garland

@ourlivelyadventures
The clean, uncluttered aesthetic continues its reign, and this leaning ladder tree absolutely captures that spirit. A significant shift away from conventional evergreens is happening, and this creation serves as a brilliant illustration.
Extra credit goes to the environmentally friendly elements woven throughout. The handmade dried citrus garland delivers an unexpectedly sophisticated feel.
When floor space is at a premium, a wall-mounted Christmas tree reveals itself as pure genius. It stays minimal, celebrates the season, and refuses to consume your entire living area.
How to Make This Craft Find a leaning ladder and confirm its stability. Drape fairy lights loosely across the rungs. Secure faux or real evergreen sprigs to the rungs using floral wire. Suspend dried orange slices with pieces of twine. Bake gingerbread cookies and adorn them with icing. Create a small hole at the top of each cookie and thread twine through it. Arrange white tinsel garland over the greenery. Introduce additional small ornaments or natural touches. Step back and tweak the arrangement until every element feels balanced. Lean the finished ladder tree against the wall and anchor it if required.
Miniature Green Floral Cardboard Christmas Tree Display
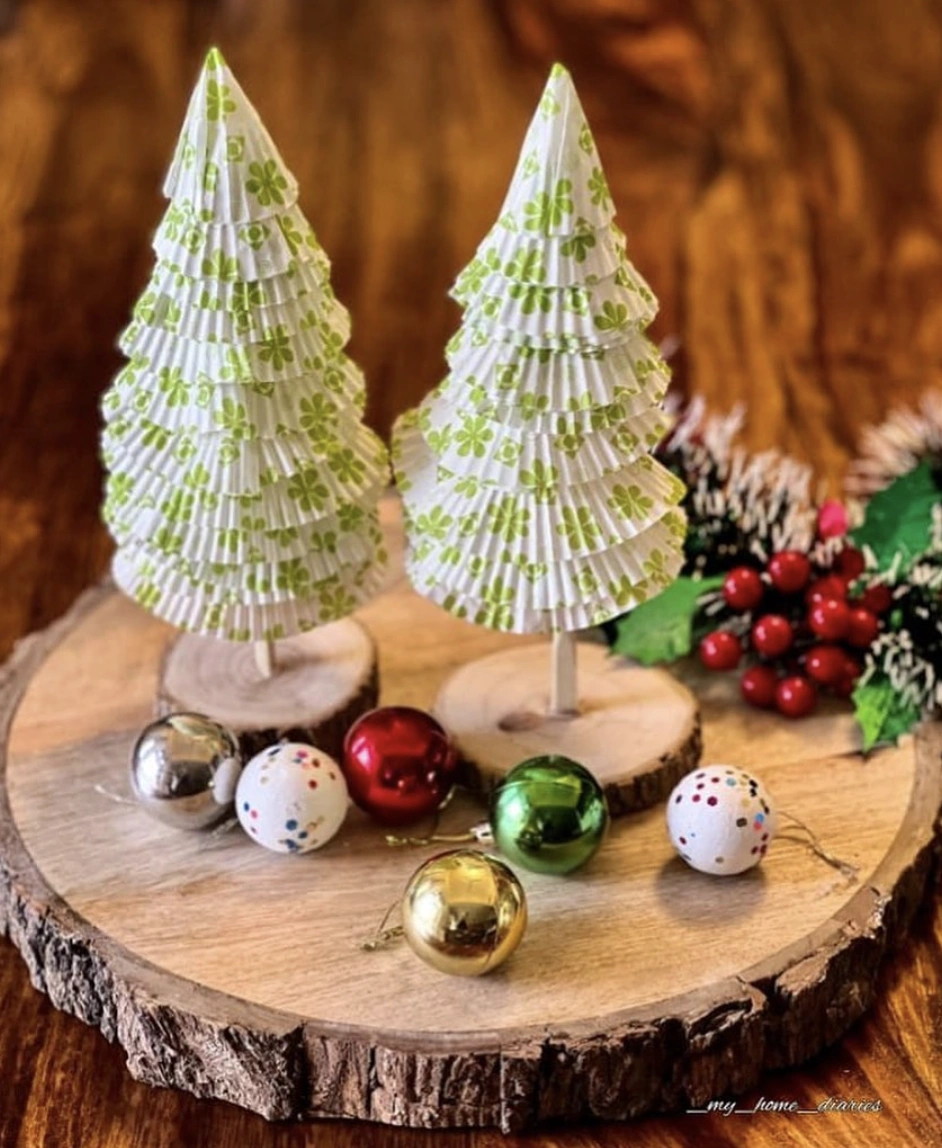
@_my_home_diaries
These petite, stepped trees capture attention immediately. The truly remarkable feature involves the delicate floral pattern rendered in soft green against the crisp white background.
That subtle detail infuses an elegant character, steering miles away from typical flashy holiday trimmings. Perched on tiny wooden pedestals, they radiate a handcrafted warmth, offering a welcome change from the routine of oversized, conventional trees. The entire cardboard Christmas tree arrangement appears thoughtfully assembled with an artist’s eye.
How to Make This Craft Snag a package of patterned cupcake liners. Flatten roughly ten to fifteen liners per tree. Cut circles out of the liners using scissors. Gradually reduce the diameter of each circle so they stack neatly from smallest to largest. Poke a center hole through every circle. Grab short wooden dowels, approximately four inches tall. Glue a dowel firmly into a petite, pre-cut wood base. Slide each cupcake liner circle onto the dowel. Apply a dot of glue between each layer for a permanent hold. Crown the tree with a tiny star or bead, securing it with glue.
Red Velvet Cone Trees with Golden Accents

@glamorouspennypincher
Anyone drawn to refined, unconventional decor will likely fall hard for these beauties. Imagine a person who enjoys subtle glamour without veering into excess.
They would suit someone who delights in crafting their own DIY tree decorations and showcasing a spark of imagination. These pieces are guaranteed to ignite conversation.
How to Make This Craft Gather styrofoam cones in several different sizes. Locate candlestick holders or decorative plinths that match your personal style. Anchor the end of a velvet ribbon to the cone’s base using hot glue. Meticulously wind the ribbon around the form, overlapping each pass slightly. Fasten the ribbon with hot glue as you progress, maintaining a sleek surface. At the cone’s peak, snip the ribbon and glue the tail end down firmly. Hot glue the completed cones onto their chosen pedestals. Add a decorative bead at the apex for an optional extra flourish.
Metallic Holiday Tabletop Trees with Star Toppers

Credit: @ralph_esparza
They serve as the perfect vehicle for injecting a little shimmer into the festivities. Truthfully, a lineup of these marching down the center of a long Christmas dinner table sounds absolutely stunning.
Or picture them scattered across the mantel, mingling with other seasonal accents. They also provide major inspiration for a personal DIY Christmas tree undertaking this year. The look is wonderfully unique and gloriously celebratory.
How to Make This Craft Source sturdy cardboard or styrofoam cones in varying heights. Assemble a collection of small ball ornaments in silver, gold, and other complementary hues. Beginning at the bottom, hot glue the ornaments directly onto the cone surface. Continue climbing upward, plugging any gaps with smaller baubles or glitter glue. Select coordinating star ornaments for the treetop position. Affix the star to the cone’s peak with hot glue. Verify every ornament is attached firmly. Allow the glue to cure completely before showcasing your handiwork.
Macrame Wall Hanging Christmas Tree with Wooden Bead Ornaments
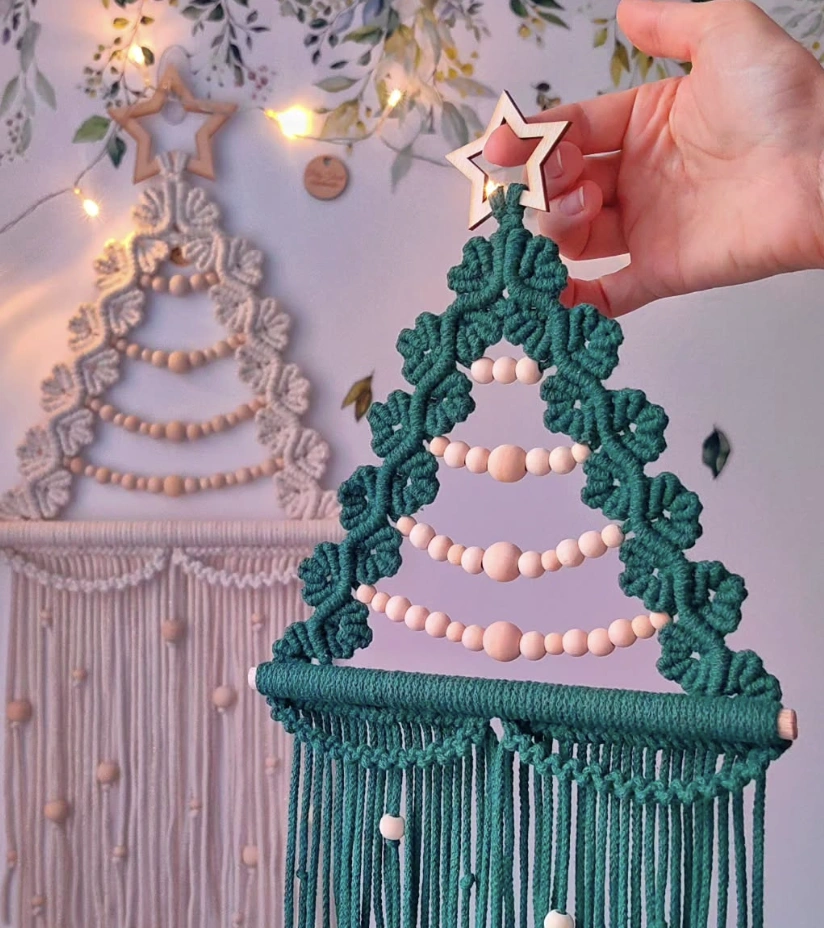
Credit: @poly_tusal
The pursuit of quick victories never ends. These macrame wall hangings are surfacing everywhere, and this concept succeeds brilliantly as a minimalist Christmas tree.
The design works magic when square footage is limited and, frankly, when the clock is working against you. Those wooden bead ornaments deliver serious charm points. This handcrafted piece merges farmhouse warmth with boho soul into one beautiful creation.
How to Make This Craft Cut macrame cord into differing lengths, tracing a triangular tree silhouette. Employ fundamental macrame knots, such as the square knot and half hitch, to build a tree-shaped foundation. Thread wooden beads onto selected cords, knotting around them to lock the beads in place. For the bottom fringe, leave a portion of the cords long and unknotted. Trim the fringe to a consistent length. Glue a wooden star at the very top. Fashion a hanging loop at the peak using extra cord. Tweak the knotwork and bead placement until the aesthetic feels right. Consider dyeing the macrame cords with fabric dye for variation. Suspend the finished macrame tree on a wall and soak in the charm.
Minimalist Wall-Mounted Christmas Tree with Wooden Shelves
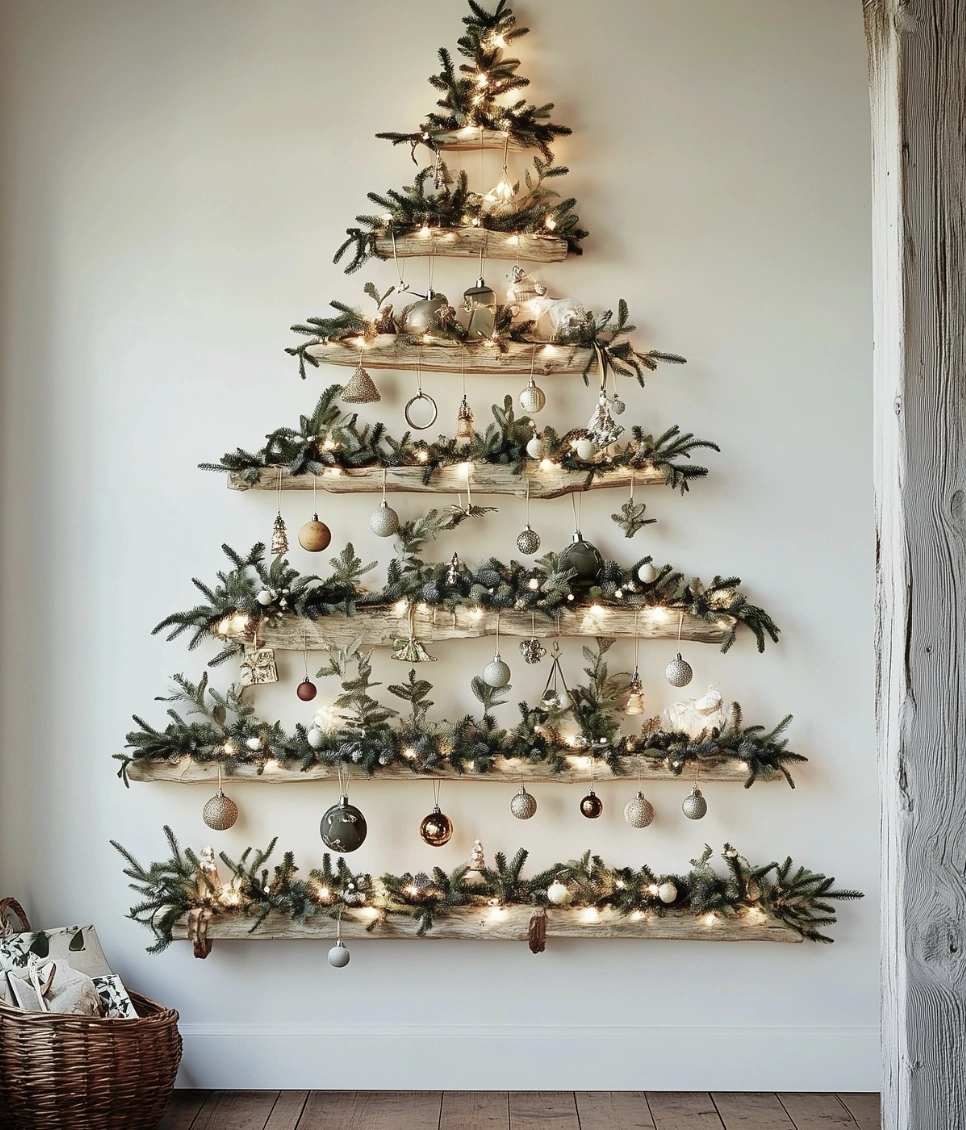
Credit: @livingbrightinteriors
So the traditional tree got the boot this year? That choice makes absolute sense.
The typical evergreen can impose itself on a compact room or simply clash with a streamlined, minimalist philosophy. This design answers that dilemma with elegance. By mounting wooden planks and dressing them with subtle lights plus a handful of curated ornaments, you craft a striking modern Christmas tree that hums with festive energy and refined composure while sacrificing zero valuable floor space.
How to Make This Craft Collect five reclaimed wood planks in graduated lengths. Sand away any rough edges from the lumber. Mount the planks onto the wall to shape a tiered tree contour using wall hangers. Swag faux evergreen garland across each wooden shelf. Thread strands of fairy lights all through the greenery. Suspend an assortment of ornaments from the boughs. Affix a tree topper. Inspect for any loose decorations. Step back and fine-tune the composition for visual balance. Add more lights if the sparkle factor needs boosting.
Crimson & Emerald Crepe Paper Christmas Tree Crafts with Mini Lights

Credit: @bloomingdalecollections.ph
The texture of the crepe paper sparks pure fascination with all those delicate, tiny lines. Observing how the paper was manipulated to mimic layered boughs feels nothing short of brilliant.
Those petite gold ornaments catching the fairy light glow add the most magical finishing detail. The bold crimson or the classic emerald, which shade captures your heart? Choosing just one seems impossible.
How to Make This Craft Roll green and red cardstock paper into cone configurations. Hold the cone shape with glue or tape. Cut countless teardrop-shaped petals from crepe paper. Start at the base, gluing each petal onto the cone with a slight overlap. Keep layering this way until the entire cone is concealed. Paint wooden beads in a gleaming gold tone. Attach the beads around the tree at regular, even spaces. Add a strand of battery-operated fairy lights to every tree. Hide the battery pack discreetly at the base. Display the collection on a mantel or tabletop to conjure a festive mood.
Rustic Branch Christmas Tree with Twinkling Lights and Mismatched Ornaments

Credit: @cosanciuin
This tree doesn’t aim for sterile perfection, and that’s precisely why it works. Forged from foraged branches, it stands as proof that a fortune isn’t required to make a home feel festive.
Stringing the tiny lights likely demanded an extra pair of hands, but the resulting warmth justifies every minute of effort. Finding straightforward paths to easy DIY Christmas decorations remains the goal, and this example shines brightly. The ornaments tell a story of their own, some old, some new, which amplifies the charm exponentially.
How to Make This Craft Locate a robust tree stand or a sizeable pot to anchor your branches. Gather an assortment of fallen limbs, brushing off any loose debris. Position the branches within the stand, placing the larger pieces at the lower levels. Stabilize the branches using floral foam or gravel. Weave fairy lights throughout the entire structure, letting them flow naturally. Suspend small, lightweight ornaments across the branches, spacing them evenly. Pick a one-of-a-kind topper. Drape a tree skirt or cozy blanket around the base to obscure the stand. Tweak the lights and ornament positions until you land on the perfect mood. Bask in the glow of your whimsical, nature-kissed Christmas tree.
Yarn-Wrapped Miniature Christmas Tree Centerpiece

Credit: @nayantara_saharia
Weary of the same old predictable holiday decor year after year? This choice provides a chic alternative and solves the chronic dilemma of tedious centerpieces.
Anyone can master the art of how to make a Christmas tree, especially with these yarn-wrapped versions. They emerge as shockingly elegant and introduce a tactile richness that standard baubles simply can’t rival. It also functions as a wonderful conversation opener.
How to Make This Craft Form small cones from paper and secure them with tape to hold the structure. Starting at the base of a cone, begin tightly swathing a strand of twine around it, tacking it down periodically with hot glue dabs. Repeat this process to sheath the entire cone. Wrap other trees using varied yarn types, repeating the gluing procedure. Use hot glue to adhere tiny stars. Wind pearls and red beads around the finished trees for extra embellishment. Introduce battery-operated string lights. Place filler material into a gold basket. Settle the finished trees inside the basket. Tuck holiday bulbs around the trees to fill any remaining gaps.
Crocheted Christmas Tree Wall Hanging with Button and Ornament Details

Credit: @onceuponacheerio
This piece is tailor-made for those cozy, compact spaces. Imagining one hanging in a snug apartment where every inch counts sparks immediate joy.
How adorable would that setup feel? This design inspires a deep desire to attempt some easy DIY Christmas decorations this year.
Starting with something like those tiny crocheted ornaments feels manageable and fun. What are your thoughts? Doing it together sounds like an absolute blast.
How to Make This Craft Crochet a broad green tree silhouette featuring a scalloped border using a basic stitch. Crochet miniature ornaments in assorted shapes and hues. Stitch buttons onto the body of the tree to replicate classic bulb decorations. Crochet tiny stockings for a holiday touch. Affix the crocheted ornaments and stockings onto the tree form. Crochet a small star for the tree topper. Attach the star securely to the apex. Add a faux strand of lights by stitching yarn across the surface. Fasten the top portion of the crocheted piece to the wall. Test the hanging’s overall stability.
Mini Pine Christmas Tree with Pinecone Accents

Credit: @fru.lily
Those organic, natural energies feel absolutely irresistible. The tiny star accents possess a rustic, almost raw aesthetic that genuinely succeeds.
Notice those little green ornaments nestled within the pine needles? Completely endearing. For anyone exploring how to make a Christmas tree using foraged treasures, this piece delivers a wealth of inspiration.
How to Make This Craft Choose a cone-shaped foam form in the height you desire. Affix evergreen clippings onto the foam cone using floral pins, working from the bottom upward. Anchor larger pine cones with hot glue, distributing them with even spacing. Add smaller, gold-painted pinecones and green ornaments to build visual depth. Press pieces of preserved moss into any visible gaps. Attach petite wooden stars, coating them with metallic paint beforehand. Accent the design with a dusting of faux snow spray. Insert the tree base into a vintage candlestick or brass holder. Check the equilibrium and rearrange elements as necessary. Showcase the piece on a table or mantelpiece.
Gingerbread Men and Dried Orange Slice DIY Christmas Tree

Credit: @livingwithlady
Can we pause for a moment and appreciate this tree? The uncomplicated, organic vibe creates pure obsession.
Forget those immaculately themed trees plastered everywhere, this vision feels totally attainable. The gingerbread men ornaments steal the show entirely.
It presents itself as a craft adventure you can genuinely share with the kids. A similar DIY Christmas tree might appear in the works this year, perhaps with a few cinnamon stick bundles tied on for an extra aromatic punch.
How to Make This Craft Fluff out the branches of your Christmas tree thoroughly, assuming it’s artificial. Thread dried orange slices onto a string to fabricate a garland. Swag the orange slice garland around the tree. Bake or purchase gingerbread men and add decorative icing touches. Hang the gingerbread men and jingle bells using standard ornament hooks. Drape a strand of tiny white lights around the entire tree. Finish the look with a star or angel tree topper. Scatter wrapped presents at the tree’s foot. Use a tree skirt to introduce a burst of color. Soak in the holiday cheer.
Minimalist Wall Tree with Ottoman Display

Credit: @ani_v
Truthfully, this idea is nothing short of genius. Forget the headache of wrestling a full-size tree into place.
Living in a compact apartment makes this the ultimate solution for your space. The half-tree silhouette offers a creative method for displaying gifts while casting a gentle, warm glow.
It also appears relatively straightforward to replicate. Anyone wishing to explore unique DIY tree decorations should absolutely give this concept a try. It stands as a true holiday lifesaver.
How to Make This Craft Measure and plot your desired tree outline directly onto the wall. Cut faux evergreen garland into sections of graduated lengths. Attach the longest piece at the bottom using wall-friendly hanging strips. Keep layering, reducing the length of each subsequent piece as you climb upward. Space the garland pieces to form a distinct tree silhouette. Add small, lightweight ornaments using ornament hooks. Position a decorative item to serve as the tree topper. Style the bench or low table below with wrapped presents and twinkling fairy lights. Tuck a few mini decorative trees beside the bench for extra depth. Adjust the garland placement for uniform spacing.
Trio of Yarn-Wrapped DIY Christmas Tree Crafts on Birch Bases
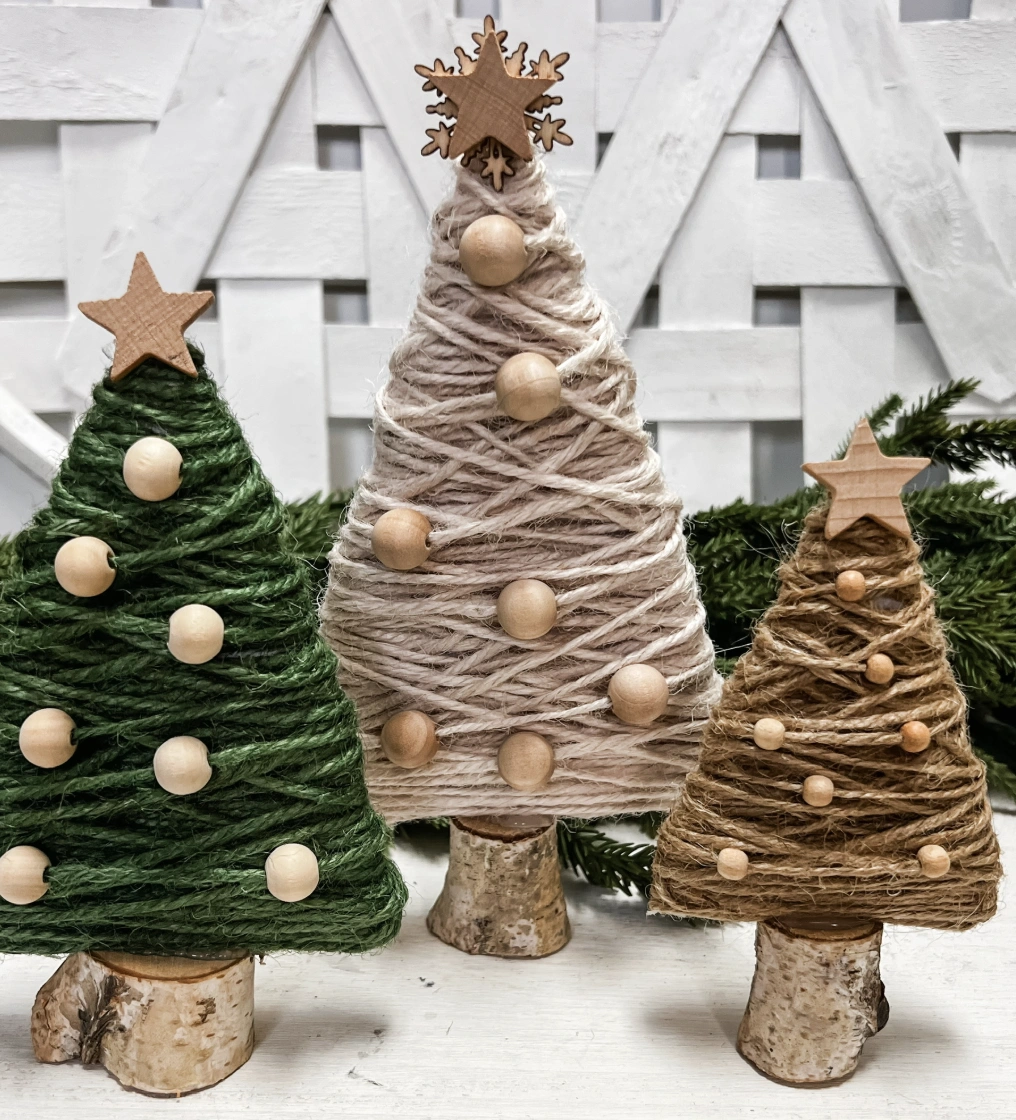
Credit: @kristyscraftroom_official
Look at these absolutely adorable miniature trees. Truly, attempting to create these feels like the next craft mission.
They would perch perfectly on a mantel, and metallic yarn colors spring to mind as a gorgeous possibility. A gold or silver tree mixed in with other Christmas tree crafts sounds divine.
The variation in their shapes and sizes adds that layer of supreme uniqueness. They even feature charming wooden stars and snowflakes.
How to Make This Craft Gather cardboard cones or construct your own versions. Use hot glue to fasten each cone onto a tree stump slice. Anchor the end of a yarn strand to the cone’s base with hot glue. Spiral the yarn around the cone, overlapping it slightly as you go. Keep wrapping until the entire cone form disappears. Fasten the yarn tail with a dot of hot glue. Adhere various sizes of wooden beads across the tree’s surface using hot glue. Glue the wooden star onto the peak of the cone. Duplicate the process using different yarn hues. Exhibit the finished cluster on a shelf or tabletop.
DIY Christmas Tree Garland Crafted from Upcycled Paper

Credit: @sneaky.christmas.elf
The clean, contemporary mood of this paper Christmas tree garland sparks total love. Amidst the whirlwind of holiday chaos, the minimalist Christmas tree aesthetic calls out loudly.
Forget high-maintenance decorations, this project is swift, sustainable, and completely accessible for kids. Letting the little ones assist with cutting out the tree shapes might actually happen. It delivers a sophisticated accent free from clutter while still ushering in the holiday spirit.
How to Make This Craft Collect vintage book pages and a tree template. Trace the tree outline onto the book pages and snip them out. Punch a tiny hole at the top of every paper tree. Snip a length of red string for the garland. Feed the string through the hole in each paper tree. Space the paper trees evenly along the length of the string. Tie loops at both ends of the string for easy hanging. Suspend the garland in a window or on a wall for an instant festive touch. Tweak the tree spacing for a balanced composition. A spritz of glitter spray can add an extra shimmer effect if desired.
Metallic Green Pinecone Mini Christmas Trees with Silver Stars

Credit: @artistscholar
Let’s be honest, hauling a massive tree into a petite apartment doesn’t exactly scream chic. These DIY pinecone trees deliver all the warm festive feelings without the hassle.
They appear utterly phenomenal grouped together on a side table. For those chasing a true design statement, blend these into your existing vignettes for a distinctive, miniature modern Christmas tree feel. Consider this a savvy design maneuver for the holiday stretch.
How to Make This Craft Gather three medium-sized pinecones that are reasonably intact. Spray paint the pinecones in a cheerful green shade and let them dry totally. Dry brush metallic silver or gold paint onto the tips of the scales to generate extra sparkle. Grab small terra cotta pots and coat them with silver spray paint. Nestle the pinecones into the pots. Employ hot glue to achieve a stronger anchor. Cut star silhouettes from metallic cardstock. Hot glue the stars onto the top of each pinecone. Arrange your petite trees on a mantel or shelf.
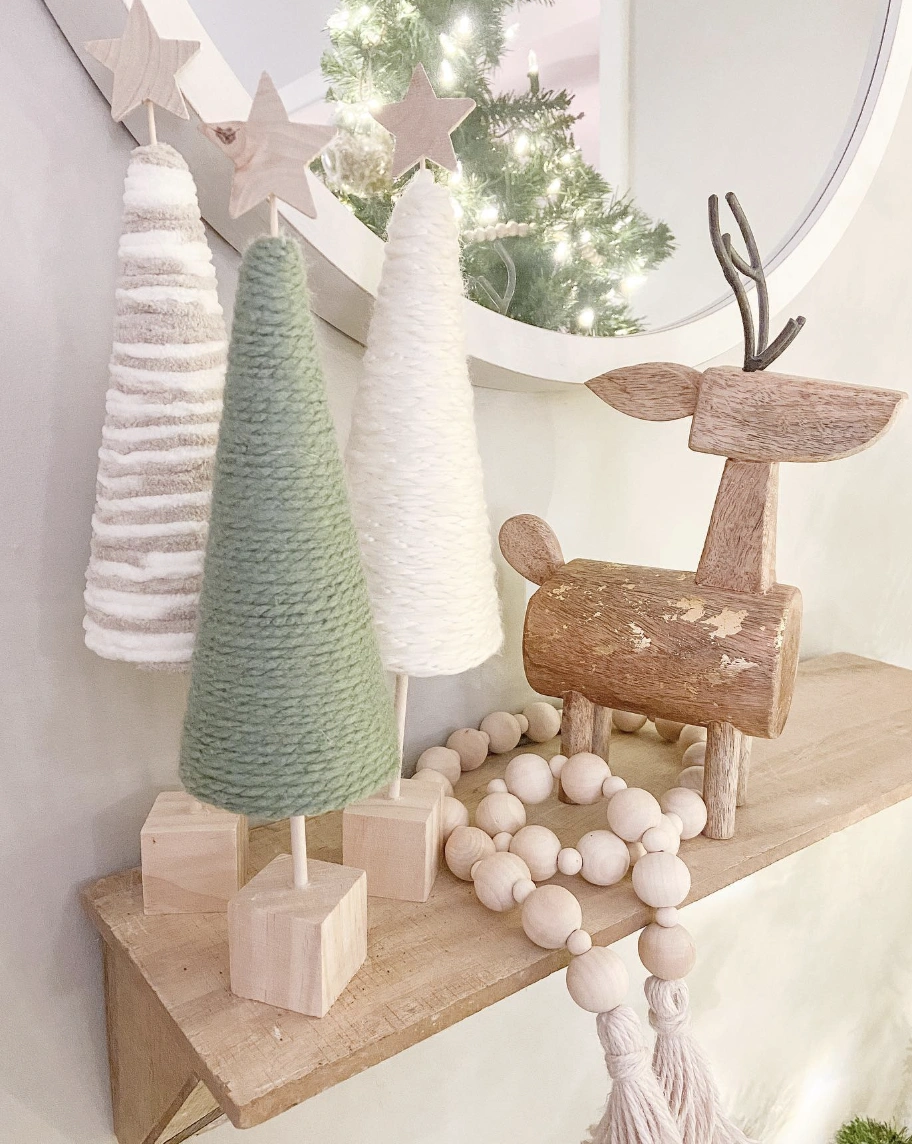
DIY Yarn-Wrapped Christmas Tree Trio with Wooden Accents
Credit: @southwayhome
Picture this scene as a cute little desk setup throughout the holidays, especially while working from home. These tiny trees represent EVERYTHING for injecting a dose of holiday cheer without tipping into excess.
Painting that wooden reindeer gold for an extra hit of sparkle also comes to mind. Forget a giant, messy real tree; this trio outshines any basic cardboard Christmas tree by a mile. The look remains effortlessly simple and impossibly chic.
How to Make This Craft Procure Styrofoam cones of varying sizes from a craft supply store. Snag chunky yarn in shades like white, sage green, and tan. Fix one end of the yarn to the base of a cone using hot glue. Commence wrapping the yarn tautly around the cone, slightly overlapping each pass. Continue the wrapping motion, dabbing glue periodically to prevent any shifting. At the peak, snip the yarn and glue the tail down firmly. Cut square wood blocks and glue them on as sturdy bases. Glue small wooden stars to the tops of the trees if you choose. Exhibit the finished trio on your mantel or shelf.
Driftwood Christmas Tree with String Lights and Minimalist Ornaments

Credit: @barefoottrailsaustralia
This piece is perfection for an apartment, no exaggeration. The design radiates an artsy, utterly chic character that feels deeply personal.
Skip the real tree that carpets your floor with needles. Imagining crafting one of these and styling it as a wall Christmas tree adorned with all your cherished ornaments paints a perfect picture. It functions as a complete game changer.
How to Make This Craft Gather an assortment of driftwood bits in assorted lengths and widths. Sort the driftwood by size, mapping out the tiers of your tree. Acquire a thick, hefty piece of driftwood to serve as the base. Employ a drill to create a hole in the center of that base. Find a wooden dowel rod to act as the central spine of your tree. Begin assembling the tree from the largest piece up to the smallest, using a powerful adhesive. Swathe the whole sculpture in string lights. Add small, airy ornaments crafted from seashells, glass, or wood. Mount a star fashioned from driftwood or a comparable material firmly at the summit. Ensure the base sits stable before unveiling your coastal creation.
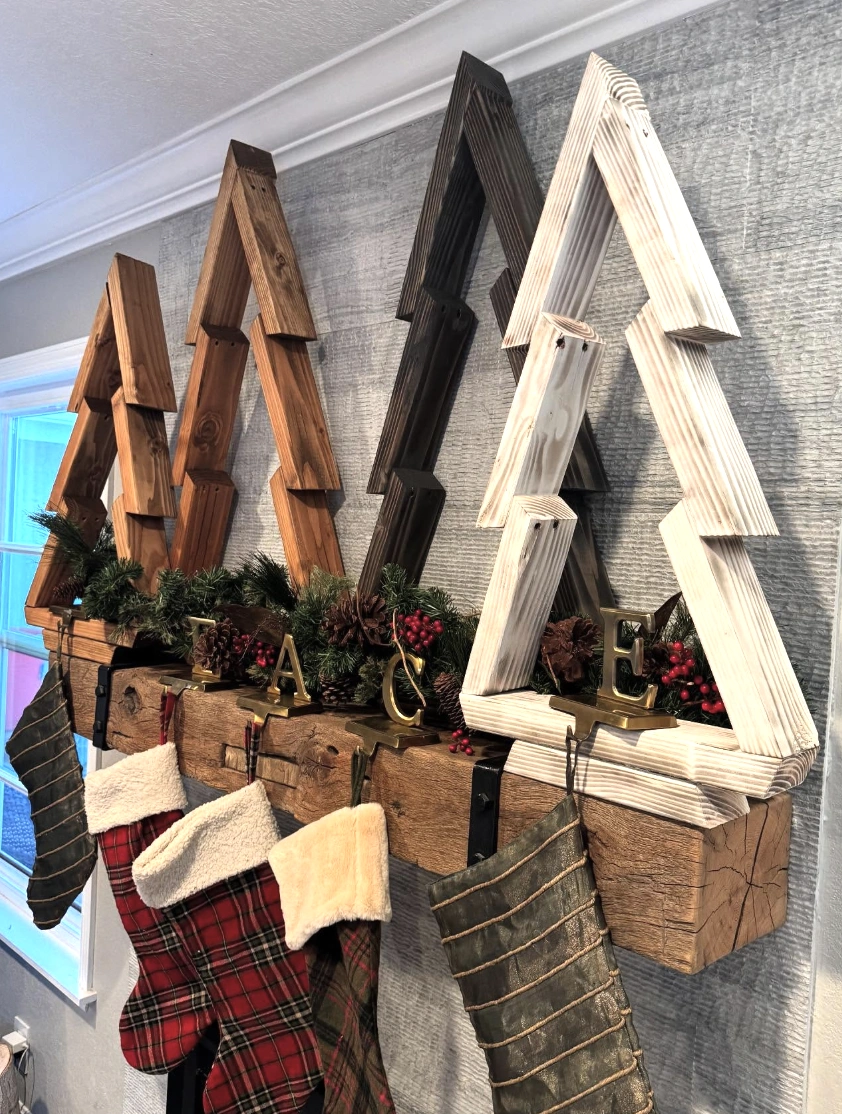
Rustic Wooden Triangle Wall Christmas Tree Trio
Credit: @bradfordflagco
Most artificial trees strive desperately to mimic reality, yet this design confidently embraces its handcrafted soul. The assorted wood stains contribute depth and personality.
Observing how it functions more as a sculptural art piece than a mere tree feels genuinely cool. It serves as a decidedly modern spin on traditional holiday decor.
How to Make This Craft Slice various lengths of wood planks, making sure the mitered angles are precise for the tree outline. Assemble the wood components into a triangle to construct the outer frame of the tree. Apply wood glue and reinforcing nails. Install tiered shelves within the frame using shorter planks. Duplicate the process to build three distinct trees. Treat each tree with a different wood stain. Let the stain dry completely. Mount the trees to the wall above your mantel using appropriate hanging hardware. Arrange faux pine garland, pinecones, and berries along the mantel. Personalize the overall scene with decorative letters or unique ornaments to craft your signature mantel display.
Upcycled Egg Carton Christmas Trees with Wooden Stars

Credit: @fraeullein_jasmin
Children gravitate toward anything involving crafts, and this project seems ideal for a quick creative session. These likely qualify as some truly fun easy DIY Christmas decorations to make.
A tiny forest of these lined up across the mantle sounds wonderful. A little hot glue, some paint, and the crafting session is ready to launch. The simplicity factor feels so high that even the youngest participants should be able to manage building these.
How to Make This Craft Snip individual cups from an egg carton and trim them into pointed petal forms. Paint the carton cups a festive green color using acrylic paint. Let them dry. Stack the cups atop each other, positioning the largest at the base to sculpt a tree form. Use hot glue to bond them. Take a thin wooden dowel and slide it through the center of the stacked cups to form the tree trunk. Anchor it with glue. Paint the dowel a brown or natural wood hue. Snipping small star shapes from craft foam or cardboard works perfectly. Affix the star onto the treetop with glue. Arrange the finished piece as a centerpiece.
Yarn-Wrapped DIY Christmas Tree Cone Decorations

Credit: @juniorsartanddiy
Imagining a niece becoming completely captivated by these feels effortless. Remember trying to figure out how to make a paper mache Christmas tree back in elementary school?
These look far simpler and, frankly, much more entertaining. She would likely campaign to keep them displayed in her room all year round, not just confined to the holiday window. That budding maker spirit mirrors your own perfectly.
How to Make This Craft Collect styrofoam cones in an assortment of sizes. Pick a wide spectrum of colorful yarns. Hot glue the tail end of a yarn strand to the base of the cone. Meticulously spiral the yarn around the cone, letting each row slightly overlap the last. Anchor the yarn with hot glue as needed. Fashion small yarn pom-poms. Stick a pom-pom or a star onto the peak of each cone. Organize your yarn-wrapped forest into a celebratory display.
DIY Photo Garland: A Contemporary Christmas Tree Alternative

Credit: @livingbrightinteriors
For everyone who adores the festive season but yearns for something outside the box, this delivers perfectly. Skip the conventional tree entirely and build this charming wall display instead.
Imagine curling up on the sofa in front of your modern Christmas tree creation, a glass of wine cradled in your hand, surrounded by the gentle gleam of lights and treasured memories. It reads as holiday sophistication without any of the fussy baggage. The concept is pure genius.
How to Make This Craft Lightly sketch a large triangle on your wall to act as a placement guide. Tack evergreen boughs onto the wall, tracing the outline of your tree shape. Weave fairy lights through the boughs. Print out favorite photographs in square formats. Mount the photos inside the garland area. Check that all photos remain properly secured. Lower the ambient light in the room. Step back and admire your personalized Christmas masterpiece.
Hand-Held Crochet DIY Christmas Tree Duo

Credit: @chthamalus.stellatus
A complete obsession with these miniature Christmas trees has taken hold. The cottagecore aesthetic dominates current trends, and these fit seamlessly within that world.
One iteration features classic green adorned with tinkling little bells, while the other sports an adorable fox topper. Crafting an entire batch as a relaxing weekend project sounds increasingly tempting.
Seriously contemplating assembling a whole family of these as a tiny DIY Christmas tree village feels right. These artisan decorations carry a personal weight that mass-produced store items could never match.
How to Make This Craft Crochet small cones employing a chunky, textured yarn. Switch yarn colors between rows for visual interest. Fashion a small, flat base so the tree can stand independently. Sew jingle bells along the green portion of the piece. Attach a wooden fox figure to the top of one tree. Lock all embellishments in place with strong thread. Present these trees with pride.
DIY Twig Christmas Tree with String Lights & Jingle Bells

Credit: @brewteafulworld
This idea calls out to all apartment occupants and minimalist enthusiasts. A full-scale Christmas tree doesn’t always harmonize with a streamlined aesthetic, right?
This DIY twig tree is calling your name quite directly. The addition of string lights and tiny jingle bells earns a chef’s kiss of approval. If the goal involves keeping things chic and uncluttered while capturing that festive glow, a minimalist Christmas tree of this nature will surely contribute that needed special touch.
How to Make This Craft Gather branches of varying lengths. Organize the sticks into a broad triangle shape. Lash the branches together firmly using twine. Swaddle the frame with string lights. Affix small stars and bells to act as ornaments. Suspend the tree on the wall from a sturdy hook. Place wrapped gifts on the floor directly below. Relax and enjoy your freshly crafted holiday decor.
Stacked Book Christmas Tree with Fairy Lights

Credit: @design.on.the.go
This stacked book tree manages to be both simple and refined. The gentle radiance of the fairy lights bathes this distinctive piece in warmth.
For a unified aesthetic, arrange books featuring a similar color palette on the outer visible layers. This project sits among those Christmas tree crafts that feel purpose-built for the devoted book enthusiast. Placing it on a desk or tucked onto a bookshelf spreads a festive mood throughout any space.
How to Make This Craft Compile a collection of hardcover books in a variety of sizes. Start the stack with the largest volumes. Systematically decrease the book dimensions as you build upward toward the top. Position a single upright book to serve as the trunk. Introduce string lights by spiraling them around the stacked books. Fasten the lights with discreet tape where necessary. Place a star at the very peak. Showcase your literary creation for all visitors to appreciate.
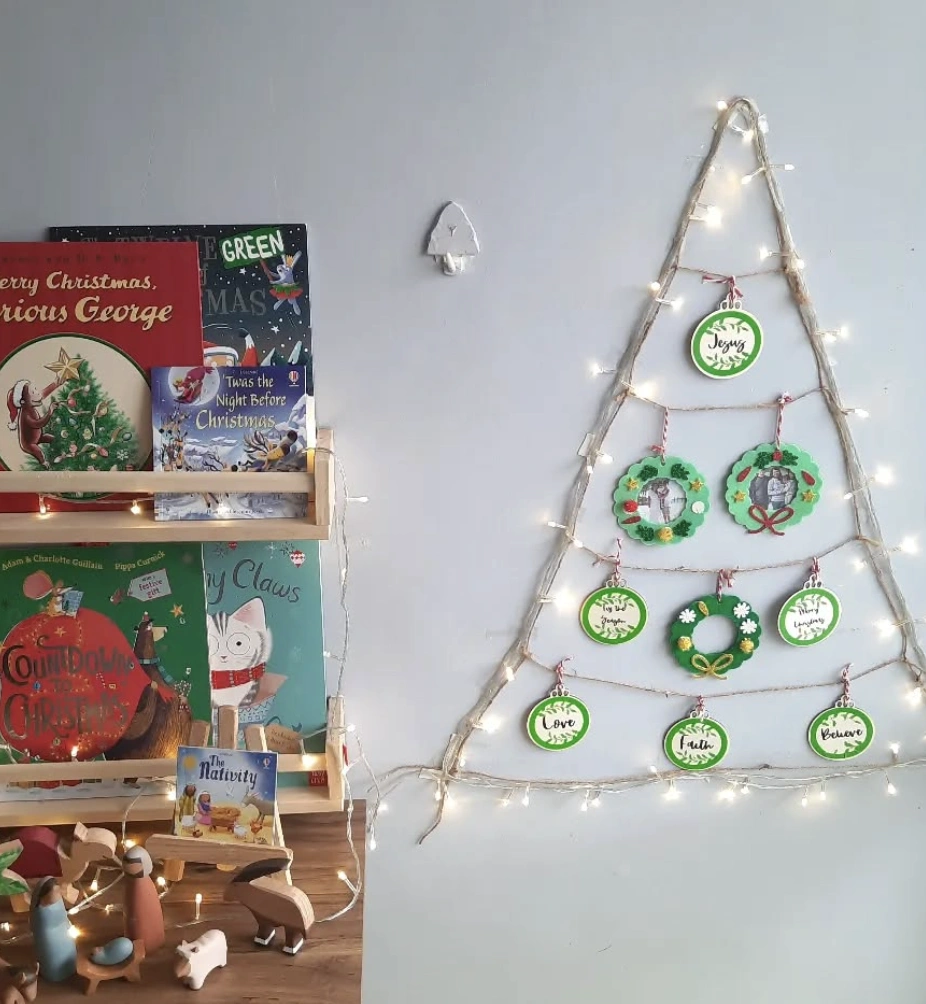
Minimalist Twine Christmas Tree with DIY Decorations and Storybook Nook
Credit: @everydaywithmigsandgabs
An absolute passion for easy Christmas decor drives this idea. This wall-mounted tree shaped from twine and fairy lights registers as genius.
It thrives in rooms where square footage is extremely limited. Crafting the DIY tree decorations together using simple green and white ornaments feels like a shared victory.
Discovering that some ornaments even hold the kids’ photos inside makes the whole project even more special. The petite reading nook situated right beside it, piled with all the beloved Christmas storybooks, makes the whole vignette feel even cozier.
How to Make This Craft Construct a triangle frame from thick jute rope, bonding the top joint with hot glue. Drape fairy lights around the jute framework. Slice green circles out of craft foam. Adorn them with glitter, markers, and small wreaths shaped from pipe cleaners. Punch a hole in each circle and thread twine through it. Print or hand-write festive words onto paper and stick them onto the circles. Add mini photos for a personal touch. Clip the ornaments onto the jute tree using mini clothespins. Fasten the tree to the wall with adhesive hooks. Modify the arrangement of lights and ornaments until the visual appeal feels perfectly balanced.
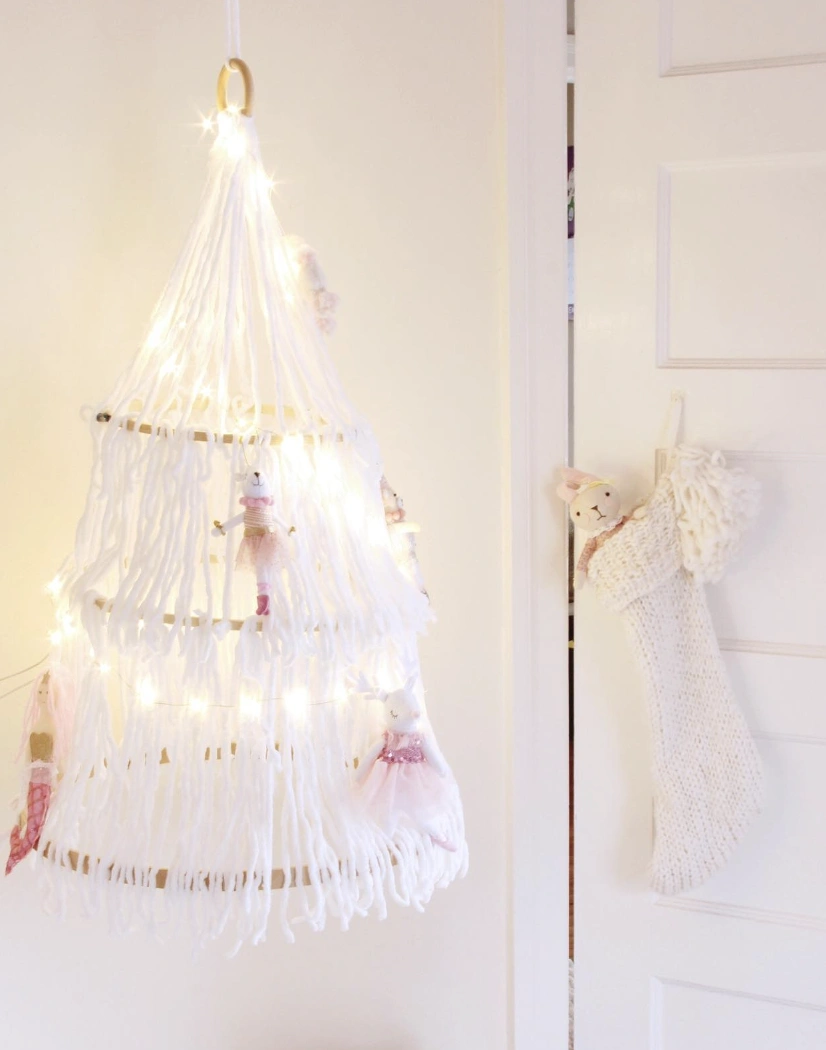
Tiered Macramé Christmas Tree with Delicate Ornamentation
Credit: @hellocentralavenue
A deep obsession with this alternative tree spirit has officially formed. Let’s dissect the exquisite details.
First, that macramé craftsmanship reads as surprisingly sophisticated; it departs completely from your grandmother’s wall hangings. Second, the dainty fairy-tale ornaments, think tulle and muted blush tones, elevate the entire composition to an art form.
Searching online for instructions on how to make a Christmas tree like this reveals many sites with helpful guides. What a refreshing departure from the typical dark green pine. Lastly, don’t overlook the subtle twinkle from the woven fairy lights, because a dash of whimsy remains perpetually in vogue.
How to Make This Craft Source three hoops of different sizes, whether wood or metal. Wrap each hoop entirely in white yarn, anchoring it with knots or adhesive. Suspend the hoops from the ceiling, placing the largest at the bottom and the smallest at the apex, using yarn or string. Snip long strands of chunky white yarn, measuring several feet in length. Tie the yarn strands to the bottom hoop to generate a cascading fringe effect. Continue tying strands onto the middle and upper hoops, letting the layers overlap. Trim the yarn to sculpt a conical tree silhouette. Interlace fairy lights throughout the yarn, securing them with small clips. Hang lightweight ornaments such as petite stuffed animals or fabric remnants. Tidy up the light wiring. Confirm the entire structure hangs securely. Introduce delicate ornaments, like small dolls, for a final touch.
DIY String Light Christmas Tree on a Wall with a Plaid Bow Topper

Credit: @tianashalfdozen
Wait, how impossibly cute does this look? Forget those enormous, extravagant trees; this direction presents something so much cooler.
People typically go wild with the faux evergreen branches, but this wall-mounted, string-light composition hops to an entirely new level. It operates primarily as a minimalist Christmas tree without forfeiting a single ounce of festive spirit.
All the presents stacked neatly underneath just amplify the cozy factor. Attempting something similar this year feels like a definite possibility.
How to Make This Craft Start by pressing and sticking snowman decals onto the wall. Map out a tree silhouette with a pencil, perhaps using a stencil. Affix the string lights to the wall using petite tacks or removable adhesive clips. Construct a star topper by bending floral wire into a star configuration and coating it with glitter or tinsel. Attach a red and black plaid bow or ribbon piece to the tree’s summit. Plug in the lights and refine the placement as needed. Organize wrapped presents beneath the glowing creation. Soak in your festive Christmas display, and celebrate the moment.
Wall-Mounted Fir Bough Christmas Tree with Pinecones and Stars

Credit: @voneinem
Full disclosure: this is not your grandmother’s traditional tree. Yet this festive little number suits individuals with compact quarters who still desire a deep connection to the holiday spirit.
It carries a minimalist soul, and those metallic stars plus pinecones contribute a whisper of subtle glamour. If the whole ordeal of a giant tree feels unappealing or avoiding a carpet of pine needles sounds like a dream, skip the standard version and opt for a cool cardboard Christmas tree or a fresh bough composition like this one.
How to Make This Craft Collect fresh fir clippings and pinecones of different sizes. Build a robust backing board in your desired tree shape using glue or wood screws. Employ floral wire to begin fastening the fir branches onto the tree backing. Glue pinecones randomly amongst the greenery to add textural interest. Coat wooden star ornaments with metallic gold and silver craft paint. Hot glue the decorated stars onto the swag for a hint of sparkle. Loop twine at the top for hanging the piece on the front door. Mist with a clear protective spray to extend the freshness of the greens. Hang the finished piece on your front door and admire the organic beauty.
Tabletop Mini Christmas Tree with Red Berry Accents

Credit: @joanseb
Picture using this darling miniature modern Christmas tree as the focal point for a cozy brunch gathering. It may be small in stature, but its impact lands powerfully.
Seeing it staged alongside pastries and charming mugs creates such a distinct vibe. Setting one up in a bedroom to spark that festive feeling also springs to mind. Isn’t it just the sweetest thing imaginable?
How to Make This Craft Begin with a cone-shaped foam or cardboard foundation. Swaddle the cone in green yarn or tinsel, holding it fast with hot glue. Adhere small red craft berries onto the tree using hot glue. Thread miniature fairy lights all around the tree. Pool some beige tulle fabric around the base of the tree. Accessorize the presentation by arranging surrounding decor items into a pleasing tableau. Position a photograph or painting on the mantle adjacent to the tree. Illuminate the string lights and relish this uncomplicated yet elegant piece.
Green Tinsel Christmas Tree Topped with a Gold Star

Credit: @priyankasarkarrr
This isn’t one of those flawlessly symmetrical, Pinterest-perfect trees. The star perched on top leans undeniably crooked.
The focus rests entirely on achievable goals, especially when the holidays roll around. Between school performances and marathon cookie baking, the need for easy DIY Christmas decorations becomes urgent.
The silvery tinsel layered throughout catches the ambient light in such a beautiful way. Baking prowess might not be in the cards, but appreciating a simple, celebratory gesture certainly is.
How to Make This Craft Acquire an artificial tree in the size that fits your space. Fluff the branches thoroughly to create a full and inviting tree shape. Swathe the evergreen tree in metallic garland or strings of beads. Suspend an assortment of Christmas ornaments, spacing them with even distribution. Craft a decorative Christmas bow from wired ribbon. Decorate a holiday cake with seasonal flavors, think spices, fruit, or rich chocolate. Position the cake on a stand in front of the tree. Trim the ribbon and add it to the cake for an extra layer of seasonal design.
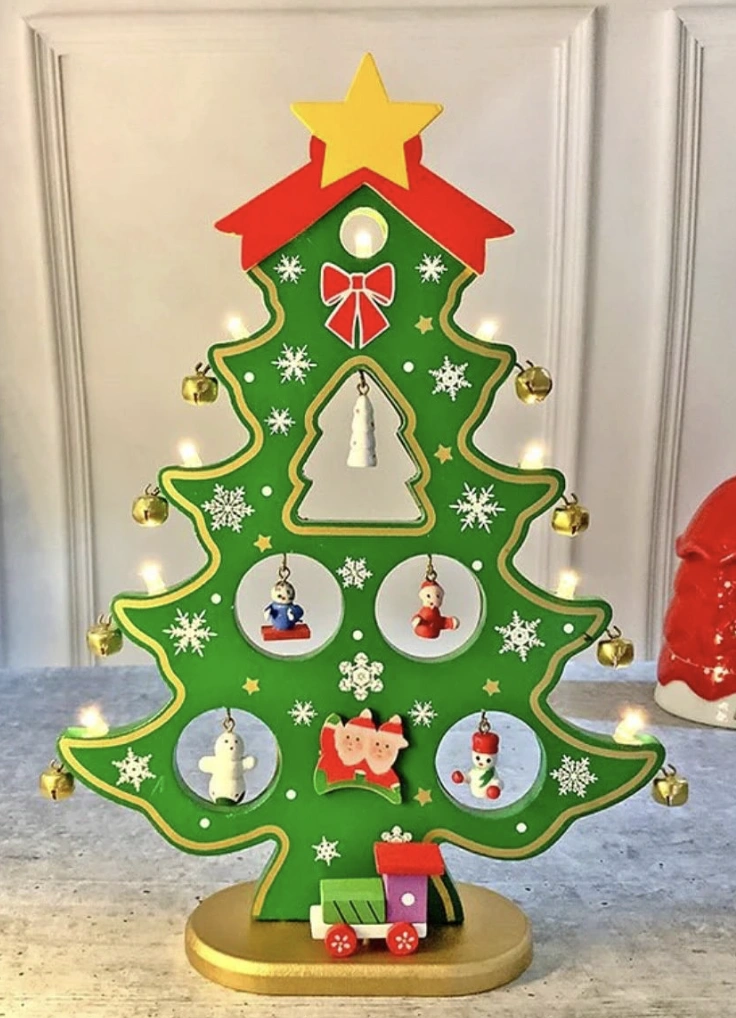
Tiered Green Wooden DIY Christmas Tree with Ornaments and Bell Accents
Credit: @mummadotcom
Okay, the sheer adorableness of this piece lands hard. Forget those massive, high-maintenance evergreens; this moment belongs to the mini treasures.
This year centers on delivering that cozy, handcrafted spirit. Spotting this super cute DIY Christmas tree, which feels like a contemporary spin on a vintage classic, sparks pure joy.
The miniature ornaments and those tiny bells generate total obsession. It performs perfectly in compact quarters and, honestly, just provokes instant smiles. Christmas, but with an extra dose of cute.
How to Make This Craft Obtain a pre-cut wooden Christmas tree silhouette, or saw your own from plywood. Coat the tree form in green paint and the base in gold using acrylic paints. Cut several ornament-shaped slots within the tree body. Paint the roof red and attach it with wood glue. Slot miniature Christmas baubles into the prepared cutouts. Adorn the edges with tiny gold bells or a dusting of glitter. Situate a small toy train looping around the tree’s base. Insert battery-operated lights into the tree for a gentle, warm radiance. Flick the lights on and savor the homemade holiday display.
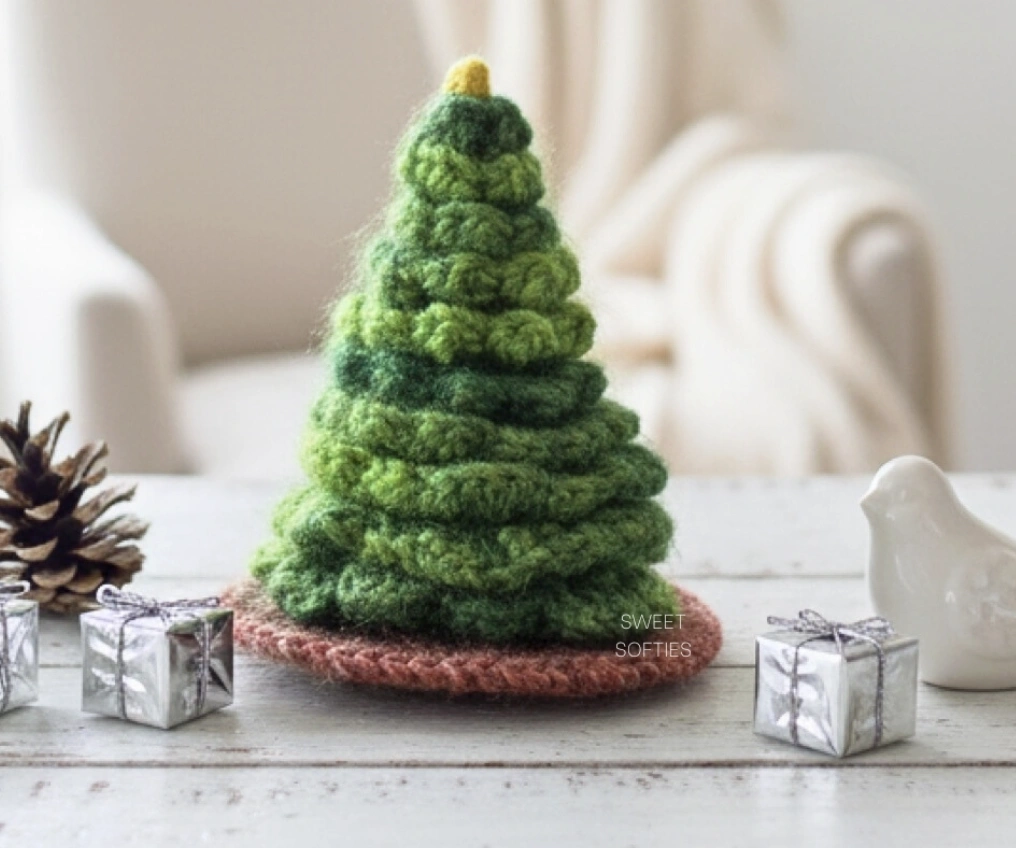
Tabletop Crochet Christmas Tree with Mini Gift Boxes
Credit: @sweetsofties
Devotees of cozy atmospheres will absolutely adore this piece. It genuinely suits anyone who delights in a whisper of homespun magic.
Imagining this little crochet tree brightening a desk or a shelf comes naturally. The design serves as a darling alternative when floor space runs short, offering a brilliant way to display handmade DIY tree decorations without tipping into visual chaos. Plus, absolutely zero needles to sweep up later.
How to Make This Craft Crochet a flat disc for the base using brown yarn. Switch over to green yarn and crochet expanding circles, shaping a layered tiered effect. Decrease the stitch count in the subsequent rows to taper the form into a conical tree silhouette. Employ varied shades of green yarn to infuse the tree with depth and dimension. Fill the interior with fiberfill as you work to preserve its plump shape. Create a tiny yellow yarn star or fluffy pompom for the apex. Sew the star securely onto the peak of the tree. Weave in all stray yarn ends to give the project a polished finish. Consider adding small decorative touches like beads or embroidered details. Steam block the finished tree to refine the stitch definition and overall contour.
Final Thoughts
Honestly, the urge to jump into a new project is already bubbling up. This year, a sleek, geometric cardboard Christmas tree might just become the ideal new addition to the living room.
The creative avenues stretch out endlessly before you. Let’s turn this holiday season into something truly memorable with a sprinkle of DIY enchantment.
Now, what kind of tree will you bring to life? Share your brilliant concepts in the comments section below.