


Think back to childhood and that little thrill of finishing a popsicle, not just for the sweet flavor, but for the tiny treasure left behind.
Those humble sticks were bursting with possibility. Know what? That creative potential hasn’t gone anywhere.
Popsicle stick crafts unlock your imagination in the best way, regardless of your age. Whether you’re drawn to straightforward projects perfect for little hands or something more detailed and sophisticated, the world of things to make out of popsicle sticks is genuinely limitless.
So go ahead, fire up that glue gun and let’s dive into some seriously cool popsicle stick art ideas for inspiration.
Patterned Popsicle Stick Photo Frames: Colorful DIY Home Decor
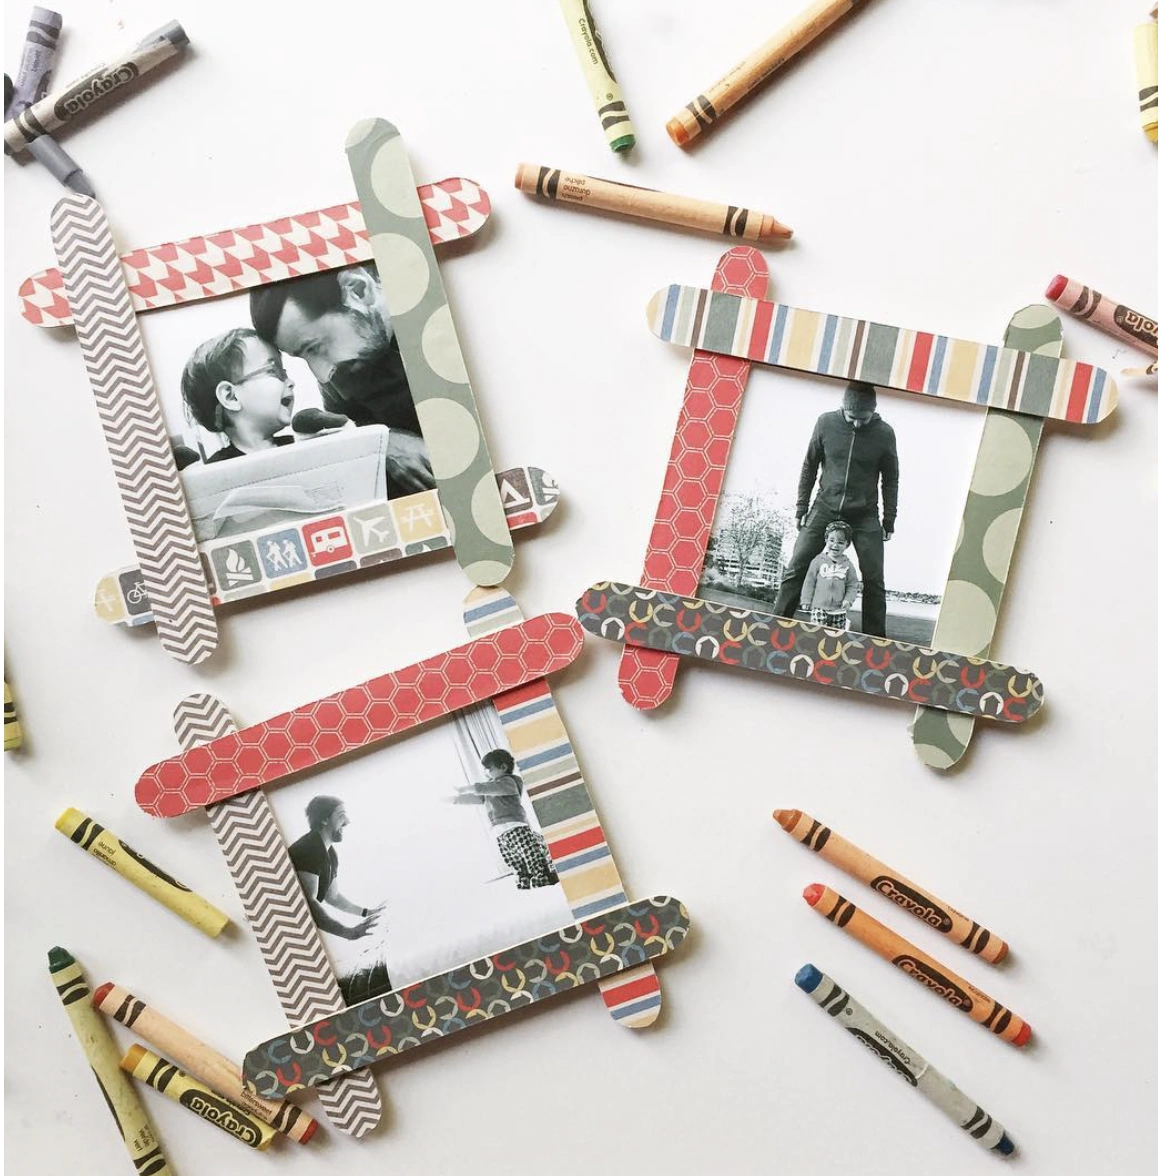
Credit: @kplicanic
Okay, crafters, prepare yourselves. These patterned popsicle stick frames are a complete game changer for injecting bright bursts of personality into any room.
Just imagine all the creative directions you could take. That gallery wall you’ve been dreaming about?
Bring in some playful handmade energy with these beauties. And if you’re hunting for easy Popsicle Stick Crafts For Adults Diy Projects, this checks every box.
A perfect gift for grandparents, friends, or even a treat for yourself, simply tailor the colors and patterns. Absolutely adorable.
How to Make This Craft Gather popsicle sticks (jumbo size works well) and some patterned paper scraps Trim the paper into strips slightly wider than the popsicle sticks Mod Podge paper to the sticks and let dry thoroughly Trim off the excess paper Arrange four decorated sticks into a square/rectangle shape Using craft glue, carefully attach sticks at corners to form a frame Reinforce corners with an additional small piece of popsicle stick, glued on the back Cut a piece of cardboard to fit the back of the frame and glue it in place, leaving space at the top to slide in a photo
Adorable Animal Creations: Popsicle Stick Art Project
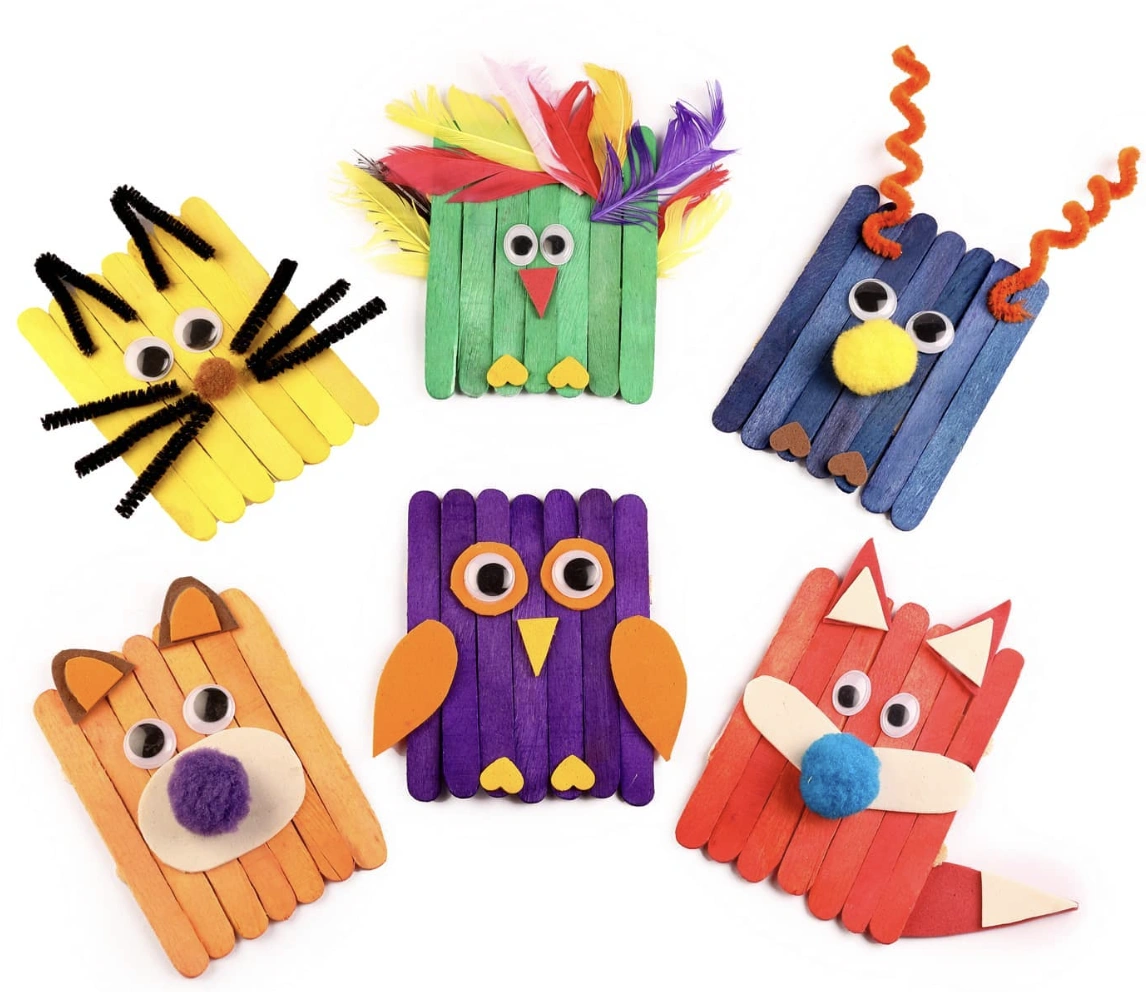
Credit: @artbyshvetagirdher
The magic here is all in the layering that makes these designs really stand out. You’ll find whimsical birds, playful foxes, and mischievous cats. Believe this, they represent a significant step up from your child’s latest art project.
How to Make This Craft Select an animal to create such as a cat, a bird, a moose, an owl or a fox Gather your popsicle sticks and felt scraps to match your chosen animal Cut and glue popsicle sticks and glue to form the base shape of the animal’s head Cut out felt pieces like ears, beaks, or wings, and attach them with glue Add googly eyes to bring your animal to life Use pipe cleaners for whiskers or antlers Get creative with feathers for a bird or pom-poms for a nose Allow the glue to dry completely before playing with your new animal friends
Rustic Popsicle Stick Sled Ornaments with Jingle Bells
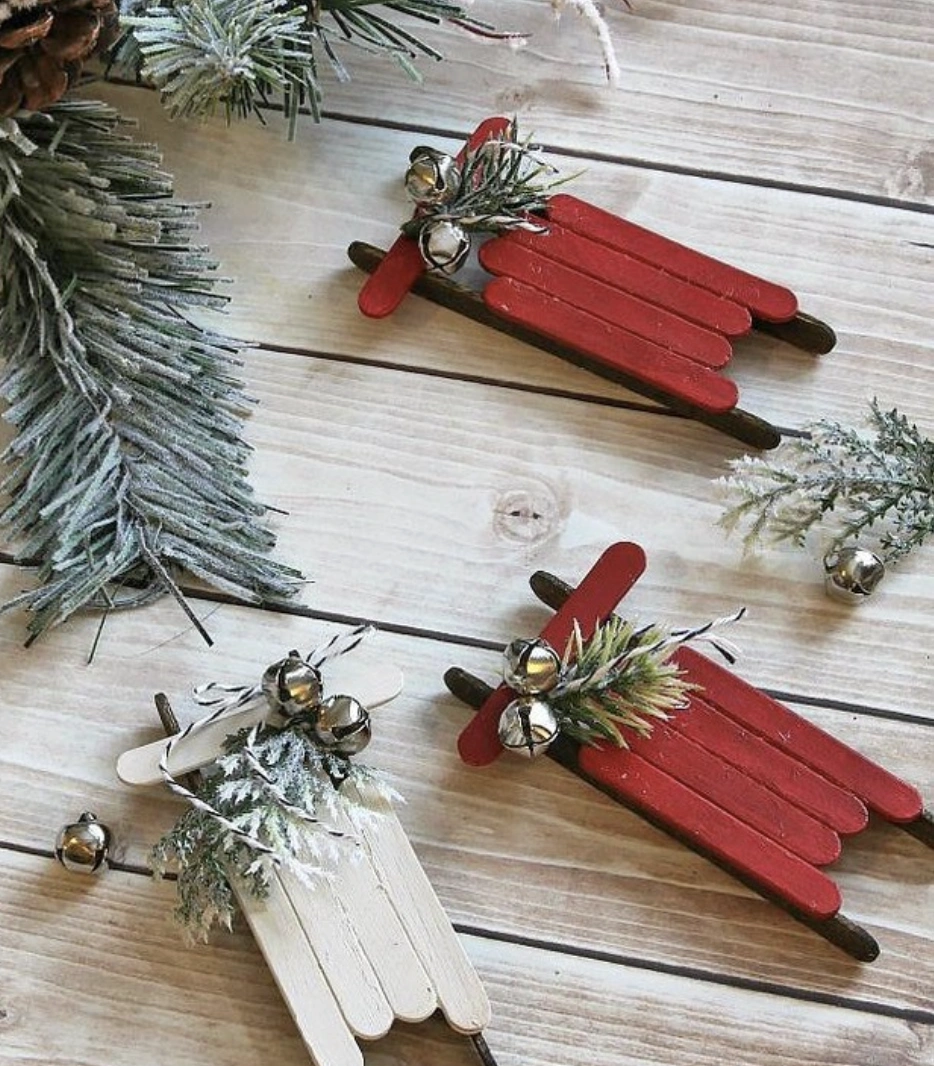
Credit: @lscostless
These petite popsicle stick crafts are utterly charming. The dark runners on the bottom create such a lovely contrast against the red and white painted tops, delivering a genuine rustic sensibility.
Plus, those tiny silver jingle bells secured with twine contribute the ideal festive accent. They’re perfect for hanging on the tree or crowning a wrapped gift.
How to Make This Craft Paint 8 popsicle sticks white or red and let them dry Cut two shorter pieces of popsicle sticks for the base Glue 6 painted sticks side-by-side Glue the shorter popsicle sticks on the bottom and front Attach the glued sticks to the sides of the popsicle sticks Attach a smaller stick horizontally across the top of the sticks for support Bundle a small sprig of faux greenery Secure the greenery with jute string in center of the sled Tie on a tiny jingle bell to the center of the jute string Let glue dry completely before hanging on your Christmas tree
Fall Harvest Truck Craft: Popsicle Stick Edition
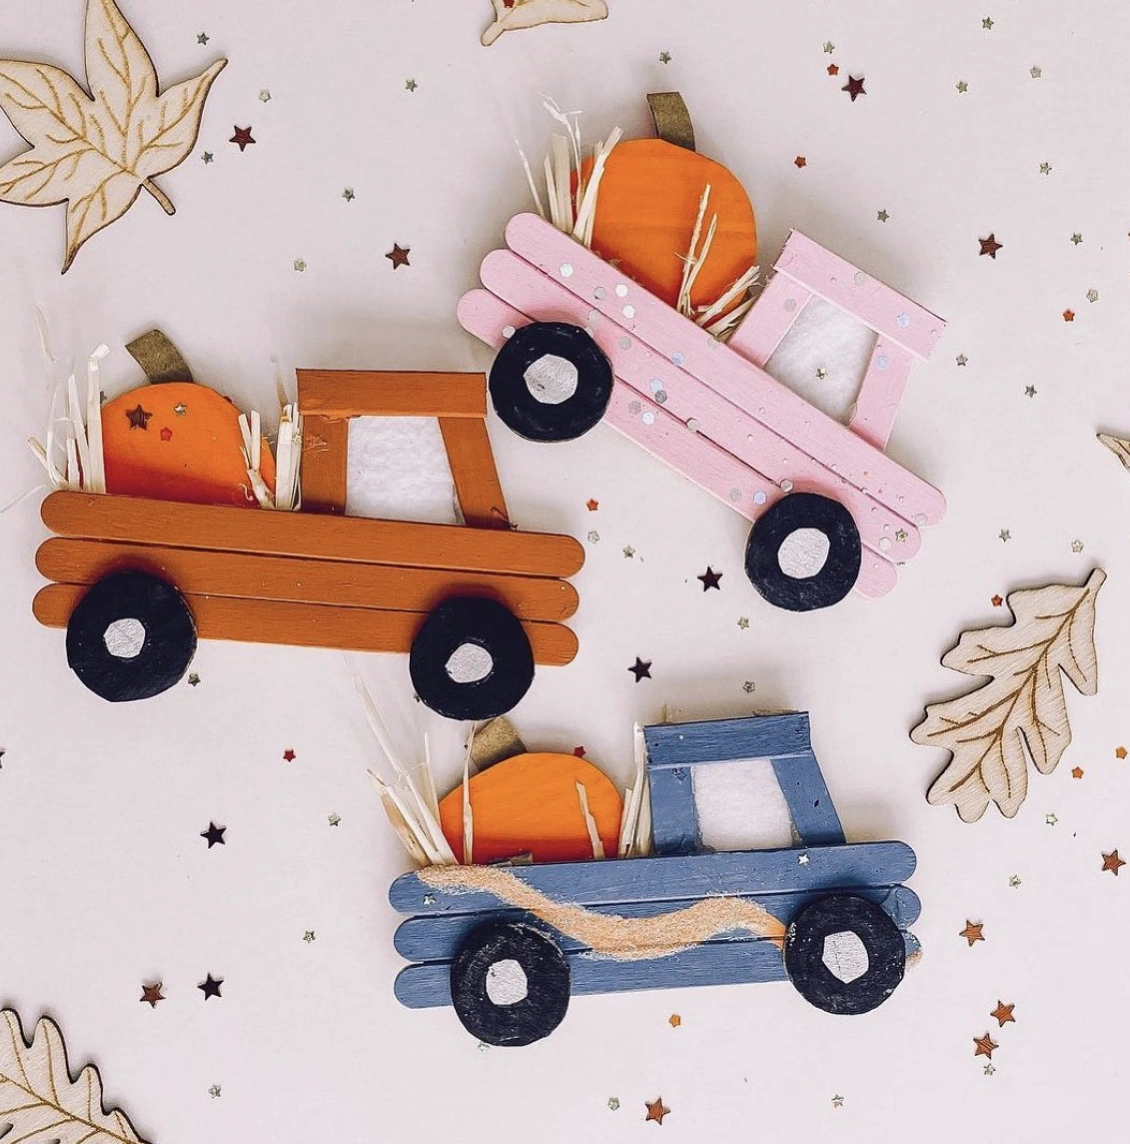
Credit: @itsme_linzy
Oh my goodness, you simply must see these adorable truck crafts. A strong case can be made for creating these as Thanksgiving table decor this year.
Forget standard place cards, imagine giving every guest a personalized little truck instead. So cute, right?
Spotting these sparked instant thoughts of all the cool Things To Do With Popsicle Sticks saved on various boards, but these are truly next level. The kids would absolutely adore getting involved in this one.
How to Make This Craft Grab a handful of popsicle sticks and choose a color for your truck Lay the sticks side-by-side and glue another stick horizontally across the top to secure them Attach a rectangle cut from a brown popsicle stick for the window base Cut and glue white felt to the rectangle for the window Stick on a small orange fake pumpkin to the top of the truck Add some hay to the space next to the pumpkin Glue black circle embellishments to create the tires Affix your craft to a cork board
Miniature Beach Scene Crafted From Popsicle Sticks, Twine, and Shells
Credit: @diyandcraftlovers
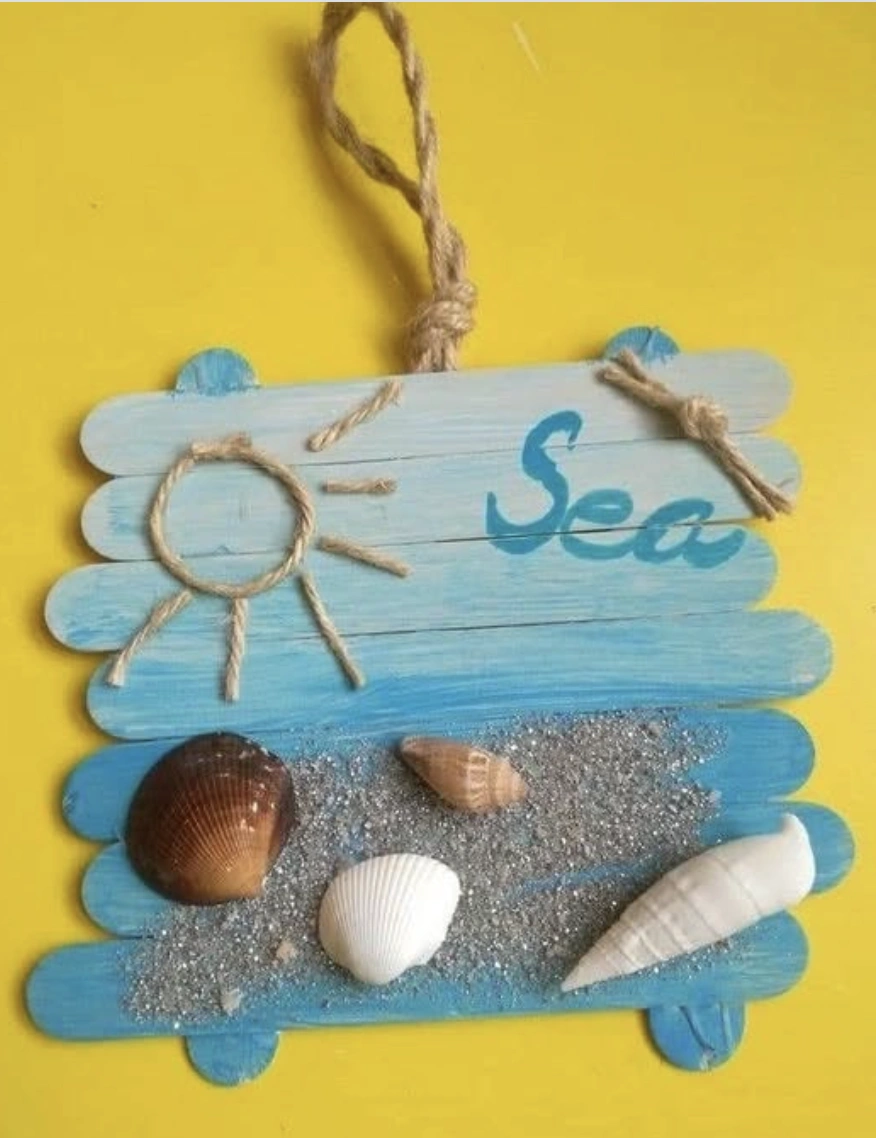
This piece isn’t meant to appeal to everyone; it connects with those who cherish handmade charm and life’s simple pleasures. If you find yourself drawn to coastal aesthetics and the concept of giving everyday materials a second life, this creation speaks your language.
It serves as a gentle reminder that beauty resides in the simplest Things To Make Out Of Popsicle Sticks. The textured sand and hand-lettered “Sea” evoke such a peaceful, calming atmosphere. It also makes a wonderfully thoughtful gift.
How to Make This Craft Lay out 10-12 popsicle sticks in a row on a flat surface Glue small wooden beams on top to keep them together Mix light blue acrylic paint with a bit of white for a faded beach look Paint the assembled sticks with the blue mix Glue the bottom with white glue and sprinkle sand on top Select 3-4 small seashells and glue them onto the sandy area Make a tiny sun out of twine, and glue to the top left Use blue paint to add the word “Sea” on the popsicle sticks Tie a piece of jute twine to the top corners for hanging Let everything dry completely before hanging
Yarn Ojos de Dios on a Classic Matchstick Cross
Credit: @luluandceleste
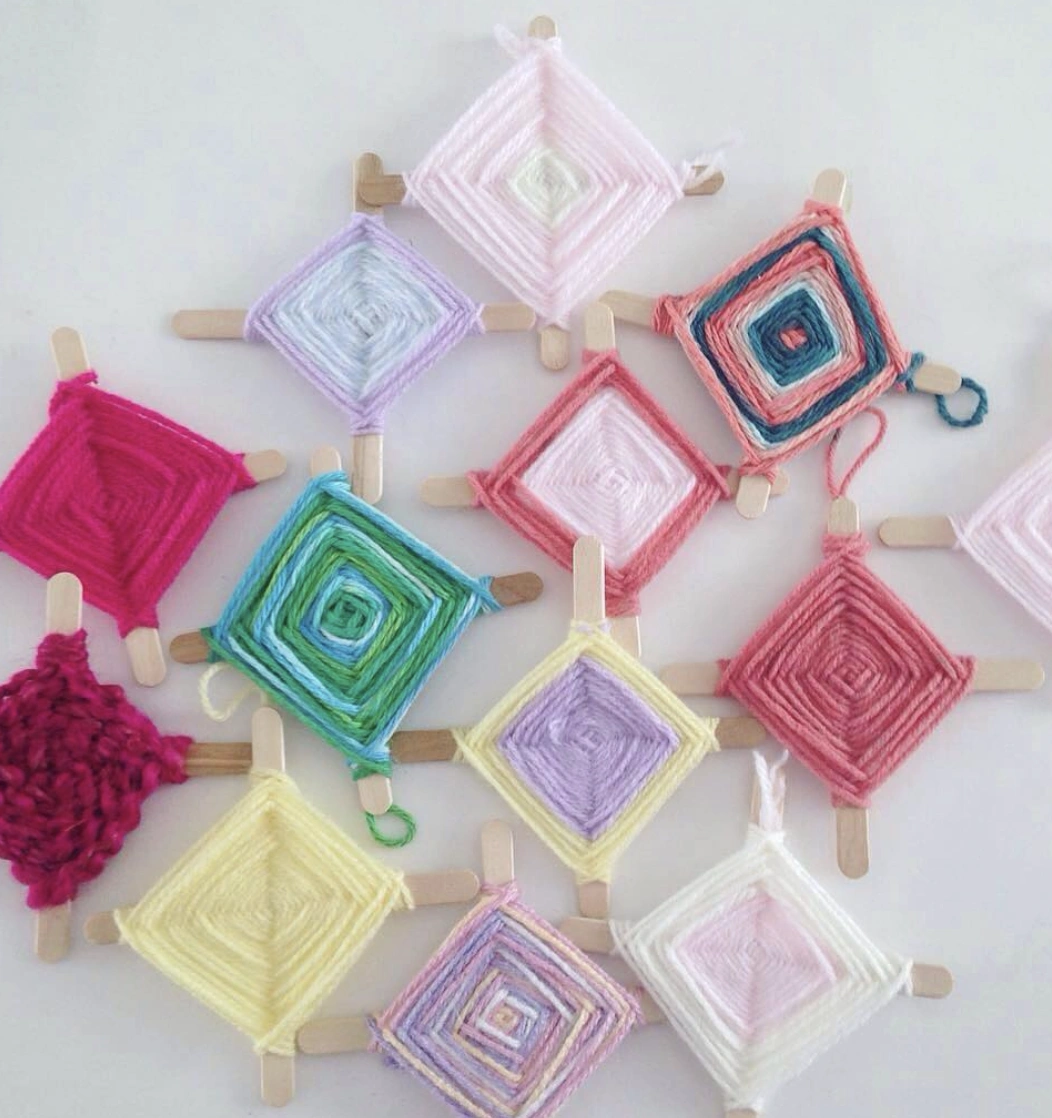
Alright, so you’ve likely encountered Ojos de Dios before, but this particular presentation feels refreshingly unexpected. Similar wall art has been spotted, though those typically employ more polished materials.
The pastel yarn reads as incredibly sweet, and the craftsmanship is genuinely interesting, yet what truly makes this piece sing is its foundation: an understated Matchstick Craft. It’s surprising and carries a subtle edge. You wouldn’t guess it, but that raw, rough element is precisely why this design succeeds.
How to Make This Craft Start with two clean craft sticks Place one stick perpendicular to the other, forming a cross Secure the center of the cross by wrapping yarn tightly around the intersection Choose your first yarn color and tie it to one of the sticks near the center Wrap the yarn clockwise around each stick, moving from one to the next When you want to change colors, tie off the first yarn and tie on the new one Continue wrapping with different yarn colors until the craft sticks are mostly covered Tie off the final yarn color securely and trim any excess Add string to tie to top of stick for hanging if desired Display your God’s Eye as a window hanging
Green Popsicle Stick Turtles with Yarn Shells
Credit: @life_with_four_kids
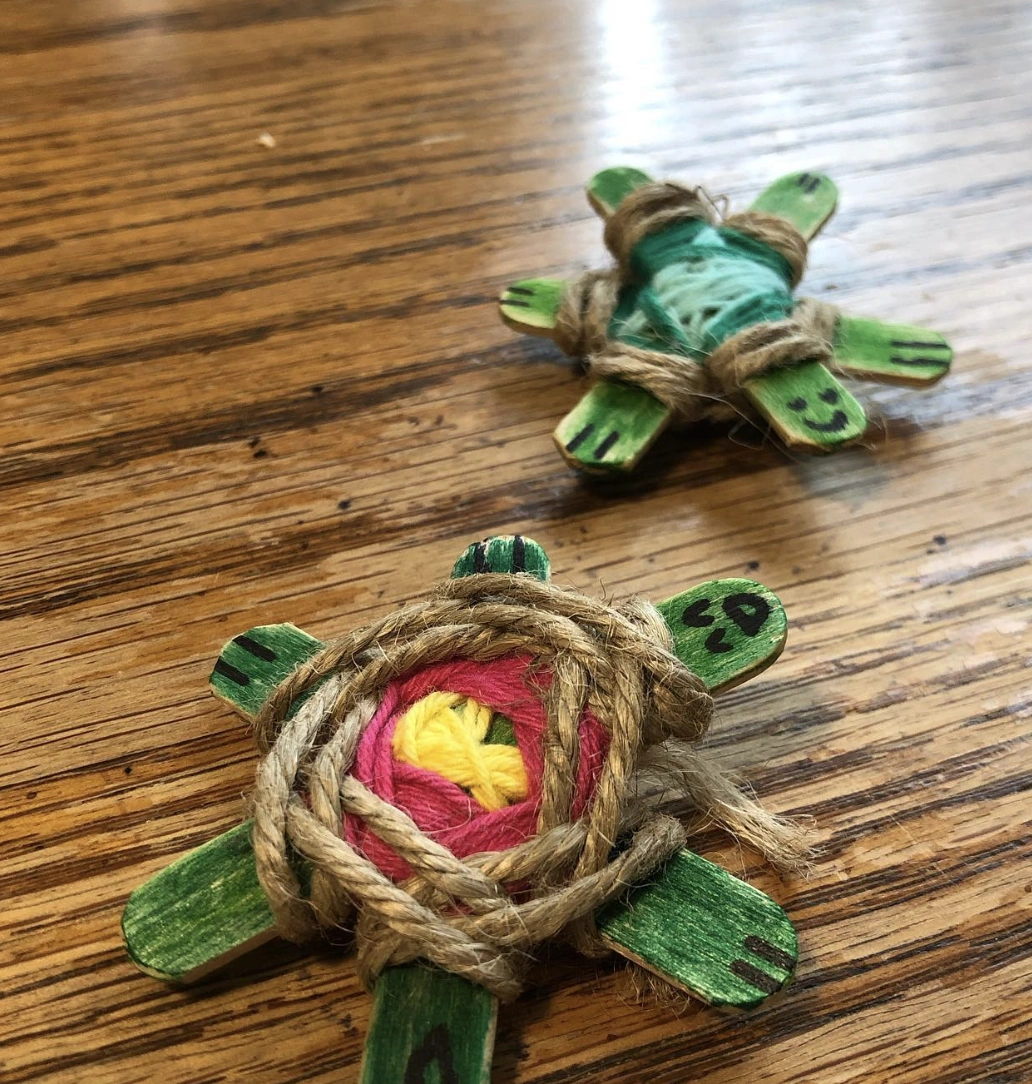
These little turtles radiate pure adorableness. They’re constructed from green-painted popsicle sticks, and the shells feature yarn wrapped in a wonderfully cool pattern.
It genuinely calls to mind those old friendship bracelet techniques. This would make a fantastic project to explore for easy, cute Stick Crafts For Kids.
Making a whole group of these for a party or special gathering seems like a brilliant move too. What’s your take?
How to Make This Craft Take five popsicle sticks and paint them green Glue four sticks in a plus shape Glue fifth popsicle stick in line with the base popsicle stick for the head Choose your favorite yarn colors to wrap around the center of the cross Wrap the yarn around repeatedly, covering the center of the cross Use twine to secure the yarn in place, wrapping around the edges of the popsicle sticks Cut the twine and knot it to secure it Draw a cute face on the head popsicle stick with a black marker Glue on googly eyes to add more character
Sparkly Star Ornaments Made from Pink, Silver, and Gold Painted Popsicle Sticks
Credit: @easyartsandcraftsforkids
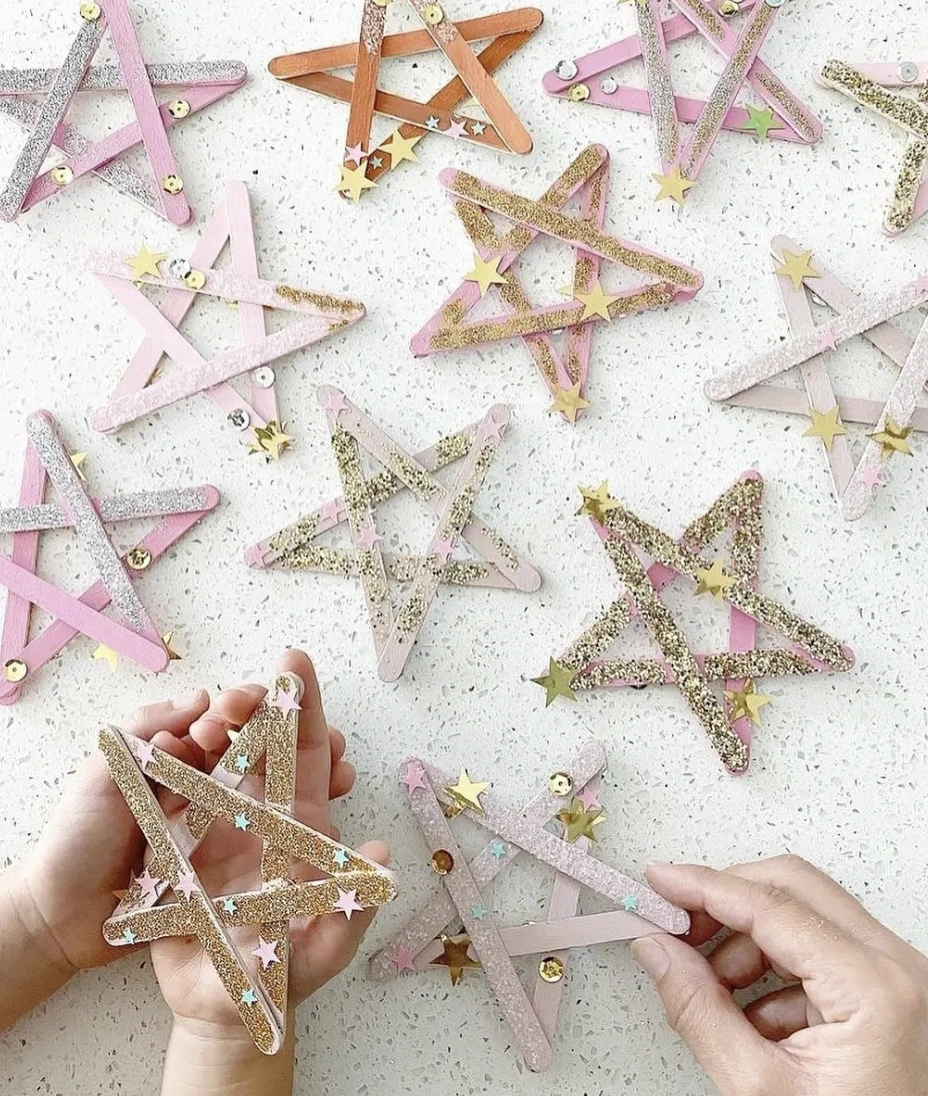
A whole batch of these absolutely needs to happen for Christmas tree ornaments. Picture a girls’ night complete with wine and an abundance of glitter.
Here’s the real draw though: it provides the perfect excuse to get crafty and finally attempt that “popstick craft diy” tutorial saved on Pinterest ages ago. These would also look incredibly cute glued onto gift bags or used as party decorations, wouldn’t they?
How to Make This Craft Gather 5-6 popsicle sticks and lay them on a protected surface Paint the popsicle sticks in light pink, and let them dry completely Arrange the sticks into a star shape with the points meeting Affix sticks together using hot glue, making sure the connections are secure Brush white glue along the arms and sprinkle generously with gold glitter While the glue is still wet, affix some star sequins using tweezers Let the glitter and sequins dry thoroughly Loop a thin piece of craft wire through one of the star points to create a hanger If desired, paint the back of the star for a finished look Use to decorate the christmas tree
Miniature White Barn Door Christmas Ornaments
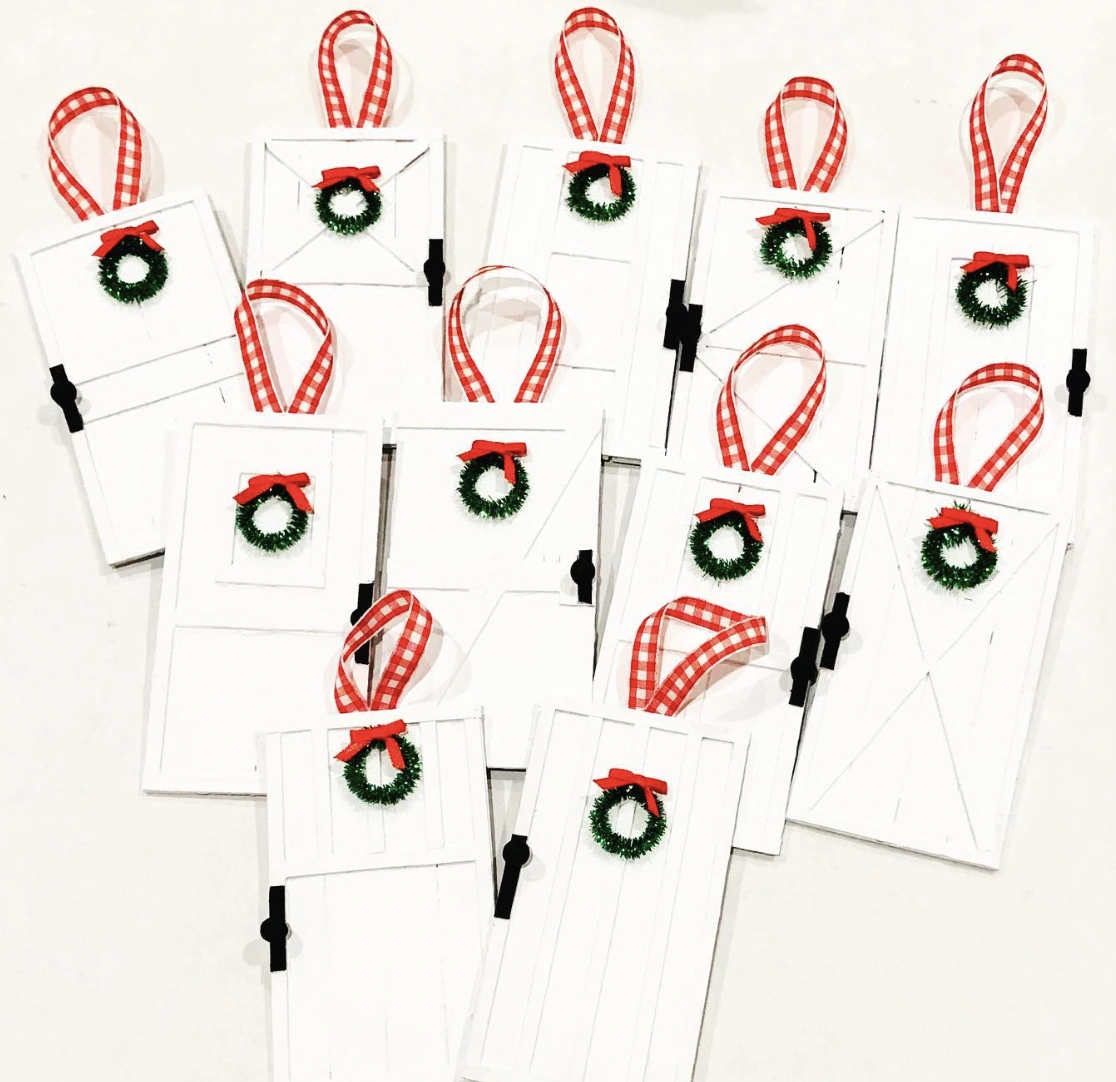
Credit: @90twins
The farmhouse chic trend has been everywhere lately, and these ornaments absolutely nail the look. But here’s the beautiful part: each ornament resembles a miniature white barn door, complete with a tiny wreath.
They’re made from craft sticks, meaning you could totally recreate these yourself as a wonderfully budget-friendly Christmas project. Making a set of your own seems like a worthwhile endeavor. These charming craft stick projects would also serve as amazing gift tags.
How to Make This Craft Assemble the miniature door frames using thin balsa wood or craft wood Paint the door frames white using acrylic paint and let them dry Affix a miniature wreath onto each door using hot glue or craft glue Add ribbon for hanging to top corner of each door Paint door knob and hinges with black paint Cut lengths of red and white checkered ribbon for hangers Loop the ribbon and glue it securely to the top of each door Add a small bow made from ribbon Touch up any imperfections with additional paint Allow the ornaments to dry completely before packaging or hanging
Colorful Popsicle Stick Look at Frames with Paper Flowers
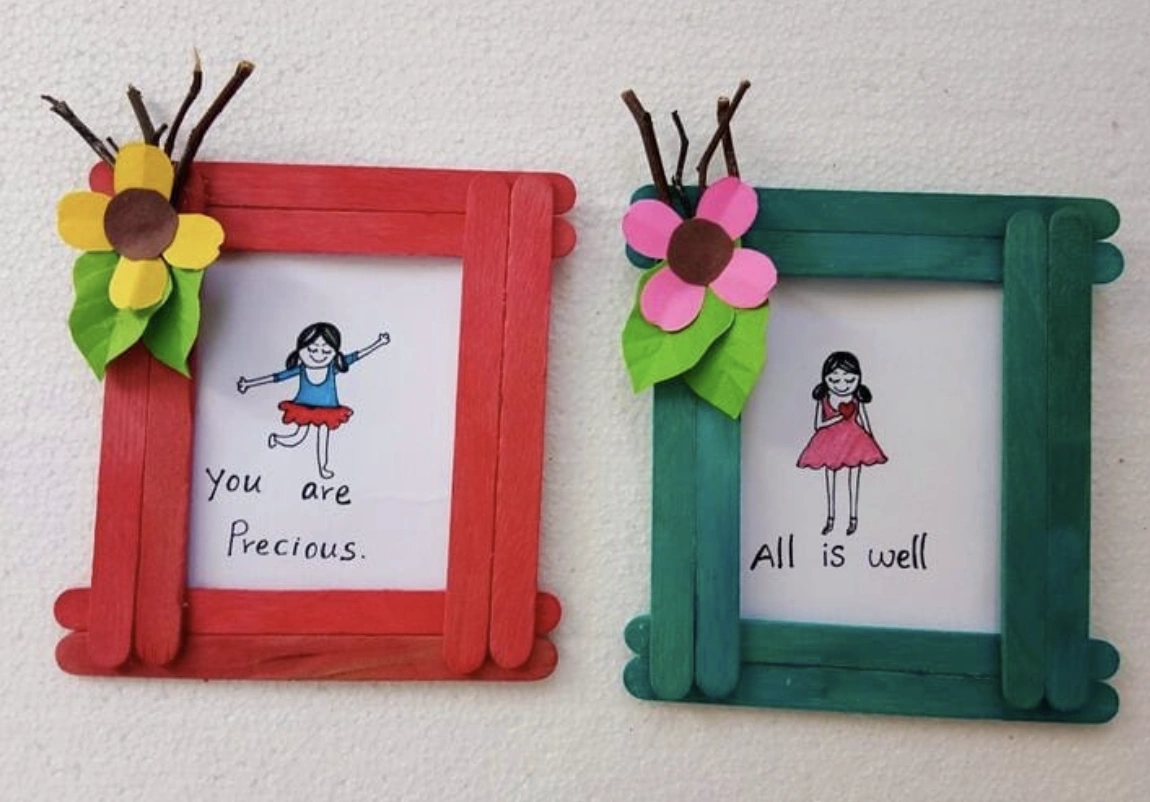
Credit: @handmade_school__project_maker
The sheer simplicity of these is incredibly appealing. The basic popsicle stick frames look absolutely adorable in red and teal.
And the best part? Those sweet little paper flowers and leaves contribute such a lovely delicate touch.
Kids would be completely absorbed in making these, especially after seeing all the possibilities for what could be placed inside. Instead of constantly building Popsicle Stick Houses, they could focus their energy on crafting meaningful gifts.
How to Make This Craft Divide popsicle sticks into two sets; one for each frame Paint each set of sticks with vibrant colors such as red and green Lay out four sticks to form a square or rectangle frame Glue the corners where the sticks meet using a hot glue gun Add paper flowers to the top corner of each frame Cut out paper leaves and glue beneath the flowers Secure desired artwork to the back of the frame using tape To create a stand, glue another popsicle stick to the back at an angle Let the frames dry completely before displaying Place your charming frames on a shelf
Festive Miniature Holiday Home Crafted from Popsicle Sticks
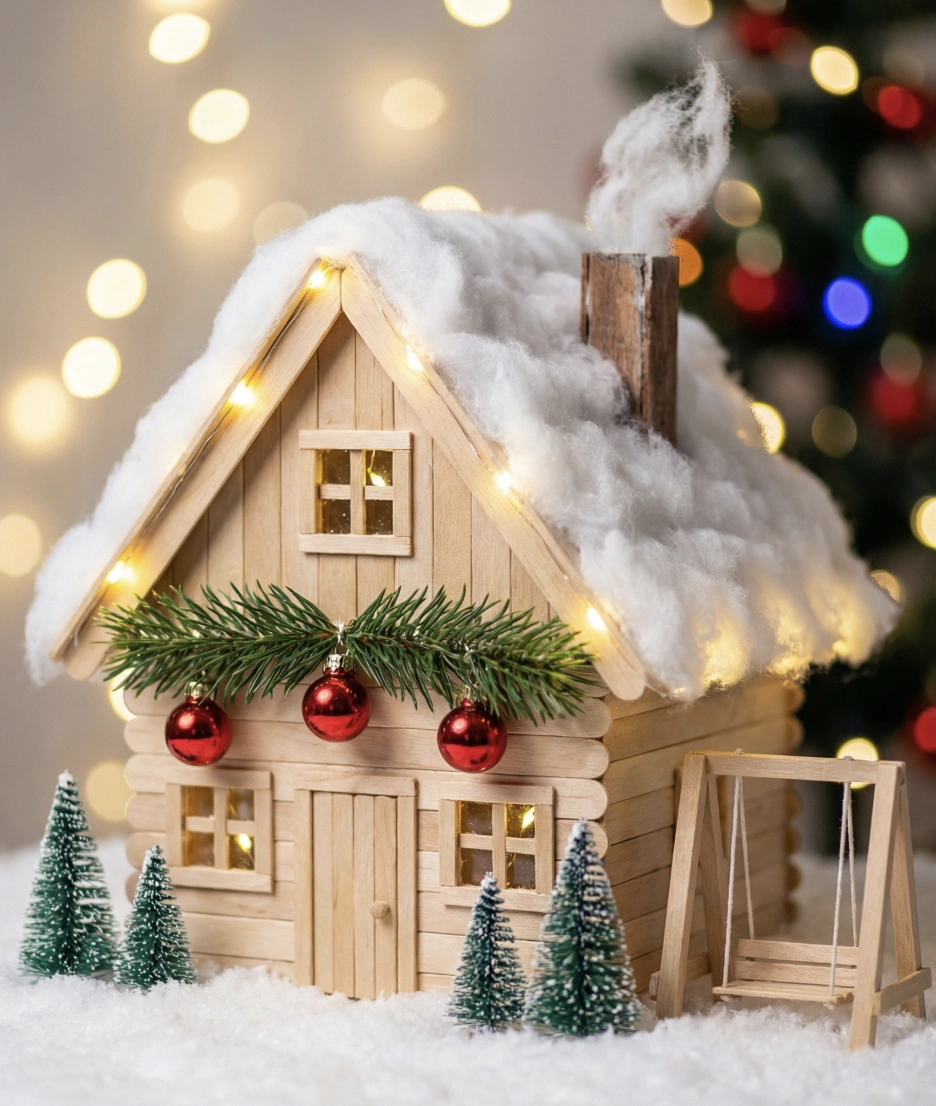
Credit: @diyvscrafts
How unbelievably cute is this tiny house? Give serious thought to making this a feature of your holiday decor.
You could absolutely DIY this entire setup yourself. Adding your own miniature trees elevates the festive spirit considerably.
Think about weaving in extra fairy lights for a truly cozy, magical glow. Unique decor ideas carry such appeal, and this type of Popsicle Stick Art is just perfect.
How to Make This Craft Gather popsicle sticks, craft glue, cotton balls, small fairy lights, brown paint Assemble the basic house shape: glue popsicle sticks to form walls Create roof using angled popsicle sticks Fashion chimney from small dowel rods and glue to roof Paint window frames and door, then glue onto walls Apply a thick layer of craft glue on the roof Cover with cotton balls to mimic snow Decorate the house with pine sprigs and small Christmas baubles Weave fairy lights around the roofline Add faux snow around the base to create a winter scene
DIY Holiday Star Ornaments: Popsicle Stick Remix
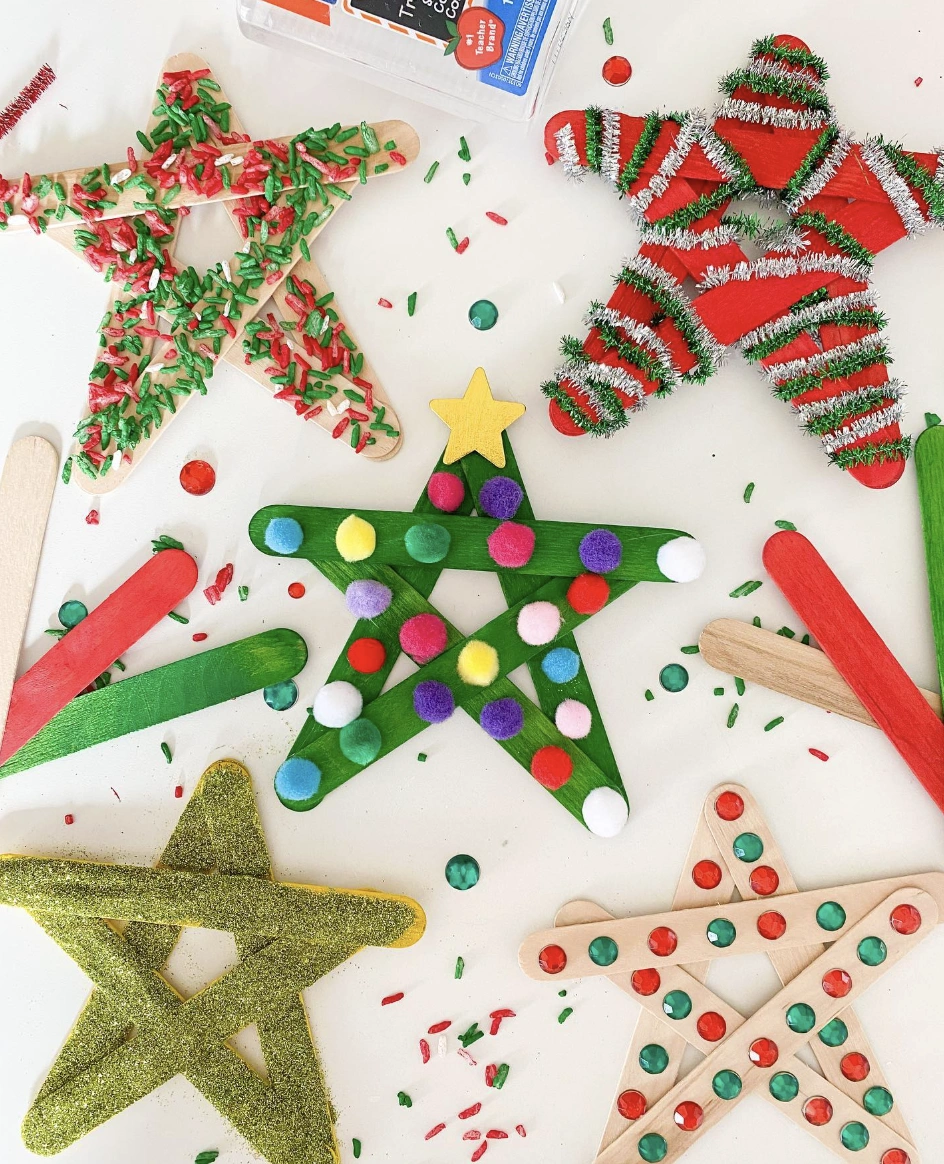
Credit: @abcdeelearning
Set aside those predictable, standard holiday decorations because these star ornaments deliver a playful, unexpected twist. They live completely in the spirit of Popsicle Stick Crafts For Adults Diy Projects by embracing the unconventional. These are a far cry from those mass-produced, identical ornaments that clutter everyone else’s tree, and that’s precisely the reason they generate such obsession.
How to Make This Craft Round up your trusty popsicle sticks! You’ll need 5 for each star Arrange the sticks into a star shape on your work surface Use craft glue to adhere the sticks at the points where they meet Let it dry Get creative with color! Paint each star in festive holiday shades While the paint’s still wet, generously sprinkle on glitter Once dry, add pom-poms, sequins and other goodies to further bedazzle Attach a loop of ribbon or yarn to one point for hanging Hang your dazzling creations on the tree and admire your sparkly handiwork!
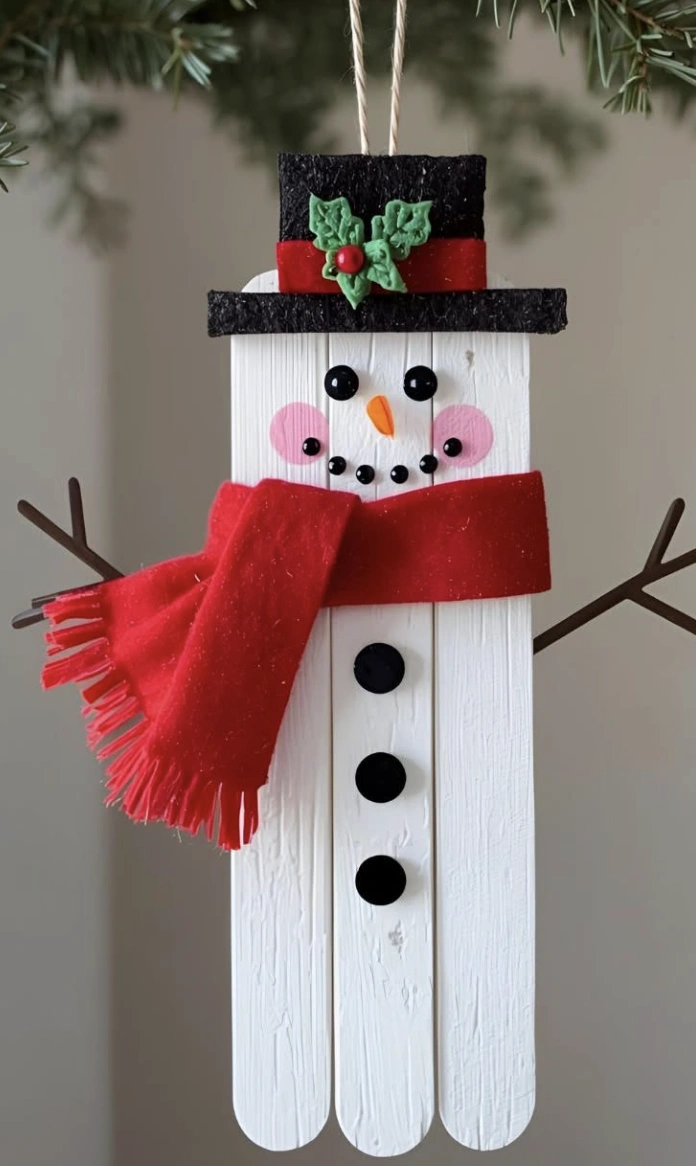
Charming DIY Snowman Ornament Made From Popsicle Sticks
Credit: @juniorsartanddiy
You know that cozy, handmade vibe everyone’s embracing these days? This creation slots in perfectly.
This little snowman provides total Pinterest-worthy inspiration. Sure, it’s simple by design, but that’s the inherent beauty of it.
The rustic aesthetic really shines through here. Additionally, that vibrant red scarf delivers such a wonderful pop of color. Projects in the realm of Popsicle Stick Art make crafting feel so much more accessible and budget-friendly.
How to Make This Craft Line up 5-6 popsicle sticks side by side Glue them together on the back with two horizontal sticks Paint the front of the sticks white with acrylic craft paint Let dry Using black paint, create the snowman’s eyes and mouth Glue small black pom-poms or buttons to create the buttons Cut a small orange triangle from craft foam for the nose Glue in place Cut a strip of felt for a scarf and fringe Glue around the snowman’s neck Add a small hat or embellishment to the top Glue a loop of twine to the back for hanging
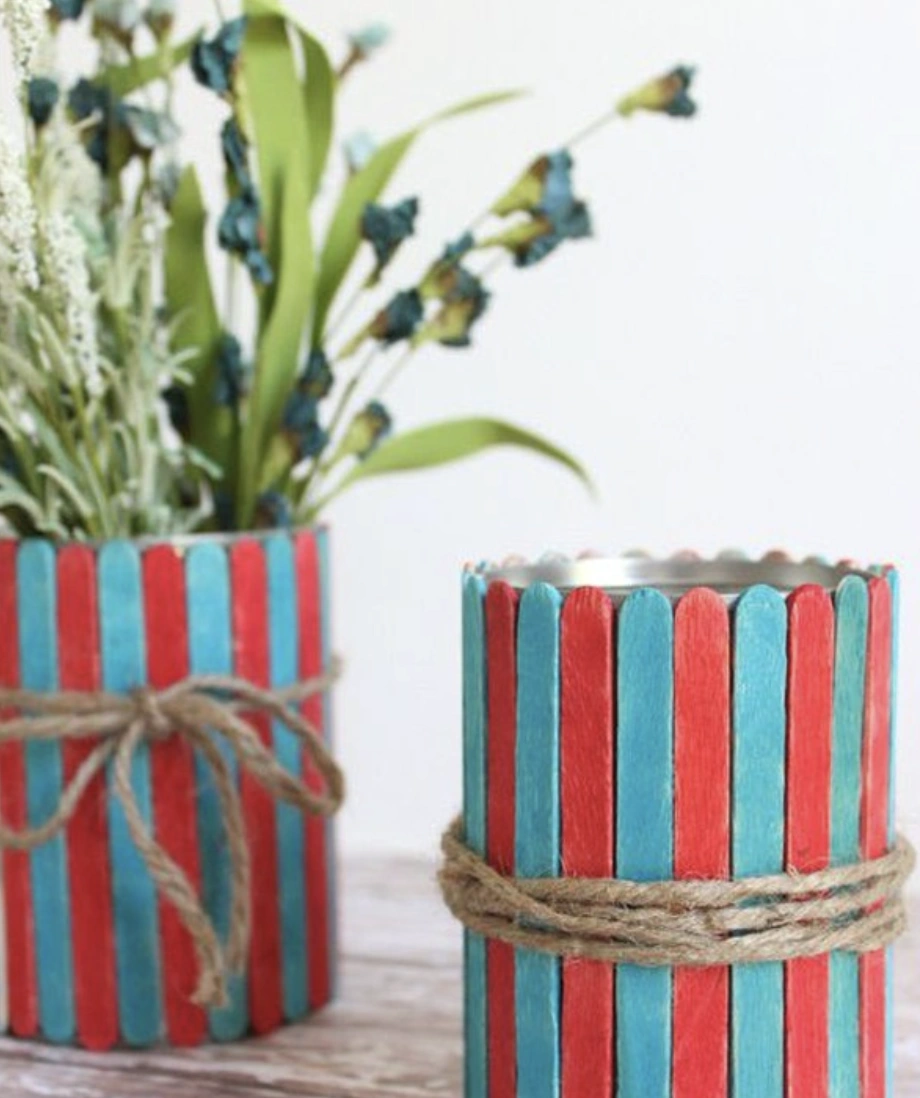
Upcycled Can Vases: Red and Teal Popsicle Stick Design
Credit: @lscostless
These vibrant vases introduce a wonderfully thoughtful element to any corner of your home. Creating a similar piece using items you already have on hand would be remarkably easy.
It’s the fine details, like those contrasting red and teal popsicle sticks, that deliver such strong visual interest. Give a comparable Matchstick Craft a try for an effortless, minimalist DIY project. A wrap of simple jute twine contributes that essential rustic finish.
How to Make This Craft Procure empty tin cans and clean them thoroughly Gather an ample supply of craft sticks Consider a palette of pleasing hues, like aquatic blues and warm corals Apply paint uniformly to each craft stick A second coat may be required Allow to dry completely Affix each painted craft stick vertically to the exterior of the tin can using a strong adhesive Once all craft sticks are adhered, select a twine or rustic rope Encircle the craft-stick-covered can with the twine, securing it in place with glue Tie in a decorative knot Fill with soil and your favorite botanicals
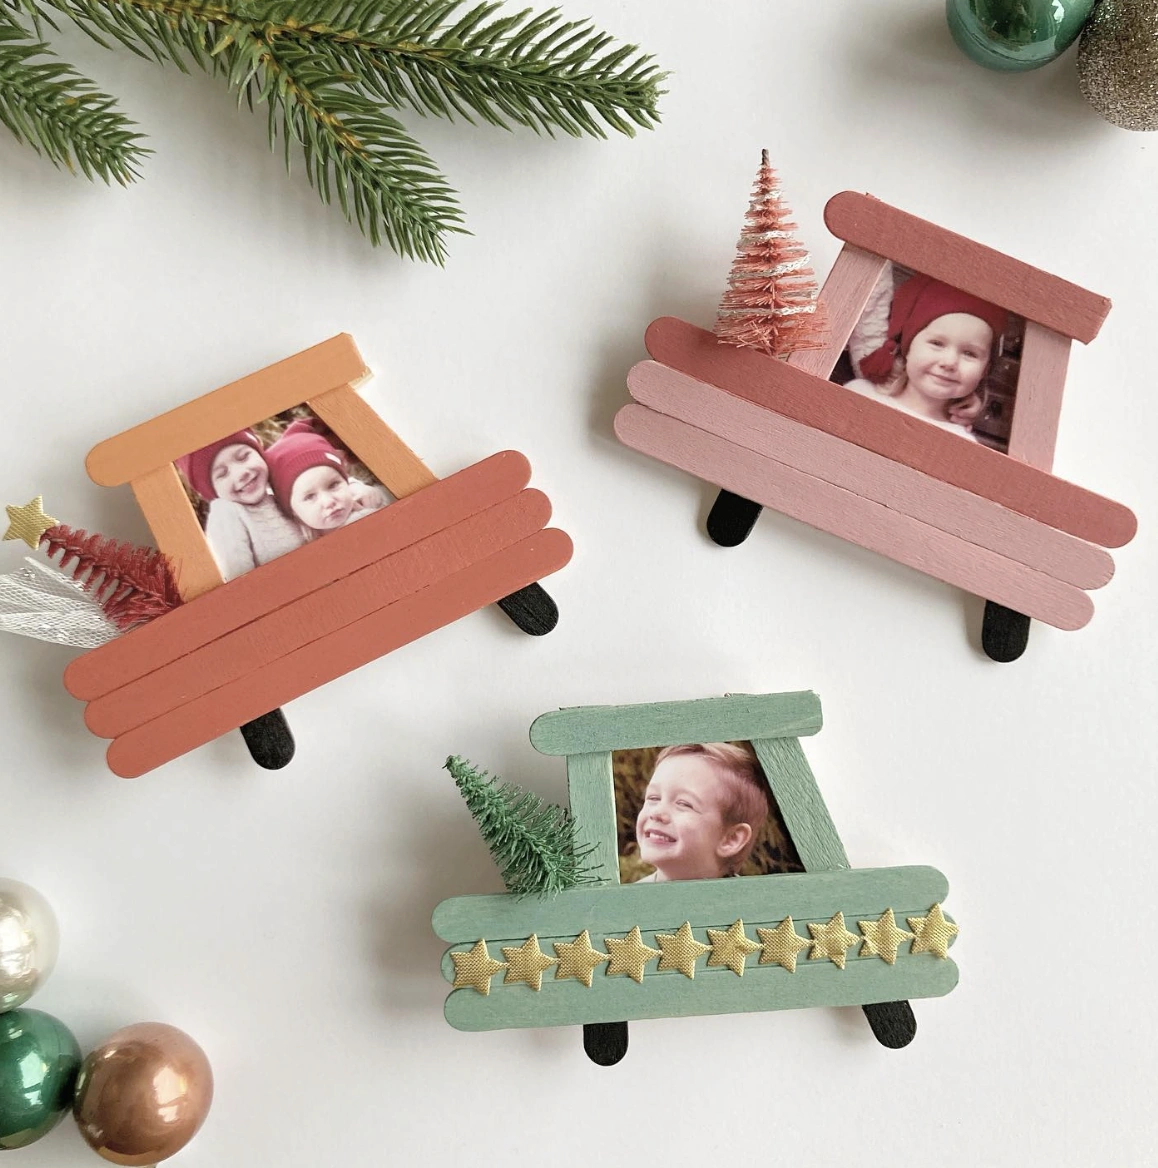
Holiday Memory Trucks: A Popsicle Stick DIY Project
Credit: @hobby.martine
Finding truly unique and personal gifts always presents such a challenge, doesn’t it? Seeing these little creations solves that dilemma PERFECTLY.
This is a Popsicle Stick Diy project at heart, featuring tiny trucks constructed from popsicle sticks that hold photographs. The opportunities for customization with different colors and little holiday trinkets are endless. So wonderfully festive.
How to Make This Craft Grab your popsicle sticks You’ll need about 20 for each truck Paint the popsicle sticks desired colors like sage, salmon, or orange Assemble the truck shapes by gluing the painted sticks together Build a cab area and truck bed Add small wooden craft circles for the wheels using craft glue Let dry Cut a photo to fit inside the cab area Insert the photo into place and secure Embellish the trucks with miniature Christmas trees and small star garlands Affix the embellishments with dabs of hot glue or craft glue Voila! Your retro Christmas truck photo frames are ready
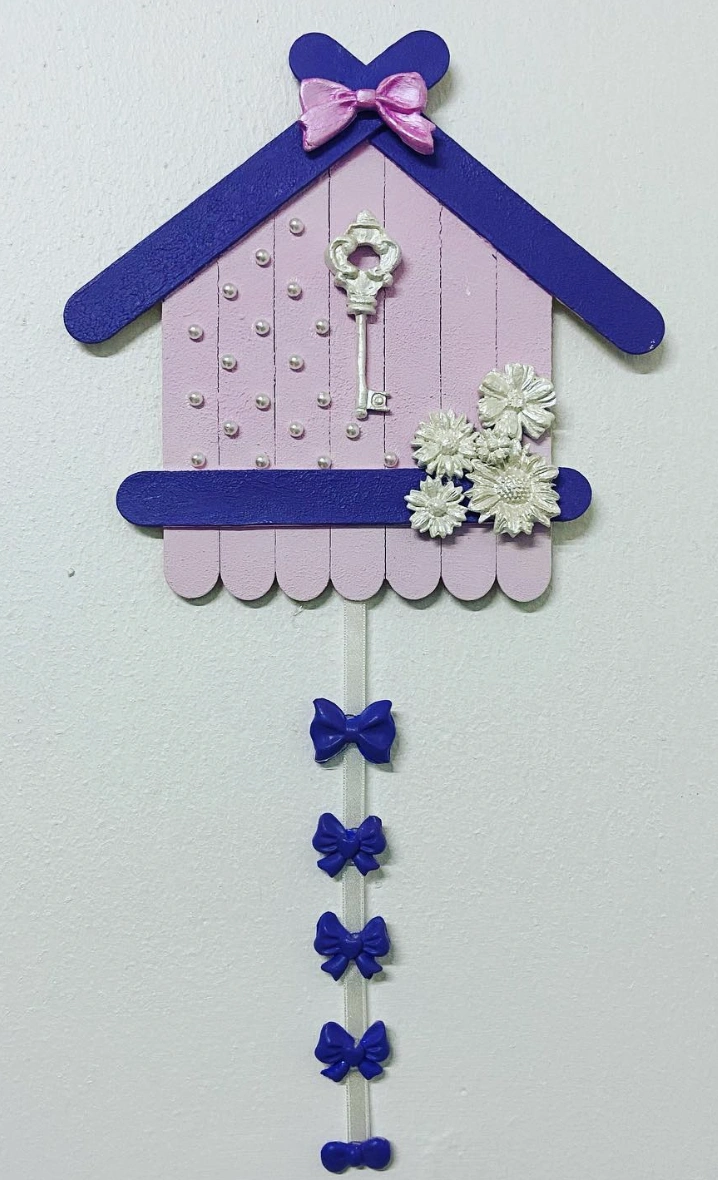
Pastel Dreamhouse: Lilac & Navy Popsicle Stick Key Holder
Credit: @beevi_stica
The cottagecore aesthetic is having a major moment right now, and this DIY key holder channels every bit of that energy. It’s crafted from incredibly simple Popsicle Stick Crafts and painted in the prettiest pastel lilac and navy blue combination.
Take a closer look at those sweet ribbon details too. Adding this to the room immediately feels like the right call.
How to Make This Craft Begin by painting the popsicle sticks with purple, violet and white acrylic paints Allow to dry Create the roof and base using glue to assemble the popsicle sticks into a house shape Glue the pearl beads onto the lavender portion of the house Attach the miniature key to the center of the house using strong glue Glue small craft flowers to the right side of the house on the ledge Secure the small bows with glue in a vertical line beneath the house, evenly spaced Attach a ribbon bow at the top of the roof Let it dry completely Hang your little dream house
Festive Holiday Houses Crafted from Popsicle Sticks
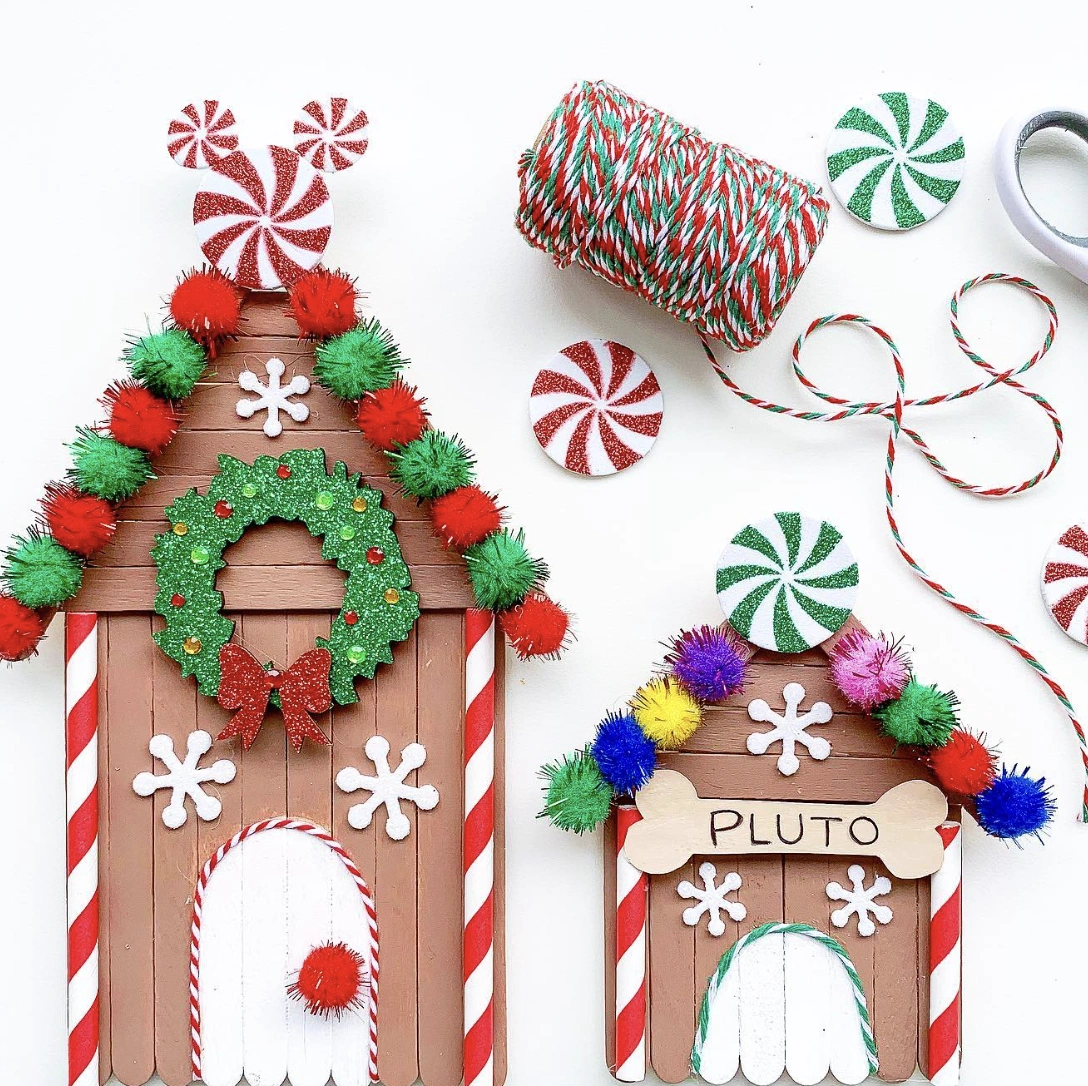
Credit: @schmittscreekfarmhouse
It’s already possible to picture the uptown moms debating whose child crafted these masterpieces. Someone possessing a genuine knack for DIY and deep holiday spirit is going to absolutely lose their mind over this.
These aren’t simply ordinary crafts. You know the type of Things To Do With Popsicle Sticks your grandmother used to suggest?
This operates on a completely different level. The candy cane trim?
The pom-pom garland? Pure inspiration. Prepare to see these beauties gracing every single Instagram feed come December.
How to Make This Craft First, align popsicle sticks and glue together to form a house structure for both large and small houses Decorate edges of houses with red and white striped tape Cut candy cane designs out of glitter paper Glue onto the tops of houses Glue pom-poms along the rooflines Decorate the front with snowflakes and other festive elements Create the front door with white craft sticks Use twine to create a hanging loop Display your craft creations on a mantel or tree
Handmade Pink Popsicle Stick Photo Frame with “I Love You To The Moon and Back” Message
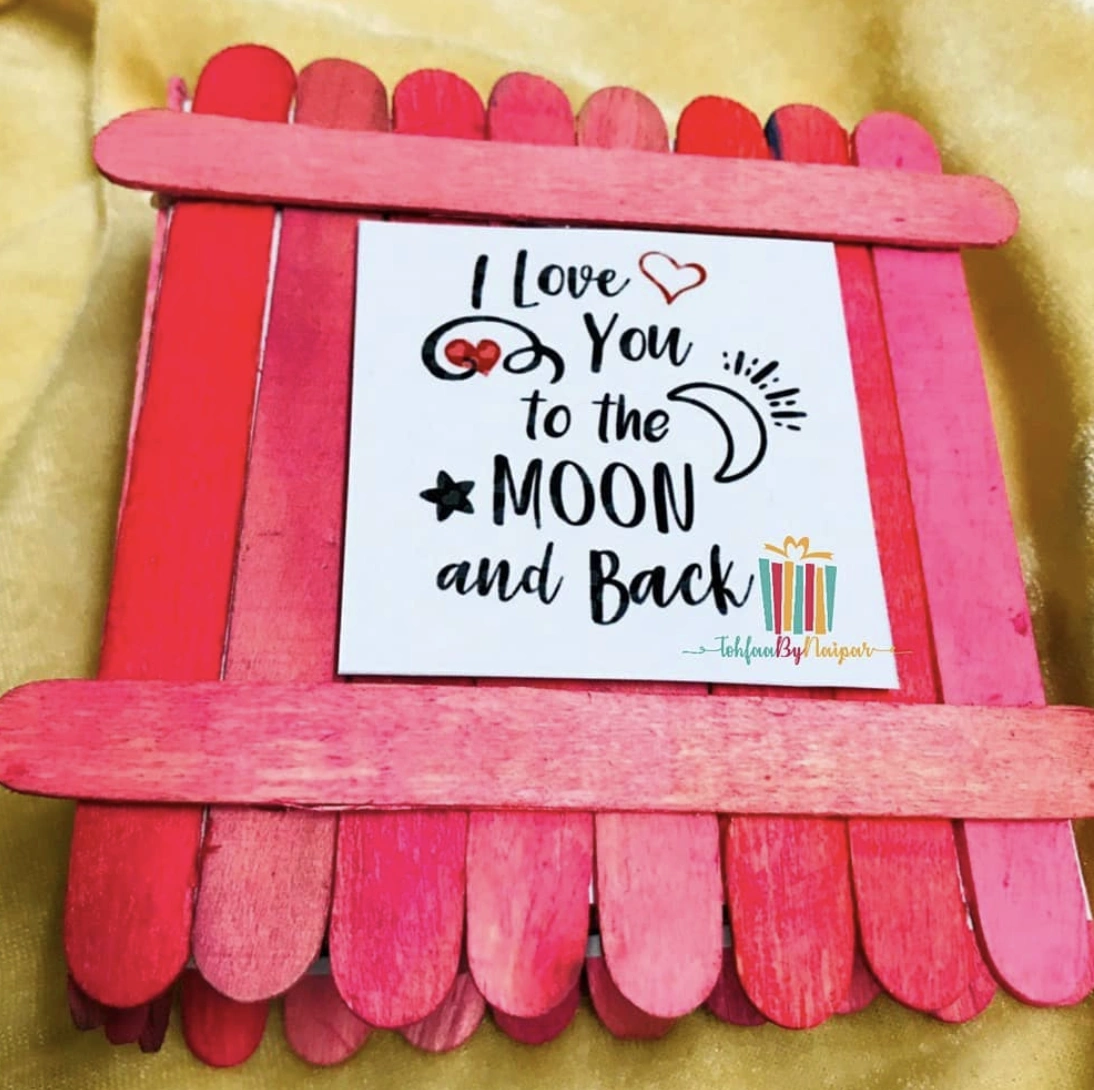
Credit: @knotglow.co
Look at this scenario: scrambling to find a last-minute Mother’s Day gift. Then a child presents this treasure.
Sure, it carries beautiful imperfections, but the thought behind it counts for everything, right? Plus, it surpasses another macaroni necklace by a mile.
This handmade frame creates the perfect home for displaying cherished family photos. Getting the kids involved in making more seems like a brilliant plan, since new Stick Crafts For Kids are always needed to keep little hands occupied on rainy days.
How to Make This Craft Paint the popsicle sticks in shades of pink, red and coral Let dry completely Lay popsicle sticks side by side on a flat surface and glue another layer of popsicle sticks across the top and bottom of the first layer Print the “I love you to the moon” image onto a piece of paper Trim the paper to fit inside the popsicle stick frame Affix the paper onto the frame using glue Let the glue dry completely Gift to someone you care about!
Ombre Painted Popsicle Stick Planters: A DIY Dream!
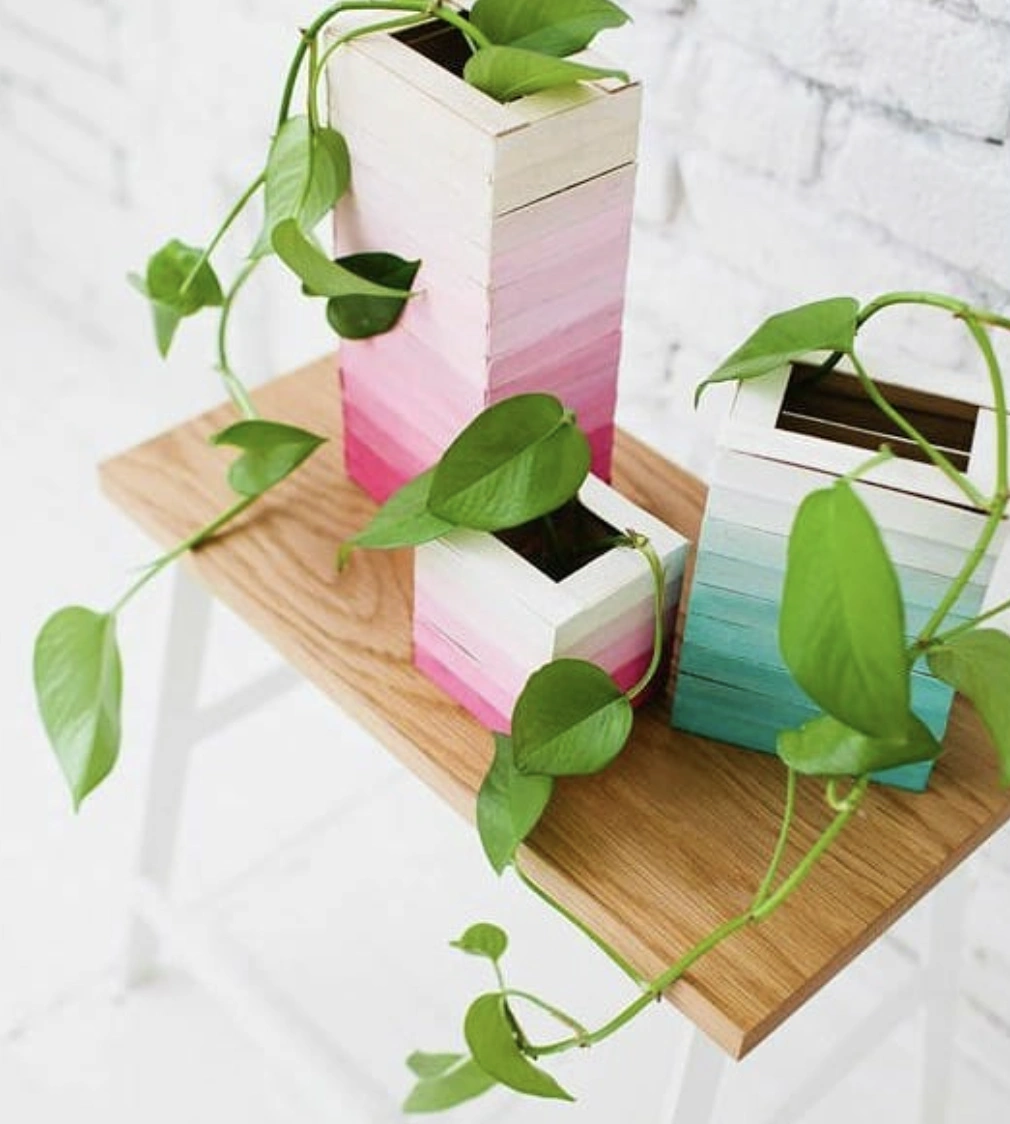
Credit: @angelcraftcorner
These planters scream indie aesthetic with every fiber of their being, and the reception here is completely enthusiastic. Remember when the world obsessed over those tiny, detailed Popsicle Stick Houses?
Well, this is the grown-up, exceptionally chic evolution of that concept. The ombre paint treatment lends them a surprisingly sophisticated air.
And here’s the exciting part: they appear to be a wonderfully fun project for tackling on a boring afternoon. Seriously, making several of these for a succulent collection is highly tempting.
How to Make This Craft Gather wood blocks Ensure they are all the same size Apply painter’s tape to create gradient sections Starting with the darkest shade, stain the bottom section of the wood block Apply the next lightest shade of stain above the last Repeat until you have reached the top Build a planter box by adhering the stained blocks Allow to dry completely Place a potted plant inside
Festive Christmas Tree Ornaments Crafted From Popsicle Sticks, Paint, and Glitter
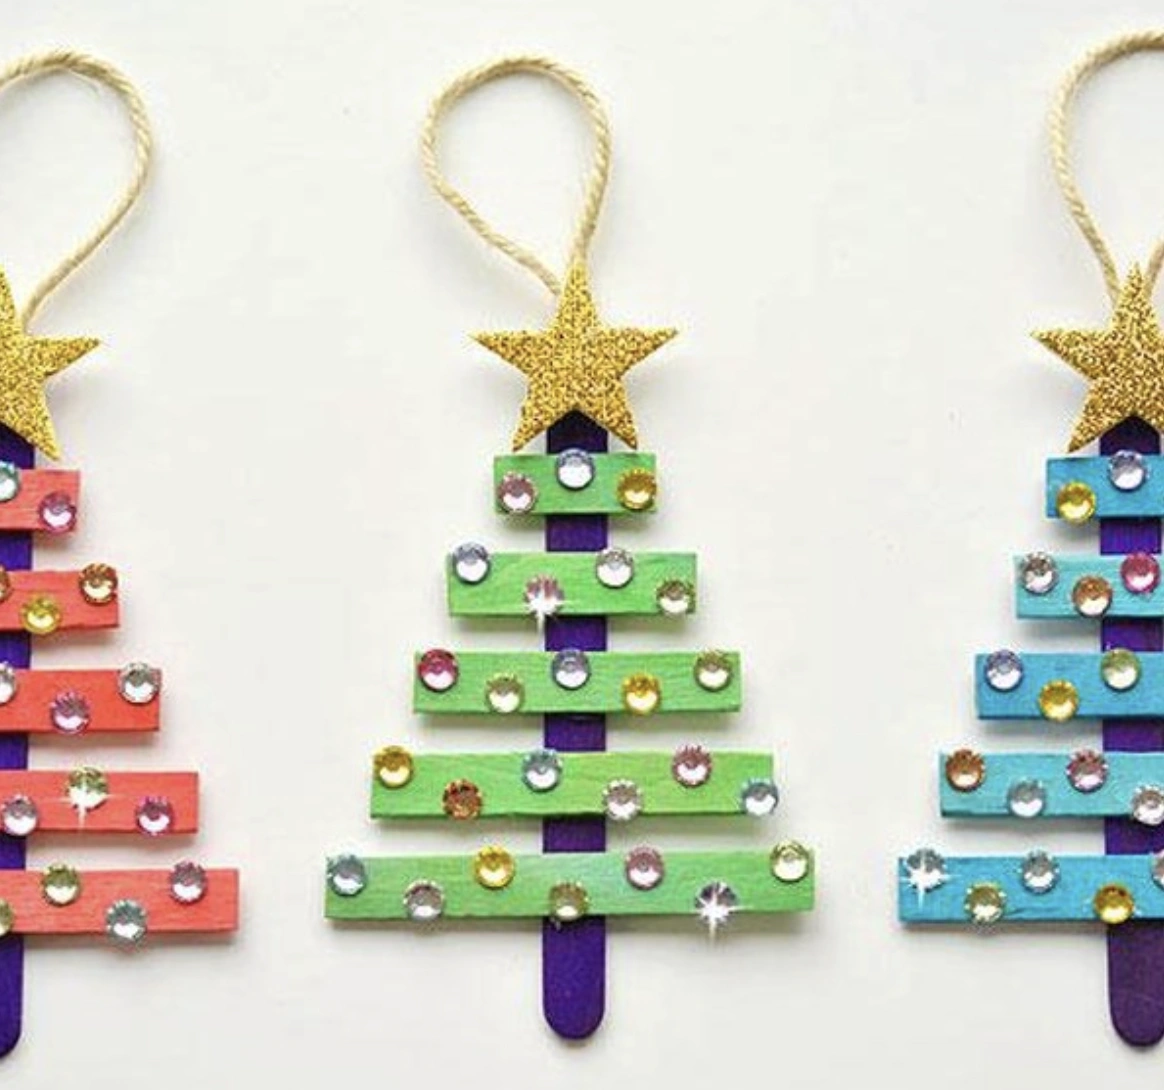
Credit: @one_little_project
Generic store-bought decorations have become genuinely tiresome. The desire for something personal, something the kids could help create, led straight to this solution.
These popsicle stick trees are perfect. They’re inexpensive, straightforward, and the kids are completely captivated.
Every single supply came from the dollar store. Sometimes approaching these projects requires thinking outside conventional boundaries.
Who knew Things To Make Out Of Popsicle Sticks could appear so chic hanging on the tree? And as a bonus, this provides an excellent distraction during the holiday chaos.
How to Make This Craft Paint craft sticks in various colors of the rainbow Allow to dry Arrange the craft sticks into a tree shape and glue them together Add glittery star at the top of the tree Adhere rhinestones all over the branches Attach a loop of twine to the top of the tree with glue for hanging Hang the ornaments on a Christmas tree or give as gifts
Blue Popsicle Stick Ornament with Snowman and Trees
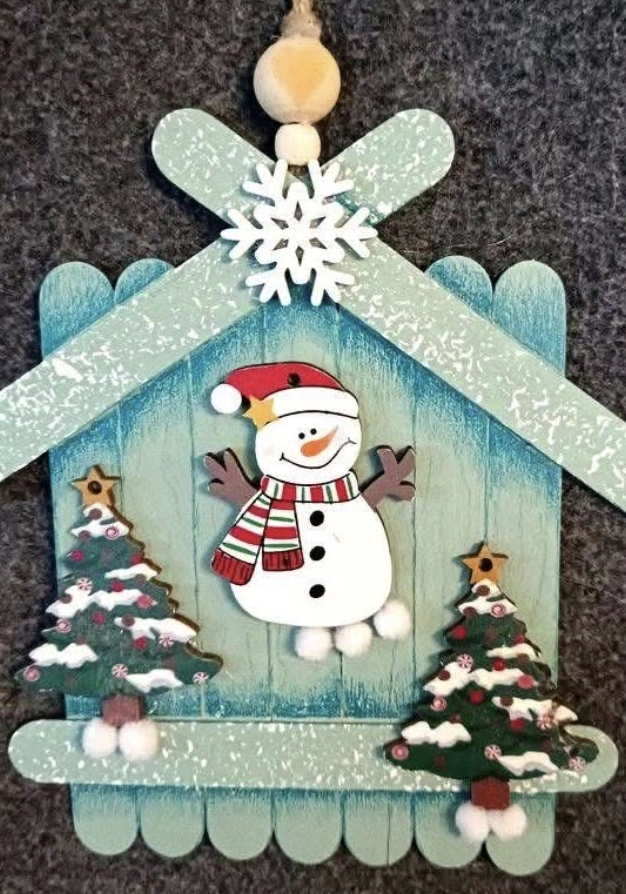
Credit: @juniorsartanddiy
This piece reads as remarkably cute, especially for anyone drawn to homemade decorations. It might not suit being displayed everywhere, but it would look incredibly sweet nestled on a tree alongside other crafty ornaments.
If you decide to create your own version, consider experimenting with different paint colors to switch things up. Craft Stick Projects like this offer such a fun method for getting the kids involved. This stands as a perfect craft for the Christmas season.
How to Make This Craft Lay 10 craft sticks side-by-side on a flat surface Glue two sticks across the 10 sticks to hold them together Paint the assembled rectangle using light blue acrylic paint and let dry Construct roof shape by gluing two more craft sticks at an angle at the top Create snowman from white craft foam, gluing on facial features, scarf, and buttons Add pre-made Christmas tree miniatures at the base on both sides Attach a snowflake embellishment to the peak Add a small wooden bead and loop for hanging
Popsicle Stick House Scene with Stone Couple
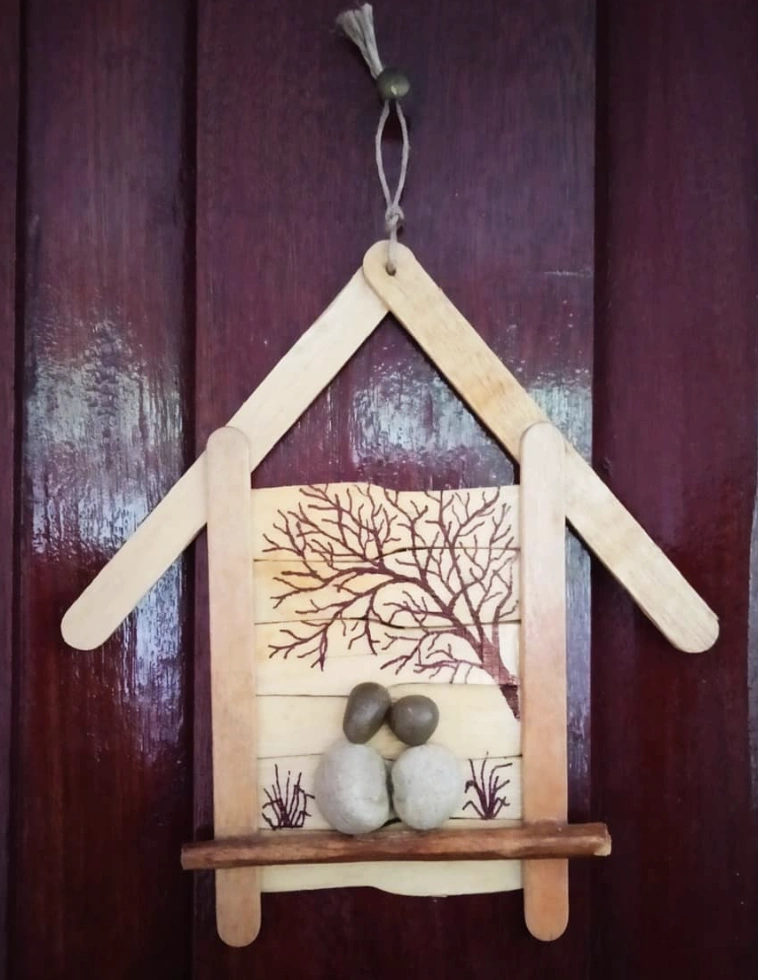
Credit: @creativedaughter_of_thecreator
Countless Popstick Craft Diy projects have crossed the radar, but this particular creation hits on a completely different frequency. Instead of merely assembling the usual basic shapes, it presents an entire miniature scene.
It functions as a mini house frame, features a cute drawn tree, and incorporates a couple made from smooth stones. How unbelievably adorable. Creating a whole collection of these with different themes for every holiday seems like a natural next step.
How to Make This Craft Select 10 clean, unpainted craft sticks Arrange the sticks side-by-side on a piece of wax paper Using craft glue, attach two more sticks horizontally across the group to hold them Once dry, construct a roof shape with two more craft sticks at the top Glue two small, smooth stones at the base Use a thin permanent marker to sketch a simple tree on the wood panel Add a small craft stick shelf underneath the stones with glue Attach a jute string at the top to be used as a hanger
Miniature Popsicle Stick Sled Ornaments: Blue and Brown Palettes
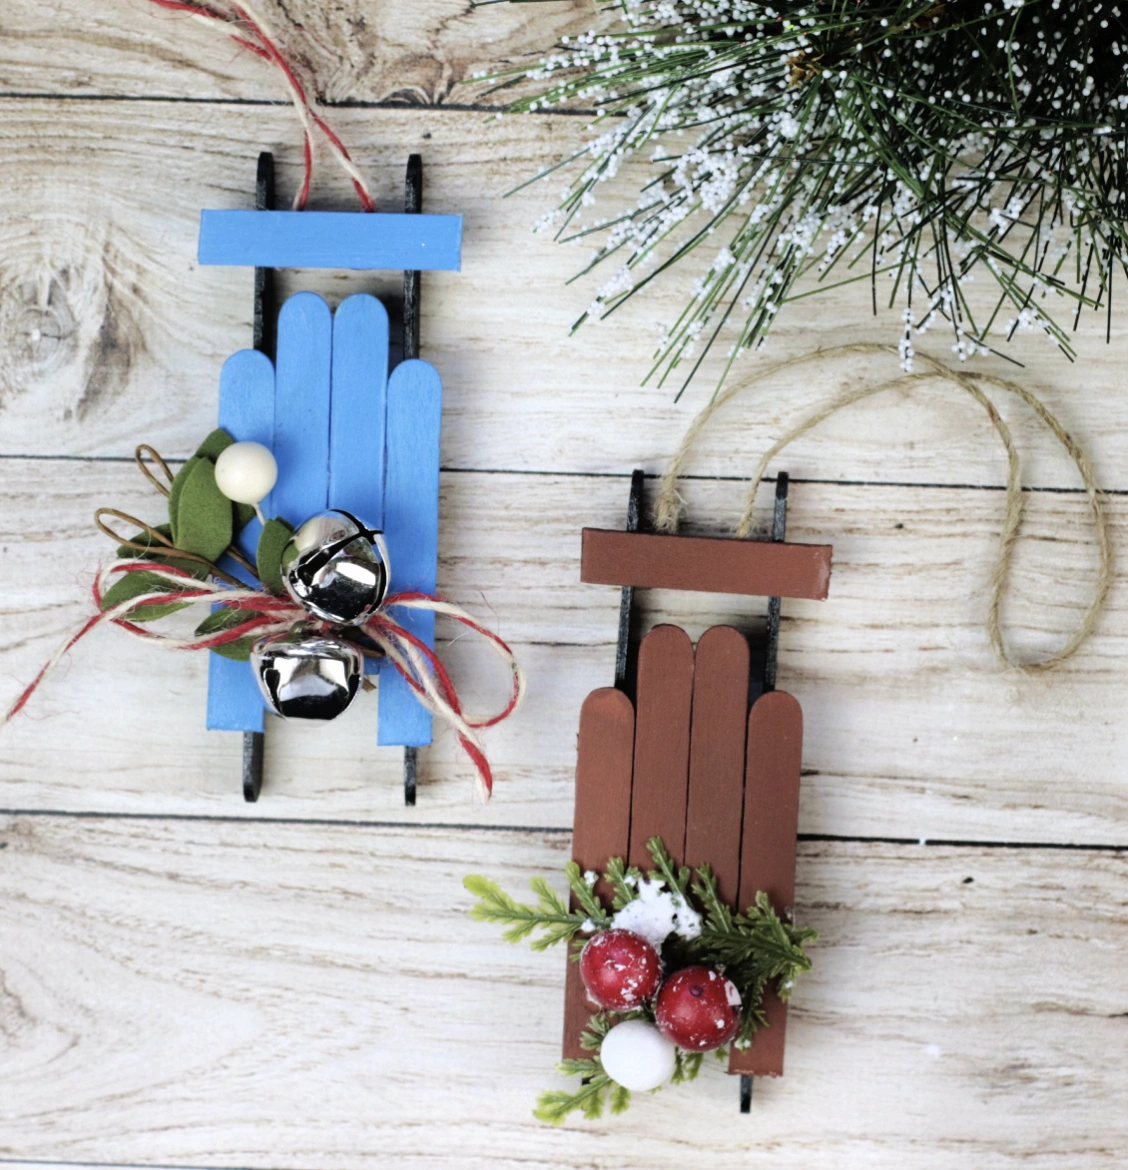
Credit: @jugglingactmama
Something about crafting during the holiday season feels inherently and deeply comforting. There’s appreciation for how this modern interpretation of Stick Crafts For Kids embraces that cozy feeling while incorporating a dash of rustic charm.
The subdued, understated color palette, when combined with the small embellishments, allows these DIY sled ornaments to register as more intentional, elevated, and less overtly childish. A simple yet remarkably impactful seasonal decoration.
How to Make This Craft Gather six craft sticks Paint them in your desired color and allow them to dry completely Glue five sticks together side-by-side to form the base of the sleigh Cut the sixth stick into two smaller pieces and glue them vertically to the bottom front of the base as the runners Cut a small portion of craft sticks for the top portion Glue these at an angle to create the sleigh seat Embellish with miniature bells, faux greenery, and a small twine bow Attach a loop of twine for hanging as an ornament
Miniature Farmhouse Doors from Popsicle Sticks with Festive Wreaths
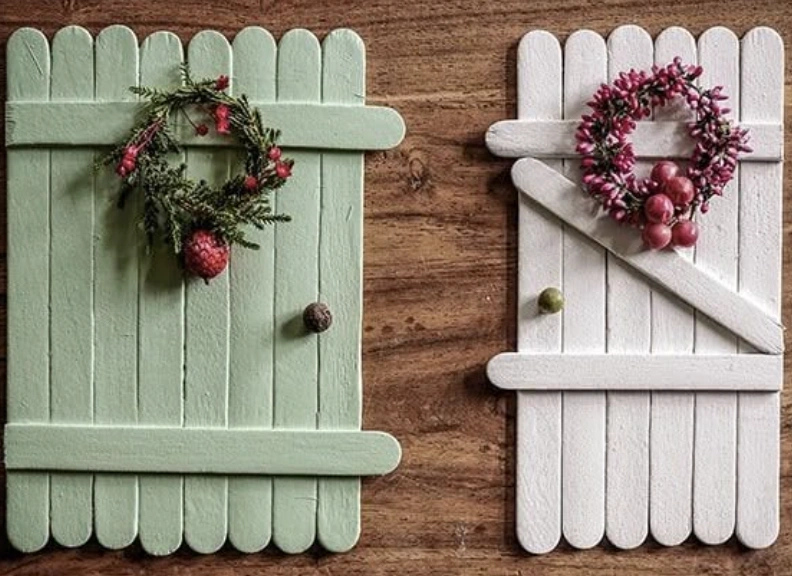
Credit: @juniorsartanddiy
These appear wonderfully cute when propped up on a shelf, especially with those tiny wreaths contributing that essential touch of seasonal charm. The overall effect feels both rustic and warmly homey.
How to Make This Craft Line up popsicle sticks vertically to create a door shape The number of sticks will determine the width of your door Glue two popsicle sticks horizontally across the back to hold them together, one at the top and one near the bottom Paint the assembled door with your desired color; mint green and white were used here Let dry completely Trim the sticks to create a more rounded or desired shape Glue a decorative miniature wreath to the center of the door Attach a small, round bead as a doorknob You can now use glue to attach popsicle sticks at the back in order to create an elevated piece of artwork Display on a wall or incorporate it into a larger holiday display
Festive DIY Snowflake Ornaments Made From Popsicle Sticks
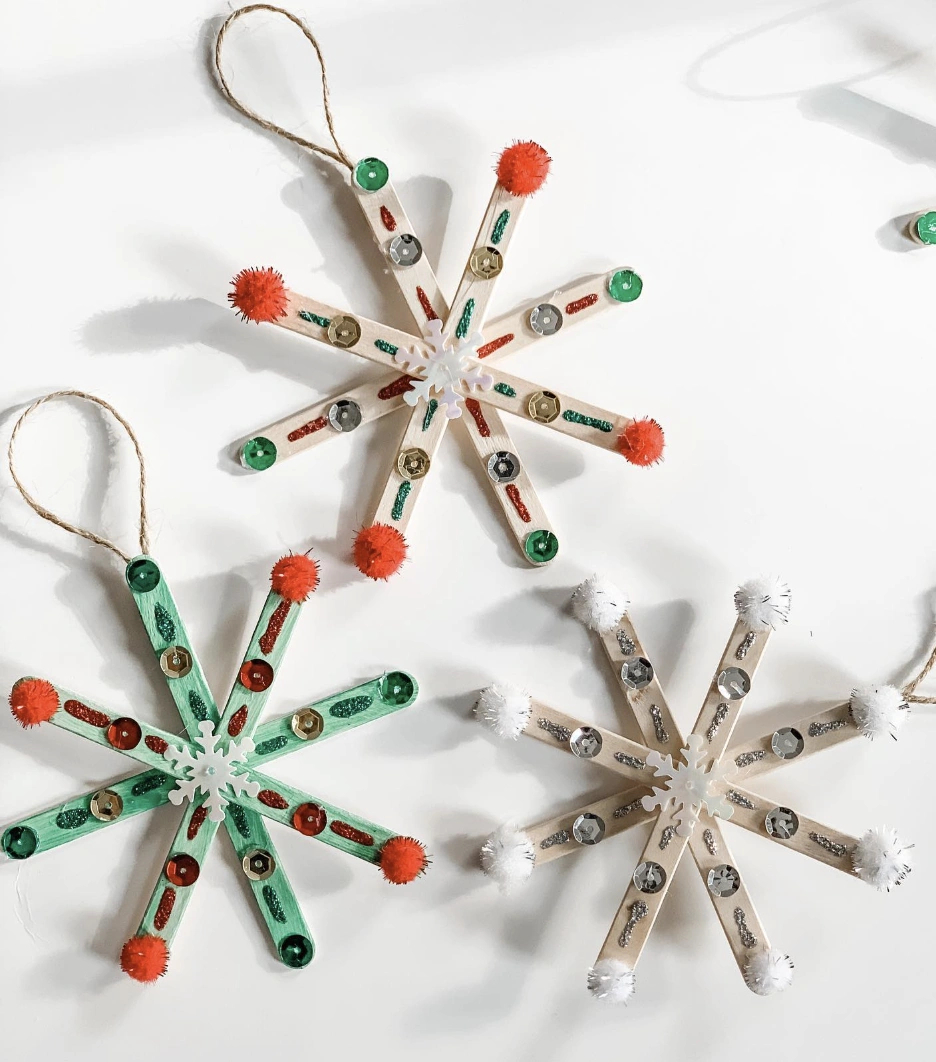
Credit: @love.always_alyssa
The uncomplicated snowflake design possesses that irresistible handmade charm, yet the glitter, sequins, and pom-poms lift them to a higher level. They appear significantly more special than your typical Matchstick Craft. Beyond that, a project the kids can genuinely participate in always counts as a major win.
How to Make This Craft Gather popsicle sticks, glitter glue, sequins, small pom-poms, white craft glue, twine Arrange three popsicle sticks in a star pattern and glue together at the center Paint each arm of the snowflake with glitter glue, choosing different colors for visual interest While the glue is still wet, sprinkle sequins over the arms of the snowflake Attach small pom-poms to the ends of each arm using craft glue Glue a snowflake-shaped sequin or button in the center of the snowflake Cut a piece of twine (6-8 inches) and form a loop Glue the ends of the twine loop to the back of the snowflake at the center point Allow the glue to dry completely before hanging
Mini Holiday House Made with Popsicle Sticks
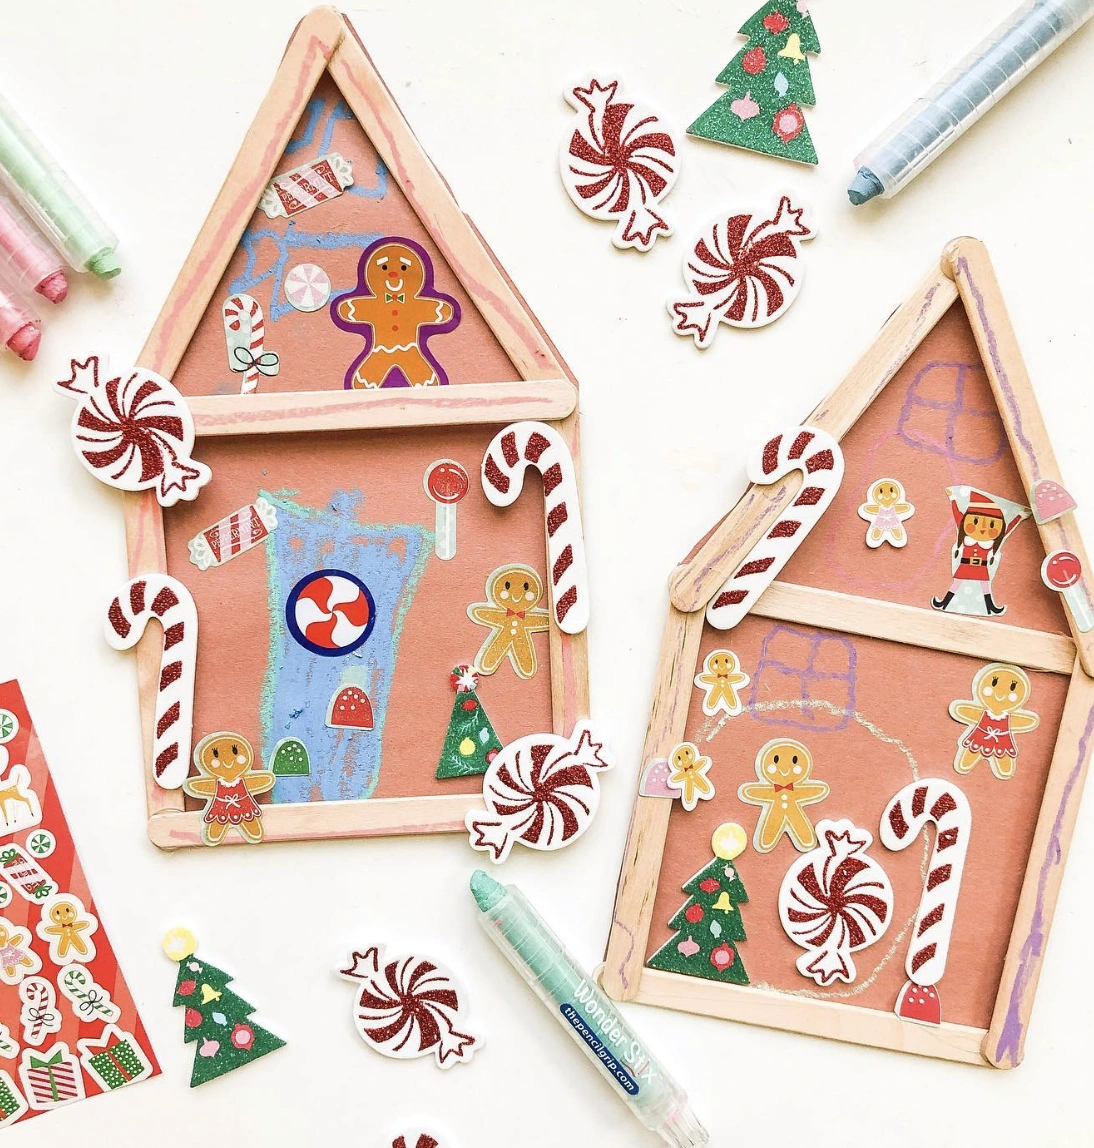
Credit: @thechildhoodglen
These little houses, constructed from popsicle sticks, come to life with stickers and drawings. It looks like the perfect project for a lazy afternoon and promises seriously good fun. The temptation to raid the craft store right now is honestly quite strong.
How to Make This Craft Round up seven popsicle sticks, colored markers, a glue stick, and Christmas stickers Grab five sticks Arrange two parallel to one another Lay two of the remaining sticks vertically inside the parallel sticks and use glue to attach the sticks Glue two more sticks together to create the roof With your marker, decorate the inside of the house Use your colored markers to draw your favorite Christmas characters or shapes Start adding stickers of gingerbread men, candy canes, or any Christmasy images you desire Let everything dry completely before playing with your new holiday house
DIY Santa Christmas Ornaments from Craft Sticks
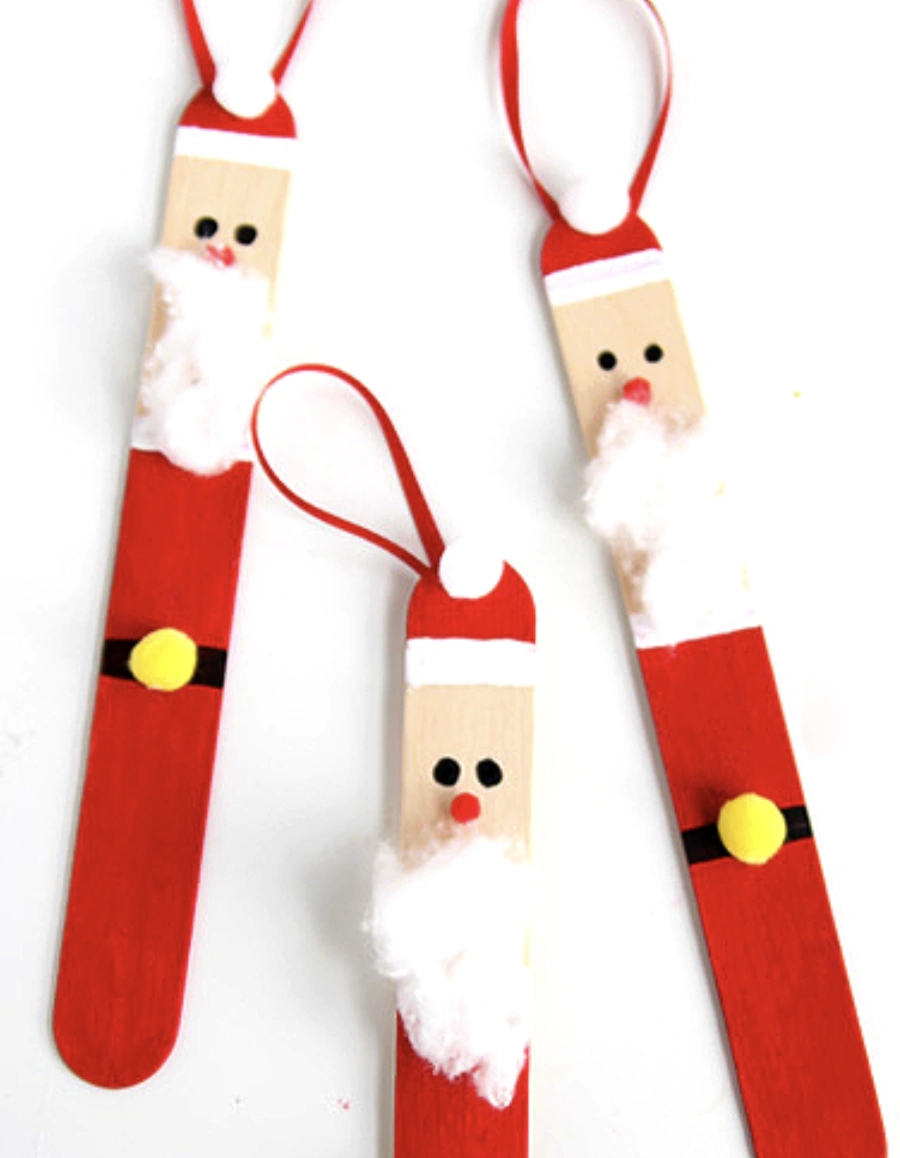
Credit: @one_little_project
Stuck wondering how to accessorize the tree this year? The struggle is real.
Store-bought ornaments can feel undeniably boring sometimes. But there’s no need to worry.
The cutest idea just surfaced: DIY Santa ornaments using craft sticks. This represents one of those wonderfully fun Craft Stick Projects that allows for total customization.
Think about the memories of making these with family, so precious. This little project introduces such a personal, heartfelt touch to your holiday decor.
How to Make This Craft Snag some popsicle sticks, red and white paint, a small brush, cotton balls, a yellow pom-pom, black marker, ribbon and glue Slather the bottom half of each stick with red paint Let that dry Paint the top third with white paint This will be Santa’s hat Let that dry too With your black marker, draw two dots on the face to serve as his eyes Glue a little piece of cotton to the bottom to make Santa’s beard Affix the yellow pom-pom onto the red part of the popsicle stick This will serve as the belt buckle Glue a loop of ribbon to the back of the top of the stick, near the white paint Let the glue dry before you hang the ornament
Quirky Penguin Family Popsicle Stick Diy Project
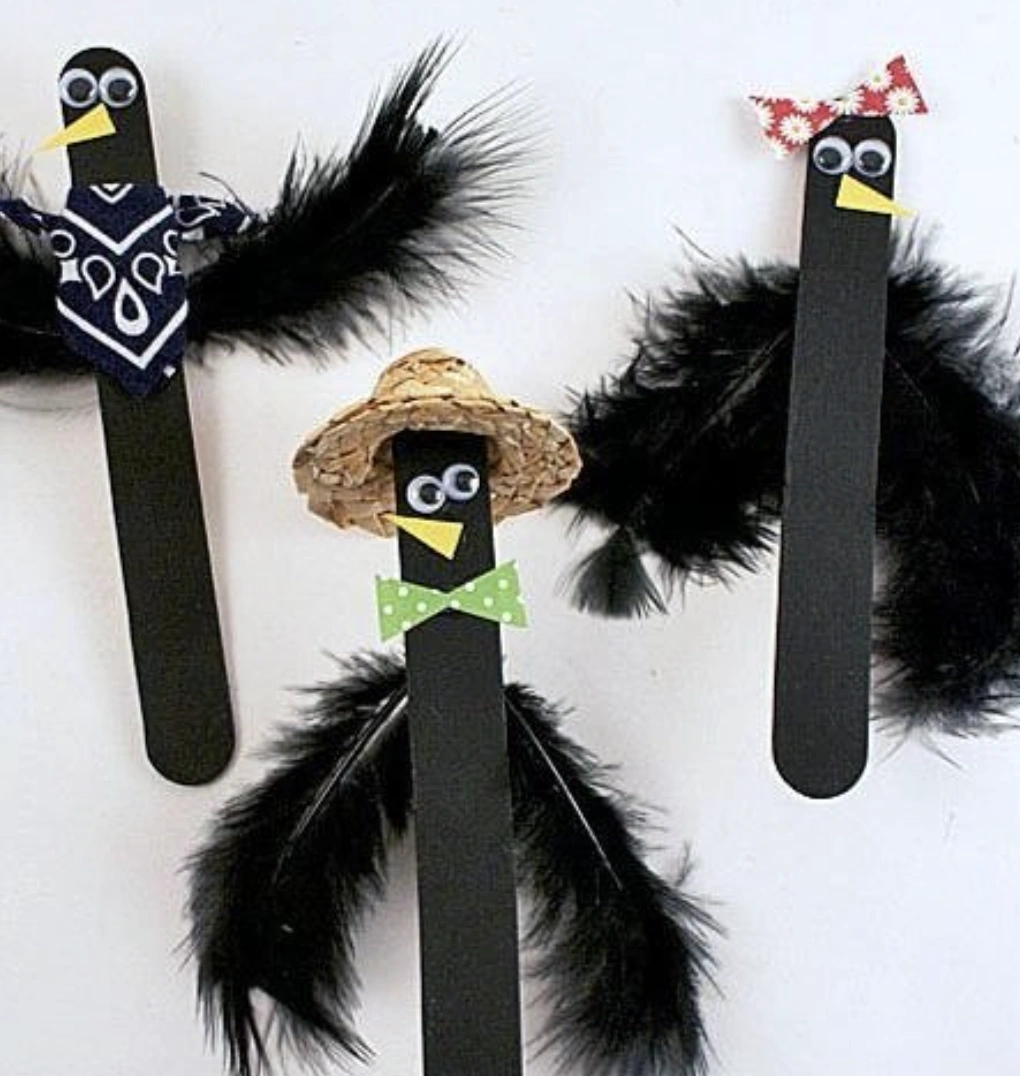
Credit: @kidsactivitiesblog
These possess a certain undeniable cuteness. But here’s the crucial detail: the unevenness of the black feathers glued on as wings gives each one distinct personality.
The tiny accessories truly steal the show, one sports a bandana, another rocks a straw hat and polka dot bowtie. If Popsicle Stick Diy projects appeal to your creative sensibilities, these goofy penguins appear wonderfully simple and would make a delightfully fun afternoon activity.
How to Make This Craft Get a hold of some popsicle sticks, black paint, googly eyes, colorful fabric scraps, feathers, glue and scissors Coat the popsicle stick with black paint, let it dry Glue googly eyes onto the top half of the popsicle stick Cut out a tiny triangle from yellow or orange fabric and glue it beneath the eyes for the beak Glue feathers to the back of the stick to create wings Cut strips or shapes from the fabric and glue around the penguin to create accessories like bandanas, bowties or hats Experiment and add additional items if you like
Silhouette Dancer Sunset Scene – Popsicle Stick DIY Artwork
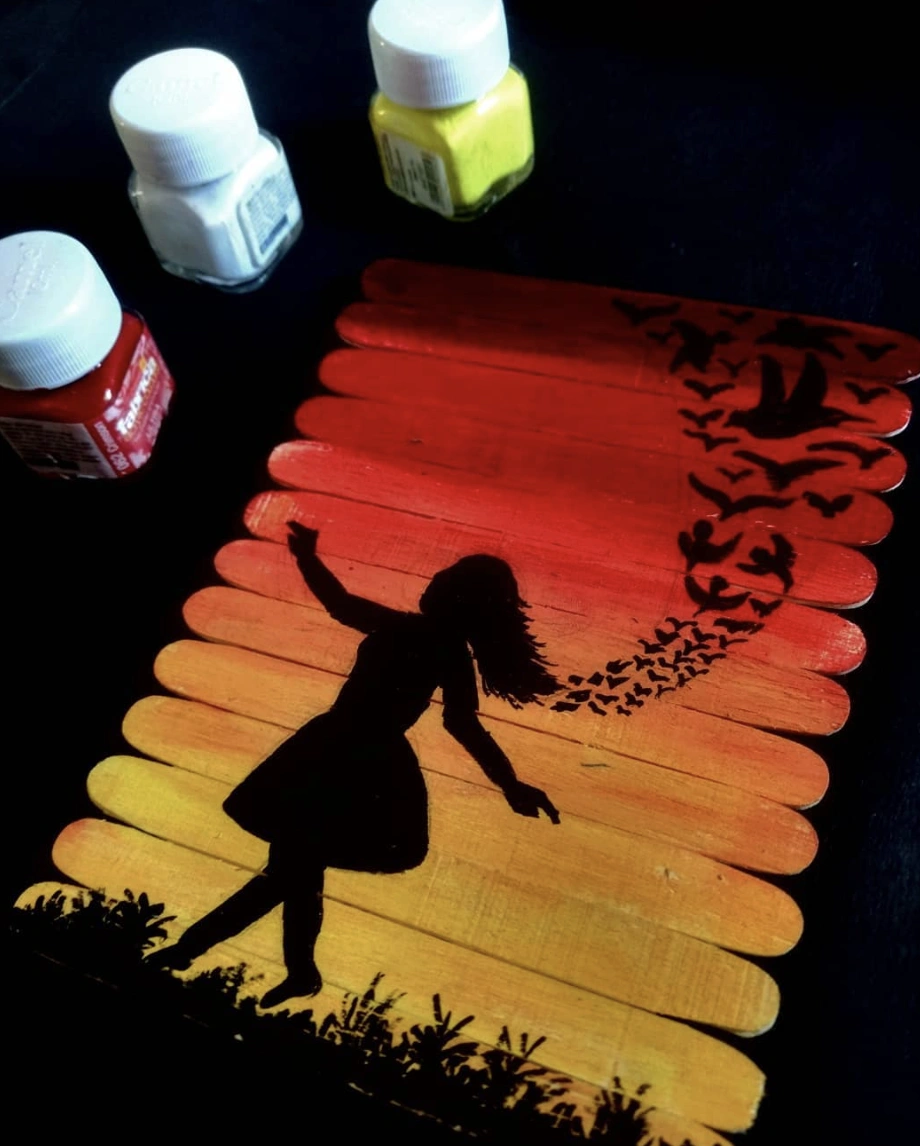
Credit: @artlyticalll
This little creation practically shouts “gallery wall” from the rooftops. The gradient sunset set behind the silhouette delivers a totally chic statement.
This piece is destined for prime placement in the art nook. It projects a moody, artistic energy.
Who would have guessed that achieving this required only a few paints, a glue gun, and, well, things to make out of popsicle sticks? Obviously, a gallery setting would be an ideal suggestion, but it would likely thrive in any space.
How to Make This Craft Collect 12-15 popsicle sticks, red, yellow, and black acrylic paint, paintbrushes, and a pencil Align the popsicle sticks side by side on a flat surface Mix the red and yellow to get sunset colors and create a gradient across the sticks, from yellow to red Let the paint dry completely Lightly sketch the silhouette of a girl and birds with a pencil Carefully paint over the sketch with black acrylic paint Touch up any smudges or errors with a fine-tipped brush For best results, add a clear sealant spray Glue a piece of cardboard to the back to keep all the popsicle sticks together
Popsicle Stick Cat Trio with Googly Eyes
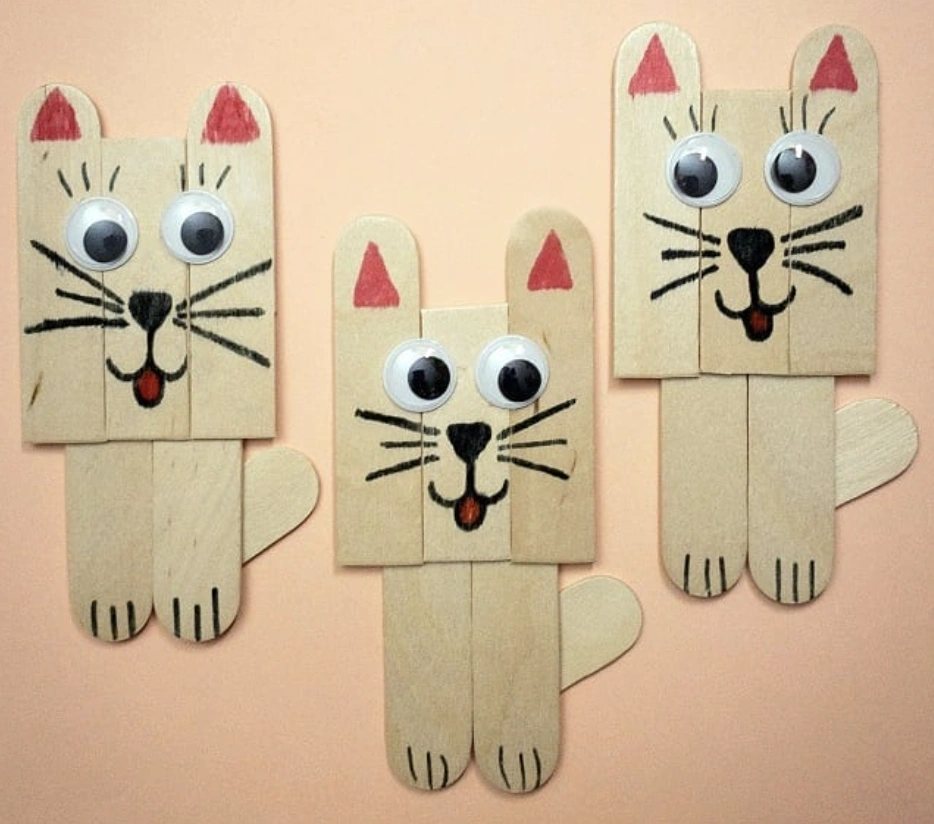
Credit: @crafty_morning
These far surpass a plain old popsicle stick frame. The googly eyes and those small drawn-on faces completely define their charm, don’t you agree?
Seriously adorable. These are perfect for simple Stick Crafts For Kids that actually deserve a spot on display.
How to Make This Craft Gather five popsicle sticks, googly eyes, and a black marker Glue four sticks side-by-side to create the cat’s head Glue the fifth stick below the head for the body Cut small triangles from spare popsicle sticks for the ears, and glue them at the top Draw whiskers, a nose, and a mouth with the marker Attach googly eyes above the nose Use the maker to outline the inner ears and draw paws Cut the popsicle stick to create the side arm and glue to cat’s body Allow glue to dry completely before handling Present to your favorite cat lover!
Halloween DIY: Jack-o’-lanterns, Mummies, and Frankenstein Popsicle Stick Art
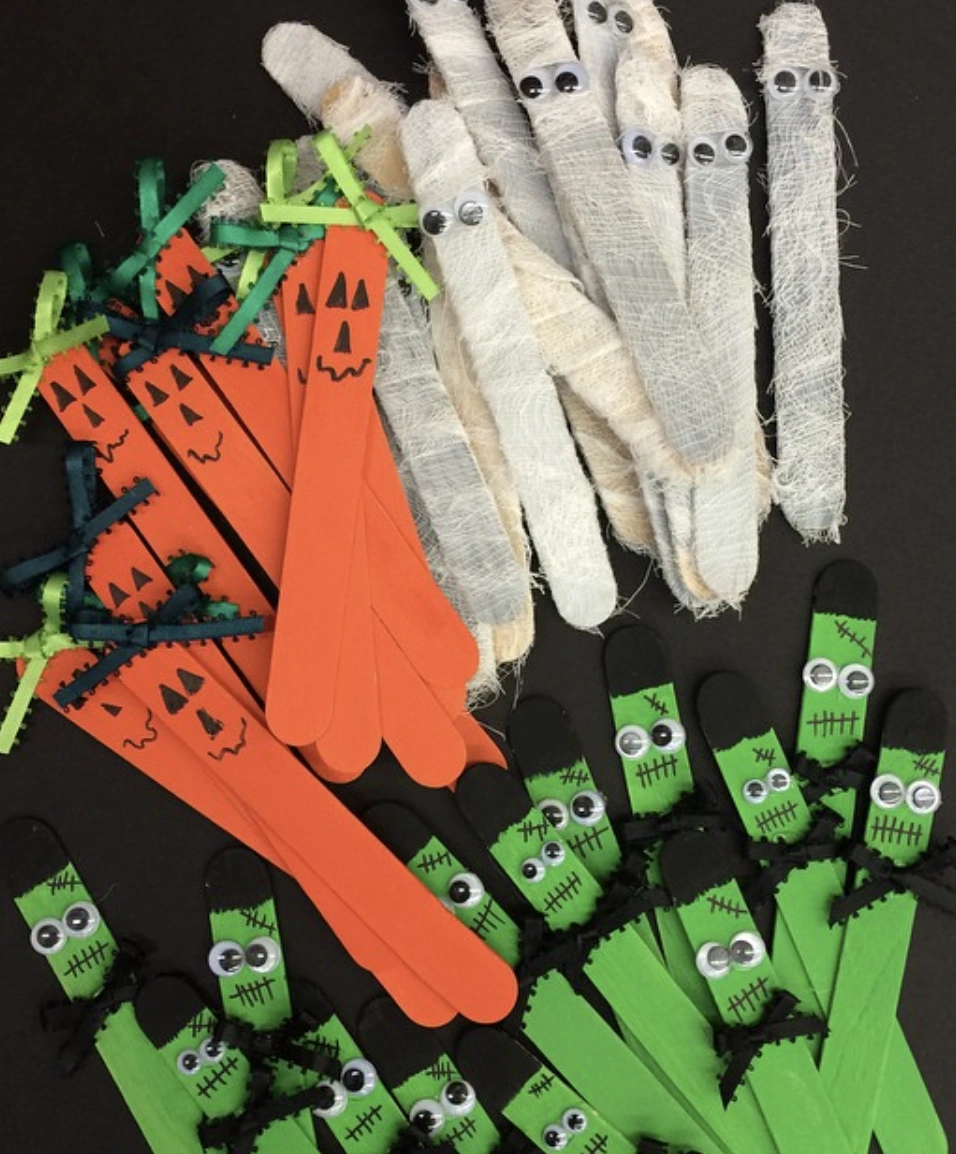
Credit: @bfcrafts
Are you looking for a super simple, inexpensive Halloween craft that the kids can genuinely manage on their own? This Popsicle Stick Art is the answer.
Forget about complicated patterns or the need for a million different supplies. Paint, googly eyes, and some ribbon, that’s it.
Suddenly you’ve got adorable Frankensteins, Mummies, and Jack-o’-lanterns. These are tailor-made for little hands, and even better, they pull double duty as cute Halloween decorations. Get that glue gun ready.
How to Make This Craft Obtain popsicle sticks, craft paint (orange, green, white), gauze, and ribbon Paint the sticks appropriately for each character and let dry For mummies, wrap the sticks with gauze and secure with glue Glue googly eyes on all characters Draw faces for pumpkins and Frankenstein characters with a black marker For Frankenstein, add stitch marks on the face with the marker Cut ribbon into short pieces Tie ribbons around the top of each popsicle stick Allow everything to fully dry Scatter around for maximum Halloween impact
Mini Grand Piano DIY: Painted Popstick Craft Creation
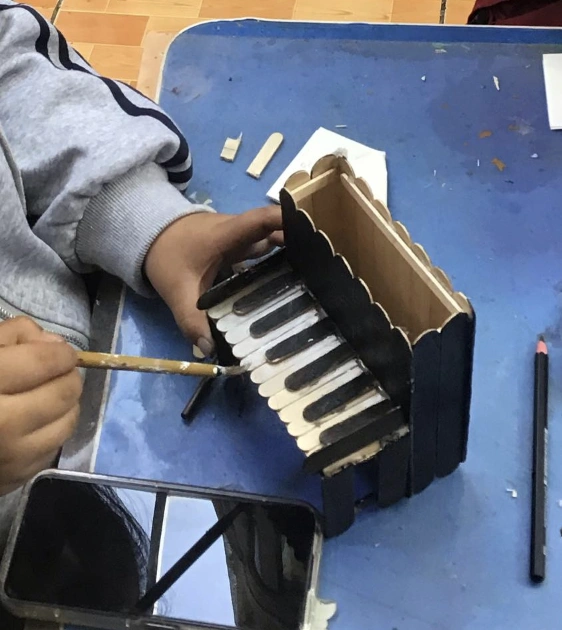
Credit: @snowlandartists
The current endeavor involves attempting a mini grand piano made entirely from popsicle sticks. Spotting this Popstick Craft Diy tutorial online triggered an immediate “challenge accepted” response.
It definitely embodies that Sunday afternoon kind of vibe, you know? Chill music, snacks, and glue covering every surface.
The finished piece is destined as a birthday gift for a niece. Fingers remain tightly crossed that it actually resembles a piano upon completion.
How to Make This Craft Collect popsicle sticks, craft glue, black paint, and a small brush Cut the sticks to different lengths for the keys and frame Assemble the frame of the piano using glue to join sticks together Paint the frame black and allow it to dry completely Create the piano keys by alternating black and white painted stick pieces Glue the keys onto a larger, flat piece of wood forming the keyboard Attach the keyboard to the piano frame Add legs to the piano using small pieces of popsicle stick Build the back of the piano with vertically aligned popsicle sticks Apply multiple coats of paint as needed and let each coat dry
Holiday Cheer: Mini Shelf Using Popsicle Sticks!
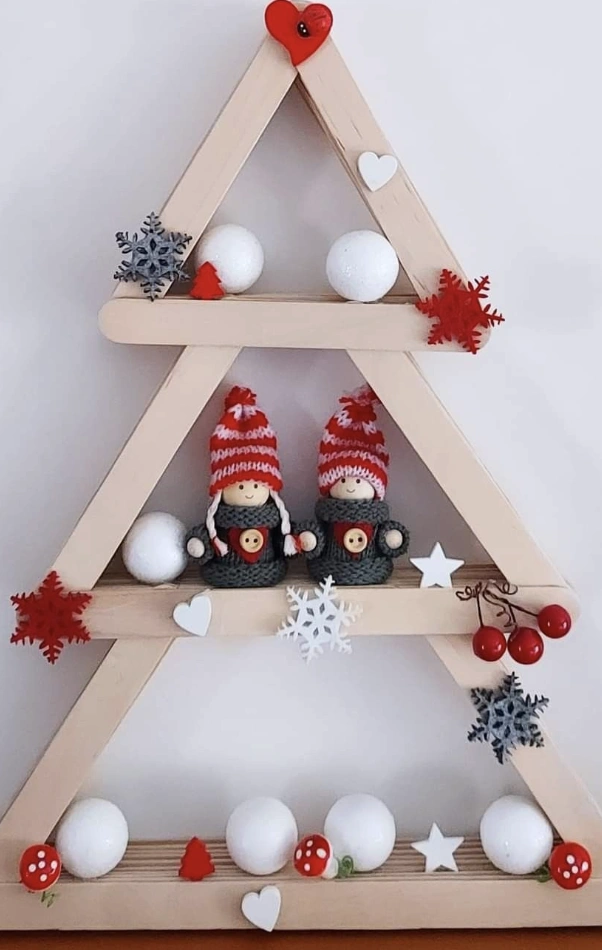
Credit: @juniorsartanddiy
This DIY delivers exactly what’s promised! Whipping up a charming tree-shaped shelf using simple Popsicle Stick Crafts proves seriously easy.
Those tiny dolls and snowflakes layer in the perfect festive touch as well. Carving out time for this next weekend is absolutely happening.
How to Make This Craft Acquire popsicle sticks, hot glue, mini ornaments, and felt Arrange three popsicle sticks into a triangle shape and glue together Glue horizontal sticks within the triangle to create shelves Craft mini gnomes using felt scraps and glue them to the shelves Attach small ornaments, snowflakes, and beads to the tree Glue a small heart to the top of the triangle Attach the ornaments with hot glue to the tree Secure the gnomes to the middle shelf of the tree Let all glue dry completely before moving Proudly display for a touch of whimsical holiday spirit
Modernist Mouse: Upcycled Popsicle Stick Art
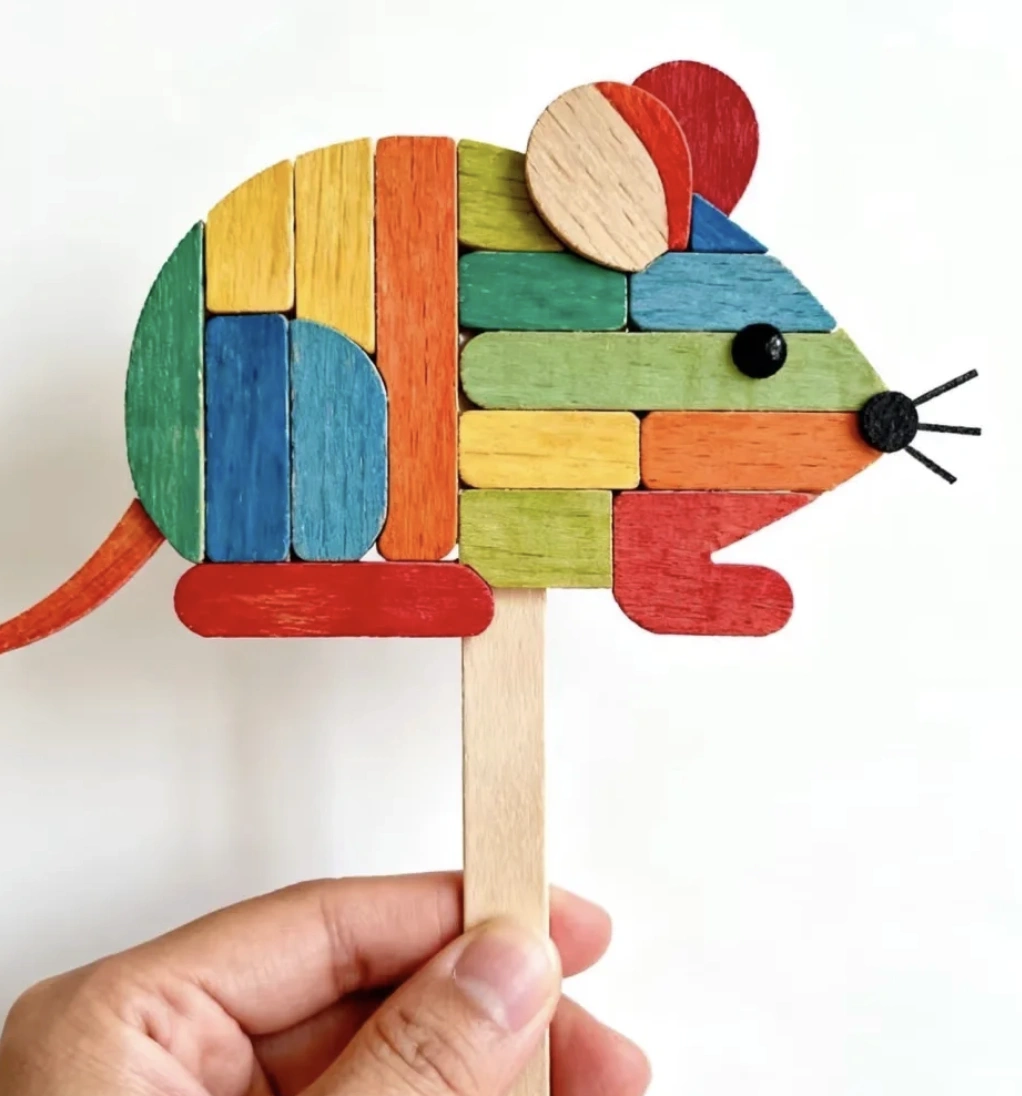
Credit: @paper.art.creation
Remember the crafting craze from roughly 2010? Well, it has officially returned, darling.
This isn’t your grandmother’s decoupage, though. Take this piece, for an example: it delivers major Memphis Group vibes, yet it’s rendered in materials any kid can easily access.
The colors align perfectly with what’s appearing in resort wear this year. Step aside, Popsicle Stick Houses, this mouse is claiming the spotlight now.
How to Make This Craft Source popsicle sticks, craft paint, glue, buttons, and wire Cut the popsicle sticks into various small pieces Paint each stick piece with different colors of paint and let dry Arrange the painted pieces into the shape of a mouse on a flat surface Glue the pieces together one by one, building up the mouse shape Attach a button for the eye and wire for the whiskers Cut out ear shape from red popsicle stick, or felt Glue the tail, ear and whiskers to the mouse Glue the mouse to a popsicle stick as the base Let the glue dry thoroughly for sturdy standing figure
Uplifting Wall Decor Crafted From Painted Popsicle Sticks
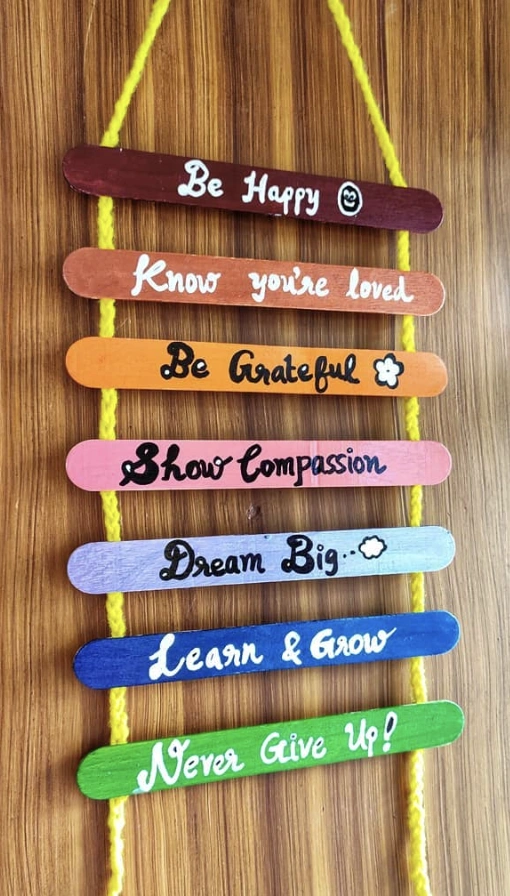
Credit: @pink__pixie__dust
Each stick receives careful painting in a unique pastel hue and displays an inspirational message in elegant lettering. The yellow yarn provides a noticeably softer touch than the twine typically used in similar projects. It stands as a simple, affordable reminder to stay positive and continue growing.
How to Make This Craft Gather 7 jumbo popsicle sticks Paint each stick a different vibrant color and let dry completely Using a fine-tip paint pen, write a positive affirmation on each stick (eg, Be Happy, Dream Big) Grab some brightly colored yarn or string Use hot glue to attach the yarn to each side of the painted popsicle sticks Leave the string between each stick long enough to hang freely Trim excess yarn with scissors Tie a loop at the top of the yarn for hanging Give it a test hang on a wall or door
Family Photo Ornament from Popstick Craft Diy
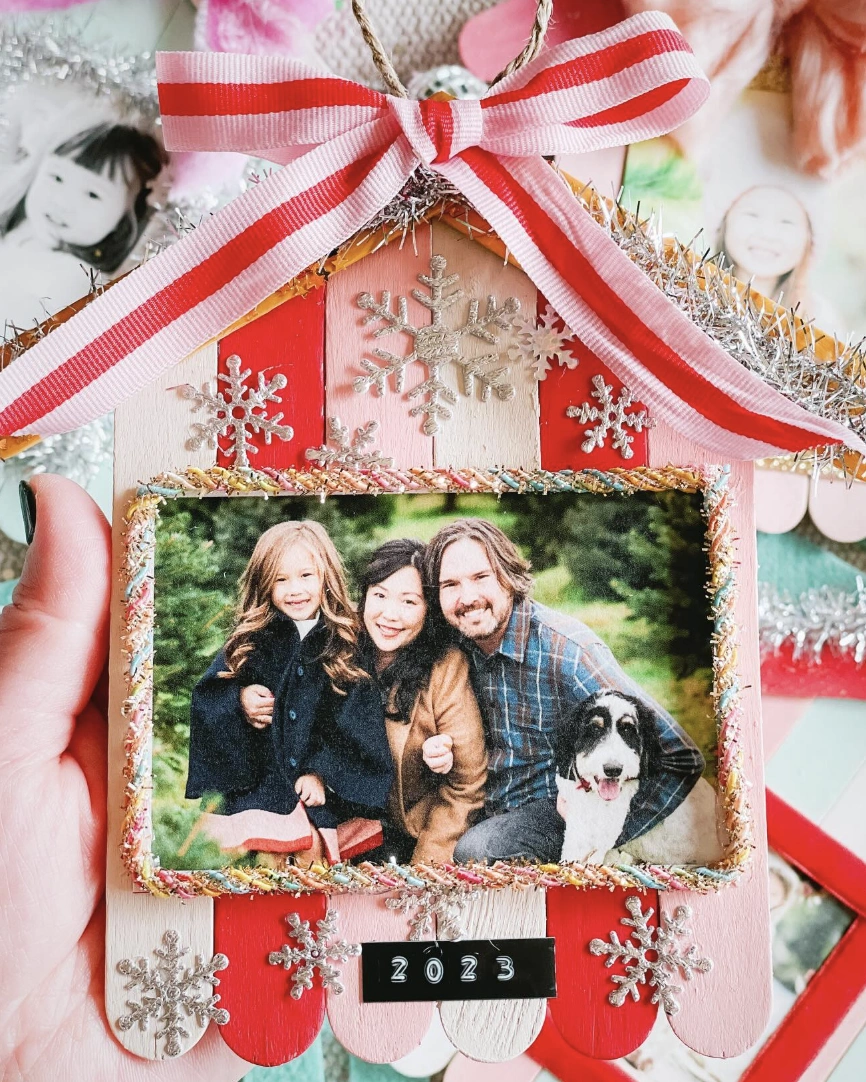
Credit: @magic4cora
This Popstick Craft Diy ornament idea? Genuinely pretty cute.
Here’s the standout feature though: that scalloped popsicle stick bottom gives it a playful, unique silhouette, a welcome change from strictly straight lines. The red and white striped ribbon adds a tasteful touch, simple yet unmistakably festive.
That border around the photo, however, with its sprinkle-like texture, sparks some uncertainty. Overall, though, this reads as a sweet and deeply personal little gift.
How to Make This Craft Start by gluing popsicle sticks into a house shape using craft glue; let it dry solid Paint the popsicle stick house with desired colors Add glitter while the paint is still wet Cut a photograph to fit inside the popsicle stick frame Glue the photograph to the back of the frame Embellish with snowflake stickers, glitter, and tinsel Cut and tie a ribbon bow at the top for a festive accent Attach a loop of ribbon at the top with hot glue to make it a hanging ornament Let everything dry completely before handling
DIY Space Exploration Popsicle Stick Puppets
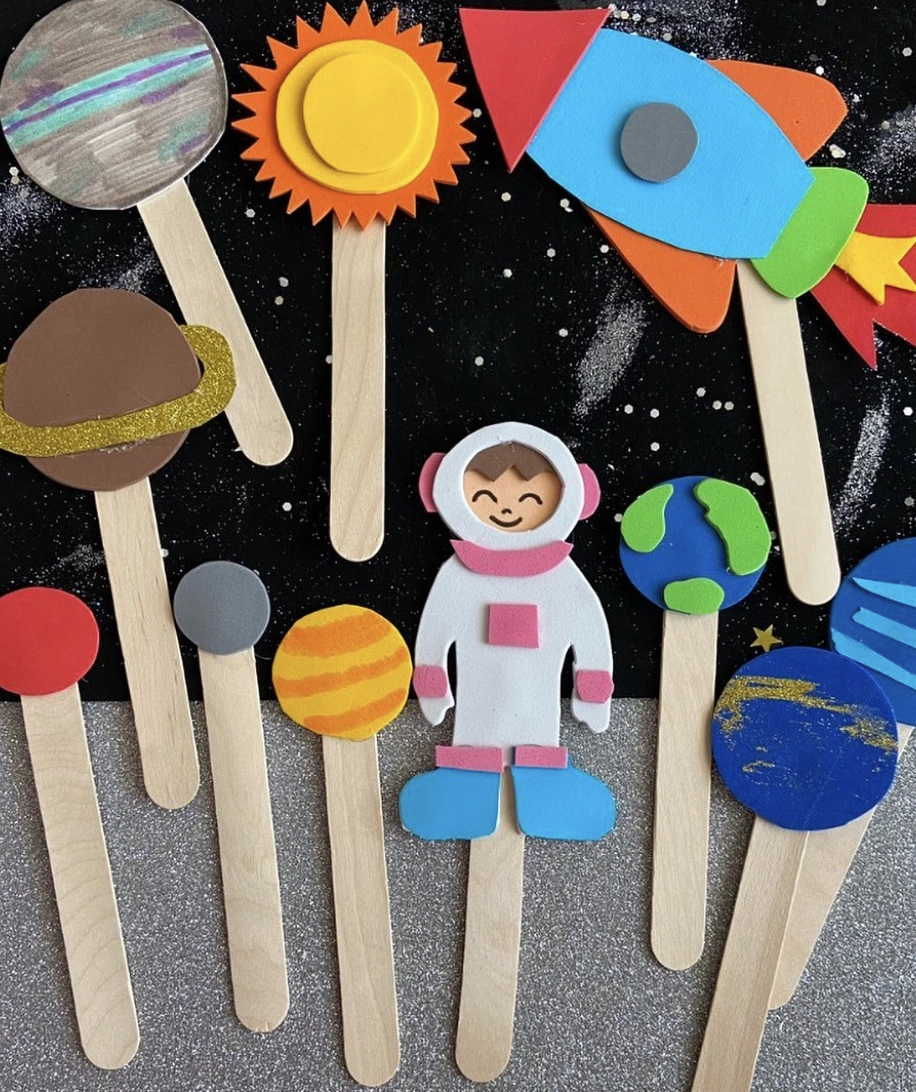
Credit: @kindergarten_ideas_
These could easily become the stars of a kid’s puppet show all about exploring new planets. Seriously, if you’re searching for a fun and easy craft to do with the kids, this type of Popsicle Stick Diy project represents a total win. Just gather some foam, glitter, and allow those creative juices to start flowing.
How to Make This Craft Download or draw templates for planets, a rocket, and an astronaut Cut the shapes out of different colored craft foam sheets Use glitter glue to add details to each shape Affix the foam pieces together to assemble each character Get out a collection of craft sticks Glue the foam shapes onto the end of the craft sticks Cut out and glue on the little astronaut’s face to the astronaut body Let the glue dry
Personalized Popsicle Stick Fireplace Ornament
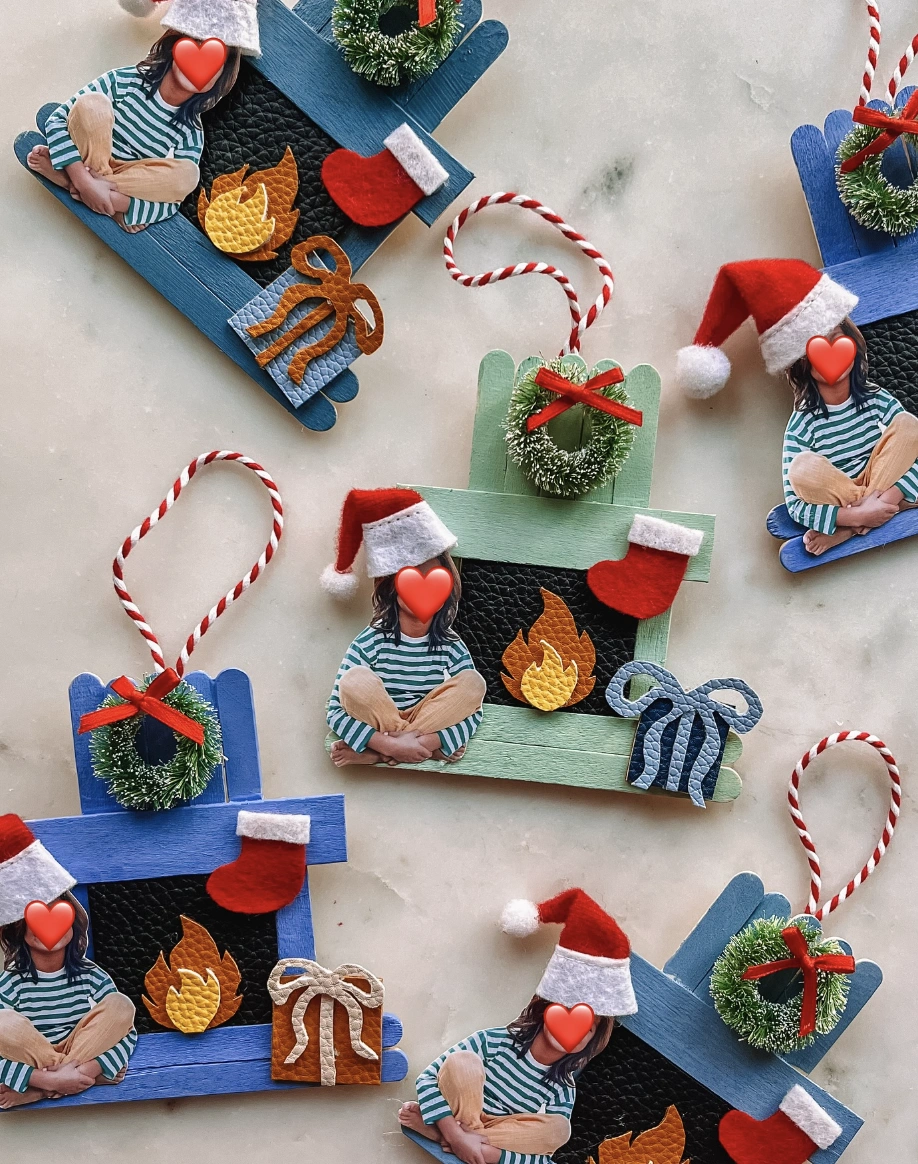
Credit: @studiodiy
That handmade aesthetic appearing everywhere right now has reached peak chic status. These adorable fireplace ornaments utilize photo cut-outs alongside a few strategically placed details.
Employing Popsicle Stick Crafts, they create a truly festive keepsake. These are seriously the cutest little things. They seem destined to become cherished family heirlooms.
How to Make This Craft Construct a rectangular frame with popsicle sticks by gluing them together Paint the frame with desired colors, and let dry Print a small photo of a child to fit within the frame Glue the photo inside the back of the frame Cut out felt shapes to resemble a fireplace (fire, stockings, wreath) Position and glue the felt shapes onto the frame Add a miniature Santa hat to the photo using glue Attach a loop of string or twine to the top for hanging
Easy Snowflake Ornaments from Colorful Popsicle Sticks
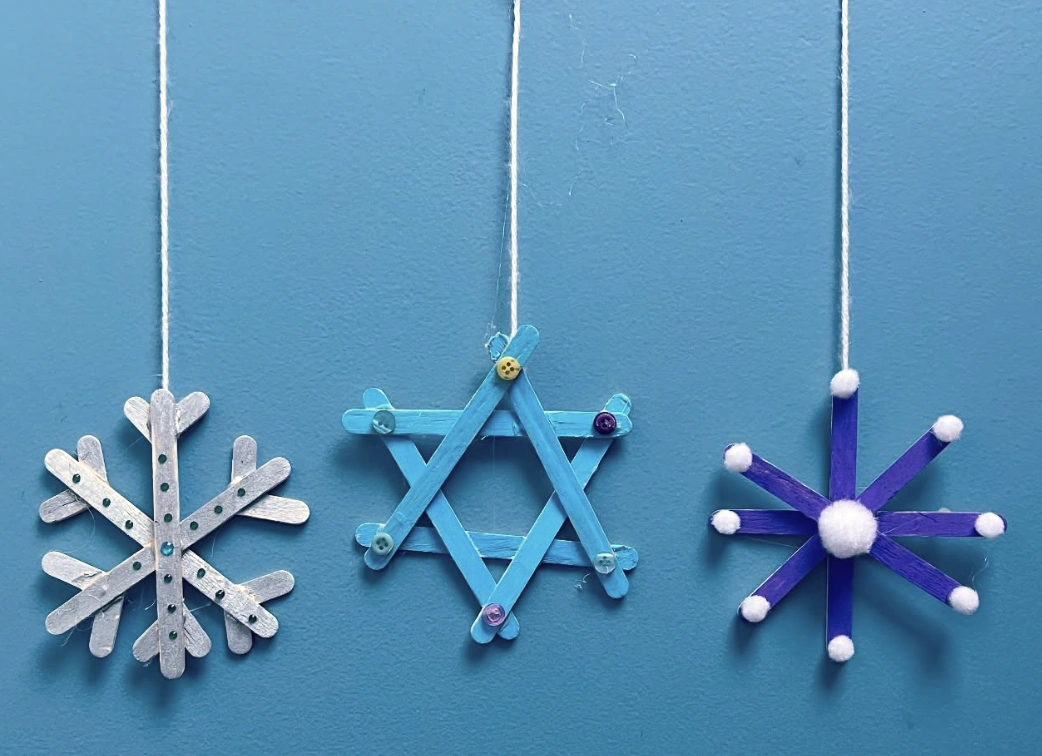
Credit: @keep_them_busy_mom
These popsicle stick snowflakes? Absolutely perfect for distracting the kids for a solid hour.
Even the littlest ones can genuinely lend a hand with this. The current plan involves stringing a whole bunch together to create a garland.
You’d be amazed what emerges from a little paint and creativity. Some cool ideas for Popsicle Stick Crafts For Adults Diy Projects provided the initial spark of inspiration for this. And notably, this involves zero glitter, which is ALWAYS a victory.
How to Make This Craft Gather popsicle sticks, acrylic paint, and small buttons Paint the popsicle sticks in desired winter colors (blue, white, silver, purple) Once dry, arrange 6 popsicle sticks into a snowflake shape, forming a hexagon Glue the sticks together at the overlapping points Select decorative buttons in coordinating colors Glue a button in the center of each snowflake and smaller buttons on the arms Allow glue to dry completely for at least 30 minutes Attach a loop of twine or ribbon to one of the popsicle stick arms for hanging
Colorful Popsicle Stick Fish with Googly Eyes
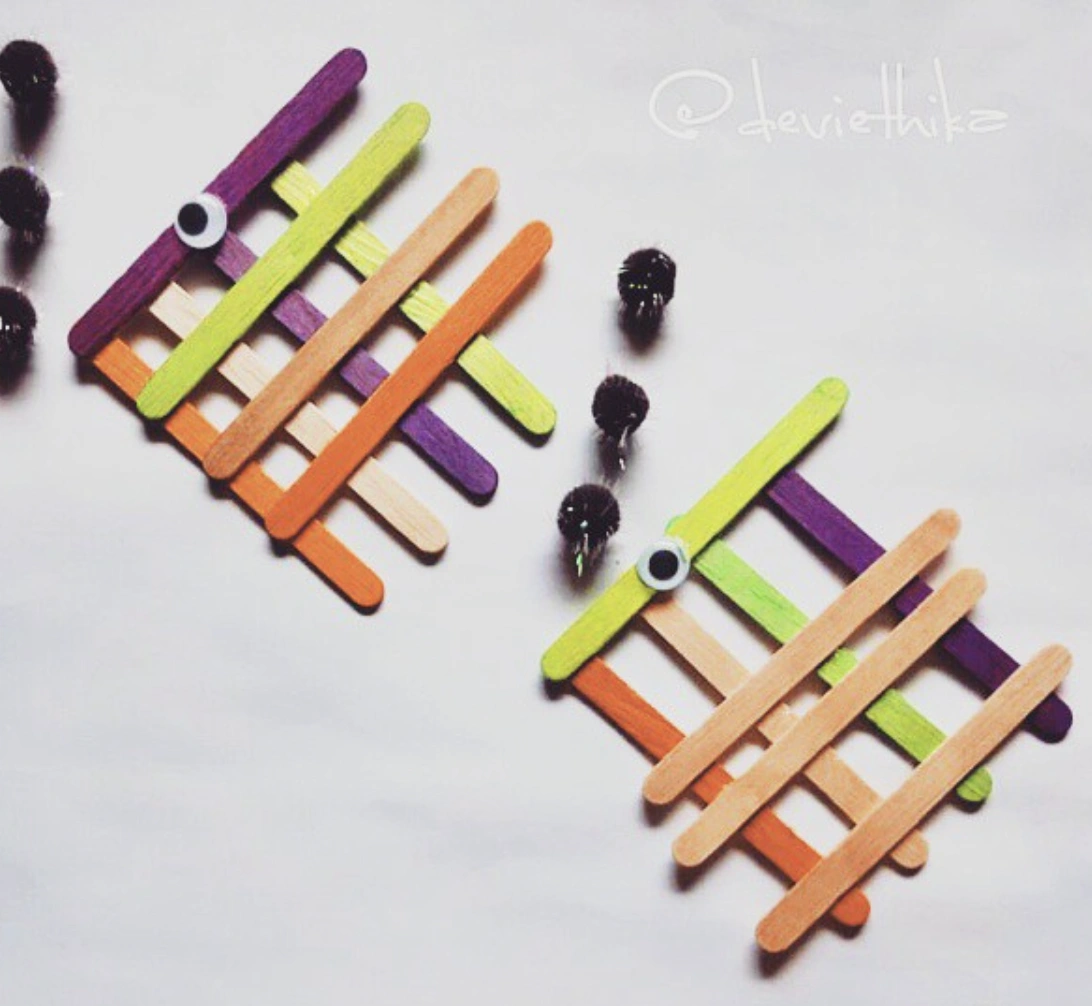
Credit: @deviethika
This creation completely embraces a kindergarten-chic aesthetic, but absolutely in the best possible way. These popsicle stick fish are seriously adorable and present the perfect activity for a rainy day.
Even adults would likely find themselves drawn into this project. It’s all about embracing that inner child, you know? These come together with remarkable ease and serve as a wonderful introduction to Stick Crafts For Kids, or for anyone craving a relaxed creative session.
How to Make This Craft Gather popsicle sticks in various colors Lay five sticks parallel to each other Glue five more sticks diagonally across the parallel ones Trim edges to form a roughly rectangular shape Attach a googly eye to one end with glue Add a small black pompom nearby to create the impression of a fin Repeat for a second sea creature
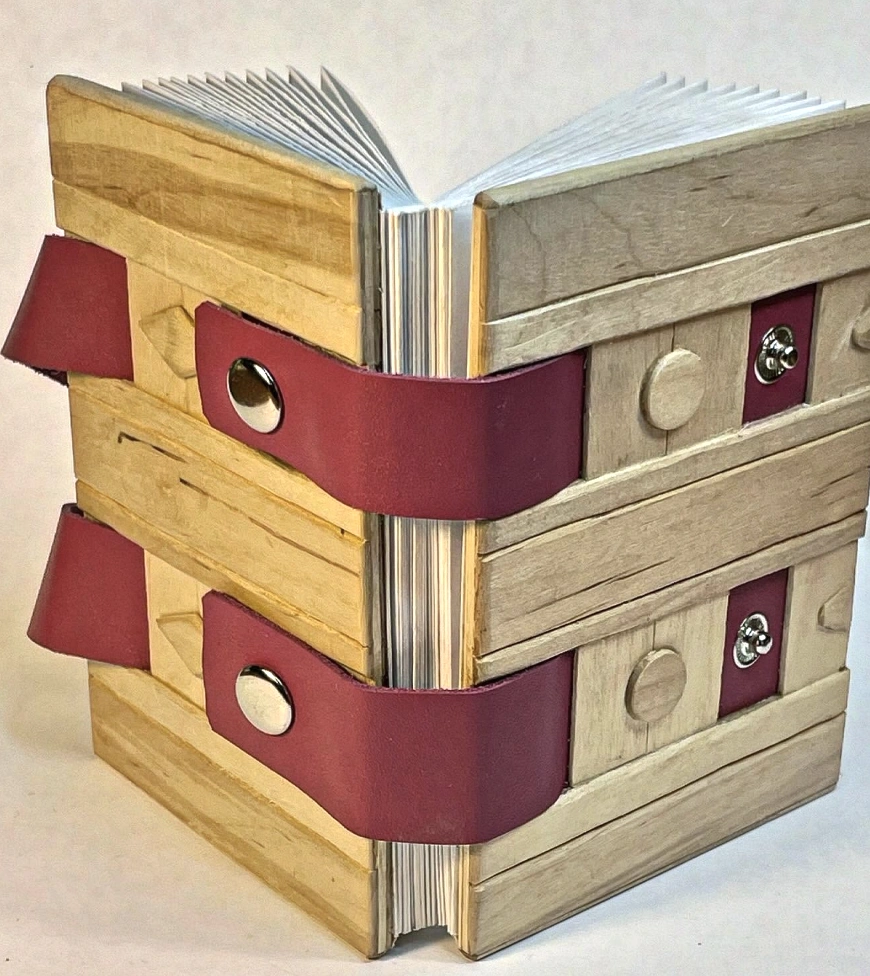
Wood Block Journal with Burgundy Leather Straps
Credit: @z.imaginarium
Forget those mass-produced notebooks entirely because this thing is handmade. It’s crafted from wood, existing almost like an elevated Matchstick Craft.
The burgundy leather straps and metal buttons lend it a genuinely luxe feel, however. This would serve perfectly for documenting all manner of travel adventures, or sketching out new outfit ideas. What’s the general verdict on this one?
How to Make This Craft Cut wood planks to desired cover size and sand edges Drill holes along the spine edges of each cover plank Bind blank pages together with strong thread to create the book block Construct spine to connect the front and back cover Fashion leather straps with metal snaps Attach the leather straps to the covers using rivets or glue Add decorative hardware to the covers, such as small metal buttons Ensure all pieces are securely fastened
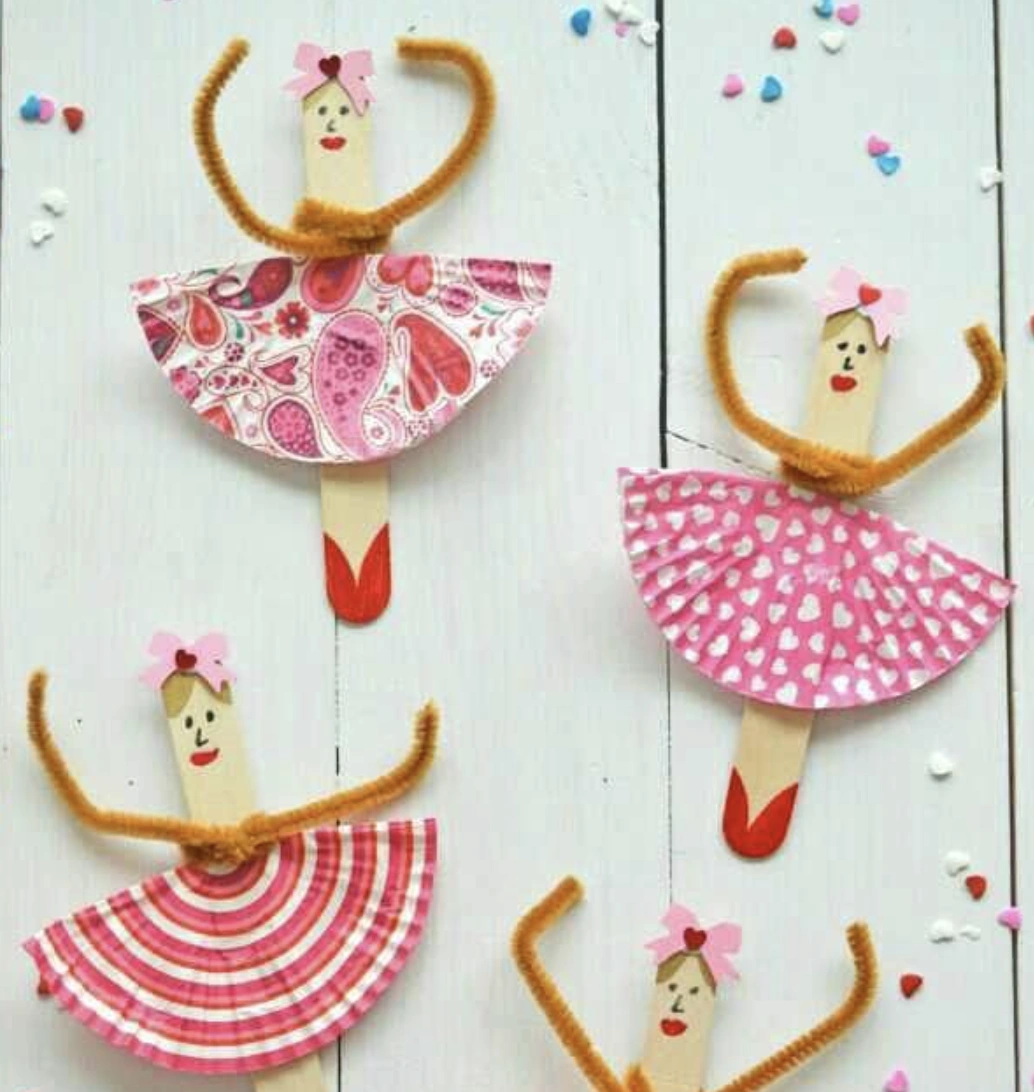
Popsicle Stick Ballerinas with Paper Cup Tutus
Credit: @clorik_com
These tiny dancers are just completely adorable. Consider them as wall decor for a child’s room.
They can also be glued to a magnet, making them perfect for decorating the fridge. The idea of using patterned paper cups for each tutu adds such a unique touch to every figure.
Those pipe cleaner arms deliver a wonderfully playful element. These Craft Stick Projects offer so much fun for kids to get involved with.
How to Make This Craft Paint popsicle sticks with skin-tone colored paint Draw faces on the painted popsicle sticks with markers Fold a cupcake liner in half and then in half again to create a skirt Glue the cupcake liner skirt onto the lower half of the popsicle stick Bend pipe cleaners to form the arms of the ballerina Attach the pipe cleaner arms to the back of the popsicle stick Add a small bow to the top of the popsicle stick as a hair accessory Optional: Decorate the cupcake liner with glitter or other embellishments
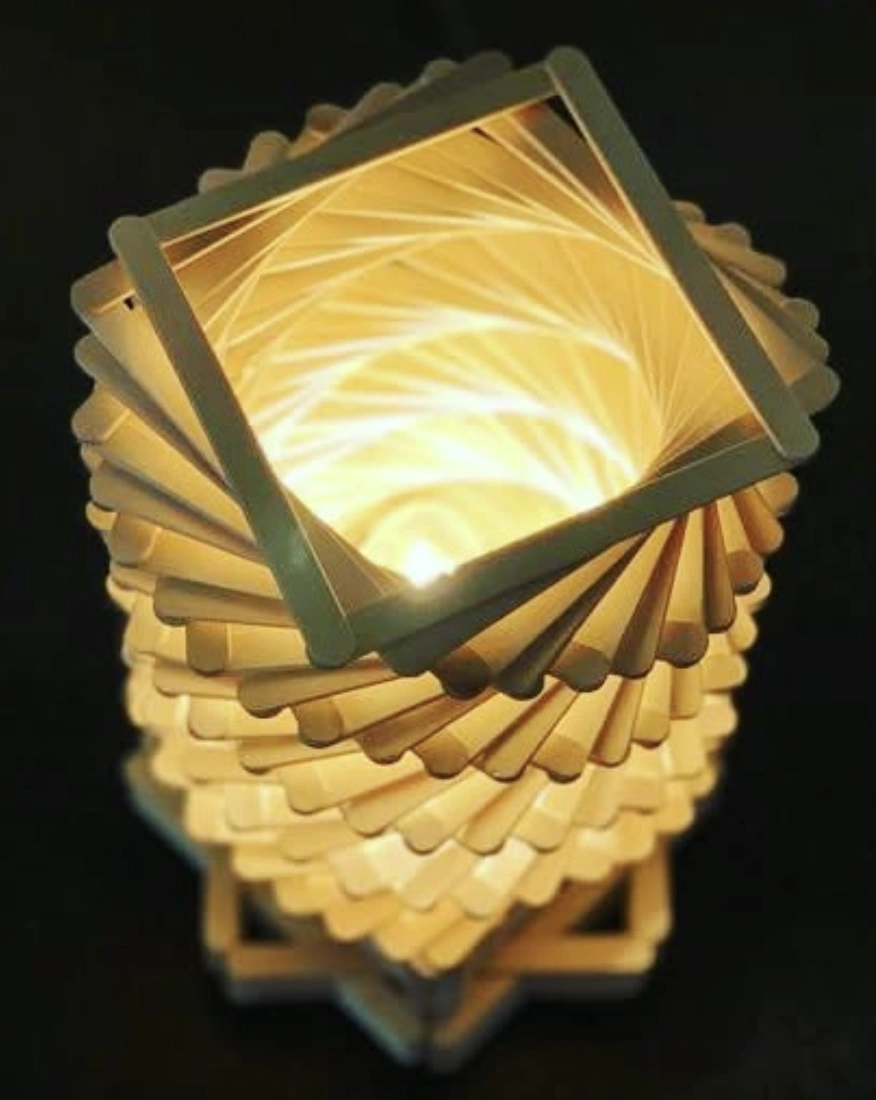
DIY Swirl Lamp Made From Popsicle Sticks
Credit: @craftyyworld.01
This is so much cooler than any attempt at Popsicle Stick Art from elementary school memories. Check out that swirling pattern created by the popsicle sticks, that is just incredibly clever.
The squared-off borders are especially appealing, giving it a modern edge, and the way the light shines through is magical. Actually trying this with the kids might be on the horizon, perhaps on a very patient day.
How to Make This Craft Begin by creating a square base with popsicle sticks Construct a second square base, slightly smaller, and glue it on top Start gluing popsicle sticks vertically between the two squares, leaning inwards Continue adding sticks, rotating the angle slightly each layer to create a spiral effect As you move upwards, decrease the diameter of each layer Frame the top with another square made of popsicle sticks Leave an opening at the top for the lightbulb Insert a string of LED lights or a small lamp into the base
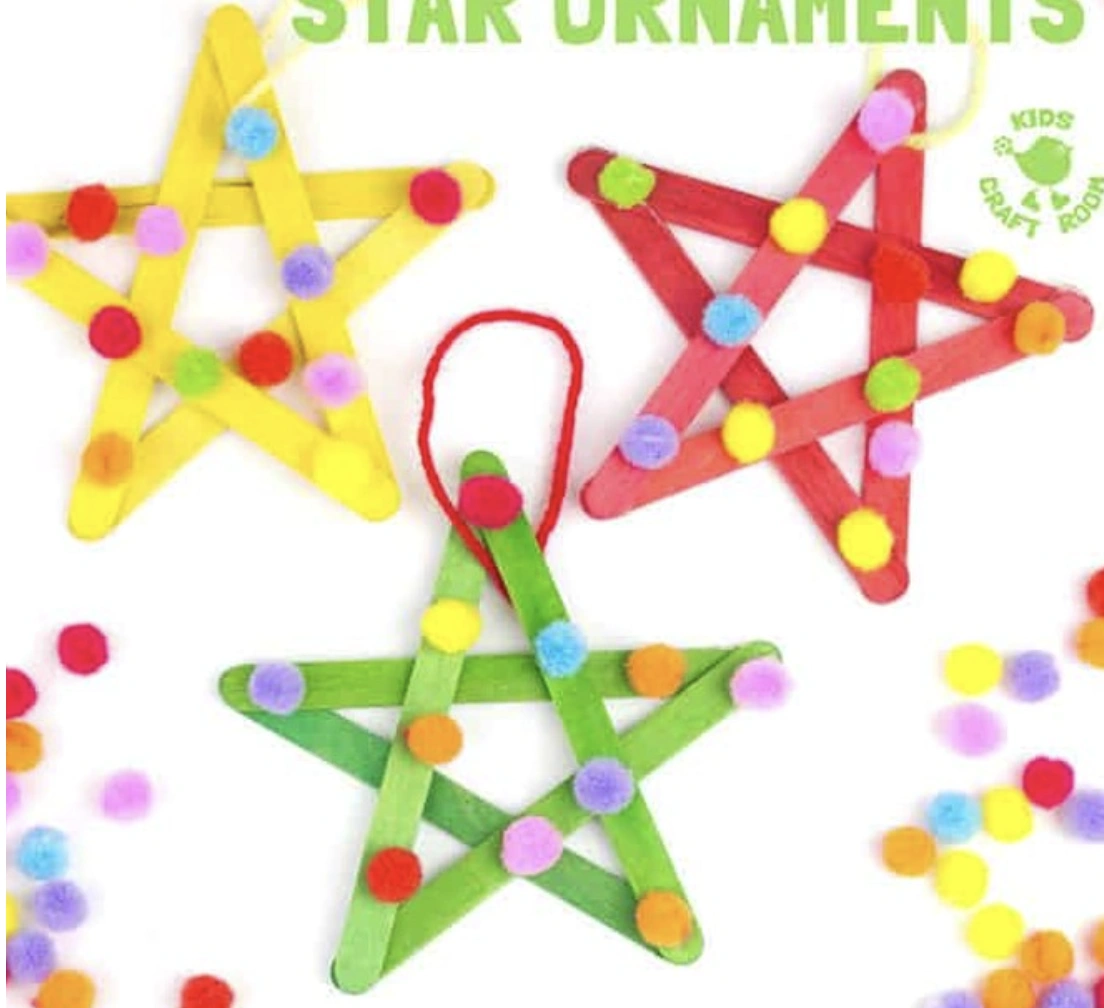
Colorful Pom-Pom Star Ornaments DIY Project
Credit: @kidscraftroom
Seriously, anyone passionate about super-easy crafts with a massive adorable payoff is going to completely flip for this. It also provides a brilliant way to keep the little ones occupied, a perfect alternative to screen time.
Remember those Things To Do With Popsicle Sticks books? This feels pulled directly from one of those pages.
They’re so wildly festive and cheerful, perfect for the holiday season. These would absolutely find a home on the tree this year.
How to Make This Craft Arrange five popsicle sticks into a star shape Glue the sticks together at each point Paint the star using your chosen color of acrylic paint Let the paint dry completely Choose an assortment of small, colorful pom-poms Glue the pom-poms randomly across the star Cut a short piece of string or yarn Glue the ends of the string to the back of one of the star points to create a hanger
Final Thoughts
Okay, a genuine sense of excitement is building to start on the next popstick craft diy project. Hopefully, a wave of inspiration has arrived for you as well.
There’s something deeply satisfying about transforming such a simple object into something wonderfully cool. So go ahead, grab a handful of those sticks and let’s discover the amazing things that can be created together.