


You know that feeling when a sudden burst of creative energy hits and you absolutely have to build something with your hands? That moment is pure magic. Getting lost in a Cricut project delivers exactly that kind of thrill.
The possibilities stretch out forever, honestly. Custom presents, stunning home accents, little wearable surprises… the crafting momentum never really stops.
Ready to jump into a universe of brilliant Cricut projects? Exploring fresh DIY ideas together is half the fun, whether that means refreshing your closet with clever Cricut shirt designs or something totally different.
Let’s wake up your inner maker and chase some serious inspiration!
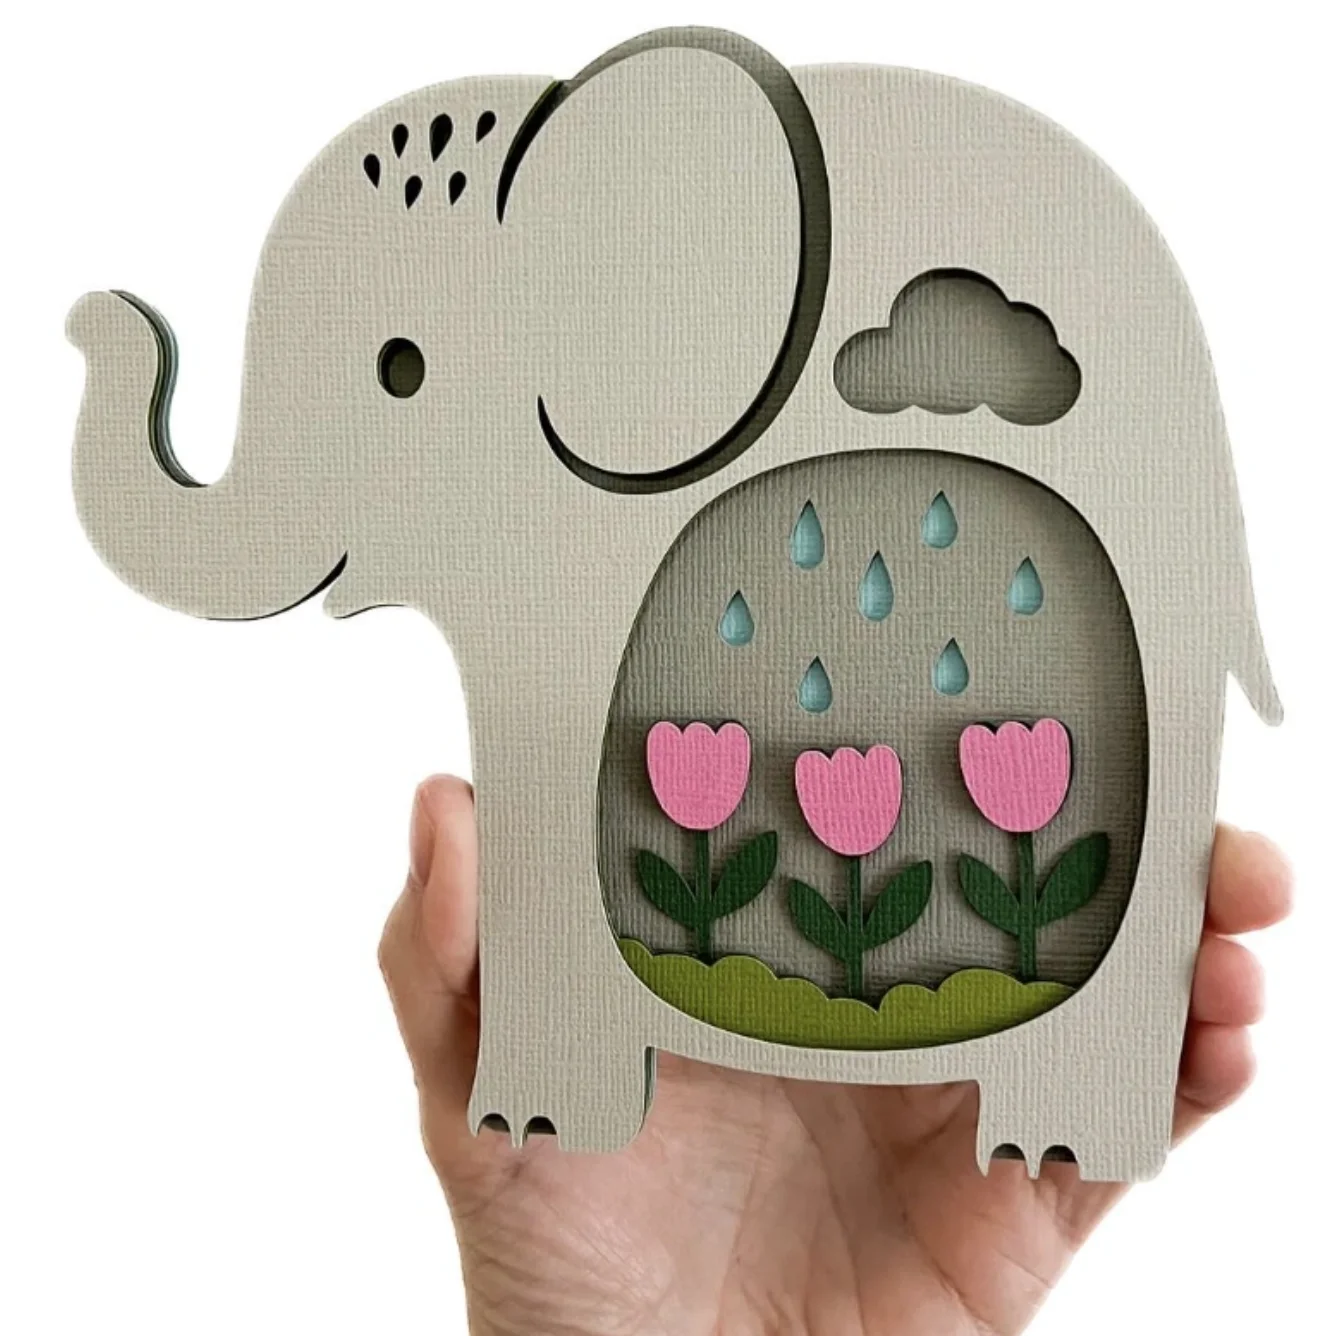
Paper-Cut Elephant with Tulips and Raindrops Shadowbox
Credit: @digital_gems
Isn’t this paper elephant just the sweetest thing? It radiates pure springtime energy with those delicate tulips and tiny raindrops.
Picture this tucked into a cozy nursery corner, absolutely perfect, right? You could easily build an entire gallery wall around pieces like this.
If charming Cricut Gift Ideas are on your mind, this handmade treasure fits the bill beautifully. It would even brighten up a workspace instantly.
How to Make This Craft Find or create a template for an elephant outline Trace the template onto a piece of light gray cardstock and cut it out This is your base layer Create a smaller elephant outline, remove its belly, and adhere it to the base for the second layer Cut out shapes like a cloud, raindrops, tulips and grass from green and pink cardstock Adhere the tulip stems to the back of the cut out belly, and then the grass, and finally the flowers Place the cloud shape behind the hole at the top of the belly Adhere the raindrops using double sided tape above the tulips for dimension Embellish the elephant with eye, tail and ear markings
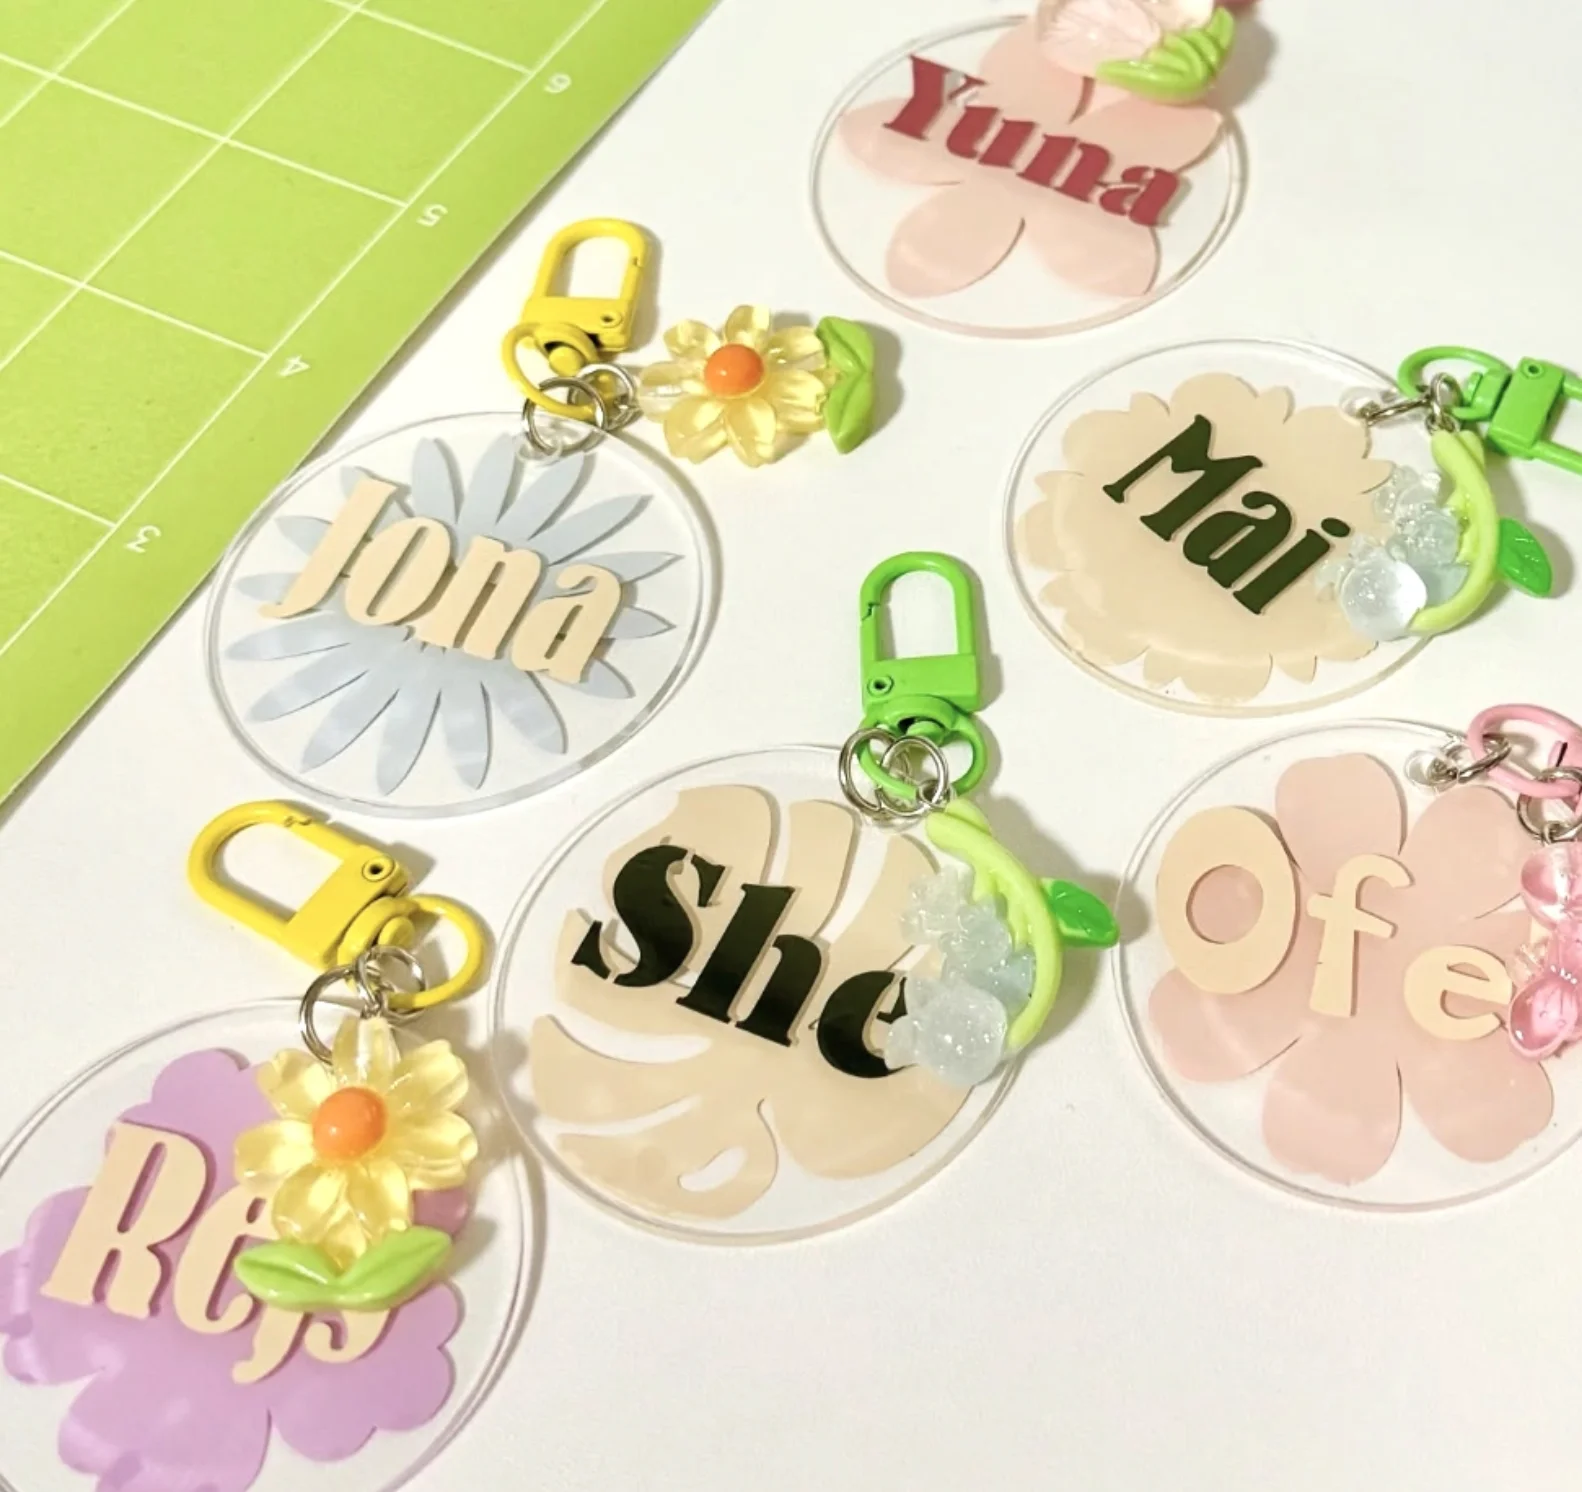
Personalized Acrylic Keychains with Floral Embellishments
Credit: @kbdcollective
There’s something so fresh about these keychains, perfectly matching the current obsession with customized accessories. The layered acrylic brings a whisper of sophistication, balanced by the whimsical feel of those dimensional flowers.
Hunting for standout DIY projects? These little beauties offer a spark of genius for future Cricut shirt ideas, just imagine translating those delicate design elements onto a simple tee. Endlessly useful and quietly elegant.
How to Make This Craft Design names or initials in a font you love using design software Load colored adhesive vinyl into your cutting machine and cut the designs Weed away excess vinyl around your text Transfer the names onto clear acrylic blanks using transfer tape Embellish with 3D floral cabochons using craft glue Attach jump rings to keychains Add swivel clasps, mini flowers and embellishments Allow glue to fully dry before attaching keys Test the keychain with a few keys for durability
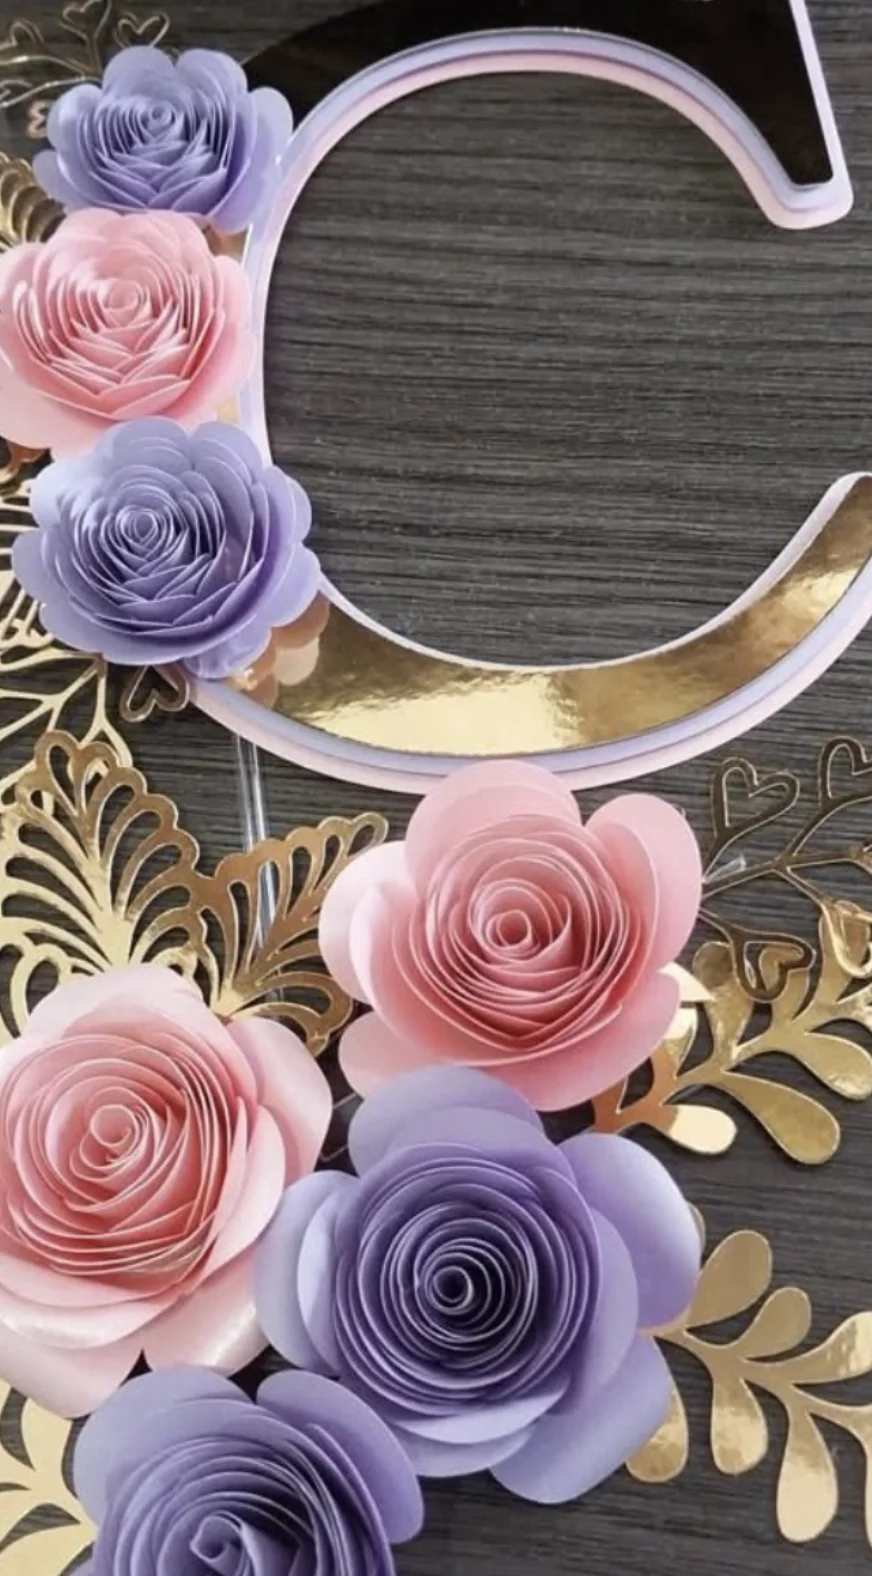
Letter -C- Embellished with Pastel Paper Roses and Golden Accents
Credit: @99svg.cricut
Remember when getting custom cake toppers meant a whole complicated process? Hunting for the right font, the perfect shade, total headache!
Those days are gone because now you can whip together a showstopper for any celebration in minutes. Who knew something so stunning could also feel this effortless?!
The gentle pastel roses create such a mood. Completely smitten over here.
How to Make This Craft Using design software, create your desired letter, approximately 5 inches tall Cut the letter from gold mirrored cardstock using a cutting machine Cut petals for roses from pink and purple cardstock Shape the petals around a pointed tool to give them dimension Start by tightly coiling a petal around itself to form the rose’s center Continue adding petals, overlapping them slightly, until the rose is the desired size Glue the paper roses and laser cut leaves around the laser cut letter, starting with the center Add a clear acrylic stick to the back of the letter using strong adhesive
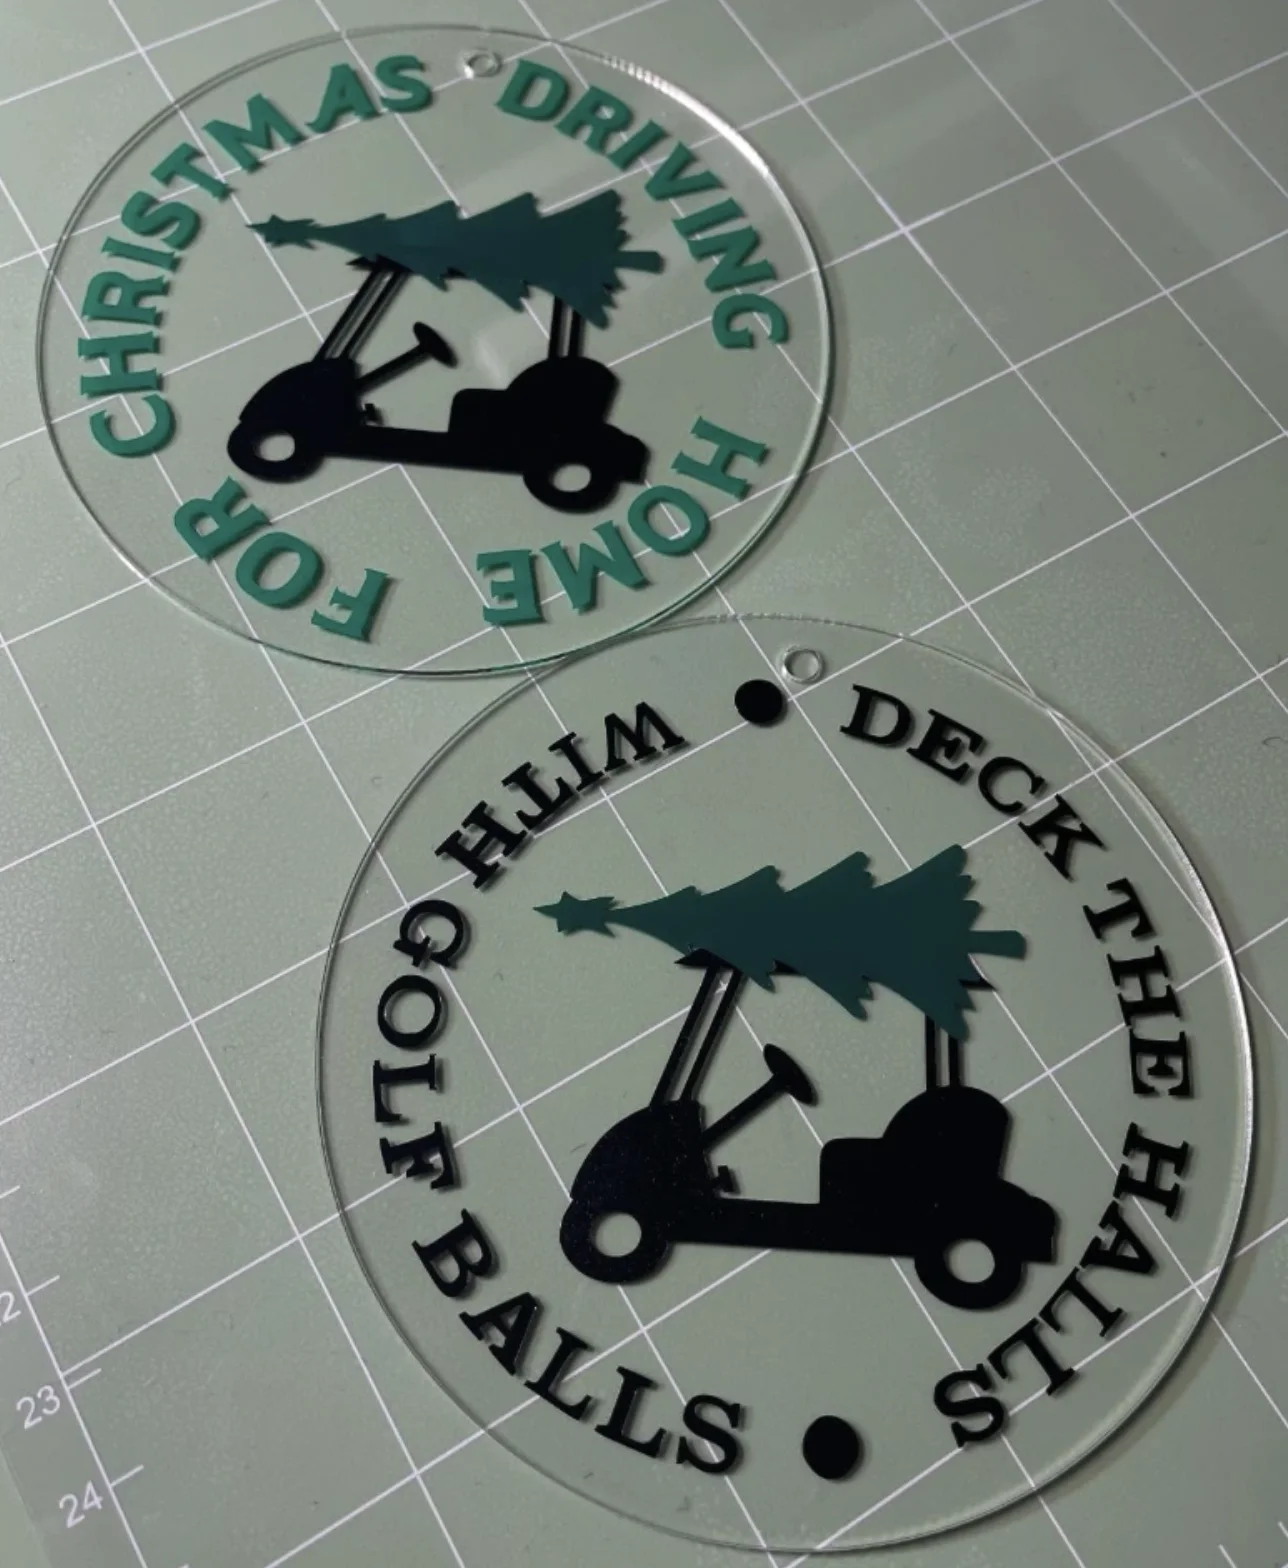
Clear Acrylic Christmas Ornaments: Golf Cart & Tree Vinyl Decals
Credit: @debz_meldrum
Basic store-bought decorations are fine, sure, but these actually tell a story! You spot generic holiday patterns everywhere, don’t you?
These, however, are crystal clear acrylic rounds brought to life with vinyl and a cutting machine! What steals the show is that golf cart hauling a Christmas tree, a total dad pleaser. These Cricut maker projects feel infinitely more meaningful and truthfully, way more entertaining to assemble than grabbing something mass-produced off a shelf.
How to Make This Craft Select golf-themed SVG design for each ornament Upload the design into your cutting machine’s software Size the design to fit onto your acrylic blank Cut the design from green and black adhesive vinyl Weed the excess vinyl from the designs Apply transfer tape to each weeded design Center the design onto the clear acrylic ornament blank Burnish the transfer tape well before peeling away Add a ribbon or string for hanging Make it a tradition to gift these at your next golf outing!
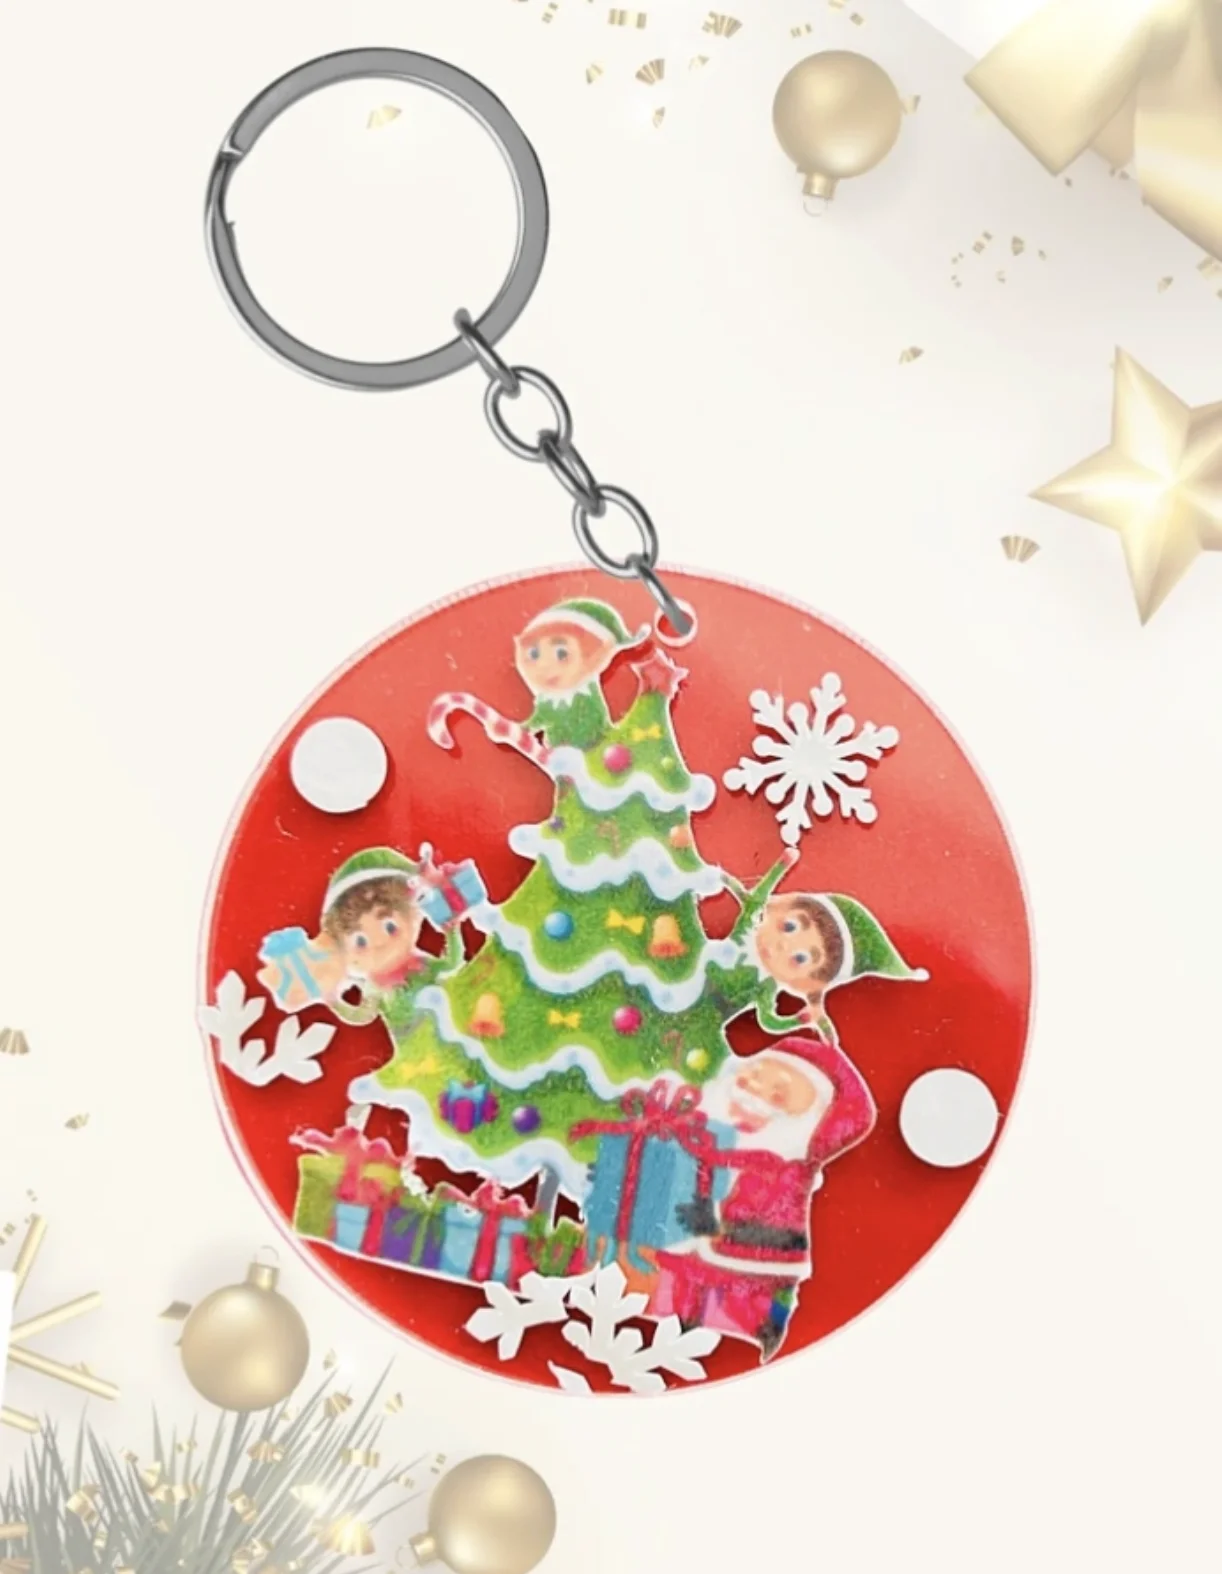
Red Acrylic Christmas Scene Keychain with Elves and Santa
Credit: @artist_meet
This little keychain bursts with charm! Clipping it onto your bag for a festive party or a wander through a holiday market feels exactly right.
It captures the seasonal spirit without shouting too loudly. A younger relative of mine churns out similar treasures each Christmas, she absolutely dives deep into those Cricut Projects! Definitely a joyful tiny accent that sprinkles extra cheer onto your daily routine when the holidays roll around.
How to Make This Craft Gather small Christmas-themed stickers and embellishments Choose silicone molds in round shape for your keychains Prepare epoxy resin according to package instructions Pour a thin layer of resin into the mold Place Christmas stickers and embellishments onto the resin Add more resin to encapsulate all elements, pop any bubbles Let the resin cure completely as per instructions Remove the hardened resin shape from the mold Drill a small hole at the top of the keychain charm if needed Add a jump ring and keyring hardware to complete the project
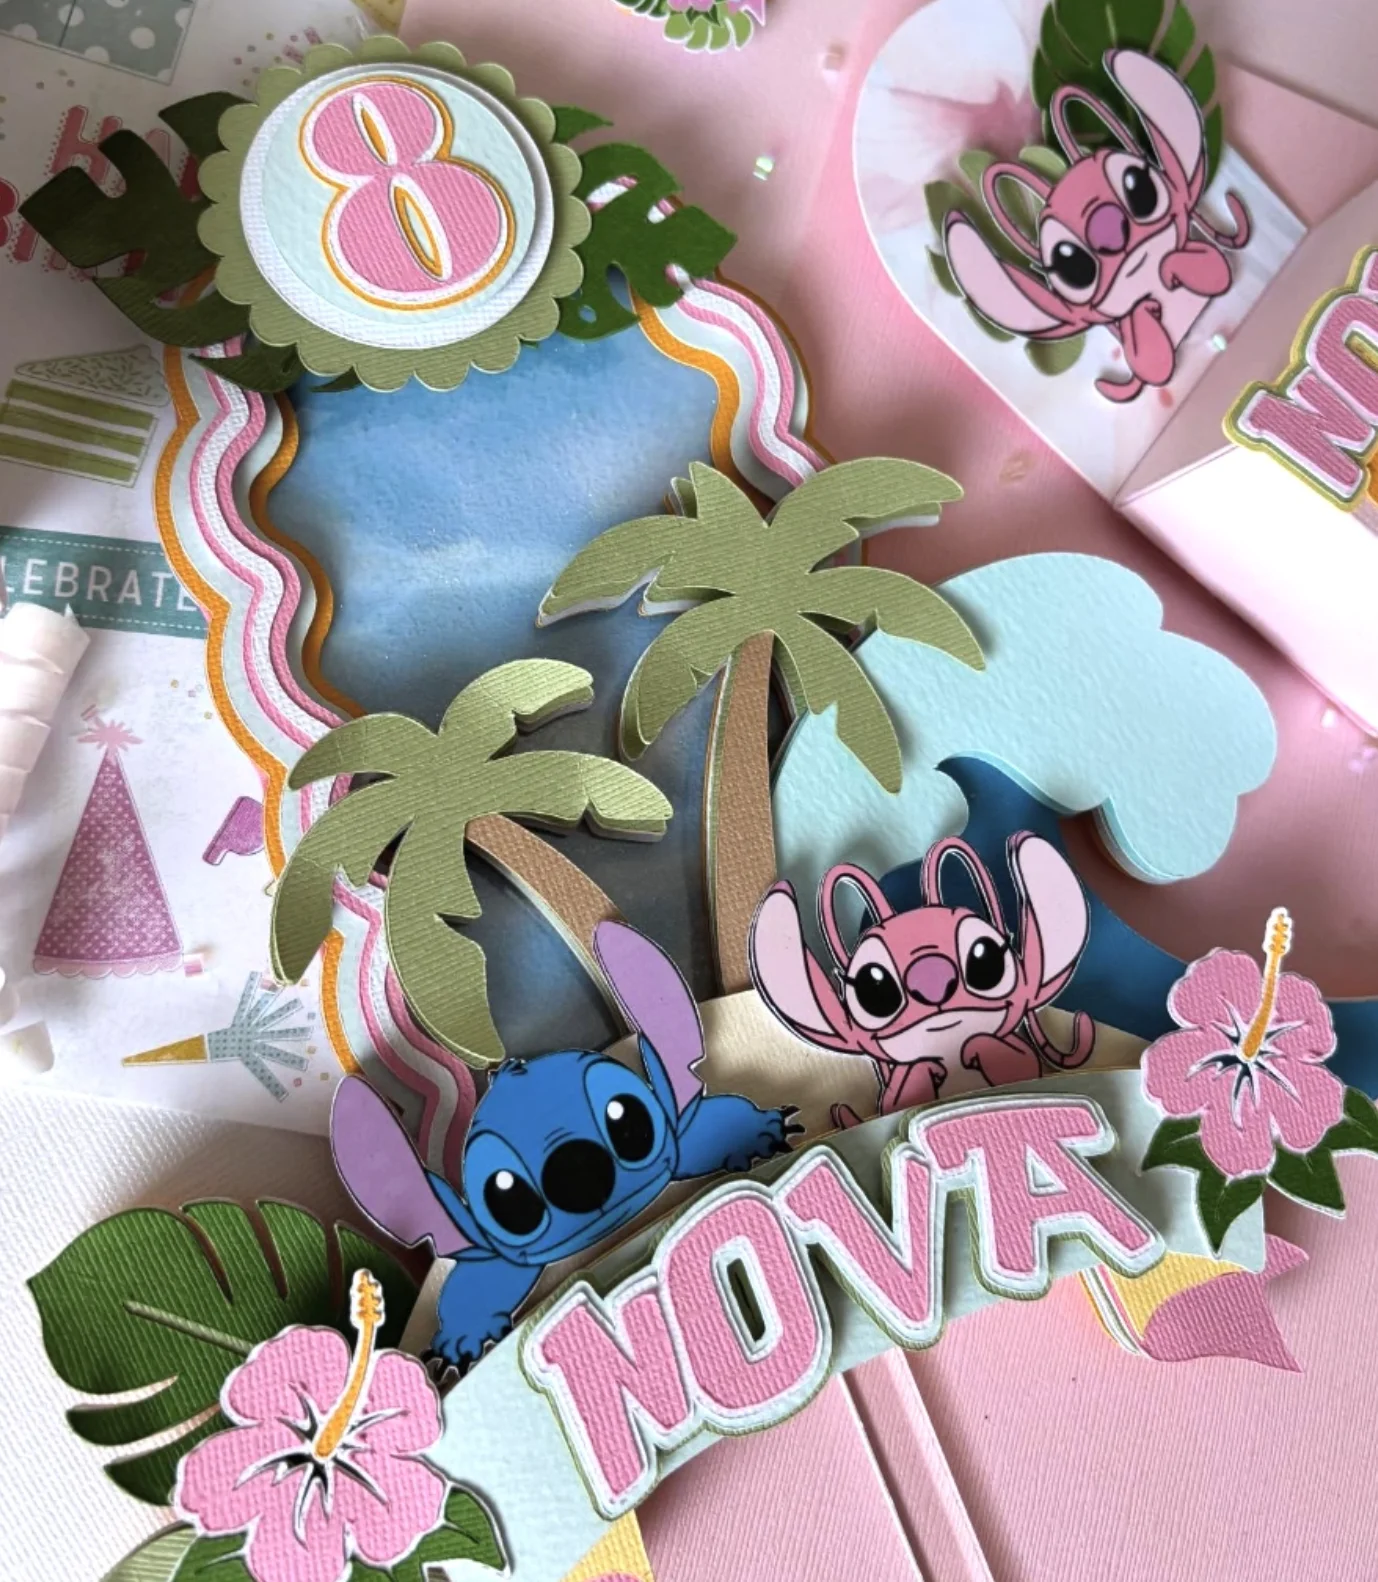
Layered Stitch Luau Birthday Party Decor
Credit: @by.designd
Luau themes are exploding in popularity everywhere, and giving it a Stitch birthday twist feels brilliantly fresh. Those layered paper accents are pure magic, I mean, look at those sweet little palm trees!
For that ultimate customized flair, imagine scaling this design onto a birthday tee. If simple yet personalized looks call your name, a universe of Shirt Ideas Vinyl approaches awaits your discovery. Let the crafting begin, pals!
How to Make This Craft Download template and cut out layers using a cutting machine or by hand Assemble base layer shapes using adhesive foam squares for dimension Glue larger background pieces (like the ocean and sky) to the base Affix the palm trees and other landscape elements with glue dots Apply adhesive to the back of the character cutouts Center character cutouts on the topper Construct number and name elements and attach to the central design Add decorative accents such as flowers to selected areas of the topper Inspect and reinforce all adhesive joints Attach topper to support sticks using strong glue
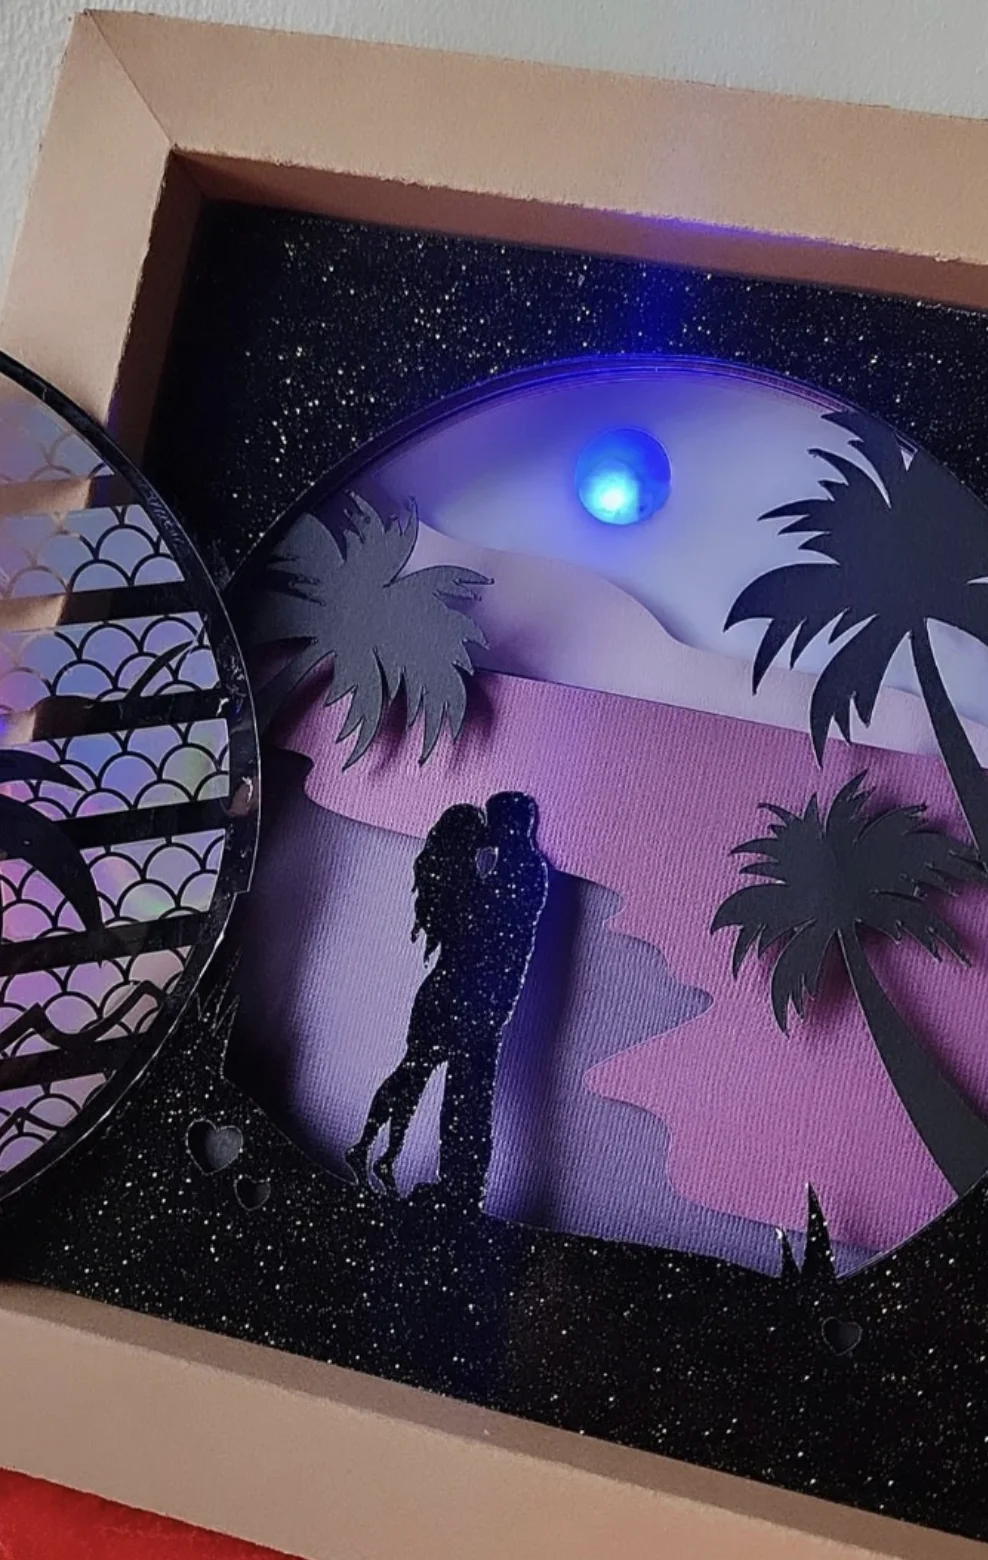
Layered Papercut Shadow Box with Kissing Couple Under Palm Trees
Credit: @cricut_th
This one speaks directly to the incurable romantic inside all of us, darling. The shadow box practically whispers “escape to paradise.” It manages to be both surprising and classic, serving as an ideal conversation piece perched on a desk or a shelf.
Anyone who loves weaving a deeply personal thread into their surroundings will fall hard for making this. Dive into those creative Diy Cricut Projects and let your own anniversary or dream vacation memories take physical shape. Building this brings pure joy.
How to Make This Craft Obtain a shadowbox frame and cut assorted colors and textures of card stock Trace or print silhouettes of trees, mountains, and a couple onto the card stock Carefully cut out the shapes using a precision craft knife Begin layering the cut-outs inside the shadow box, starting with the background Insert the silhouette of the couple in the foreground Affix small LED lights behind the layers for illumination Connect the battery pack or power source to the LEDs Test the lighting effect and adjust the LED placements if needed Seal the shadowbox frame Display in a dimly lit area to accentuate the romantic scene
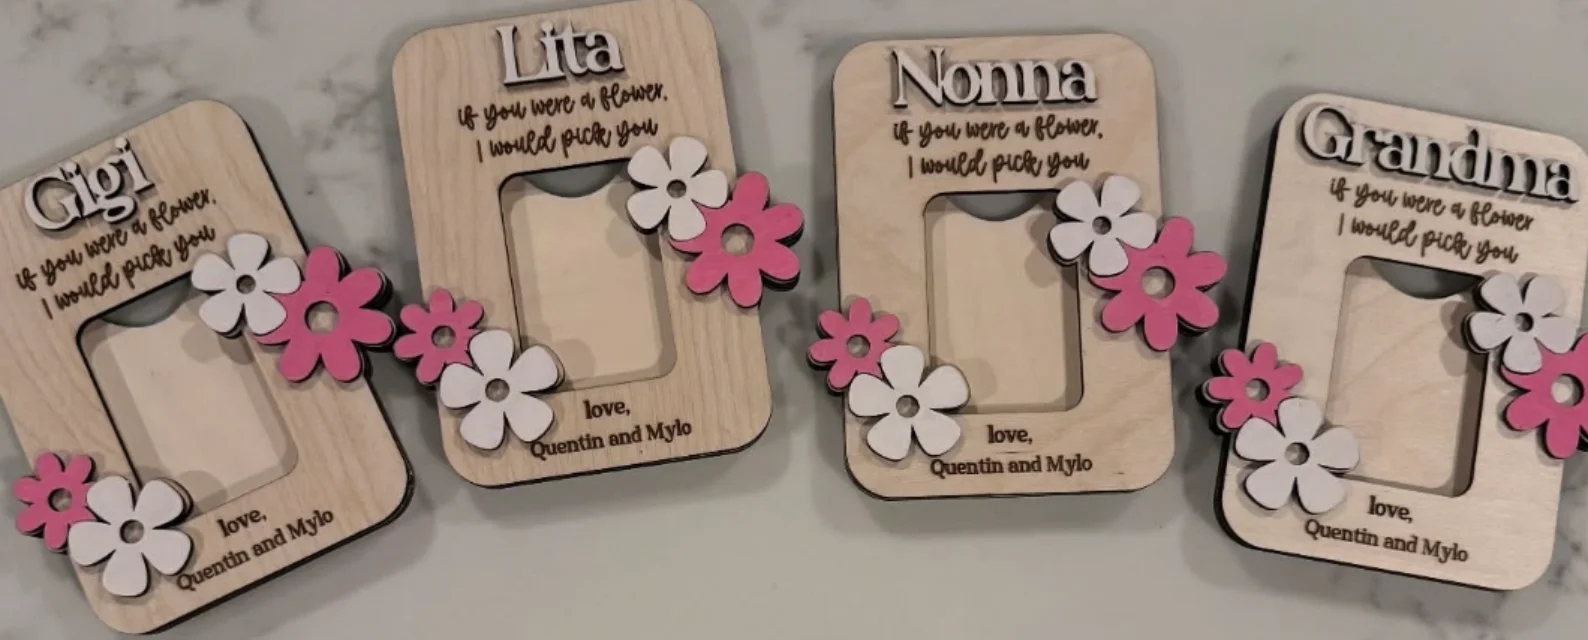
Personalized Wooden Photo Frames for Grandparents
Credit: @kikiparksdesign
Stop everything, how heartwarming are these frames?! They serve as the ultimate showcase for those impossibly cute snapshots of the little ones.
The tiny wooden blossoms provide such a gentle accent, and custom names push it right over the top. For those drawn to Things To Make With Cricut, recreating these is entirely within reach! Plotting a batch to gift to every grandmother figure in your orbit sounds like a perfect plan.
How to Make This Craft Design the frame layout with names, quote, and flower placement on a computer program Load the wooden frames into a laser engraver Etch the design onto the wood surface, ensuring clarity and depth Sand the edges of the frames to remove any roughness Die-cut pink and white paper flowers in varying sizes Adhere the paper flowers around the frame opening Apply a protective sealant or finish to the wood for durability Let the sealant dry completely Insert photo and secure with backing Wrap and present as thoughtful gifts
Initial -D- Shaker with Cherry Pattern and Glitter Accents
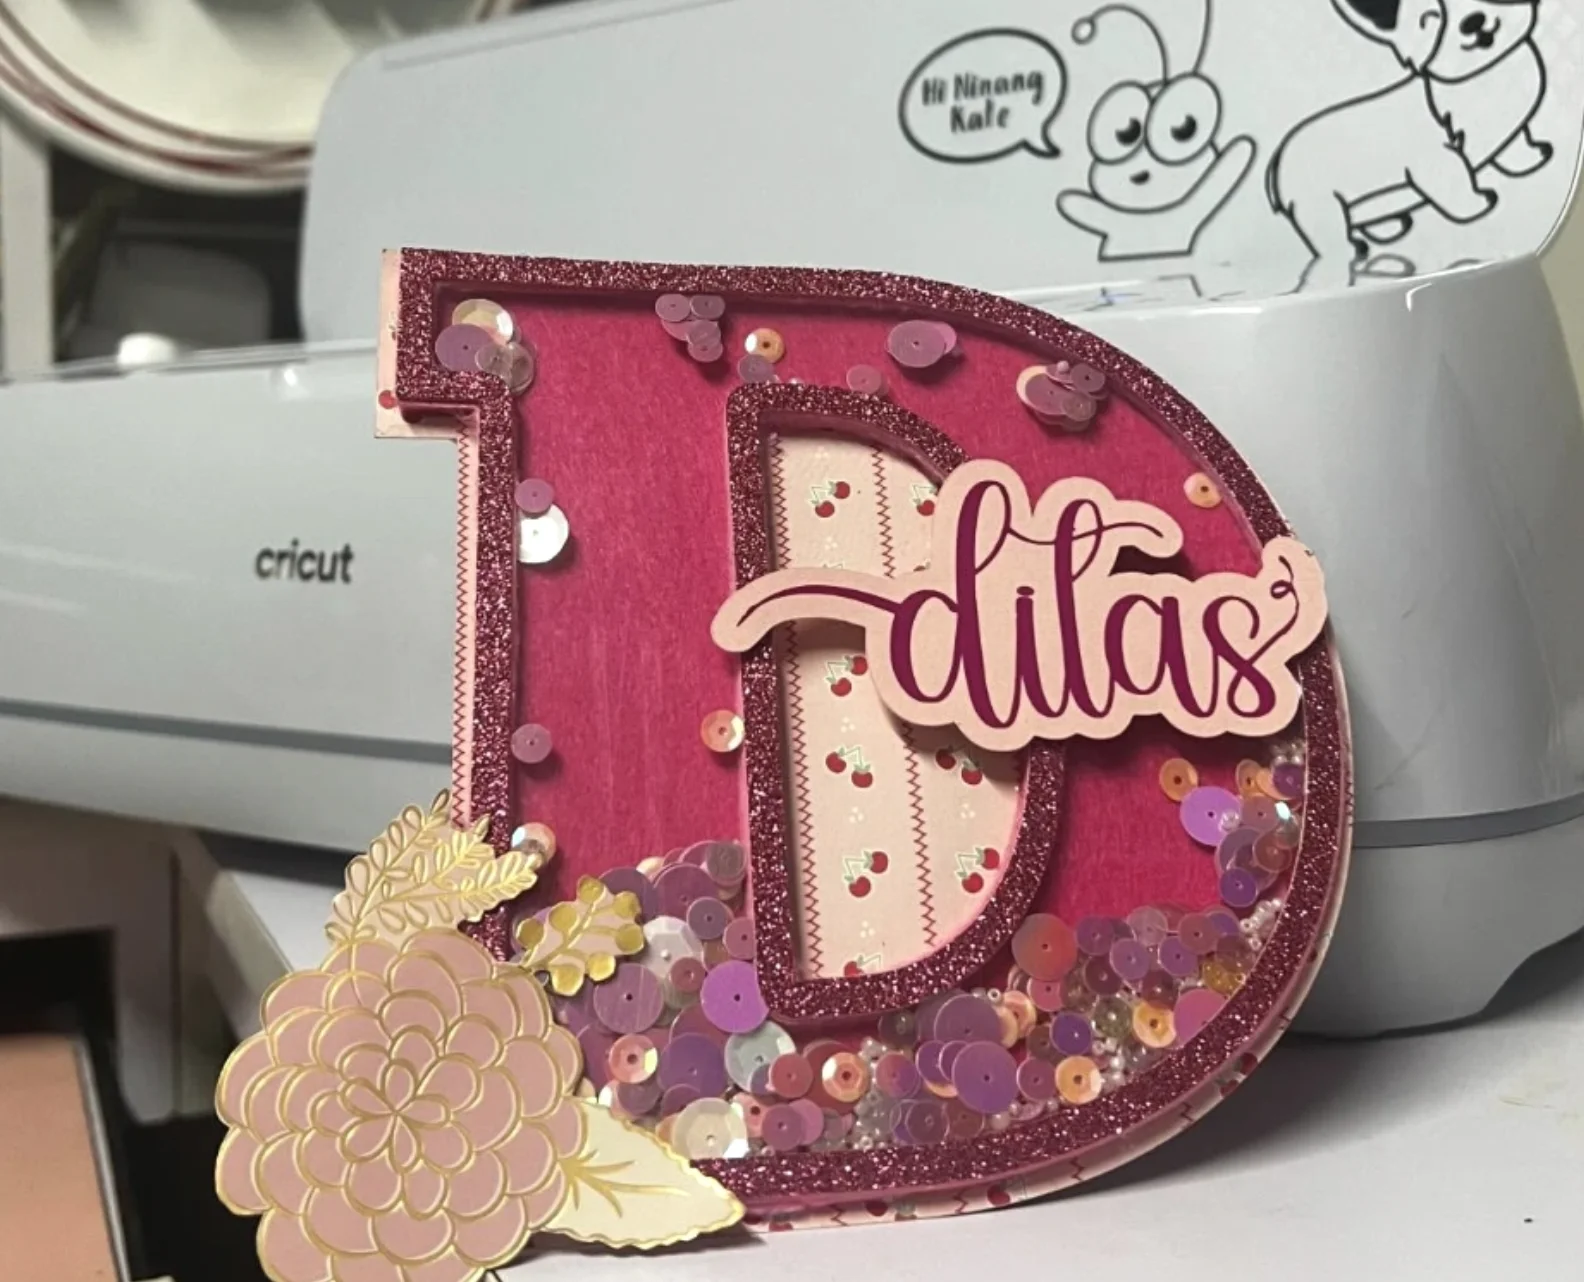
Credit: @katevillasph
You have to check out this precious initial -D- shaker! The cherry patterned paper peeking out from the middle totally steals the spotlight.
And those shimmering glitter edges? Absolute heart eyes happening!
Watching the tiny sequins drift and dance around inside is strangely hypnotic. A whole alphabet collection of these feels like the next logical move. So many brilliant Cricut Projects spring to life when you add a dash of wild imagination!
How to Make This Craft Cut the letter -D- shape out of cardboard Cut an identical ‘D’ shape and a frame to create the shaker box Attach the two -D- cutouts to the frame, leaving an opening at the top Paint or cover the sides of the letter with glittered paper or adhesive Pour sequins, confetti, or other small decorations into the shaker Seal the opening using transparent plastic or acetate Back the letter with patterned fabric for a finished look Embellish with paper flowers and additional decorative elements Add the script name -ditas- using adhesive Allow all adhesives to dry completely
Personalized Phone Case: -Growth, Not Perfection-
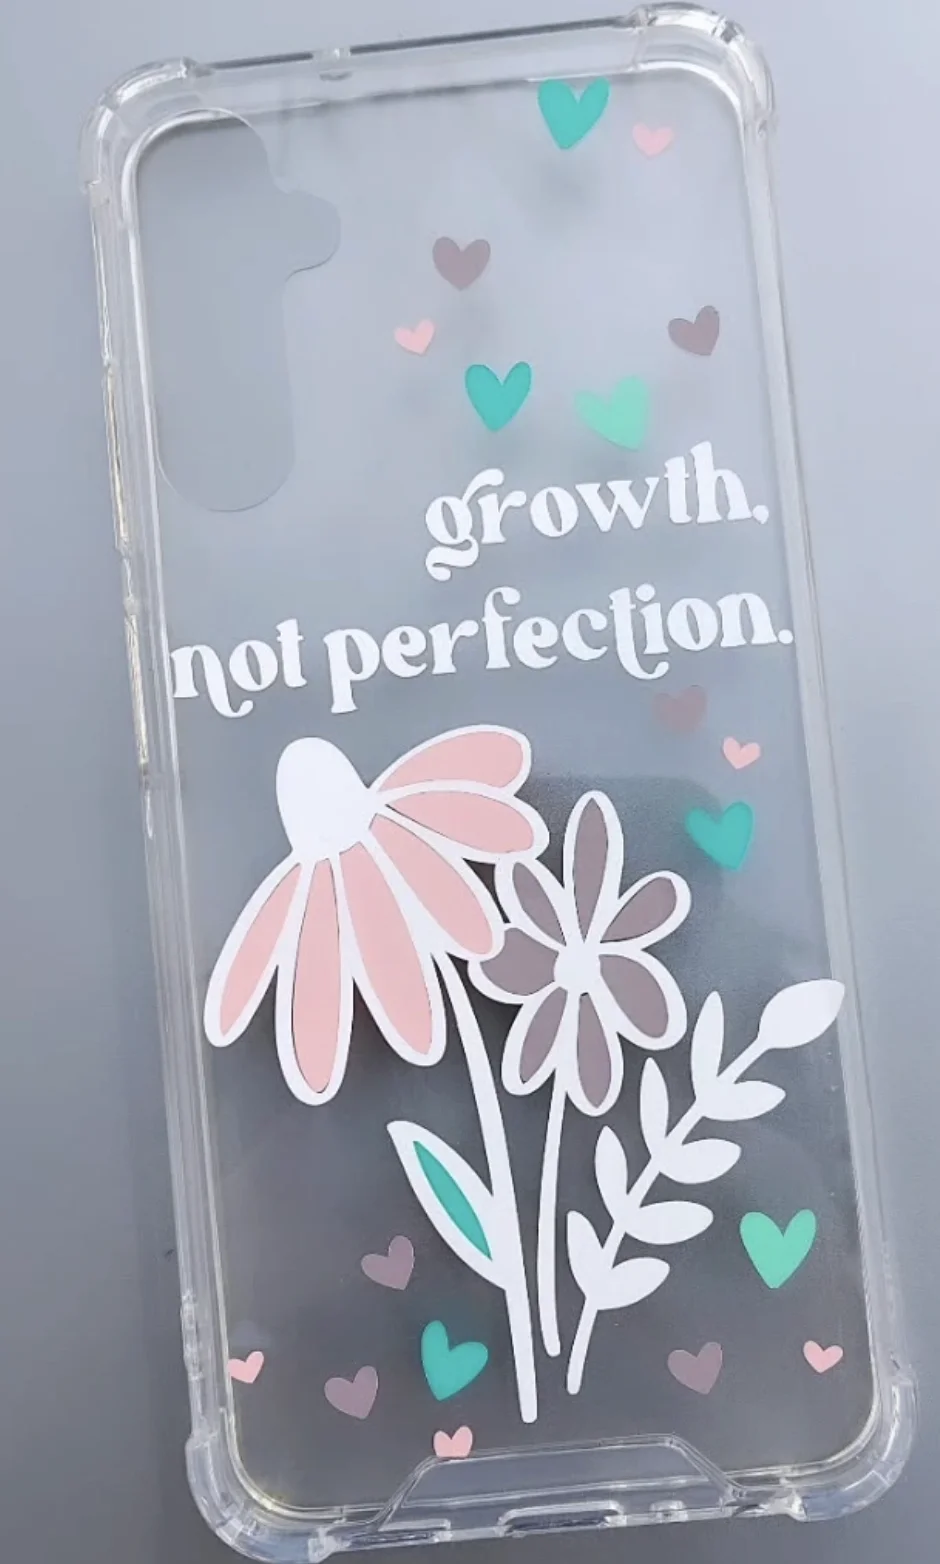
Credit: @canicavanlog
There’s a surprisingly steadying quality to this phone case design. It remains wonderfully simple, yet the gentle nudge about progress strikes a deep chord.
Carrying this along to a calm coffee meetup or while losing yourself in a quiet bookstore feels right. This is a quiet statement accessory that signals a preference for meaningful intention over loud flashiness.
How to Make This Craft Measure the phone case and design the lettering and floral arrangement in a design software Cut the design from vinyl using a cutting machine Weed away the excess vinyl from the design, leaving only the letters and shapes Apply transfer tape over the weeded design Carefully position the design onto the clean phone case Use a scraper to burnish the design onto the case Slowly peel away the transfer tape, leaving the vinyl design adhered Smooth out any bubbles Optional: Add a protective sealant spray Let the sealant dry before using the case
Handcrafted Fifth Birthday Monster Truck Cake Topper

Credit: @casaconfetti.atx
DIY party decor is absolutely having its big moment, and this cake centerpiece is cruising right at the front of the trend! Boasting a custom -MJ- banner, it easily outshines anything pre-packaged.
If you’re on the hunt for approachable Cricut Projects Beginner Ideas, kickstarting your journey with a personalized topper like this is a brilliant move. Even better, it transforms into a beloved memento long after the last slice is gone! Pretty great, right?
How to Make This Craft Download and cut out templates for monster trucks, flags, and numbers using a cutting machine Layer the truck pieces together, adhering with glue dots Create the base circle with cardstock layers in various colors Attach the age number to the front of the circular base Affix the checkered flags to the back of the base using glue Attach the two monster trucks to the base on the sides Layer banner pieces and add the letter initials to it Connect the banner to the front of the base with glue Attach a clear acrylic cake pop stick to the back with strong adhesive Let everything dry completely before placing on cake
Layered Paper Pumpkin with Sunflower Embellishments
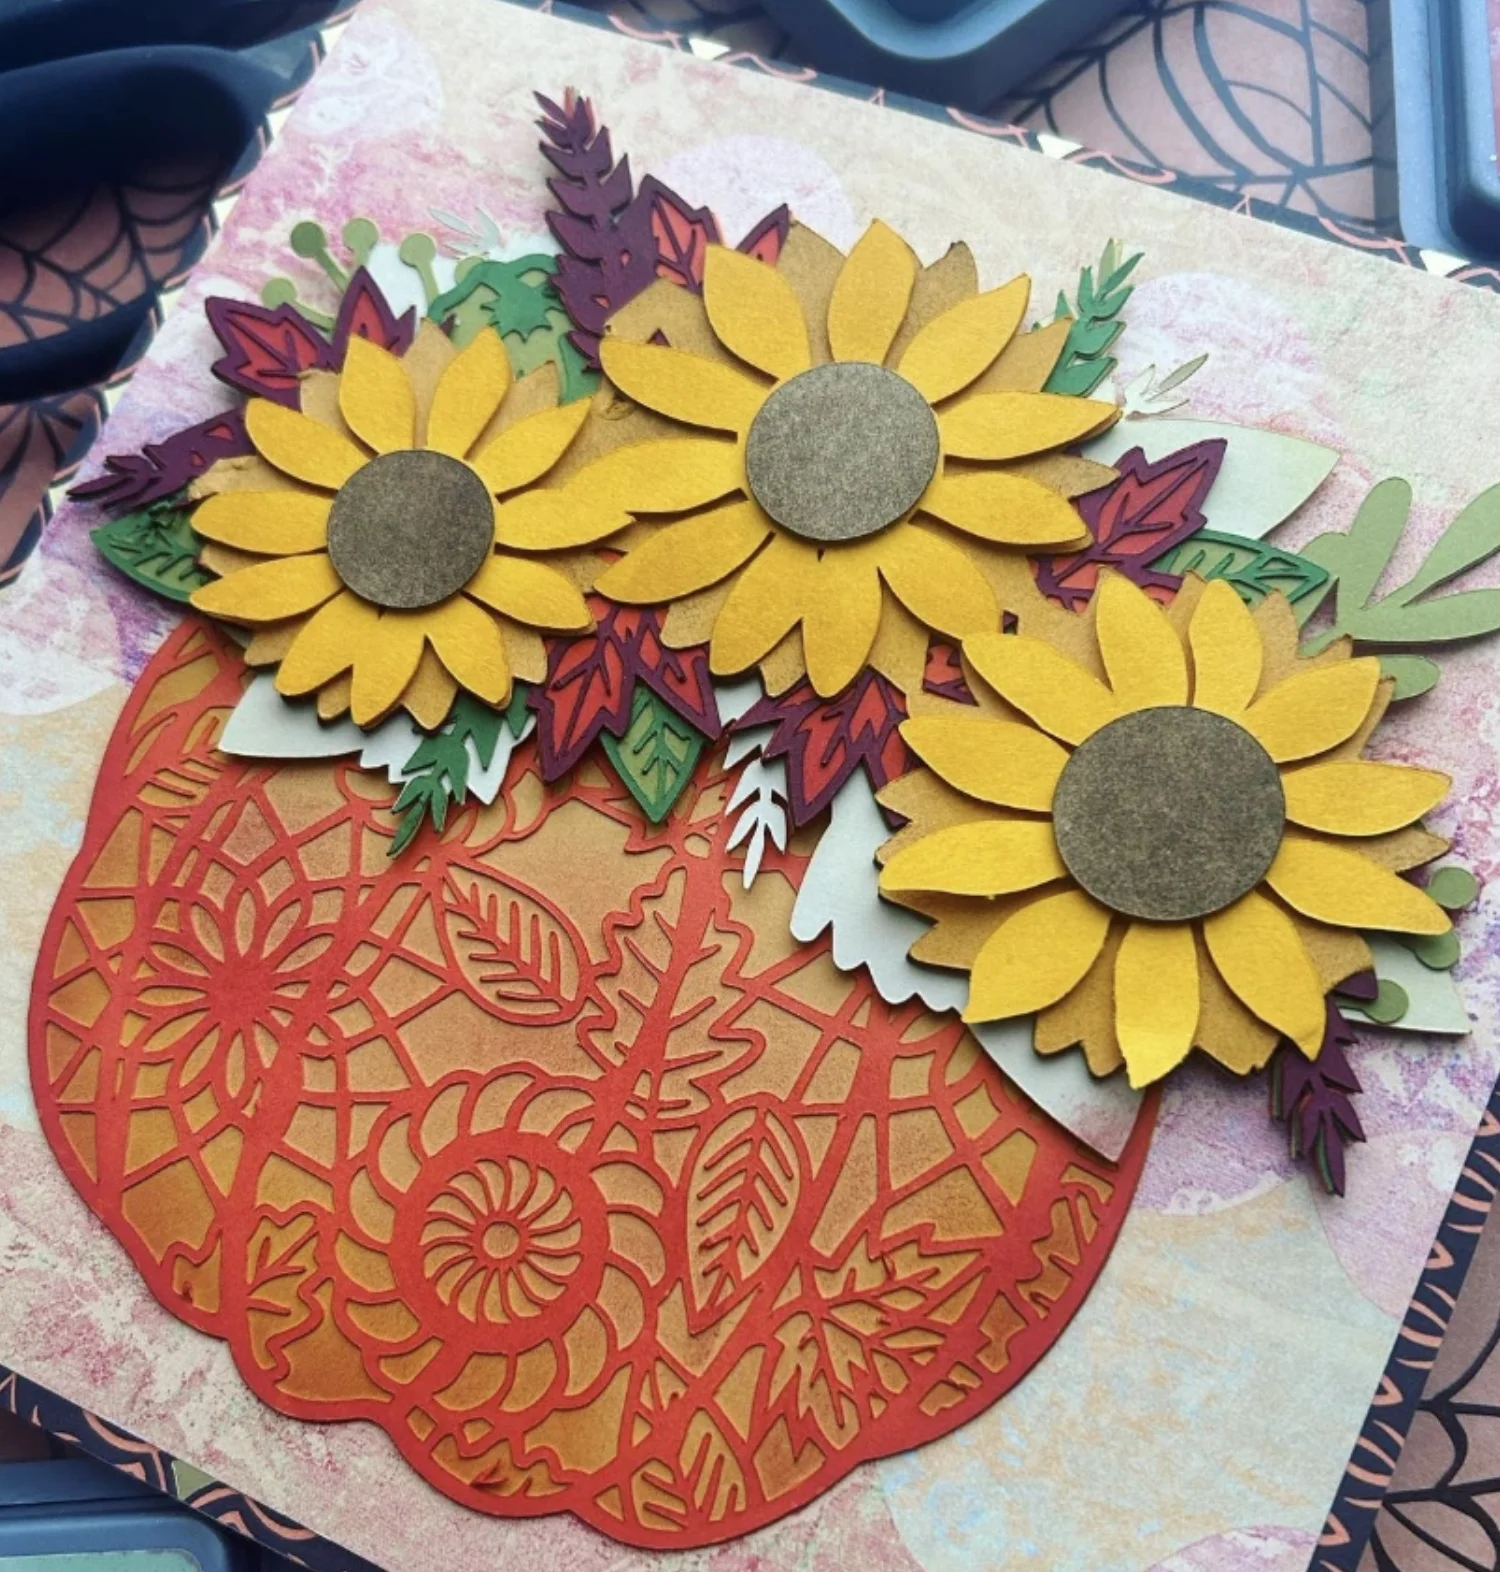
Credit: @acreativedirection
This pumpkin creation is outrageously charming, isn’t it? Placing that lacy orange filigree shape over the subdued background was a stroke of brilliance, it practically leaps off the surface.
And adding those bright sunflowers? Absolutely inspired!
A tiny helper even joined in for placing the leaves, turning simple Diy Cricut Projects into core memory material. Those varied green tones bring a much welcome burst of fresh color that isn’t another shade of harvest orange!
How to Make This Craft Obtain a patterned cardstock background layer Die-cut an ornate pumpkin shape from orange cardstock Adhere pumpkin to the background layer using foam squares for dimension Die-cut sunflower petals and centers from yellow and brown cardstock Assemble the sunflowers by gluing petals around centers Cut various leaf shapes from different shades of green and burgundy cardstock Arrange sunflowers and leaves around the pumpkin, adhering with craft glue Embellish the layout by gluing additional leaves around the pumpkins Let everything dry completely under a heavy book to prevent warping Frame completed project for display
Framed Paper Flower Heart Wall Art: A Cricut Masterpiece
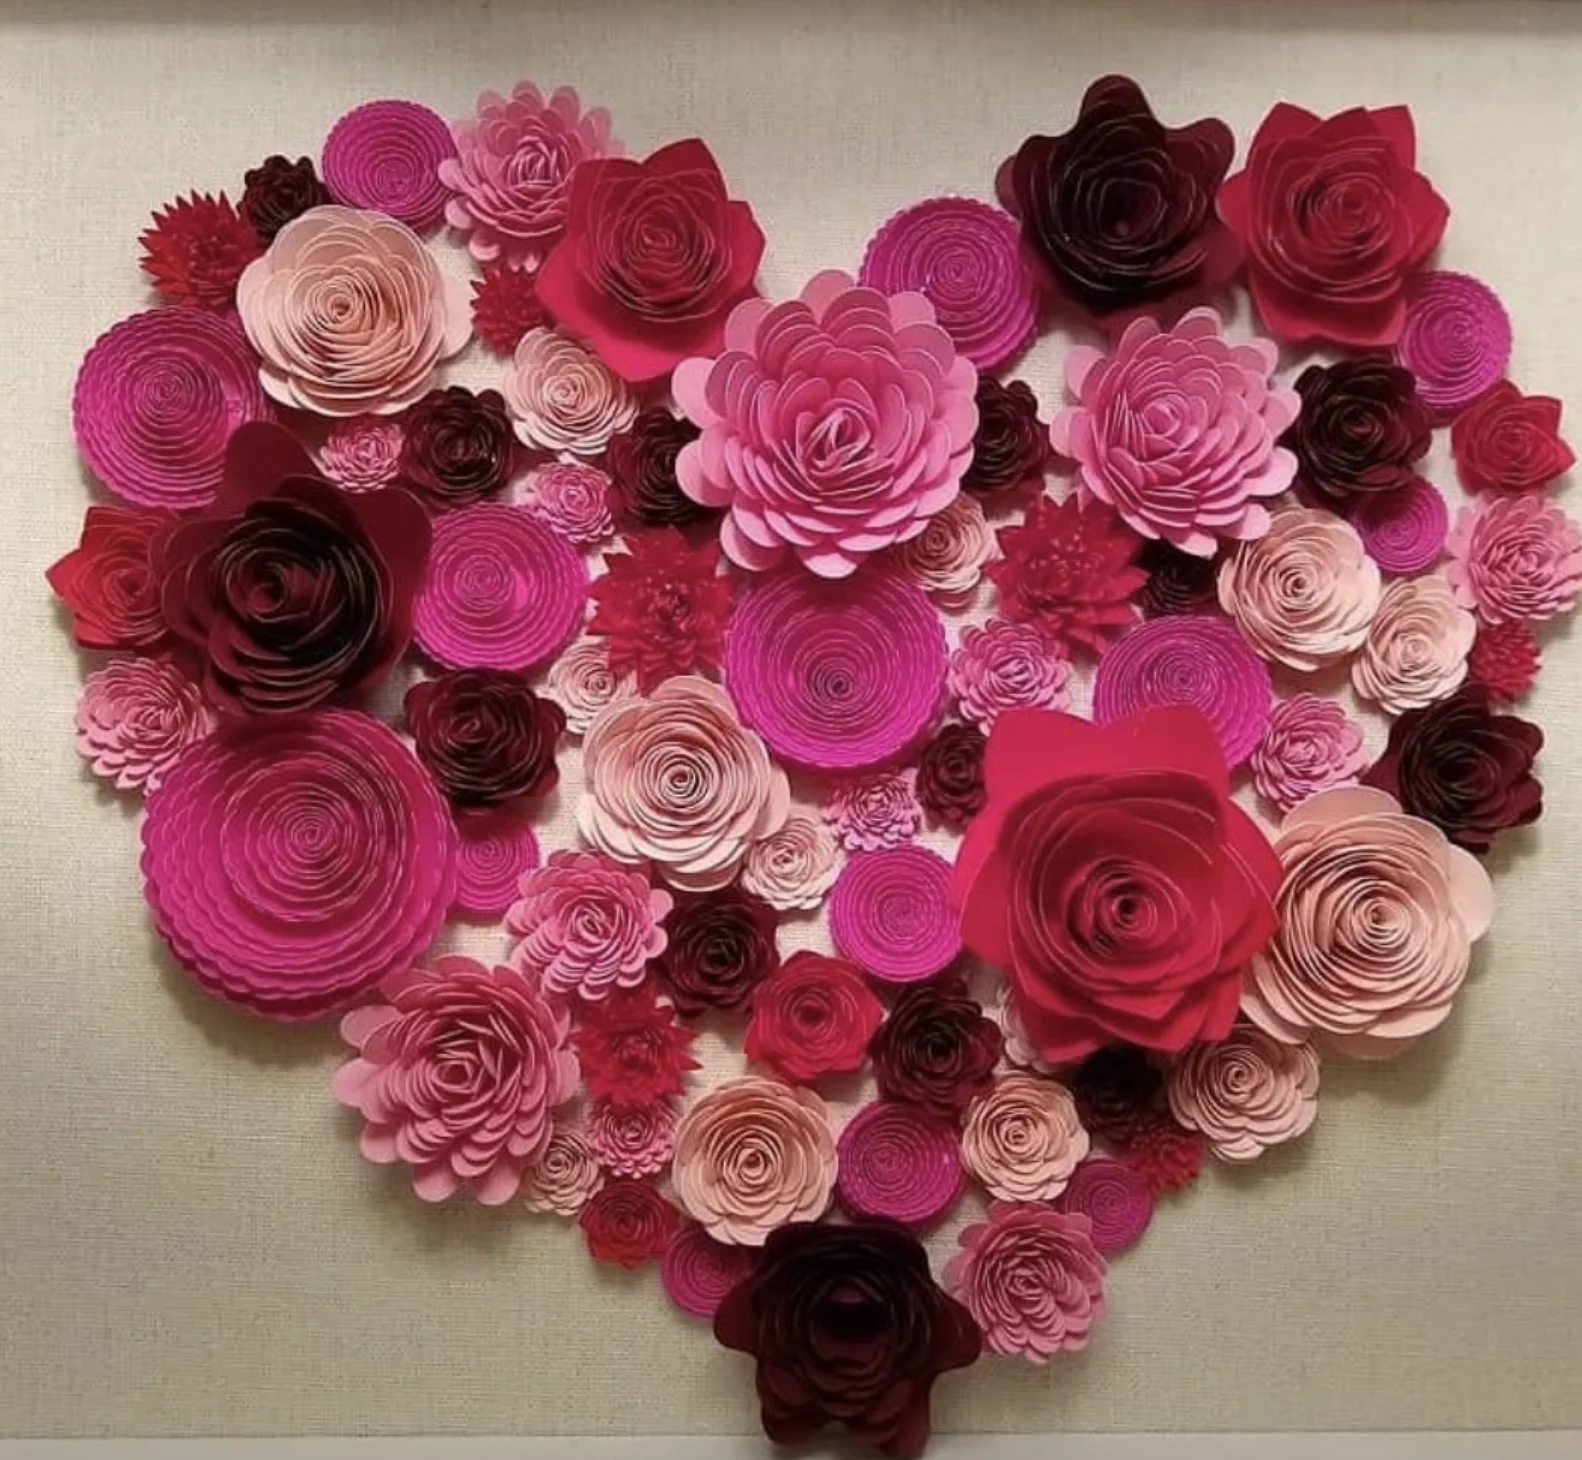
Credit: @cutnmakecrafts
Sure, paper flowers pop up everywhere, but this framed heart operates on an entirely different level. Unlike those flimsy, ready-made paper decorations that fall apart, this piece reads as legitimate art.
It has been thoughtfully constructed and placed inside a proper frame so it instantly elevates any wall. It sparks thoughts about all the incredible Cricut shirt ideas floating around online, because if a machine can produce this level of detail, crafting a killer t-shirt should be a piece of cake. Genuinely motivating.
How to Make This Craft Select a variety of pink and red cardstock in different shades and weights Cut out spiral shapes from the cardstock, increasing in size Roll each spiral tightly from the outside edge towards the center, gluing at the base Arrange the paper roses within a heart shape on a piece of cardboard Glue each flower to the backing board, starting from the outer edges and working towards the center Ensure varying heights for a visually appealing effect Once dry, place the flower heart inside a shadow box frame Secure the backing of the shadow box Test mounting before hanging
Adorable Halloween Countdown with Spooky Haunted House
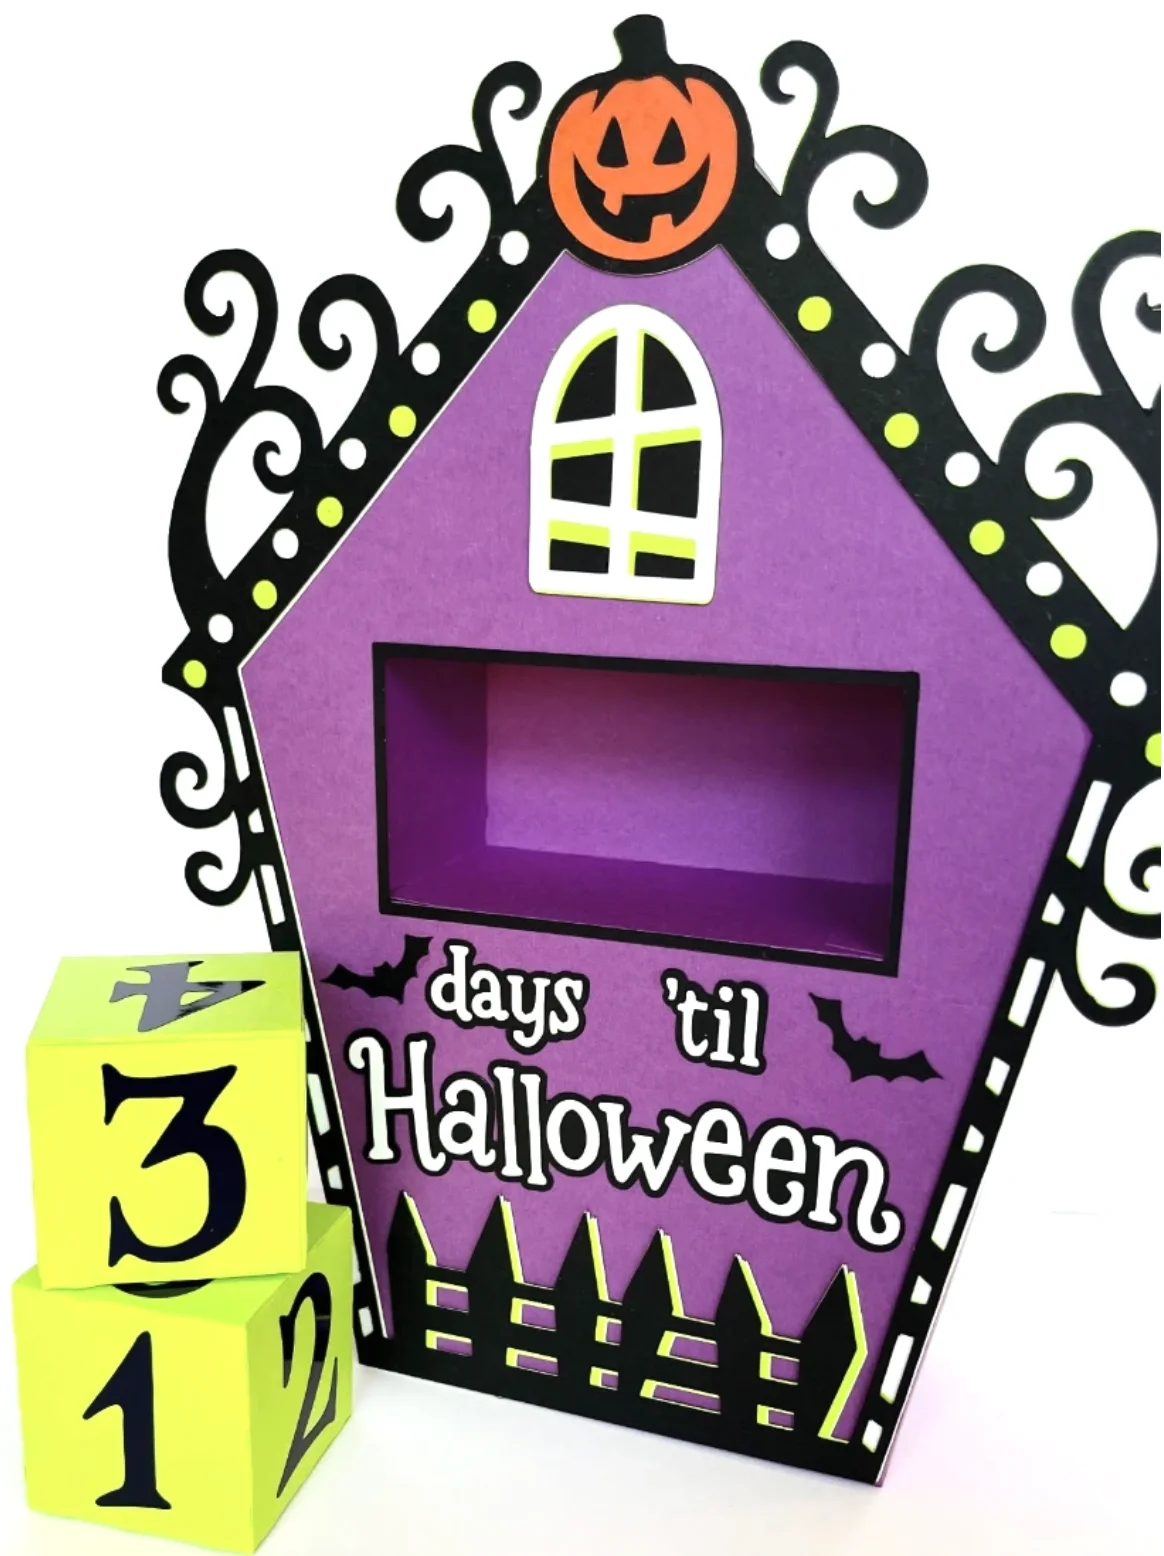
Credit: @thesaltyyankee
Calling all Halloween fanatics and craft enthusiasts, this creation is aimed directly at YOU! Getting over the sheer genius of this countdown calendar is impossible.
A haunted house silhouette plus sliding numbered blocks?! This works brilliantly for a family room mantel or a lively classroom setting.
For the hands-on crowd, scanning all the Things To Make With Cricut opens a portal to insane creativity! The absolute best feature is how it delivers festive thrills while draping your space in a layer of spooky sophistication.
How to Make This Craft Download and cut out coffin template from heavy cardstock or thin wood Assemble the coffin structure, including the sliding drawer, with strong glue Prime and paint the coffin in a base coat of purple Add black decorative elements around the edges and window cutout Paint the number blocks with lime green acrylic paint Use stencils or freehand to paint the numbers 0-9 on each side of the blocks Glue decorative elements around the coffin Cut vinyl Halloween designs from vinyl sheets Affix the designs to the coffin Slide the number blocks into the drawer to count down the days until Halloween
Multi-Layered Paper Cut Ballerina with Pink Tutu
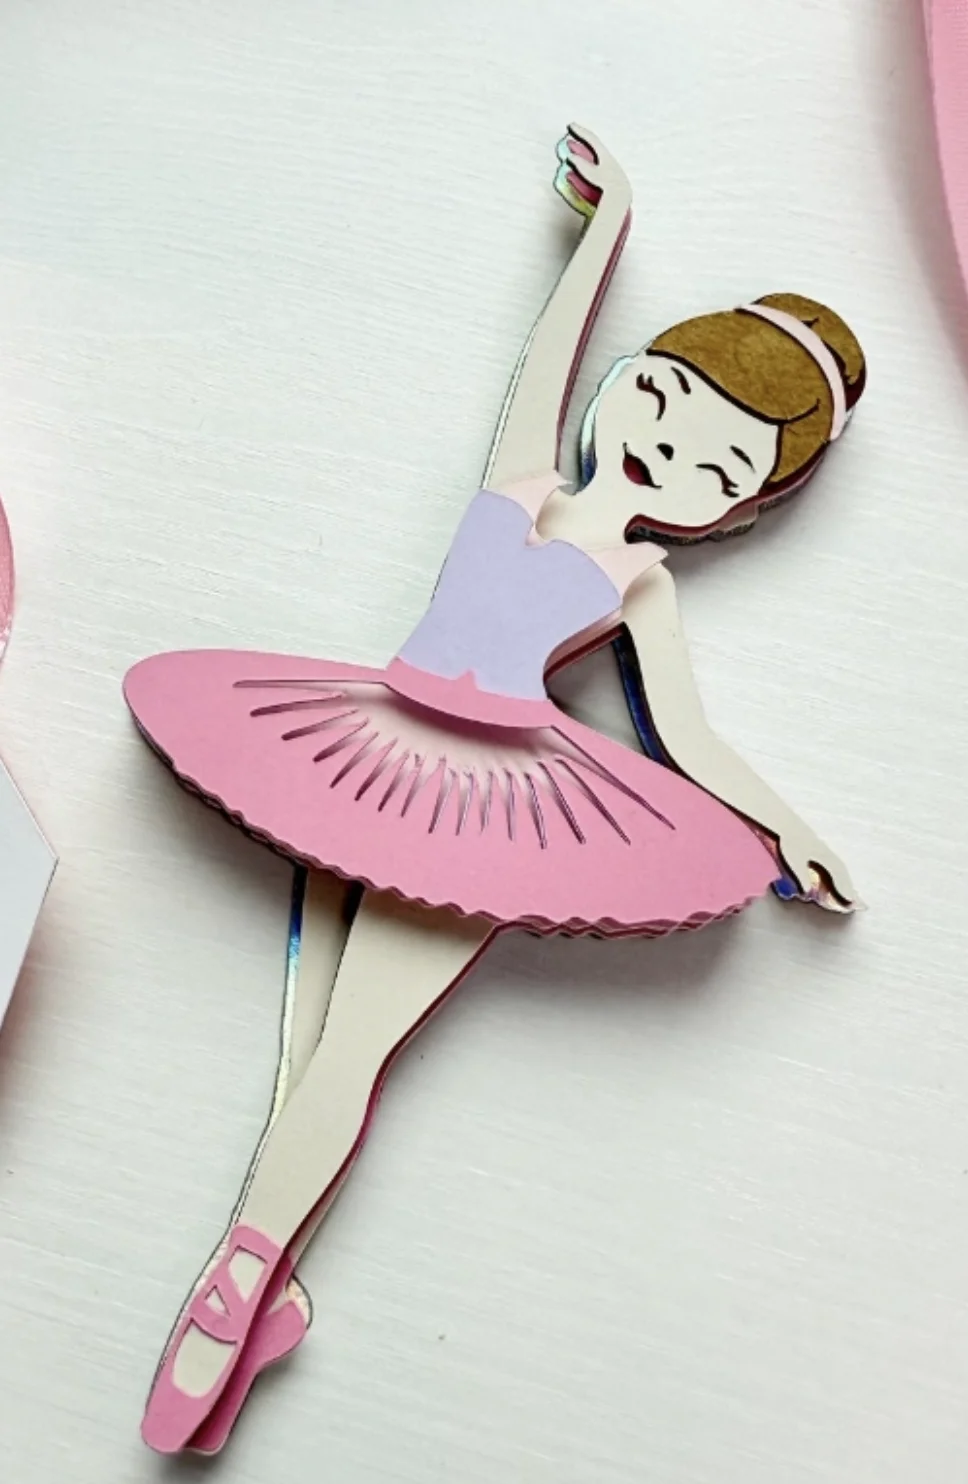
Credit: @11creativethings
Hunting down unique treasures for people with very specific passions can feel like an impossible mission, can’t it? This layered papercut dancer solves that dilemma with pure grace and delicate charm.
The end result grabs your attention and doesn’t let go. Plus, building it yourself adds immense value! Any maker on your list will recognize this as top tier Cricut Gift Ideas material, delivering far more emotional weight than a generic shelf purchase ever could.
How to Make This Craft Find a digital template for ballerina image Cut base layer from white cardstock Die-cut the ballerina’s body parts in desired colour Cut the tutu from pink glitter cardstock, cutting along the lines Attach the skirt to the waist area Attach the legs and arms to the body Affix head to the upper body Layer the pieces together, using foam squares to add dimension Embellish tutu edges with glitter glue for extra sparkle Attach a ribbon or string for hanging as an ornament
Personalized Holographic Vinyl Water Bottle with Polka Dots
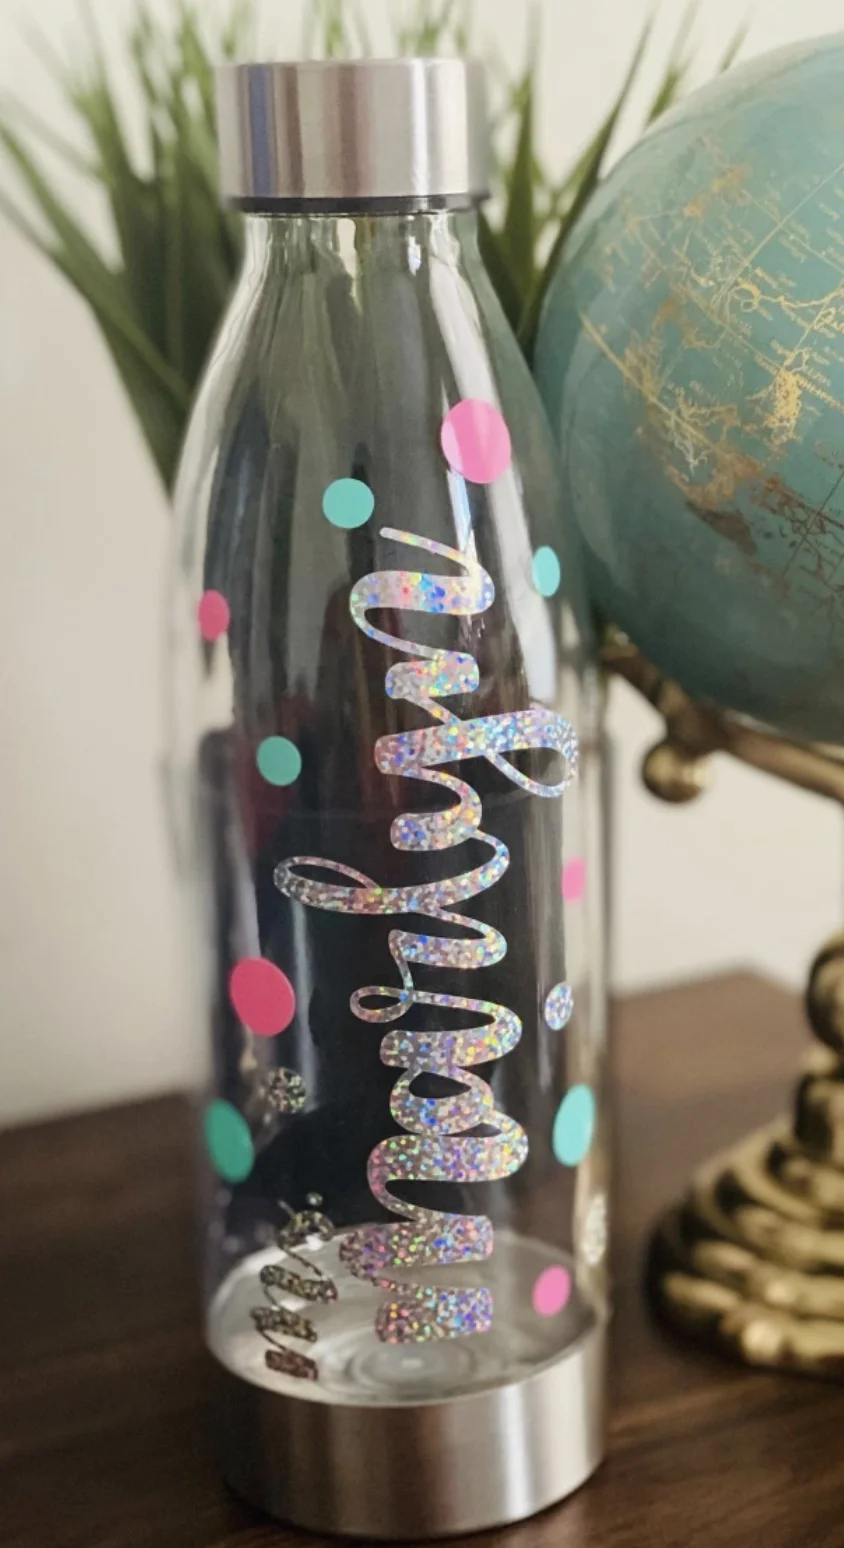
Credit: @paperflowermarketva
This water bottle brings serious adorable energy to the table! If transforming everyday objects into personalized statements sounds like your kind of activity, this one will grab your attention.
Stamping a favorite name or a playful mantra onto it makes hydration feel special. This kind of project practically demands firing up the Cricut Maker projects queue.
It sits firmly in beginner-friendly territory, so diving into the craft pool at the shallow end feels safe and rewarding here. Those playful dots really seal the deal, too!
How to Make This Craft Choose design or name and measure area of water bottle Upload desired design to a vinyl cutting machine software Adjust size of design and cut on holographic vinyl Weed excess vinyl using weeding tools Apply transfer tape over design Gently burnish the design onto the transfer tape Carefully peel the design from the vinyl backing Position the design on the clean and dry water bottle Burnish the design onto the bottle Carefully peel off the transfer tape
Adorable Fall Ornament with Orange Bow and Leaf Details
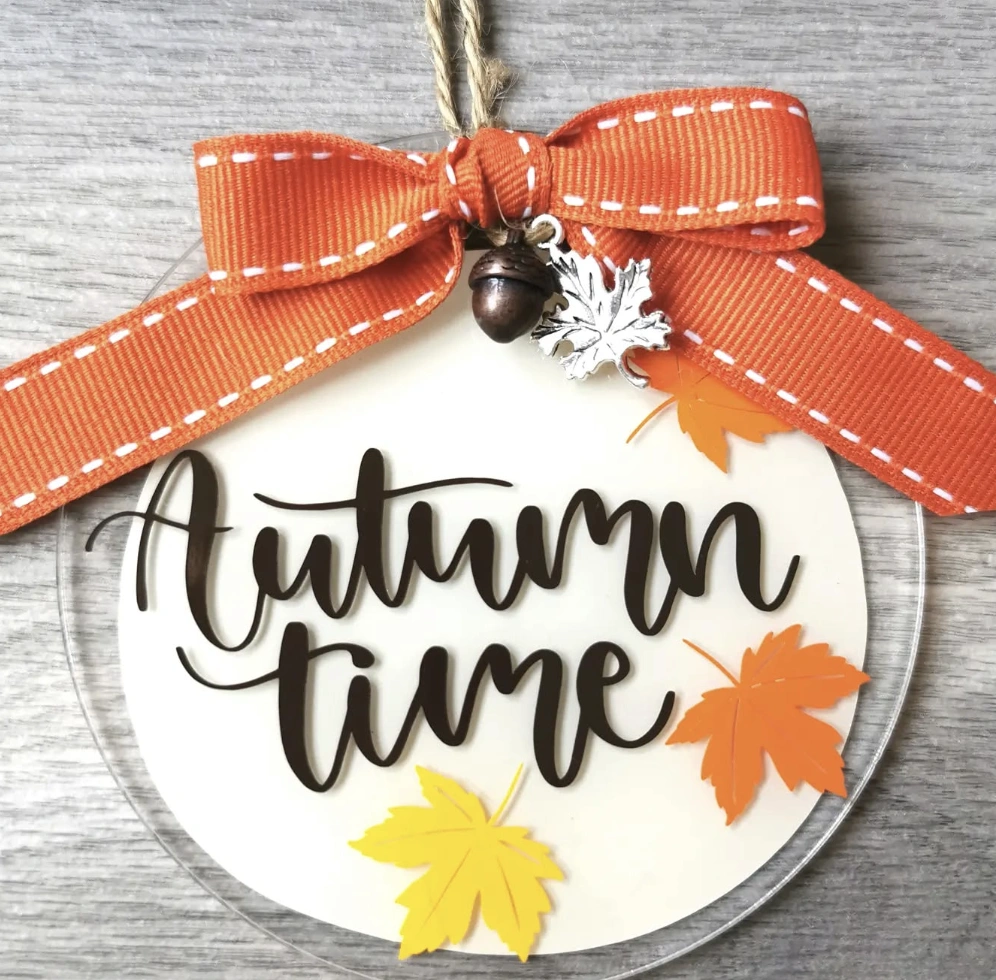
Credit: @karismakes
You could genuinely hang this small treasure anywhere, dangling from a door handle or woven into a seasonal garland strung across a window. Here’s the takeaway: that vivid orange bow grabs all the attention in the best way, doesn’t it?
Even a hesitant beginner could absolutely conquer a charming piece like this. Sounds like the perfect excuse to wake the cutting machine from its nap! It’s remarkable how festive our living spaces become when we pour energy into simple Cricut Maker Projects.
How to Make This Craft Obtain a clear acrylic disc Using a cutting machine, cut out the phrase -Autumn Time- from brown vinyl Carefully weed the vinyl, removing excess pieces Apply transfer tape over the vinyl lettering Position the vinyl lettering on the acrylic disc Burnish and peel off the transfer tape Hot glue faux leaves to the acrylic disc Tie orange ribbon into a bow and hot glue to the top Add acorn charm for extra detail Attach jute twine for hanging
Rainbow Birthday Shaker Cards: Care Bears, Unicorns, & Dinosaurs
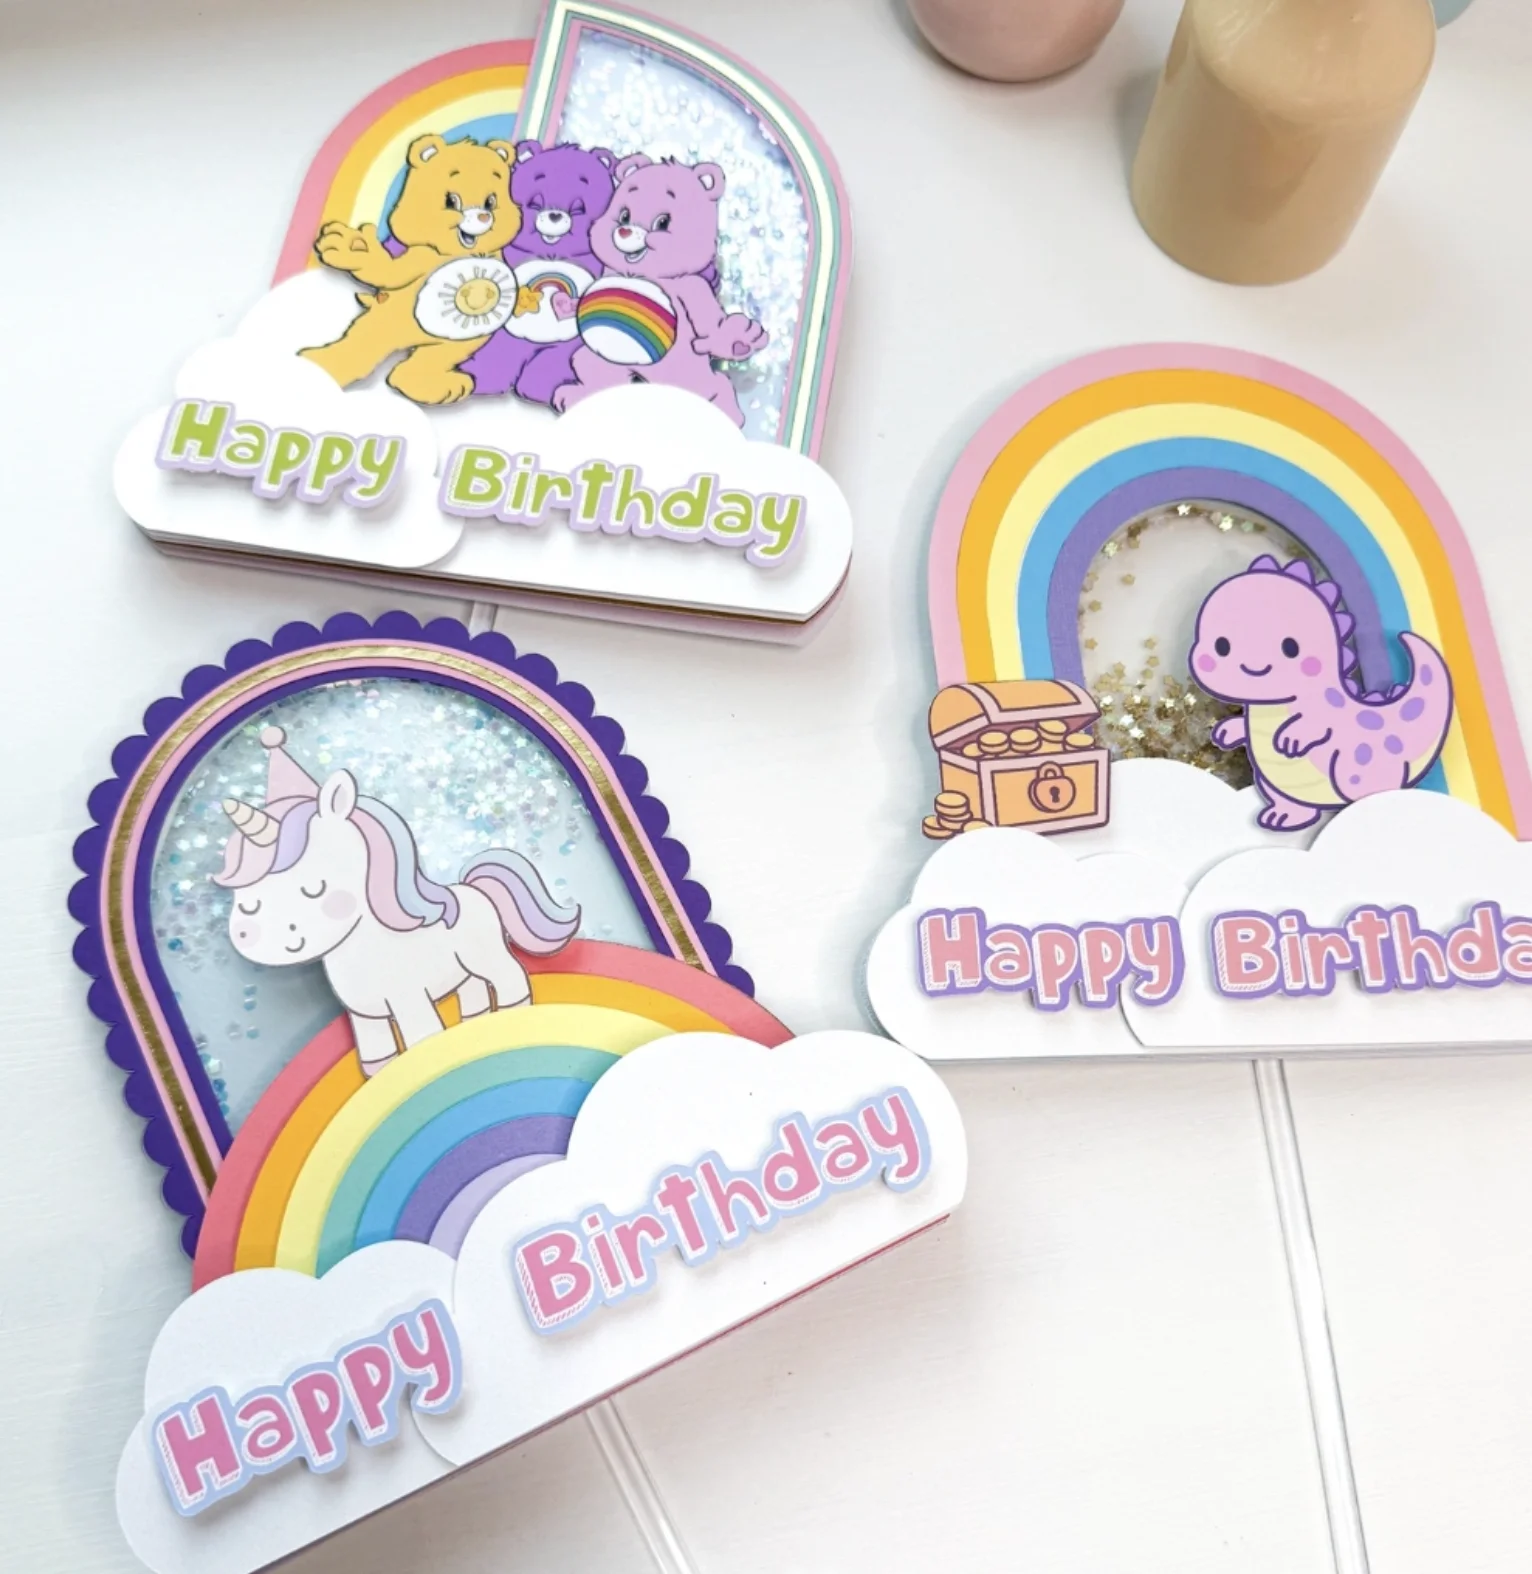
Credit: @11creativethings
Childhood memories crash headfirst into custom design here. Splashing rainbows and loose glitter around functions as a guaranteed serotonin boost.
These tactile shaker cards bring a completely unique energy to any birthday party, leaving generic supermarket greetings in the dust. Scouting for brilliant Cricut gift ideas?
Tailoring matching cards around someone’s absolute favorite hues or beloved characters makes the gesture unforgettable. Paying attention to those thoughtful details transforms a simple gift into a core memory.
How to Make This Craft Select patterned cardstock for the background Cut rainbow shapes from colored cardstock using a die cutting machine Adhere rainbow layers to the background, leaving space for the shaker window Cut a clear acetate sheet for the shaker window Create a foam tape border around the window area Fill the window with loose glitter and confetti Seal the shaker window with another layer of cardstock Die-cut characters and -Happy Birthday- sentiment from cardstock Embellish shaker card with stickers and cut-out embellishments Affix birthday sentiments to the front with double-sided tape
Acrylic Keychain Collection: Custom Designs and Tassel Details
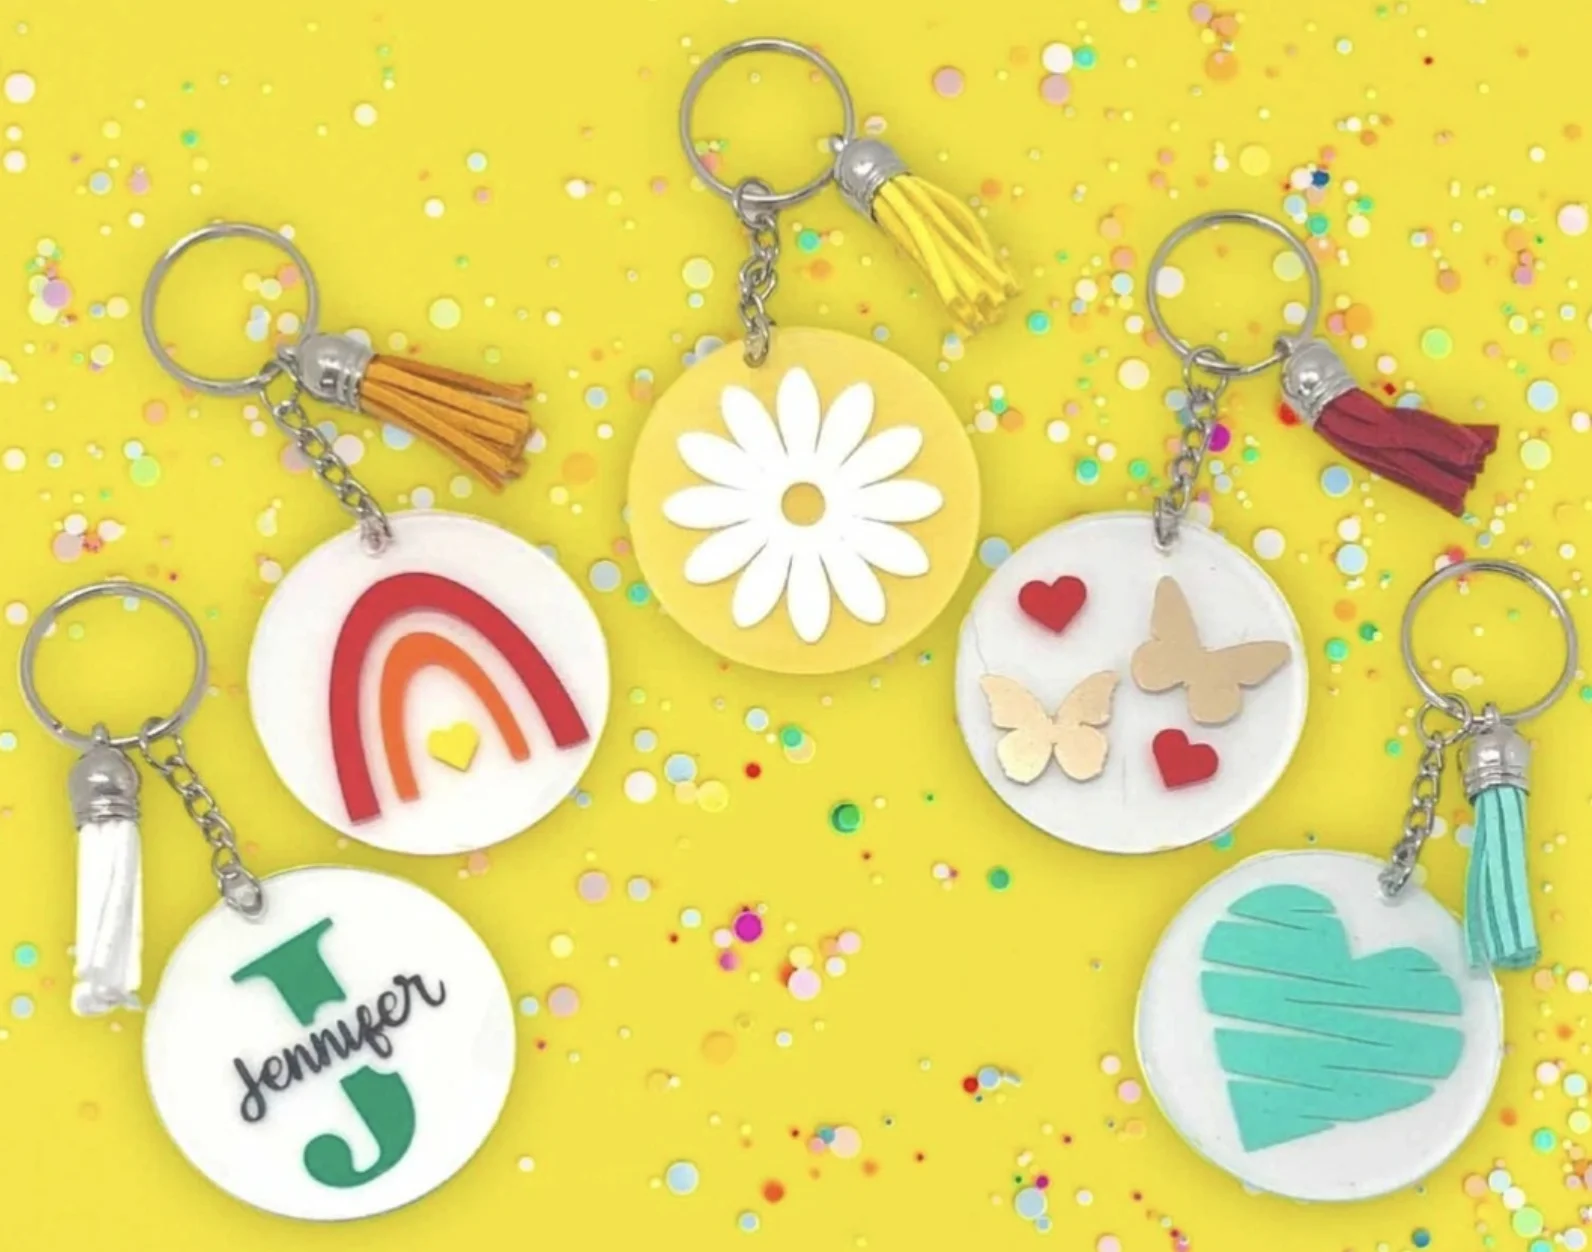
Credit: @jennifer.maker
Exhausted by boring, uninspired keychains clanging around in your bag? Same feeling here.
These personalized acrylic pieces fix that problem in a flash. The graphics pop with bold, playful energy and absolute individual flair.
Stylized initials or cheerful rainbows channel your specific mood directly. Adding those tiny swinging tassels was a stroke of pure genius.
Transforming ordinary everyday carry items through clean Cricut Projects shifts the entire game. Who decided keychains couldn’t actually be effortlessly chic?
How to Make This Craft Gather clear acrylic circles Design initials/shapes using a craft software Cut the shapes out using different colored vinyl Attach vinyl decals to acrylic circles carefully, weed the unused vinyl pieces Drill a hole in the top of the acrylic circle Pour a thin layer of clear resin over the design Let resin cure completely, following the product instructions Attach a keyring and a decorative tassel Check finished keychain for sharp edges; sand if needed Add metal rings to the keyring
Adorable DIY Halloween Treat Holders: Frankenstein and Skeleton Designs
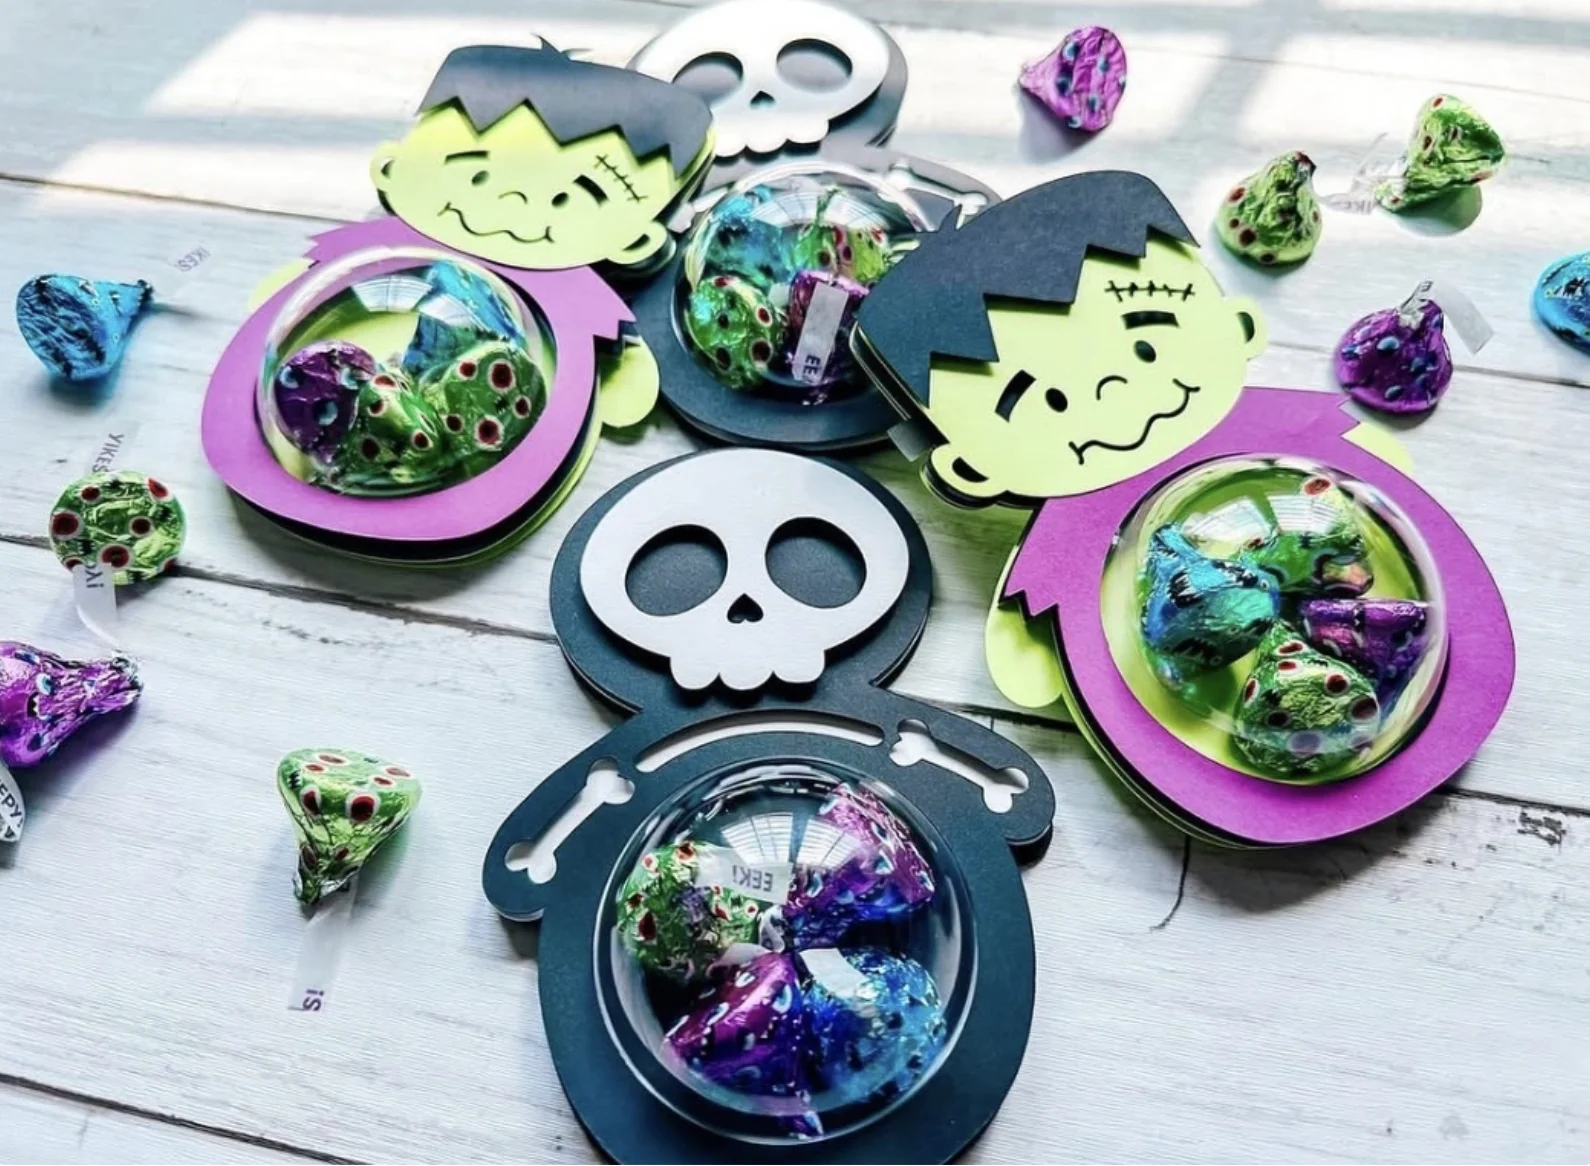
Credit: @withlove.cs
Alright, Halloween season is totally your moment, but those mass-produced plastic buckets? Hard pass.
These little treat containers are screaming your name at full volume. For parents juggling chaos but still craving that handmade touch, these solve a huge problem.
Honestly, these check every box on the hunt list. The internet overflows with brilliant Cricut Projects Beginner Ideas, and this design ranks among the absolute sweetest. They provide such an easy method for infusing Halloween candy handouts with genuine heart.
How to Make This Craft Download template of monster and skeleton Print the template on green and black card stock Cut out all the template pieces carefully using scissors or a craft knife Score along the fold lines and assemble the monster and skeleton shape Glue the edges of the template to construct the favor box Secure a clear plastic dome to create candy holder Fill the dome with small candies Close the box, making sure the candy is secured inside the dome Glue the Frankenstein or Skeleton shapes around the dome Embellish with extra details such as paper eyes and stitches
Rustic Wood Sign Featuring Rolled Paper Flowers in a Mason Jar
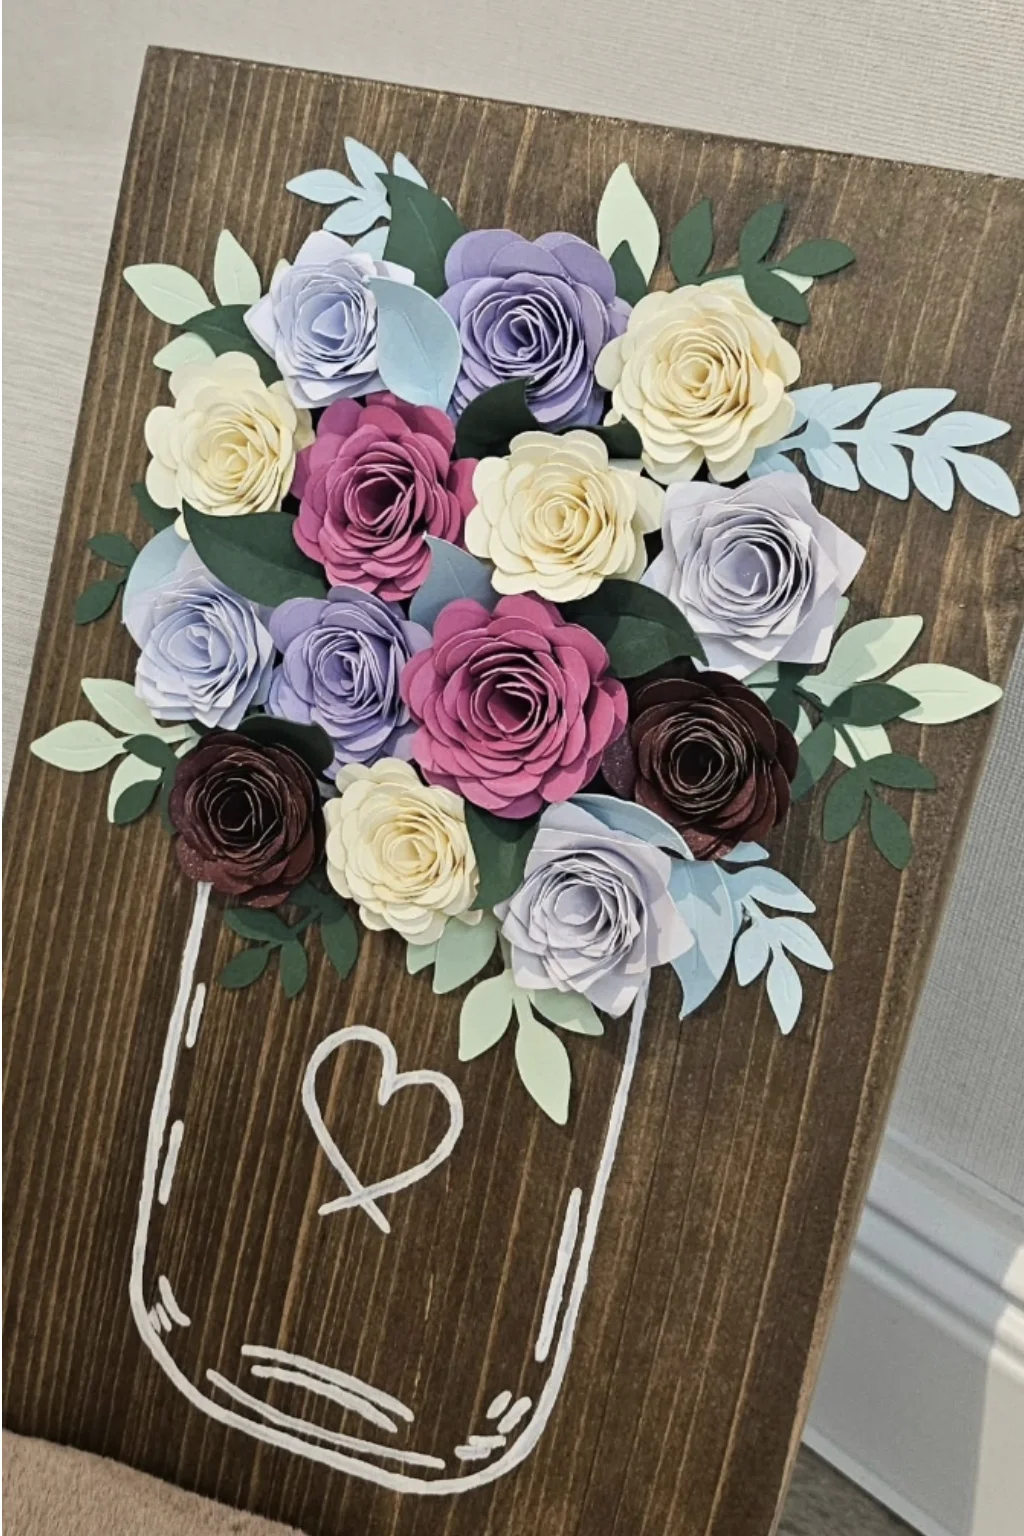
Credit: @plotter.more
This sweet wooden plaque broadcasts farmhouse elegance at maximum volume, but those spiraled paper blossoms steal the show with incredible texture and playful dimension! The gentle pastel palette truly hits the mark here.
To make the piece fully your own, imagine washing the glass jar silhouette with a shimmering metallic paint for an unexpected jolt. These represent the exact flavor of things to make with Cricut that stamp a space with unmistakable personality. The construction feels sturdy enough to stick around for ages, too!
How to Make This Craft Sand and stain a wooden plaque to your desired shade Let dry Using white paint or a paint marker, draw a mason jar outline Cut out circles from various colors of cardstock Spiral cut each circle, leaving a small base Roll each spiral tightly from the outside in, gluing the base to secure Cut leaf shapes from green cardstock Hot glue the rolled paper flowers and leaves inside the mason jar outline, clustering as desired Let everything dry completely Consider adding a protective spray sealant
Tropical Hibiscus Flower Keychain Set: DIY Vinyl Crafts
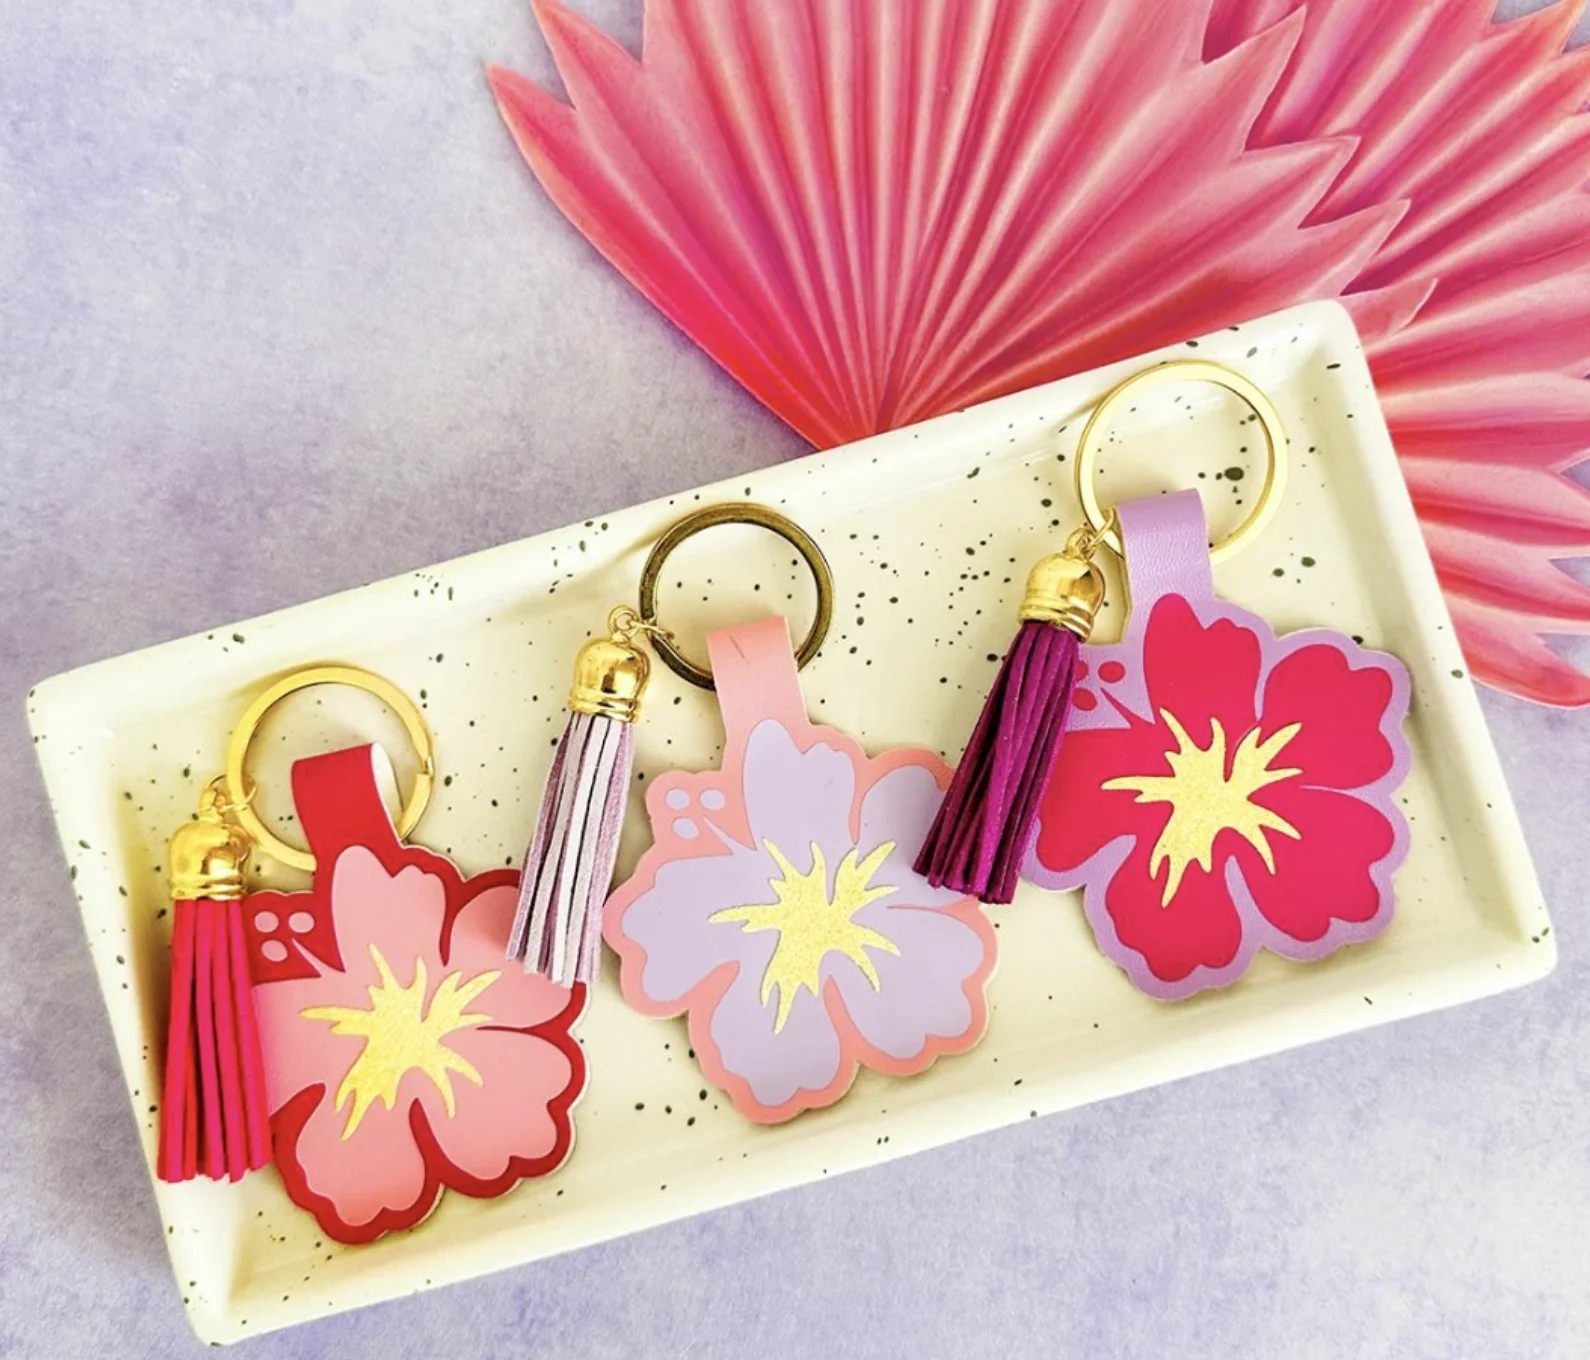
Credit: @amyromeucrafts
Say goodbye to dull key rings or sad backpack zippers, these tropical cuties inject a massive splash of vivid color and instant sass. And since the whole thing is DIY, the customization paths stretch out into infinity!
During a deep dive for thrilling new craft ventures, tutorials unlocked a tidal wave of Shirt Ideas Vinyl inspiration. Dropping everything to whip up a batch of these feels absolutely urgent!
How to Make This Craft Download and cut out the hibiscus flower templates from acrylic Paint or apply vinyl to each petal to create layered effect Attach the gold center piece to the center of the flower with glue or resin Thread leather cording through tassel end caps String the cording through the flower piece with the tassel Secure the keychain loop to the end of the cord Tighten the cord until the keychain loop and tassel hold the flower in place Test the strength of the connection before attaching to your keys
Laser Cut Wooden Leaf Dangle Earrings with Copper Foil
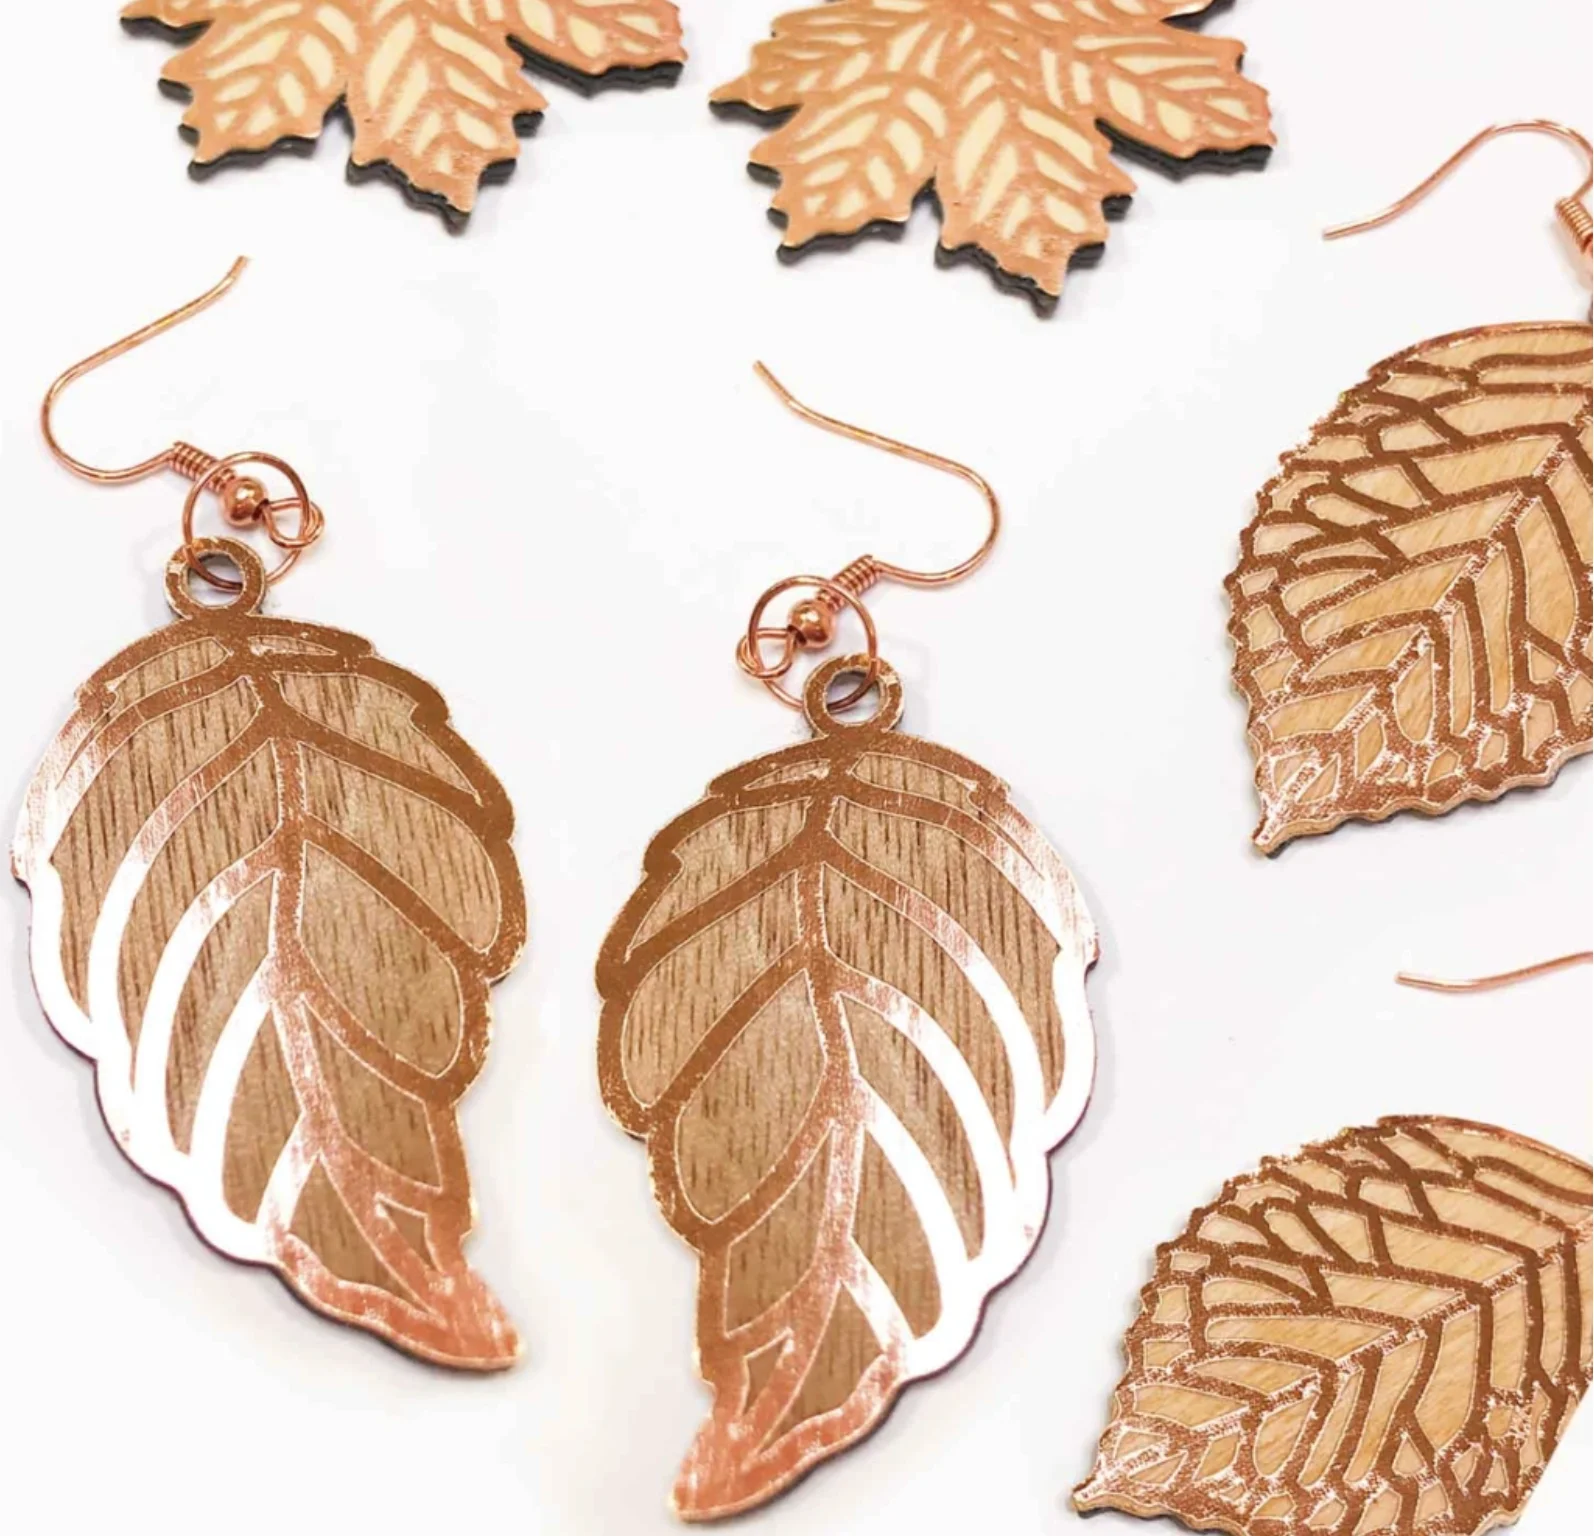
Credit: @jennifer.maker
A cozy, harvest-time aura radiates from these pretty earrings. Rocking these at a bustling maker market or strolling through a crisp autumn festival feels perfectly aligned!
The design stays sleek enough to slide into a relaxed office Friday without missing a beat. Thoughts of assembling a similar pair keep bubbling up, digging through various Diy Cricut Projects recently has sparked a major wave of motivation. The classic leaf silhouette remains timeless, while the metallic copper edge delivers a precise hit of subtle shimmer.
How to Make This Craft Gather pre-cut wooden leaf shapes Apply adhesive to the edges of each leaf Gently press copper foil onto the adhesive edges, ensuring a smooth finish Use a craft knife to trim excess foil Drill a small hole at the top of each leaf Open a copper jump ring with pliers Attach the jump ring through the hole in the leaf Attach the copper earring hook to the jump ring Close the jump ring securely Repeat steps for the second earring
Butterfly & Skull “Dia de los Muertos” Paper Craft
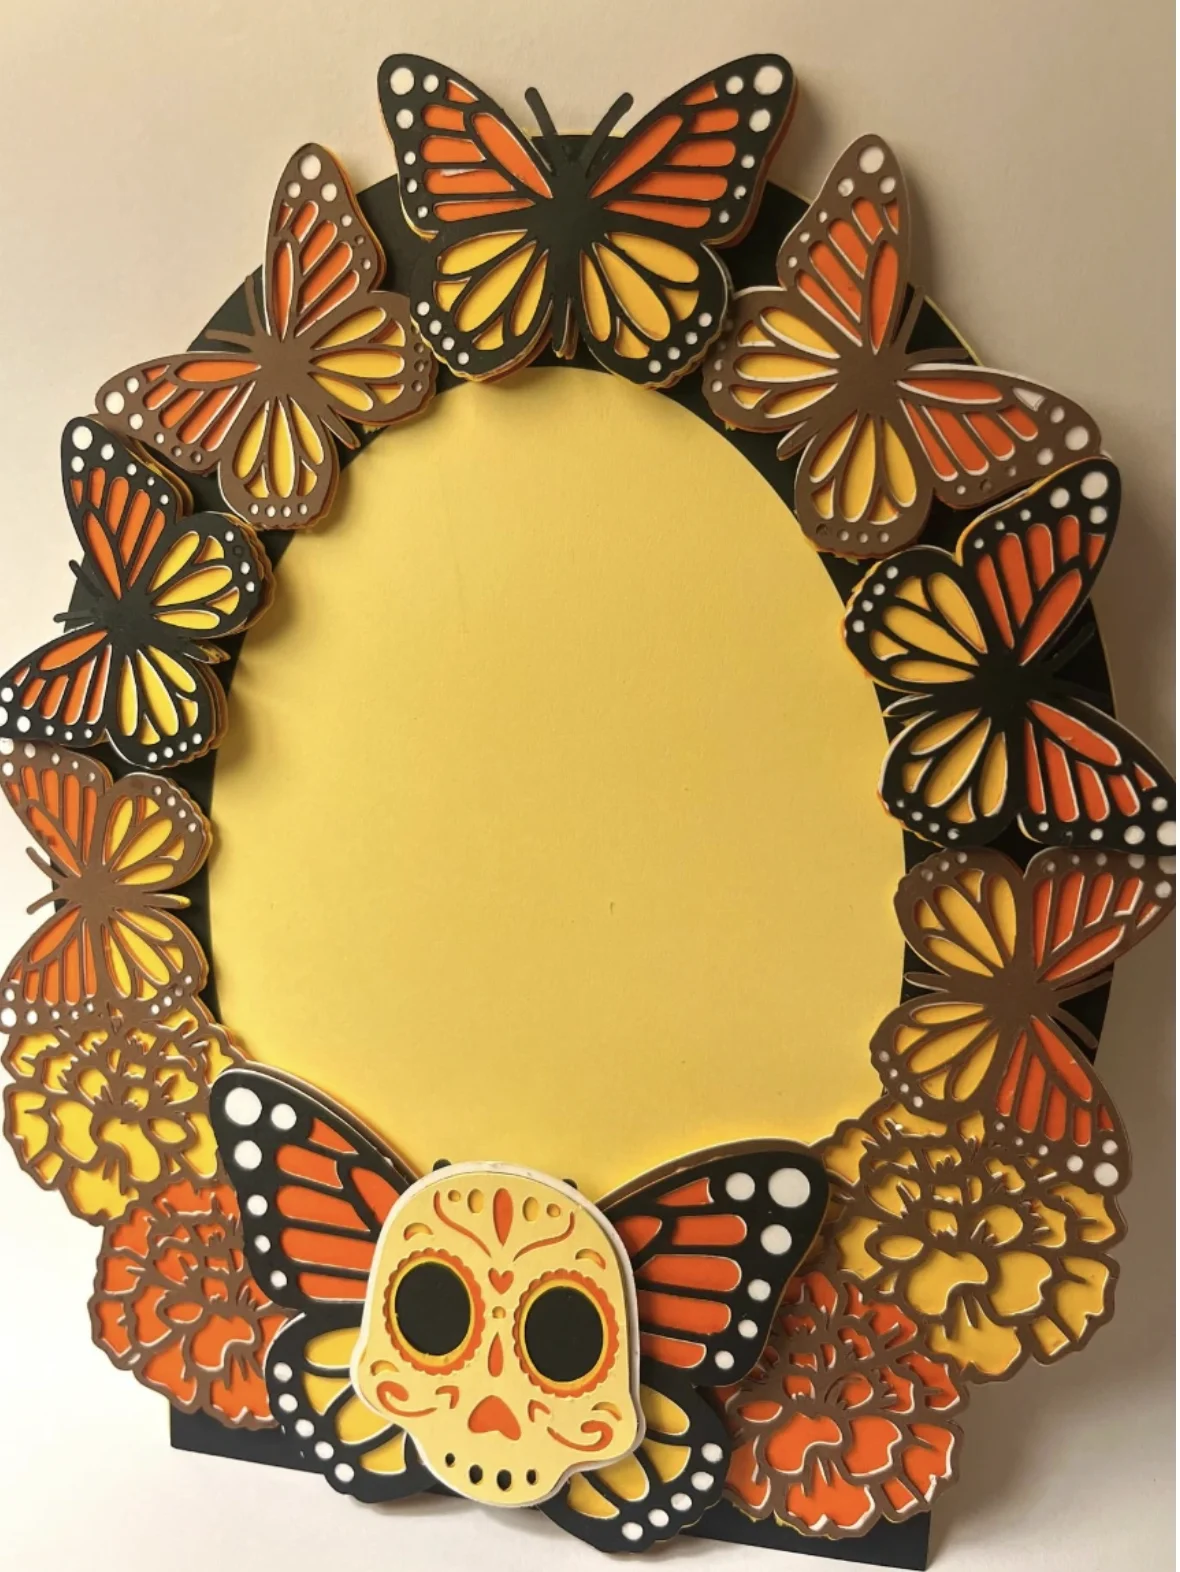
Credit: @shecricuts
This dimensional paper masterpiece demands a serious creative investment. While scrolling past phenomenal Cricut Shirt Ideas has been thrilling lately, this hanging piece catapults the craft game into a whole new stratosphere.
Imagine this vibrant wreath anchoring a Day of the Dead celebration. The juxtaposition of delicate butterflies and that intricate skull, suspended around open space, feels wildly original. Consider this the official signal to haul out the supply stash and start slicing.
How to Make This Craft Cut out the wreath base from thick black cardstock Download and cut templates for marigolds, butterflies, and sugar skull Assemble the paper marigolds from colored cardstock Glue the marigolds along the bottom of the wreath Layer multiple butterfly cut-outs to create depth Arrange and glue the butterflies around the wreath Assemble the sugar skull using contrasting cardstock colors Add any decorative details on the sugar skull, such as paint or glitter Glue the sugar skull to the bottom center of the wreath Allow all pieces to dry completely before handling
Personalized -Two- Rex Birthday Card with Excavator
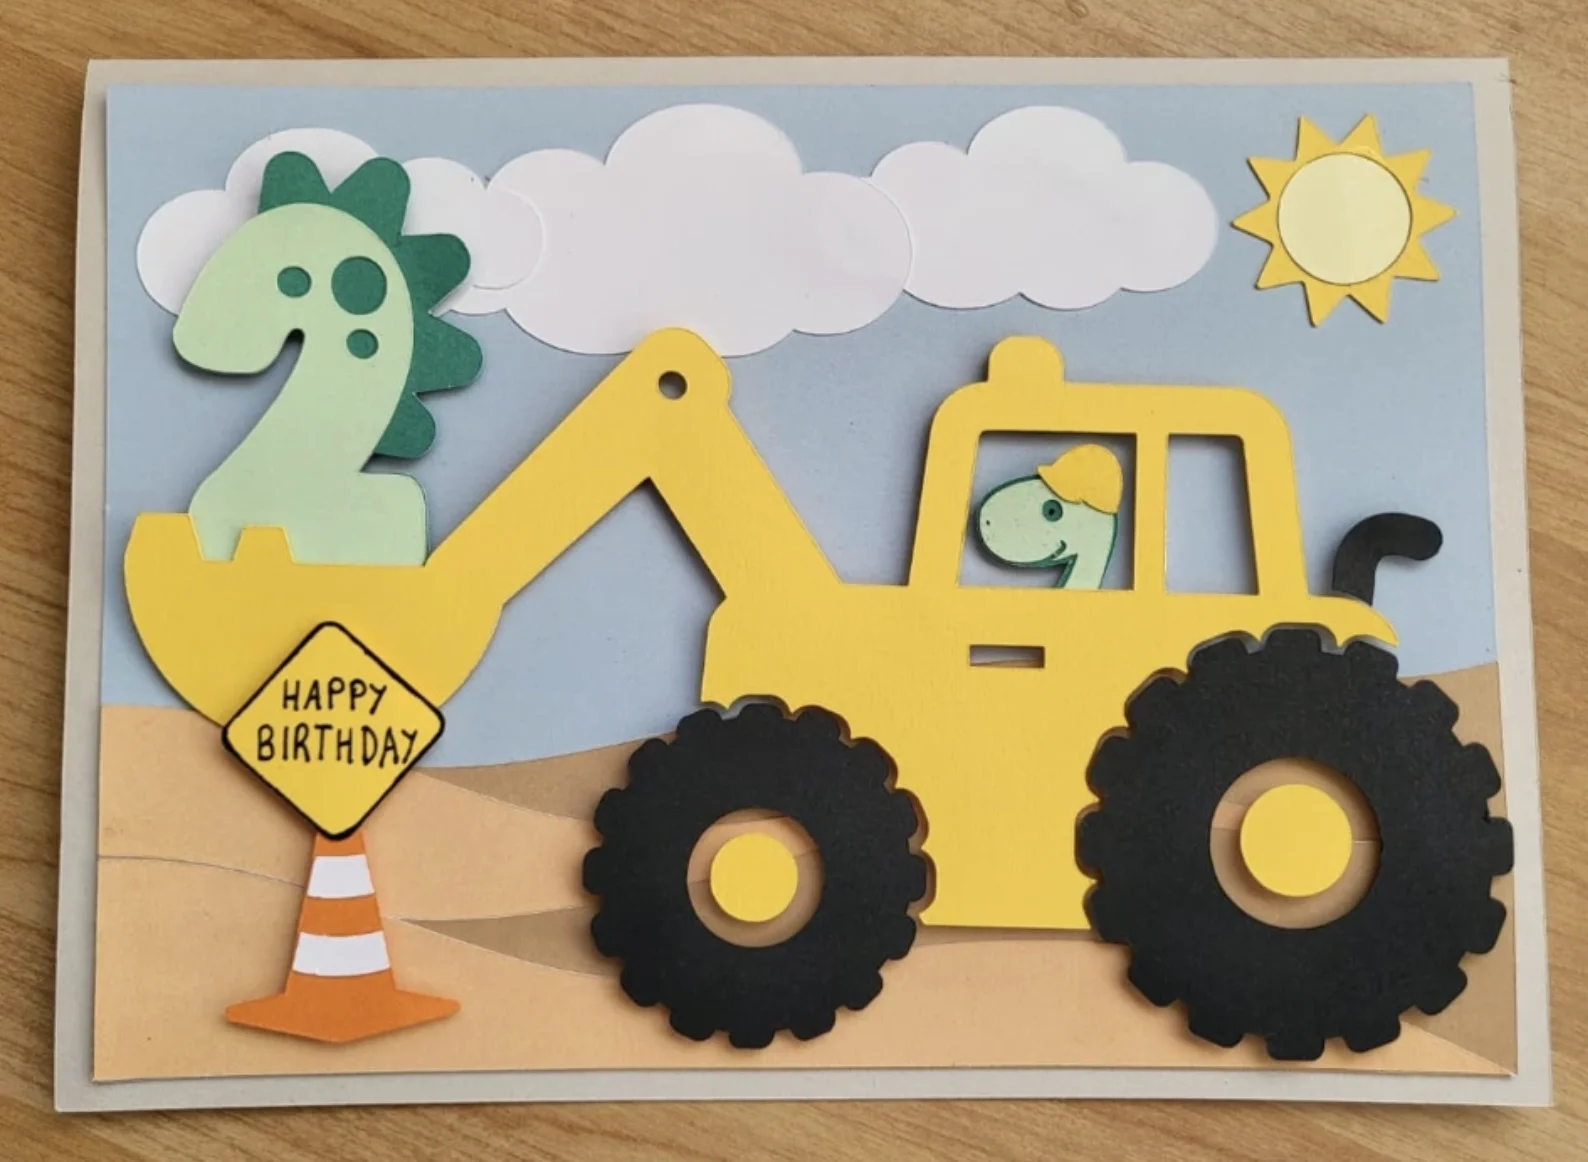
Credit: @mvshobbies
Putting a deeply personal stamp on everything is where the magic truly lives, and this card absolutely understands the assignment! Here’s the secret sauce: the dino-meets-digger concept strikes a brilliant balance between playful whimsy and elevated design.
If the hunt for Cricut Gift Ideas has led you here, treasure awaits. Toss aside those forgettable mass-market cards destined for the recycling bin within hours.
This handcrafted creation carries significantly more emotional weight, functioning almost like a tiny, display-ready artwork. And those little prehistoric accents? Utter perfection.
How to Make This Craft Download and cut excavator and dinosaur template pieces from cardstock Glue the excavator pieces together to create a 3D effect Create the background by layering blue and tan cardstock Cut out white clouds and sun using white and yellow cardstock Adhere clouds, sun, excavator and other elements to the card background Write -Happy Birthday- with a black pen on the traffic sign Secure the dinosaur in the excavator Adhere the -2- to the excavator Embellish with other cardstock and pen detail
Glittery Pink Letter -C- with Paper Roses and Gold Butterflies
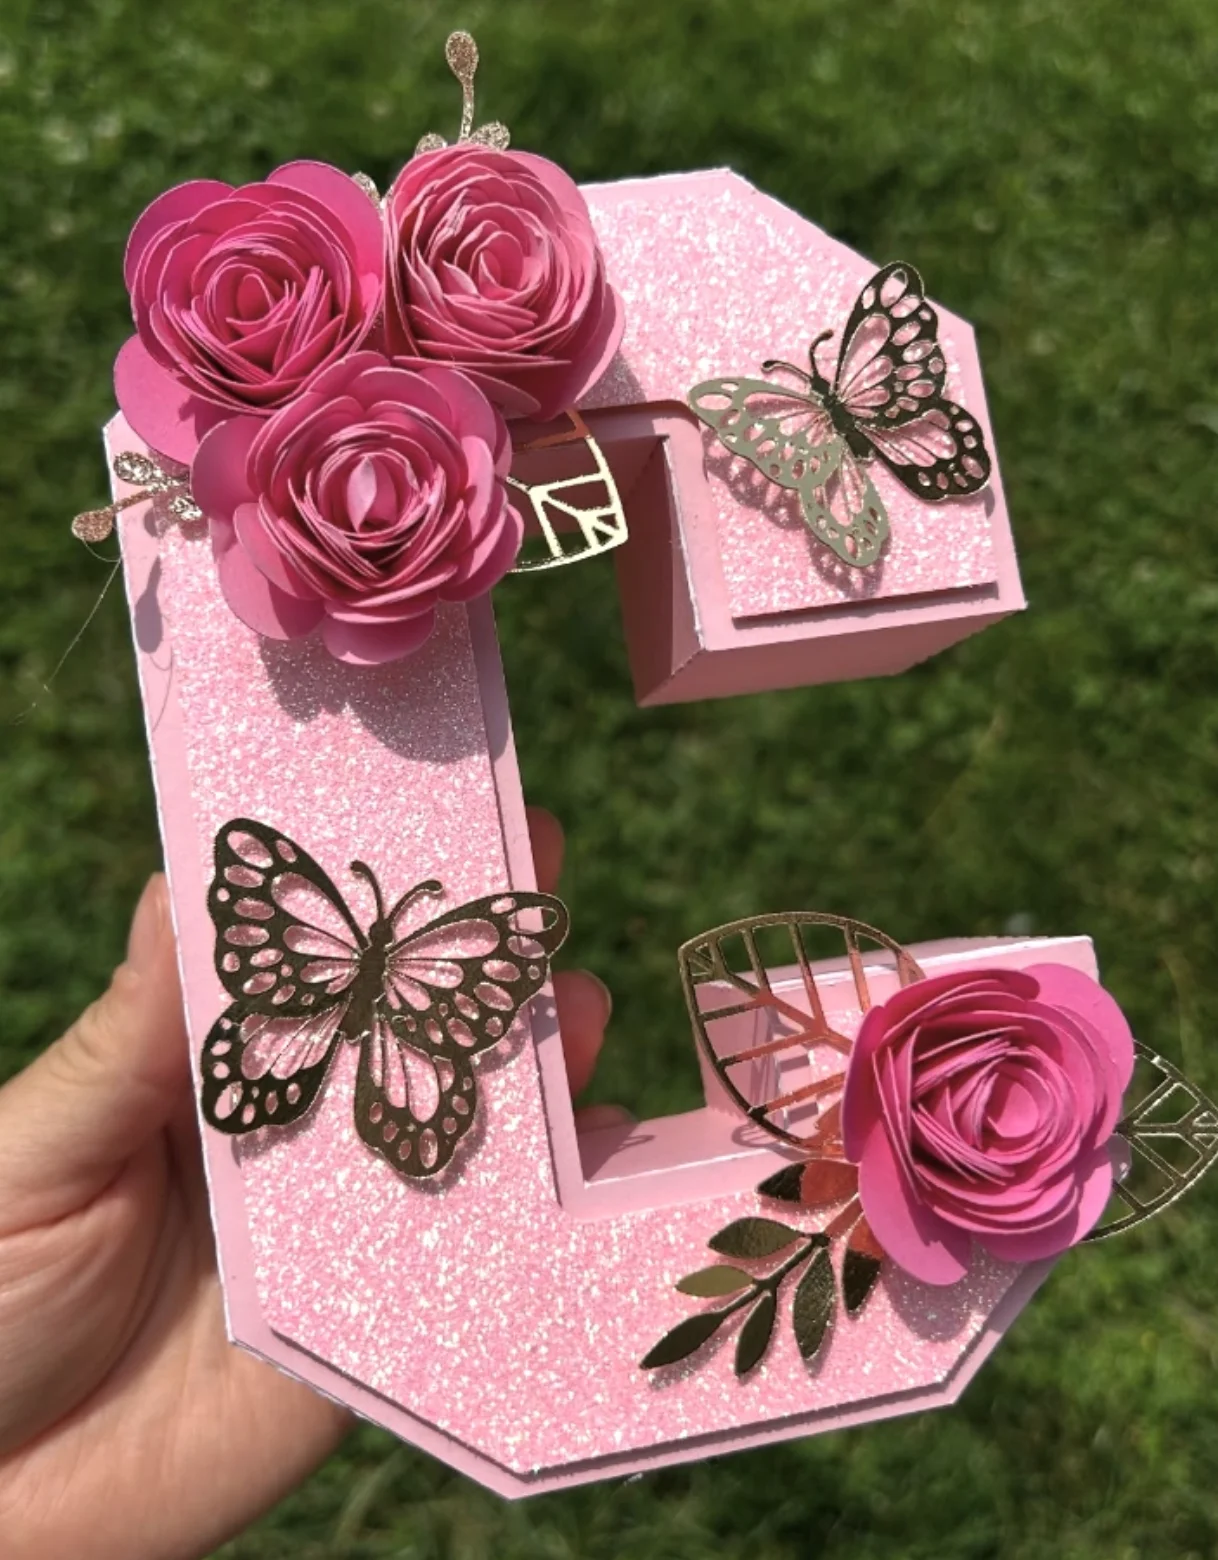
Credit: @kraftybykarla
Pay close attention to how the light dances across the fine glitter coating the letterform, producing a gentle twinkle that feels refined rather than aggressive. The meticulous craftsmanship of those tiny paper roses also deserves a round of quiet appreciation, so painstakingly assembled.
How to Make This Craft Cut letter shape from sturdy chipboard Assemble the structure by gluing the sides Paint with glue and sprinkle fine pink glitter all over the letter surface Cut rose petals from pink cardstock using a die-cut machine or by hand Form each rose by gluing the petals together in a spiral Attach roses, gold leaves, and butterfly embellishments using hot glue Allow glue to dry completely
Buffalo Plaid Christmas Ornaments: Gift, Tree, and Merry Christmas Designs
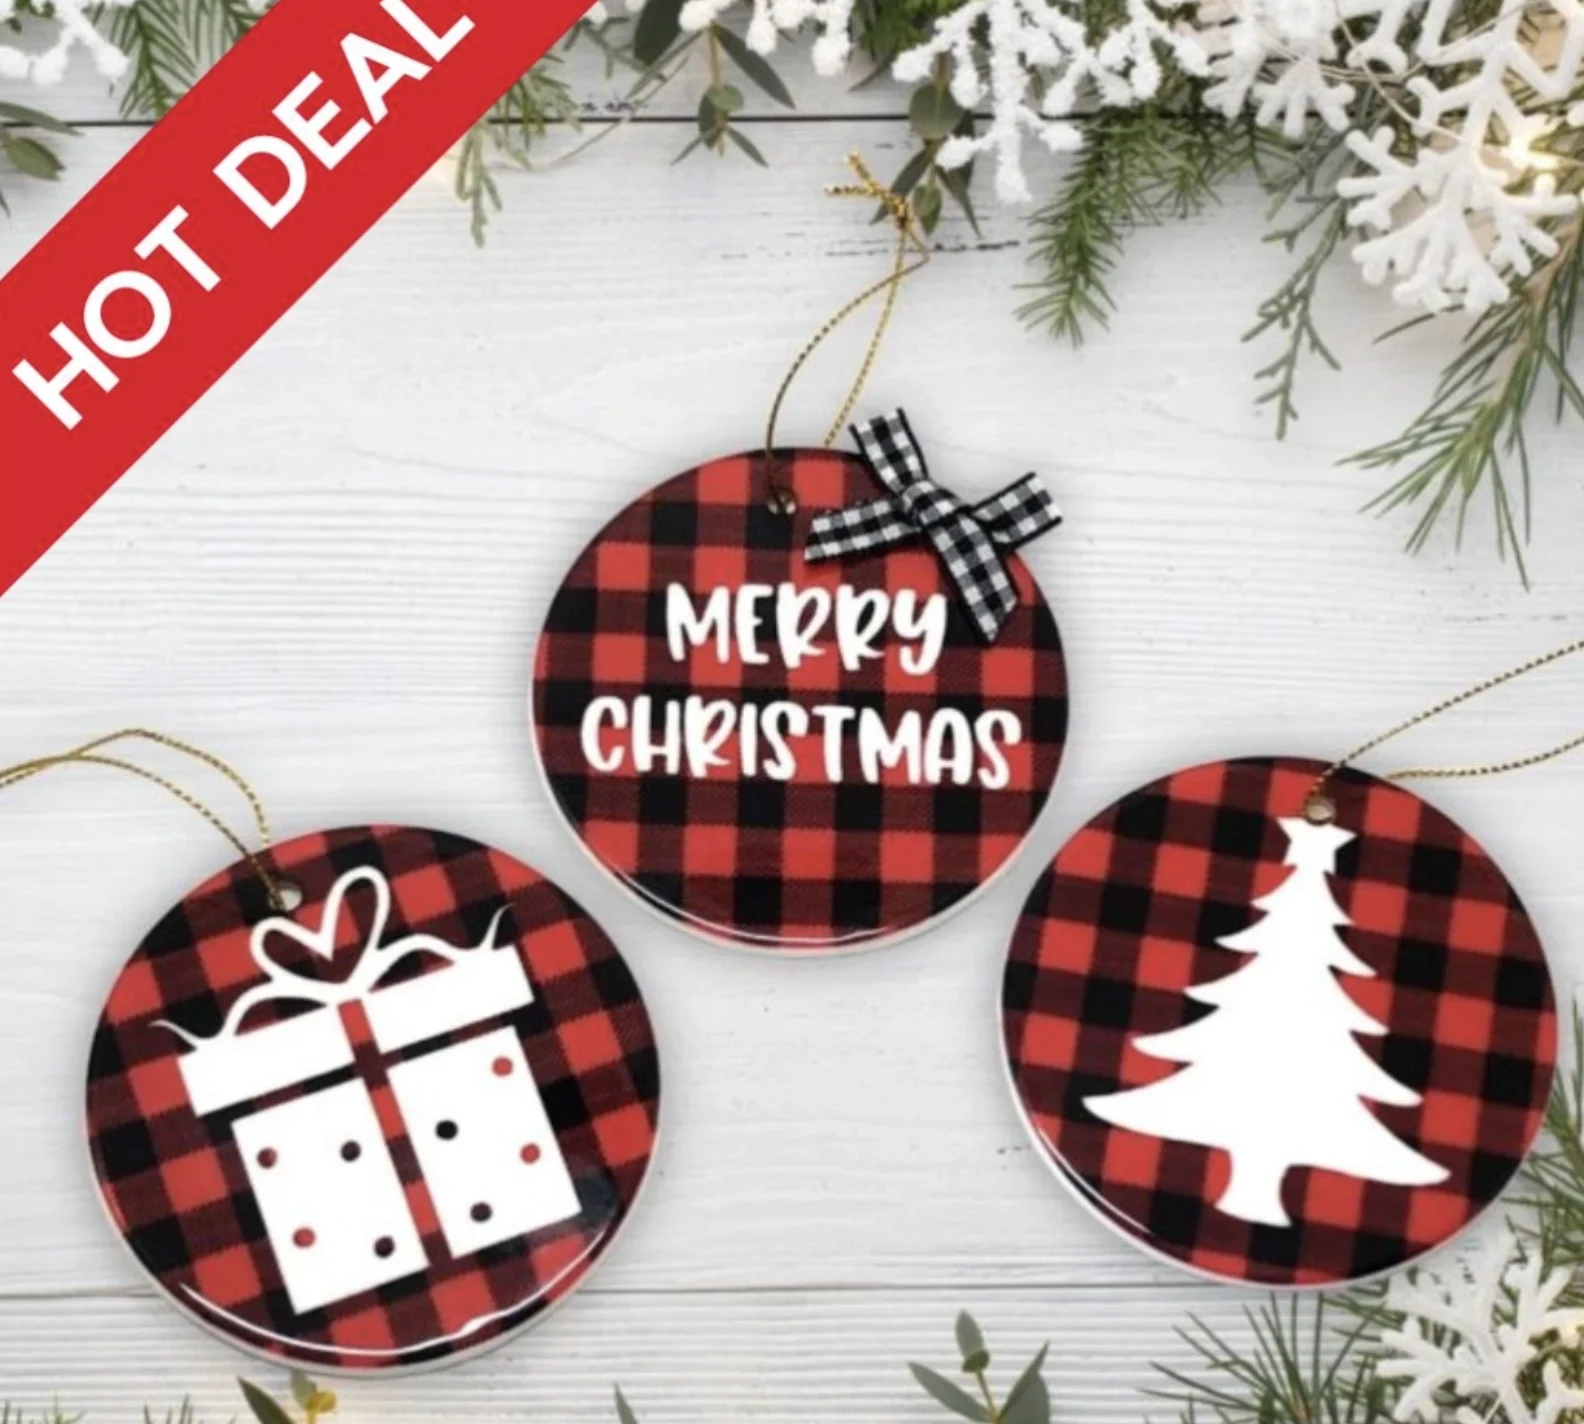
Credit: @jennifer.maker
Do you ever hit a wall trying to locate holiday decorations that feel both affordable and genuinely charming? This snapshot delivers total creative fuel!
The ornament aesthetic reads as delightfully cozy. Tackling these as a DIY mission sits squarely in the sweet spot of possibility!
If the search for ultra-simple Cricut Projects Beginner Ideas is underway, look no further. The combination of that classic buffalo check backdrop layered with the tiny present, evergreen tree, and cheerful greeting feels impossibly cute!!
How to Make This Craft Purchase plain ceramic disc ornaments Paint the disc with red and black plaid paint Let the paint dry completely Design Christmas images on vinyl using design software Cut the vinyl decals with a cutting machine Weed excess vinyl Transfer vinyl design to the ceramic disc Attach a ribbon
Layered Cake Toppers: Roblox, Princesses, Nightmare Before Christmas, and Bee Themes
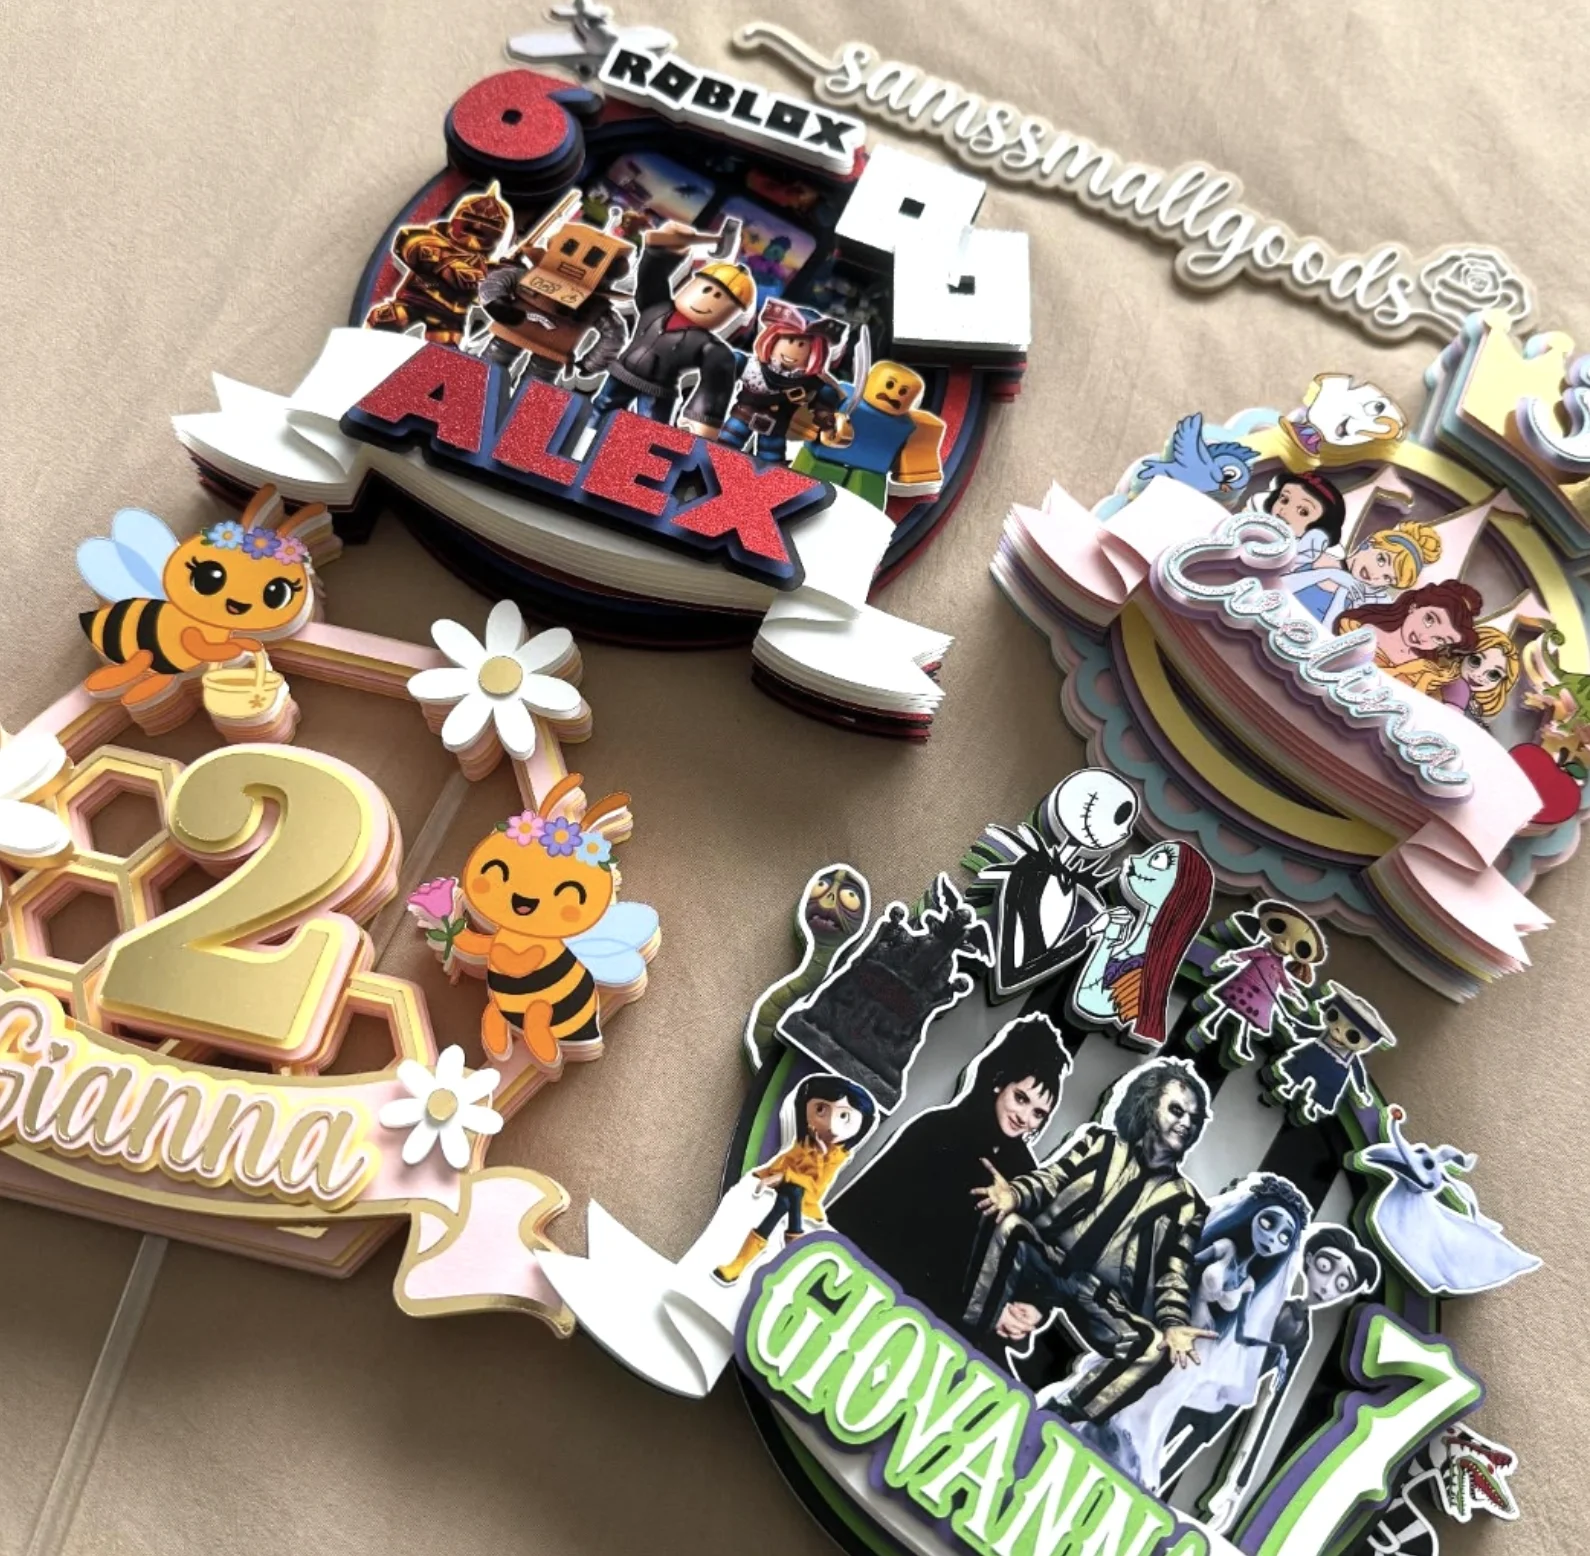
Credit: @samssmallgoods
These layered centerpiece accents swoop in to rescue any parent craving a unique party touch while racing against the clock. The Roblox version will send any young gaming obsessive into a full tailspin of excitement!
The mental floodgates have opened regarding future possibilities; occasionally, these toppers serve as direct visual reference for future shirt ideas vinyl ventures ready to be cut and sold at the upcoming neighborhood artisan market. They hit all the right notes, wildly customized, totally adorable, and significantly less stressful than actually baking a flawless cake.
How to Make This Craft Pick desired characters and age themes Download images online Cut cardstock using electronic cutting machine Weed excess card stock Layer each card stock design Secure layers using strong adhesive Attach characters using adhesive foam dots Affix cake topper to food-safe sticks
Clear Acrylic Bookmarks with Pink Heart Motifs
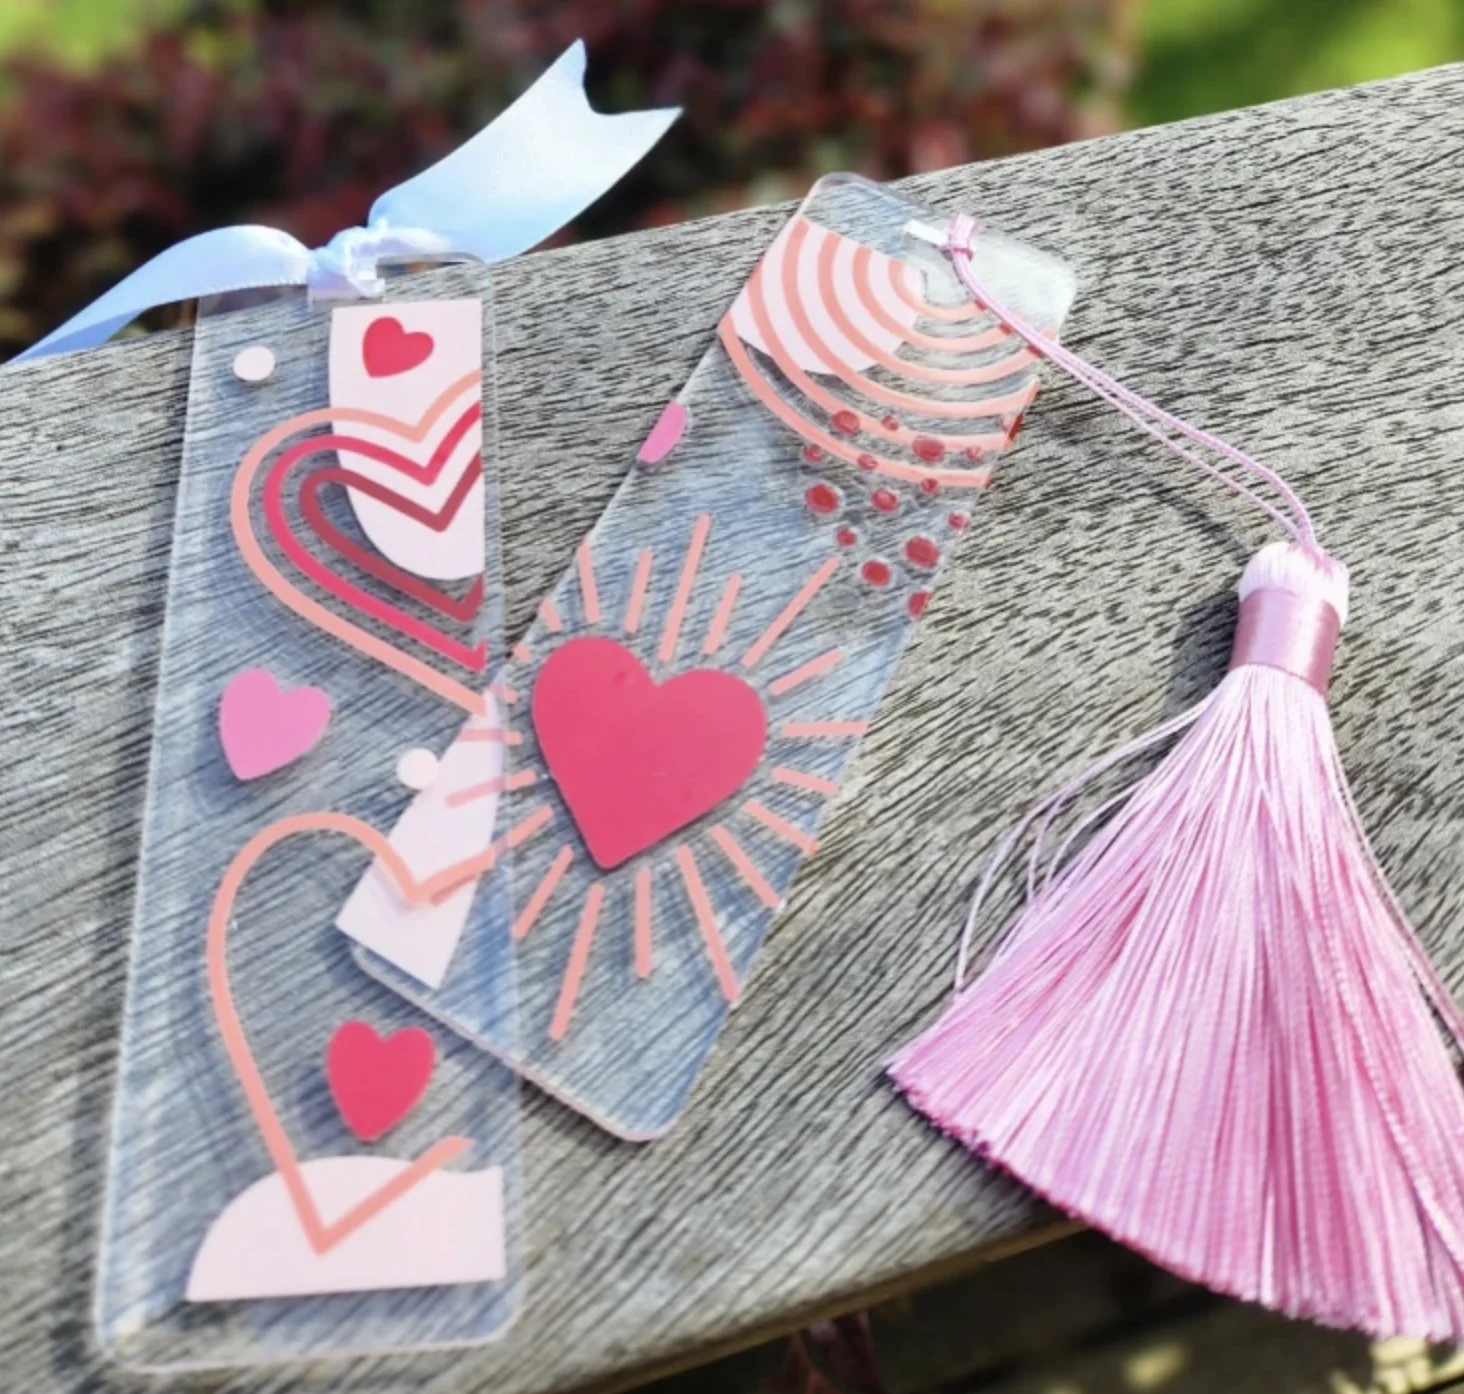
Credit: @_byrania_
These are sparking every possible happy emotion right now. To start, the transparent acrylic foundation delivers a crisp, modern minimalism that feels so current.
Next, zero in on that color story, the layered shades of blush and rose feel whisper soft yet harmonize in a deeply satisfying way. The version sporting the pale pink tassel specifically commands full attention, it makes a quiet but firm declaration. Any self respecting DIY lover would instantly fall head over heels for these streamlined Cricut Projects, no question about it.
How to Make This Craft Purchase clear acrylic bookmark blanks Design heart themed images using design software Use a Cricut or Silhouette Transfer the image to the acrylic blank Smooth out any bubbles Drill a small hole at the top of the bookmark Thread ribbon through the hole Attach a decorative tassel
Truthfully, diving into Cricut Maker projects opens a portal to a genuine happy place. There exists a profound and deeply satisfying magic in plucking a fleeting idea from thin air and transforming it into something solid you can hold in your hands. Hopefully, this flood of inspiration nudges you to wake up your own dusty machine or maybe even bravely take the leap to acquire one. The real question remains: What will YOU dream up and bring to life?
Leave a Comment
Your email address will not be published. Required fields are marked *
Type here..
Email*
Website