


Christmas is quietly tiptoeing closer, isn’t it? Can you feel that festive hum starting to build? It’s the perfect season for sending little bursts of joy, and nothing captures that quite like a beautiful holiday card.
Are you on the hunt for something truly unique this year? Maybe you’re dreaming up cute Christmas card ideas that feature your adorable pets? Or perhaps your hands are itching to get crafty with some completely handmade Christmas card designs?
Let’s explore a world of gorgeous inspiration that will help you wrap up the warmest wishes and send them out into the world.
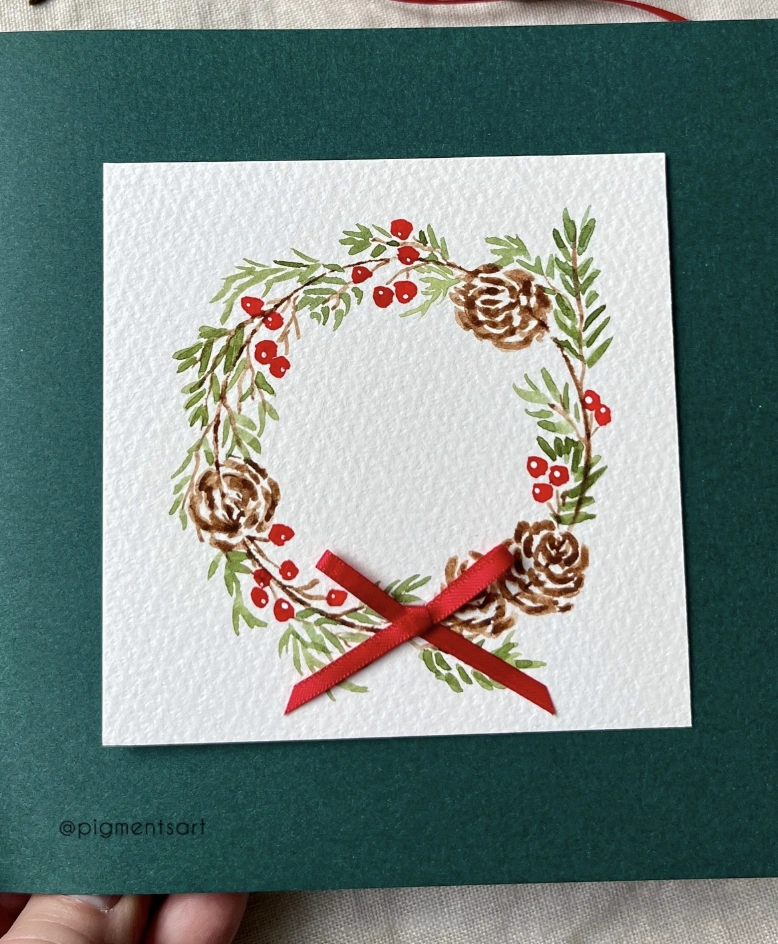
Watercolor Christmas Wreath Card
Credit: @pigmentsart
This delicate watercolor wreath is a masterclass in quiet elegance. It feels effortlessly simple yet undeniably refined.
If the thought of DIY holiday cards is dancing in your head, let this be your sign to explore basic watercolor tutorials. There’s a whole universe of easy Christmas card ideas waiting. Turning it into a family activity with the kids just makes the whole experience even sweeter.
How to Make This Craft: Begin by gently sketching a circle on watercolor paper. With a fine brush, paint soft green leaves to build the wreath’s foundation.
Dot in small taps of red paint to create clusters of berries. Blend shades of brown to add detailed pinecone accents.
Once the watercolor dries thoroughly, attach a tiny red ribbon at the wreath’s base. Refine any outlines and add finishing touches.
Mount the piece onto cardstock for displaying or mailing. Remember to let each paint layer dry completely before introducing a new color.
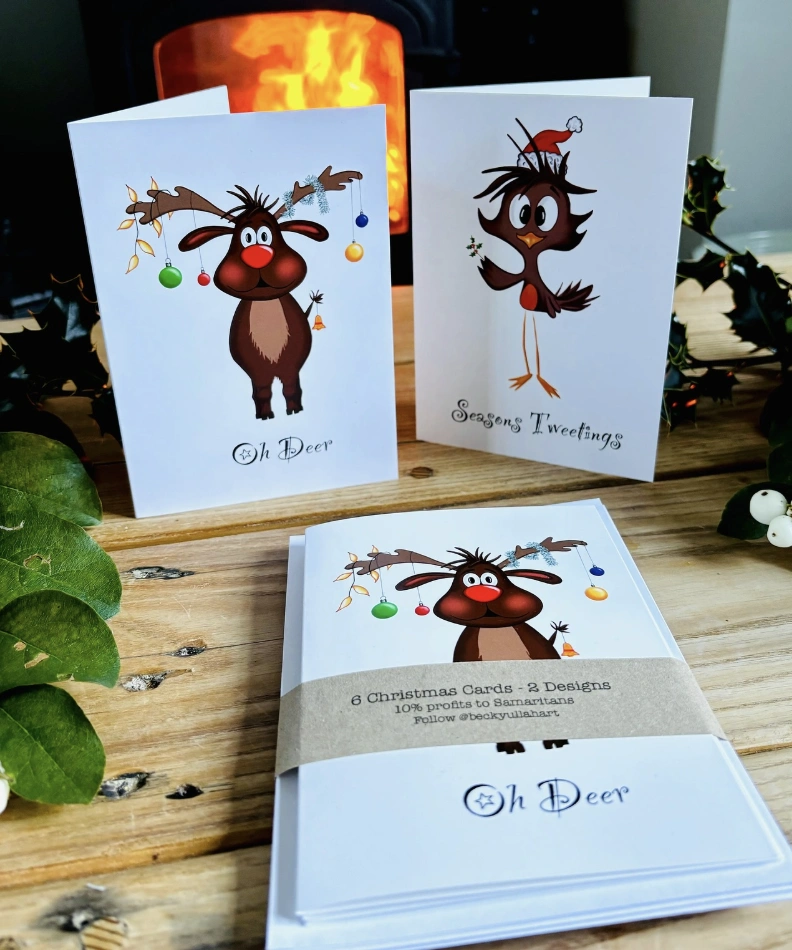
Oh Deer and Seasons Tweetings Christmas Card Set
Credit: @beckyullahart
These designs feel like the perfect companion for a snug, fireside holiday gathering. They strike that magical balance between playful and polished.
Sending these to your closest friends or family feels like a warm, personal gesture without being overly fussy. Hunting for unique handmade-style designs can be a real mission, so grabbing a pre-made set like this one lets you share the charm while keeping life simple.
How to Make This Craft: Design original festive animal illustrations using digital art software. Compose a layout featuring a cheerful holiday phrase like “Oh Deer” or “Seasons Tweetings.” Print the designs on high-quality cardstock using a home printer or a professional service.
Score the cardstock cleanly for a crisp fold. Trim the cards to size with a paper cutter.
Assemble the finished pieces into coordinated sets. Bundle the card sets with paper and tie them with twine. Include a thoughtful note about donating a portion of profits to Samaritans.
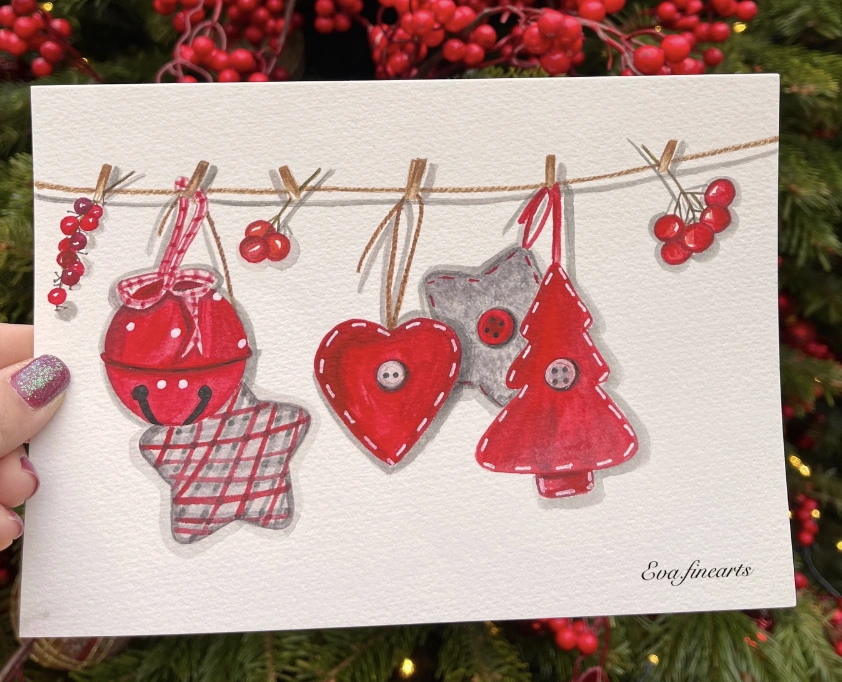
Watercolor Christmas Card with Festive Hanging Ornaments
Credit: @flourishingxpression
Something about watercolor always evokes a deep sense of nostalgia. This particular card showcases hand-painted ornaments dangling as if they’re set out to dry, a clever nod to cozy, homespun holiday rituals.
It’s a brilliant choice if you’re searching for cute Christmas card ideas that radiate authenticity. The gentle, muted red and gray palette ensures the card won’t visually clash with anyone’s festive decor, allowing it to blend seamlessly into a holiday mantelpiece display.
How to Make This Craft: Start with a smooth piece of watercolor cardstock. Draw the outline of a string dotted with miniature clothespins.
Along the string, sketch outlines for festive shapes like hearts, Christmas trees, stars, and baubles. Paint each shape with watercolors, selecting hues that speak to you.
Add intricate patterns onto the shapes for extra detail. Adhere small buttons to each ornament using white glue.
Wait for the glue and watercolor to dry fully. Sign your artwork and prepare your holiday greeting for its journey.
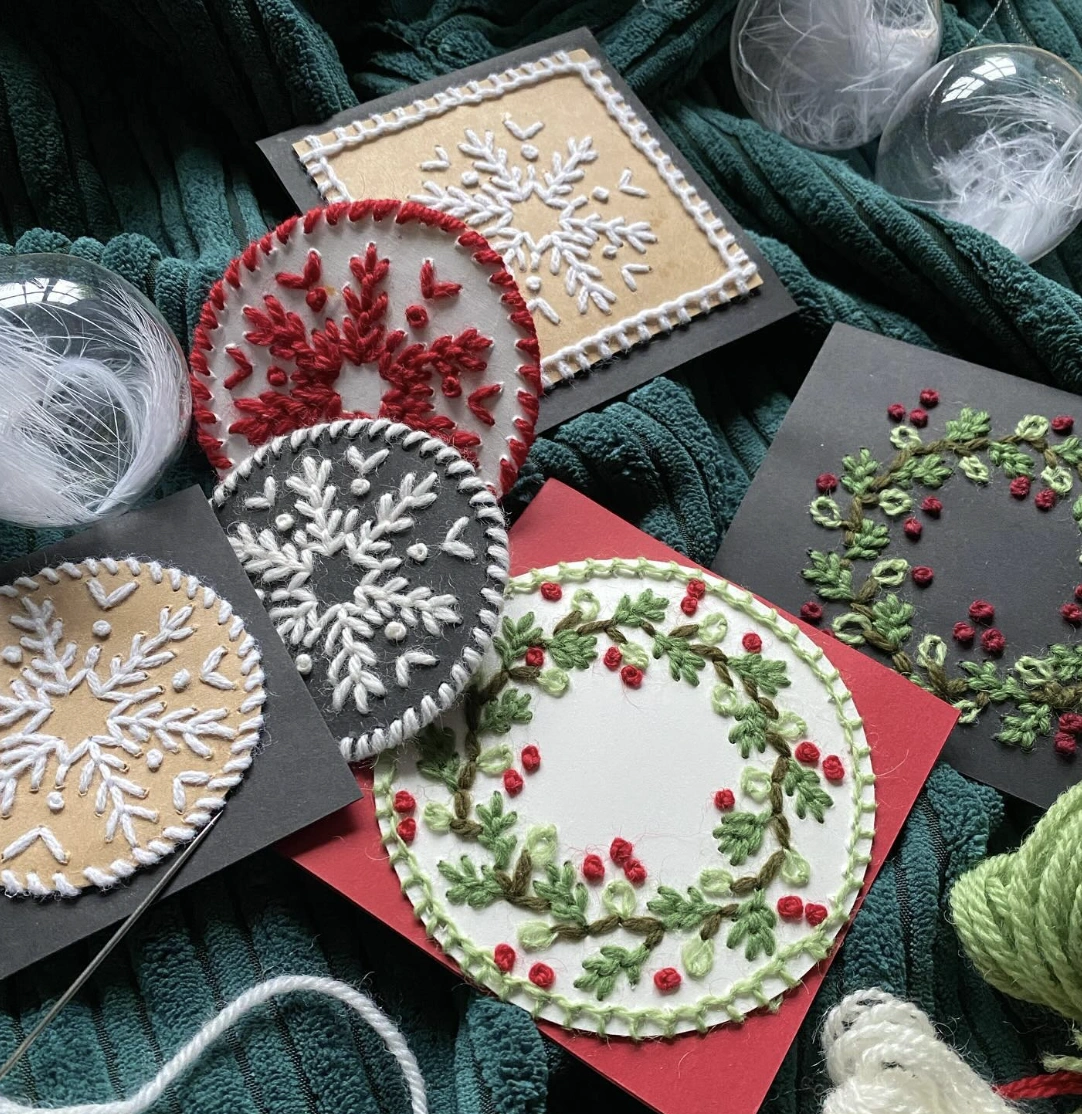
Embroidered Snowflake & Wreath Christmas Card Design Set
Credit: @aravisdolmenna
If a cozy, handcrafted aesthetic is your entire vibe, these hand-embroidered cards are everything. Talk about going the extra mile.
Any friend who lives for a DIY project would completely lose their mind opening an envelope to find one of these inside. While the wreaths might steal the show for some, that snowflake Christmas card design holds its own unique magic, too. They’re so distinctive and special that the recipient could easily pop one into a tiny frame as a piece of miniature art.
How to Make This Craft: Cut matching circles from paper and felt to create your embroidery base. Lightly draw snowflake or wreath motifs directly onto the felt circles.
Thread your needle with embroidery floss and knot the end securely. Using a combination of back stitch, satin stitch, and French knots, bring your designs to life on the felt.
Embellish each piece with different decorative stitching patterns. Once finished, glue the embroidered felt circles onto their corresponding paper circles.
Allow the glue to set completely, resulting in lovely, durable little coasters. Now you can enjoy a cozy beverage without a single worry.
Assorted Handmade Christmas Card Collection: Trucks, Bikes, and Winter Scenes

Credit: @macoron.us
What truly sets this collection apart is the unmistakable homemade warmth. Forget flat, mass-produced greetings.
These cards pop with dimension thanks to layered paper cutouts and dainty little bows. Some designs are pure charm, like the classic red truck hauling a fresh Christmas tree, while others feel whimsical with a vintage bicycle motif.
The winter village scenes possess a quiet, refined elegance. It’s a quality handmade card, delivering that thoughtful extra touch that so many people deeply cherish.
How to Make This Craft: Pick a base cardstock in a vibrant festive color. Emboss the surface to introduce a layer of rich texture.
Use metal dies to cut out shapes like vintage trucks, evergreen trees, and quaint houses. Layer these die-cut pieces to construct a dimensional winter tableau.
Secure the shapes to the embossed cardstock using a tape runner. Fashion a sentiment banner with a trusty label maker.
Add final embellishments like ribbons or tiny bows. Pen your personal message onto the inside of each completed card. Tuck the card into a coordinating envelope and address it to a beloved recipient.
Watercolor Christmas Card of a Child Dressed as a Christmas Tree
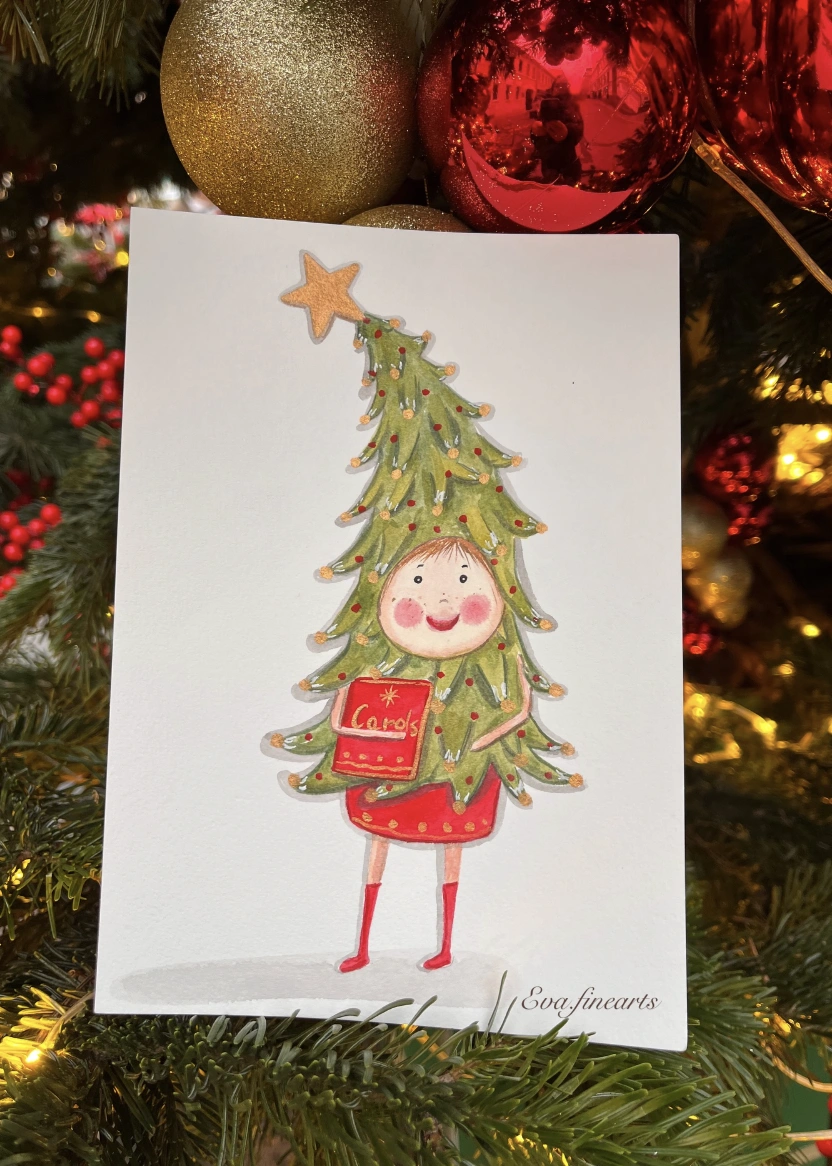
Credit: @eva.finearts
This is the kind of card you’d gleefully send to every single person on your mailing list. Imagine pulling this little masterpiece out of the mailbox.
It earns an instant spot on the refrigerator door, without question. The charm factor is so high you might want to hang it up as decor.
This is serious Christmas card inspiration for future holidays and a powerful argument for creating a tree-themed design yourself. The search for the perfect paper and watercolors starts now.
How to Make This Craft: Use a pencil to lightly sketch the outline of the child-tree figure. Apply watercolor washes to develop the skin tones on the face, arms, and legs.
Paint the tree costume using a rich variety of green watercolor shades. Dab a golden metallic watercolor onto the star perched at the very top.
Highlight the Christmas book by painting it red and inscribing “carols” with a white marker. Define the facial features using precision fine liner pens.
Deepen the dimension with watercolor pencil shading. After the paint dries completely, gently erase any lingering pencil marks.
Seal the paint with a fixative spray to guard against smudges. Write a personalized note on the back.
Handmade Holiday Card with Santa Legs in Chimney
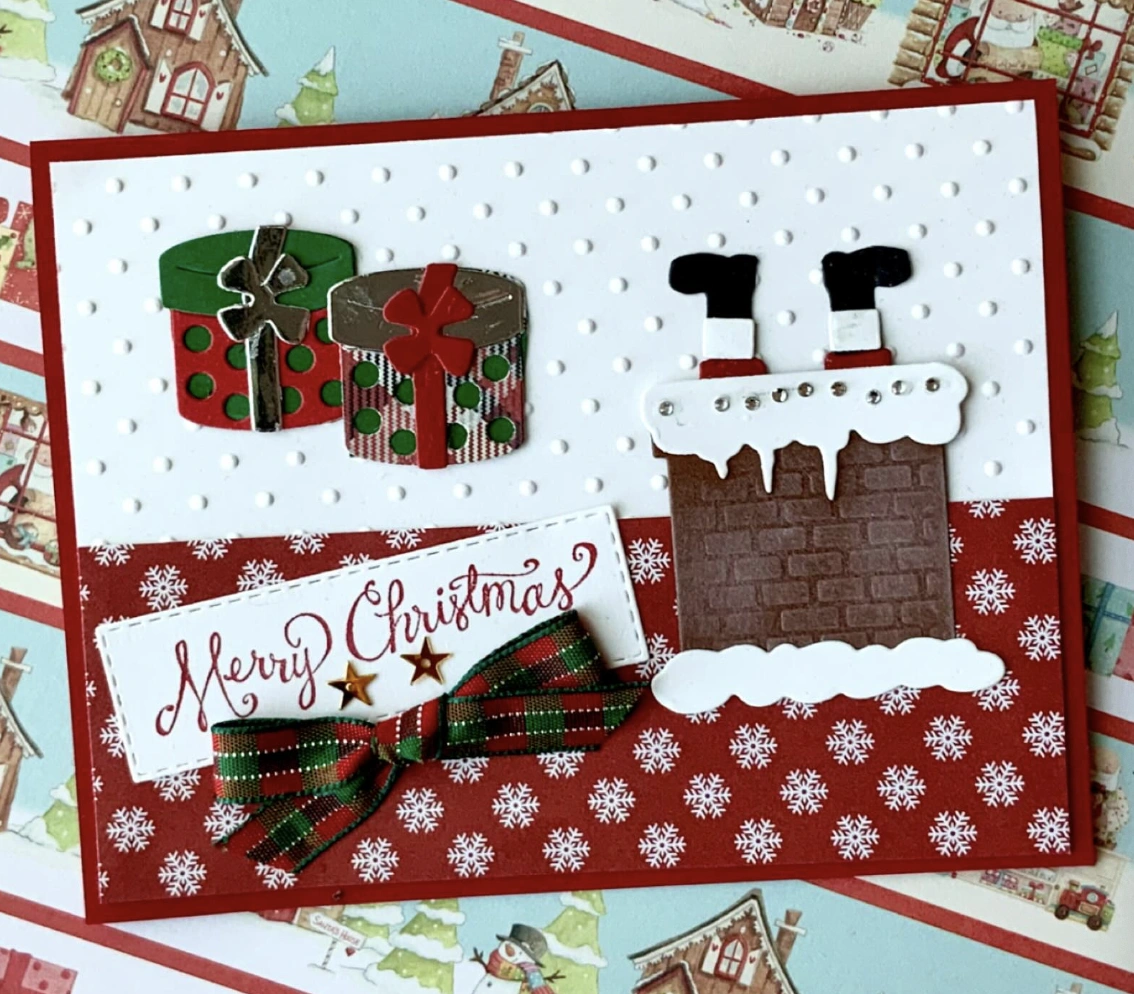
Credit: @macoron.us
This card communicates so much through its intentional little details. Notice the raised, polka-dot textured background, providing a subtle tactile surprise.
The whimsical chimney and dangling Santa legs radiate pure warmth. Consider pairing this thoughtful card with gifts that echo its artisanal spirit, perhaps experiential presents or small-batch artisan goods. Choosing Christmas prints for the gift wrap would complete a truly bespoke and coordinated look.
How to Make This Craft: Trim a 5×7 inch card base from sturdy red cardstock. Layer a 4×6 inch sheet of embossed polka dot paper on top.
Cut a 2 inch wide strip from snowflake patterned paper. Adhere this snowy strip across the bottom of the card design.
Cut out and assemble two charming little gift boxes using decorative paper. Die-cut and emboss a chimney shape and Santa’s iconic legs.
Attach the gift boxes and the chimney cutout to the prepared card. Cut out a label reading “Merry Christmas” and mount it using foam adhesive for a pop of depth.
Finish by adding a neatly tied bow using plaid ribbon. Trim any uneven cardstock edges for a clean, polished final result.
Variety Pack of Luxe Christmas Cards with Ribbon Accents
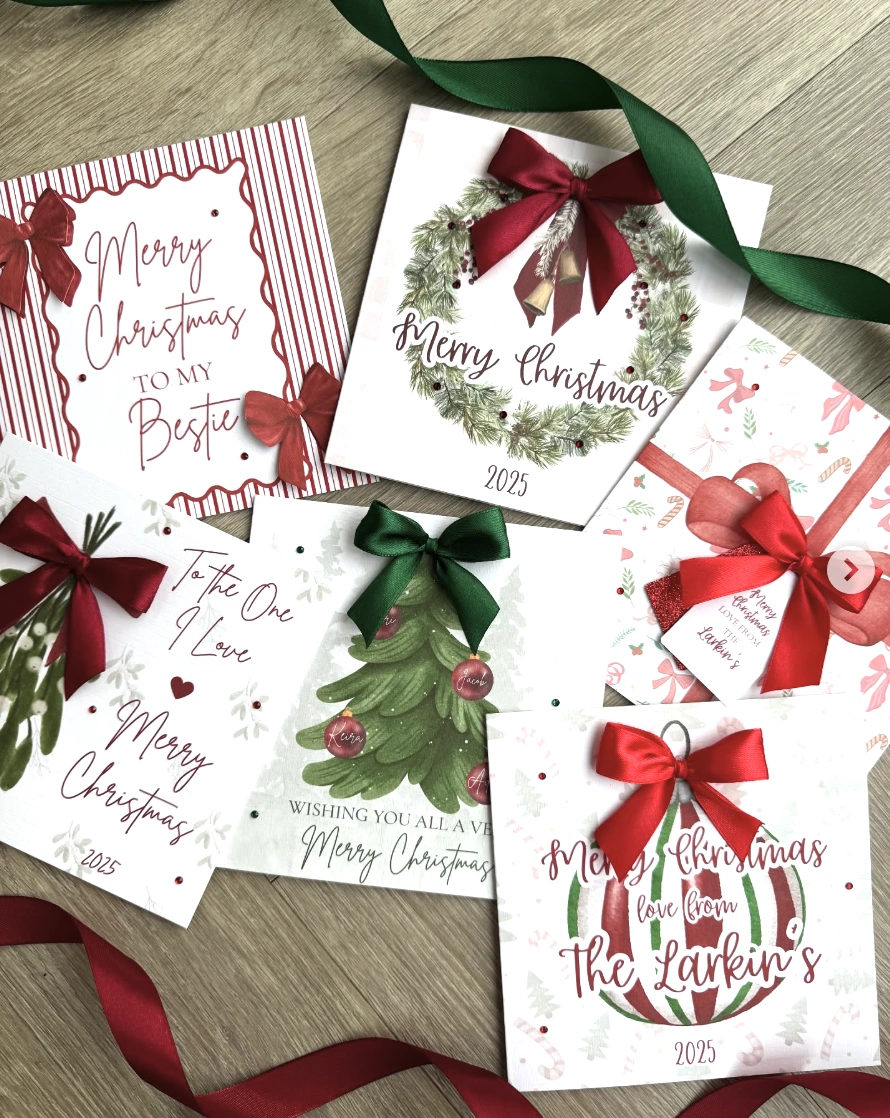
Credit: @cardsandcreationsbycb
It’s easy to picture a friend who throws legendary holiday soirées gravitating toward these beauties. For someone who adores making homemade style cards, these printed versions deliver the exact same heartfelt aesthetic but with far less mess.
And those velvet ribbons? Absolutely captivating. Ultimately, it’s all about those luxurious little details.
How to Make This Craft: Select beautiful pre-printed Christmas card designs from a specialty craft shop or print your own at home. Select coordinating ribbons in lush shades of red, green, and white.
Measure and cut lengths of ribbon, leaving enough excess for creating bows. Affix the ribbons to the cards using precision craft glue or strong double-sided tape.
Tie the ribbon lengths into decorative bows and secure them with tiny glue dots. Handwrite a warm, personal message inside every single card.
Ensure the adhesive has dried thoroughly before the cards are handled. Apply polished address labels for a crisp, effortless finish. Bundle the finished stack together with a final festive ribbon and prepare to send them out.
Have a Sweet Christmas Handmade Gingerbread Card
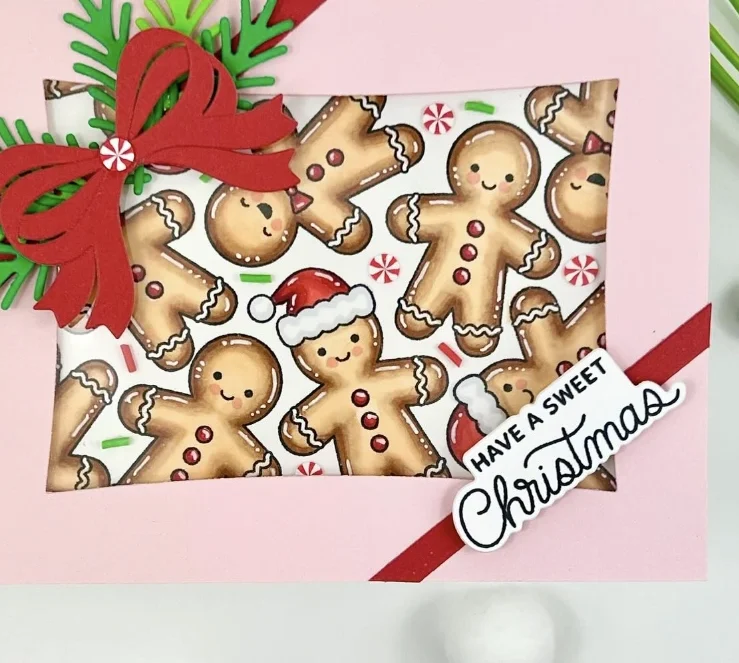
Credit: @hanhmadecards
This design is literally flawless for sending out to the entire extended family, especially when you want super cute Christmas cards that look like they took countless hours to create. The background pattern of tiny gingerbread men is irresistibly adorable, and that bow?
Simply to die for. It’s the perfect project to attempt yourself. Gather your supplies and let’s get crafting.
How to Make This Craft: Cut a 5×7 inch card base from soft light pink cardstock. Build a window frame using a slightly smaller sheet of cardstock.
Use a die-cutting tool to punch out gingerbread men from patterned paper. Adhere the patterned paper cutout snugly behind the window frame.
Arrange the gingerbread men artfully inside the window to construct a delightful holiday scene. Form a lush bow using vibrant red ribbon.
Tuck some festive paper greenery around the window for embellishment. Attach a tiny candy-shaped embellishment to the center of the red bow.
Stamp or handwrite “Have a Sweet Christmas” onto a small tag. Mount the tag to the card with foam adhesive for dimensional impact. Glue a red ribbon diagonally across the card for a final pop of festive color.
Hand-Painted Christmas Tree Card with Little Robin
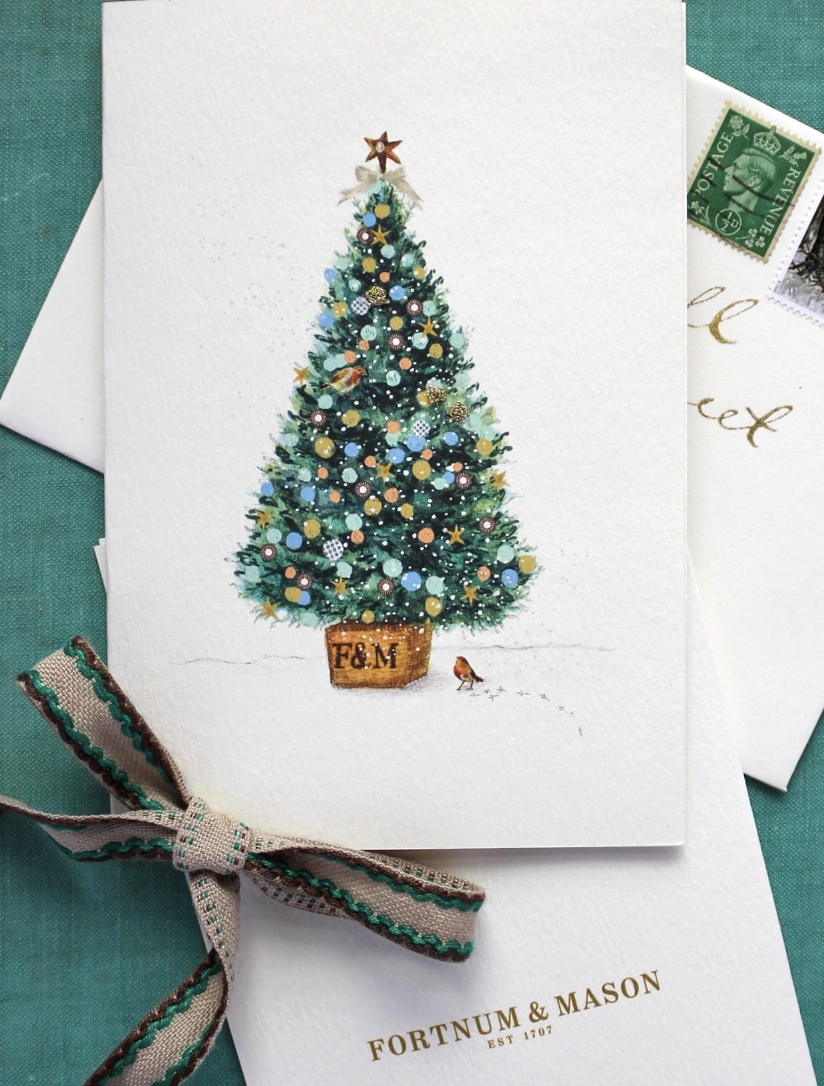
Credit: @elenadeshmukh
Life gets busy, so buying holiday cards in bulk is often the default. But these hand-painted treasures offer a serene and beautiful pause from the seasonal chaos.
Sending one out is an undeniably classy touch, the perfect choice for those relatives who seem to own everything already. This year, instead of reaching for a generic greeting, dedicating a little more time to creating something special feels right. A card like this pairs beautifully with a heartfelt personal note.
How to Make This Craft: Choose a premium quality blank greeting card. With a light touch, sketch a Christmas tree silhouette using a pencil.
Lay down light washes of green watercolor to form the tree’s foundation. Build depth and dimension by layering on progressively darker shades of green.
Dot the branches with painted ornaments in a rainbow of colors. Tap on specks of white gel pen to mimic falling snow or gentle sparkle.
Use watercolors to paint a delicate basket and a tiny robin resting at the base of the tree. Allow the entire painting to dry completely.
Carefully erase any visible pencil guidelines. Attach a silk ribbon to the card as a final festive flourish.
Handmade Floral Christmas Cards with Embroidery Details

Credit: @sarahbecvardesign
If a hint of vintage and handcrafted charm makes your heart sing, these are the cards for you. Beyond just being beautiful, they would also make a remarkable gift to mail to your family and friends.
The brainstorming for fresh Christmas card making ideas is already in full swing just looking at these. Calling all boho-chic enthusiasts and artsy souls, this is your cue to try recreating these stitched beauties.
How to Make This Craft: Begin by cutting out your chosen fabric shapes, think stockings, little birds, or hanging ornaments. Position the fabric shapes onto your blank cards, using fabric glue or straight pins to hold them steady.
Carefully stitch around the perimeter of each shape with a sewing machine, or work by hand with a neat running stitch. Add decorative details using embroidery thread, such as the veins in holly leaves or charming stitched patterns.
Tie a tiny, elegant bow out of embroidery floss or ribbon and stitch it onto each fabric shape. Inscribe a beautiful personalized message, like “Merry Christmas” or “Happy Holidays,” using a fine-tipped pen.
Snip away any stray threads for a clean finish. Adhere a backing card to the inside front cover to neatly conceal the stitching on the reverse side.
Snow Day Cutout Card: “Happy Holidays”
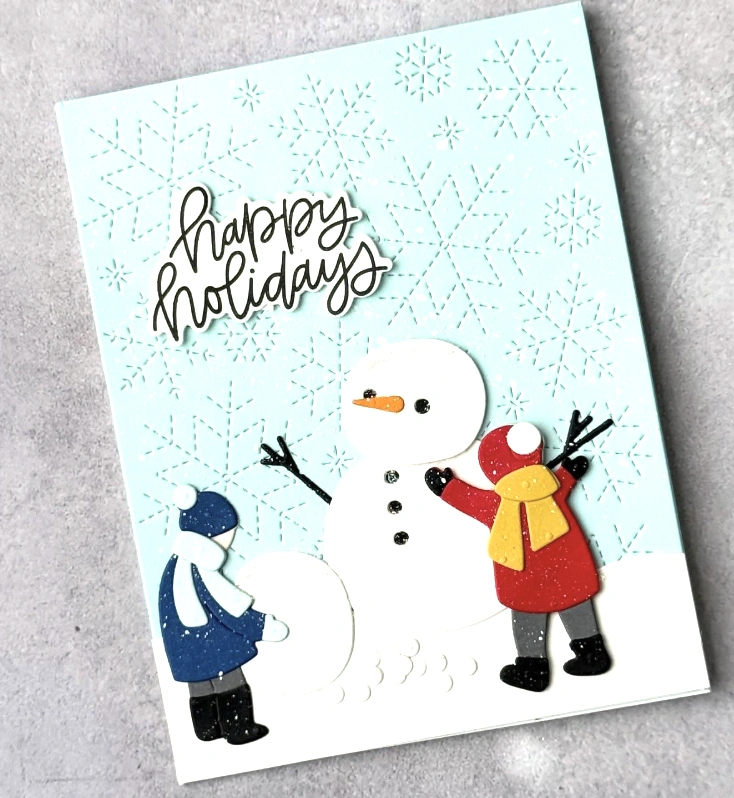
Credit: @marzipanpaperie
The stitched snowflake pattern in the background is the secret weapon that elevates this card from simple craft to sophisticated chic. That subtle texture really makes the design sing.
Notice how the artist used varying heights for the little snowman family, it creates such a lovely sense of dimension. Finally, a snowman that feels completely original. For anyone seeking Christmas card inspiration that is sweet without being syrupy, this design is the answer.
How to Make This Craft: Use a die-cutting tool to punch a snowflake pattern from soft baby blue cardstock. Die-cut playful snowmen, bundled-up children, cozy hats, and scarves from white, red, blue, yellow, and black cardstock.
Adhere the intricate snowflake cardstock layer onto your card base. Build the snowman and children figures piece by piece, layering them with glue or foam tape for a 3D effect.
Assemble the hat, scarf, and clothing details onto each paper person. Apply a “happy holidays” sentiment banner using foam adhesive strips.
Add fluffy white snow piles to the bottom edge using foam adhesive for a tactile ground. Let the glue set until it’s completely dry.
Watercolor Christmas Card with Ornament Motifs

Credit: @dewintonpaperco
Step away from the tired Santa sweaters and predictable reindeer antlers. This season is all about channeling a sophisticated, elevated holiday spirit.
These watercolor Christmas prints would look absolutely stunning framed and hung on a gallery wall. Alternatively, layer them among other vintage cards on a bookshelf to achieve that collected, effortlessly chic, curated look. The soft, muted color palette keeps the whole piece feeling beautifully understated.
How to Make This Craft: Lightly sketch four circular ornament outlines onto a sheet of watercolor paper. Mix together pink, red, and gold watercolor paints, thinning them with water to achieve a luminous transparency.
Apply the colors to the ornaments using soft washes, allowing each layer to dry fully before applying the next. Introduce metallic gold paint to add intricate surface patterns and gilded details to each bauble.
Connect the ornaments with fine lines to suggest dangling threads, using a red fine-tip marker. Inscribe a looping “Merry Christmas” phrase around the ornament cluster using the same red marker.
Wait for the painting to dry completely. Frame the artwork or mount it onto a folded card.
Watercolor Christmas Tree and Ornament Card
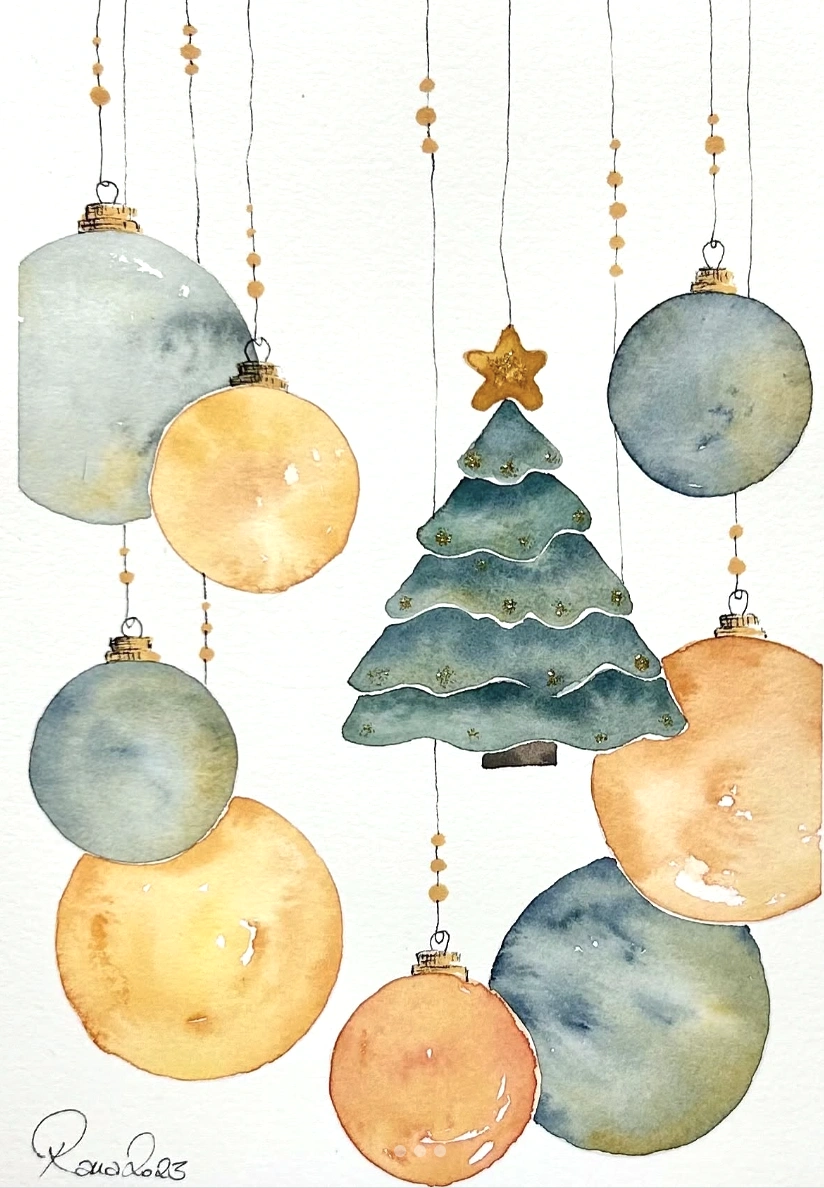
Credit: @rana18art
Move past the glossy, overly slick mass-produced holiday cards. This watercolor piece communicates a distinct and quieter kind of magic.
The palette of muted blues and antique golds gives it a mature, sophisticated edge, a welcome departure from saccharine-sweet holiday designs. If your goal is to find cute Christmas cards that still feel thoughtful and grown-up, here it is. This design speaks directly to someone who holds a deep appreciation for handmade beauty and artistic grace.
How to Make This Craft: Begin by lightly sketching the fundamental shapes of the ornaments and a Christmas tree onto watercolor paper. Dampen the paper with clean water before introducing the watercolor washes to the ornament shapes.
Use a delicate blend of light blue and gold pigments, letting the colors bleed and bloom into each other organically. Paint the Christmas tree in a soft, faded green hue, adding subtle touches of gold to the star on top and the garland draped across the branches.
Sketch thin, dangling lines in a dark brown watercolor to connect all the ornaments to the top of the page. Scatter a few flecks of gold paint to simulate the sparkle of glitter on the ornaments.
Once the scene is bone dry, add a signature at the bottom edge. Frame the piece or attach it to folded cardstock for a gorgeous gift.
Four Hand-Painted Christmas Card Designs on Kraft Paper
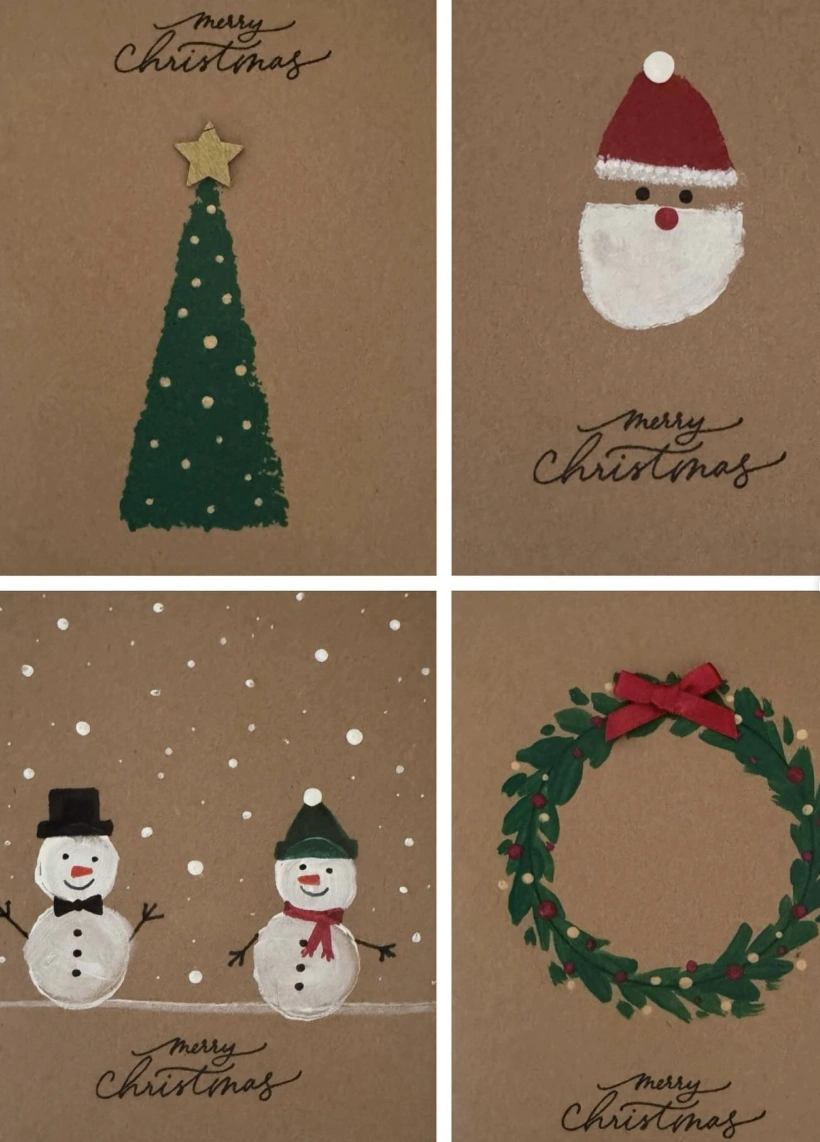
Credit: @the_rural_headteacher
Struggling to find Christmas cards that truly feel personal? These hand-painted designs on kraft paper offer that charming, homemade touch without requiring the actual labor of a professional artist.
Each card features a beloved classic motif including a Christmas tree, jolly Santa, a cheerful snowman duo, and a festive wreath. It’s precisely the kind of thing needed to spark a batch of cute Christmas card ideas, and they make a darling gift for a grandparent. This route definitely saves you from the fate of another generic drugstore box.
How to Make This Craft: Spread out your sheets of kraft paper or kraft card and visualize a Christmas design for each one. For the Christmas Tree, sketch a simple triangle shape with pencil before painting it green.
Use a q-tip dipped in white paint to dot on the tree “ornaments” and add a star topper. For Santa, paint a half-oval blob of white.
Add a smaller red blob above it for his hat and finish with a white dot for the pom-pom. For the Snowman Duo, paint two white circle blobs side by side.
Give them eyes and mouths with tiny black dots, then add a black circle hat with a white brim line. Repeat for the second snowman, switching up the hat and scarf colors.
For the Christmas Wreath, draw a circle outline in pencil. Paint the wreath shape green, dot on red berries, and add a red bow at the crown. Write “Merry Christmas” on each design with a black calligraphy pen and let the paint dry fully before gifting the handmade cards.
Snow Globe Scene with Fox and Snowman
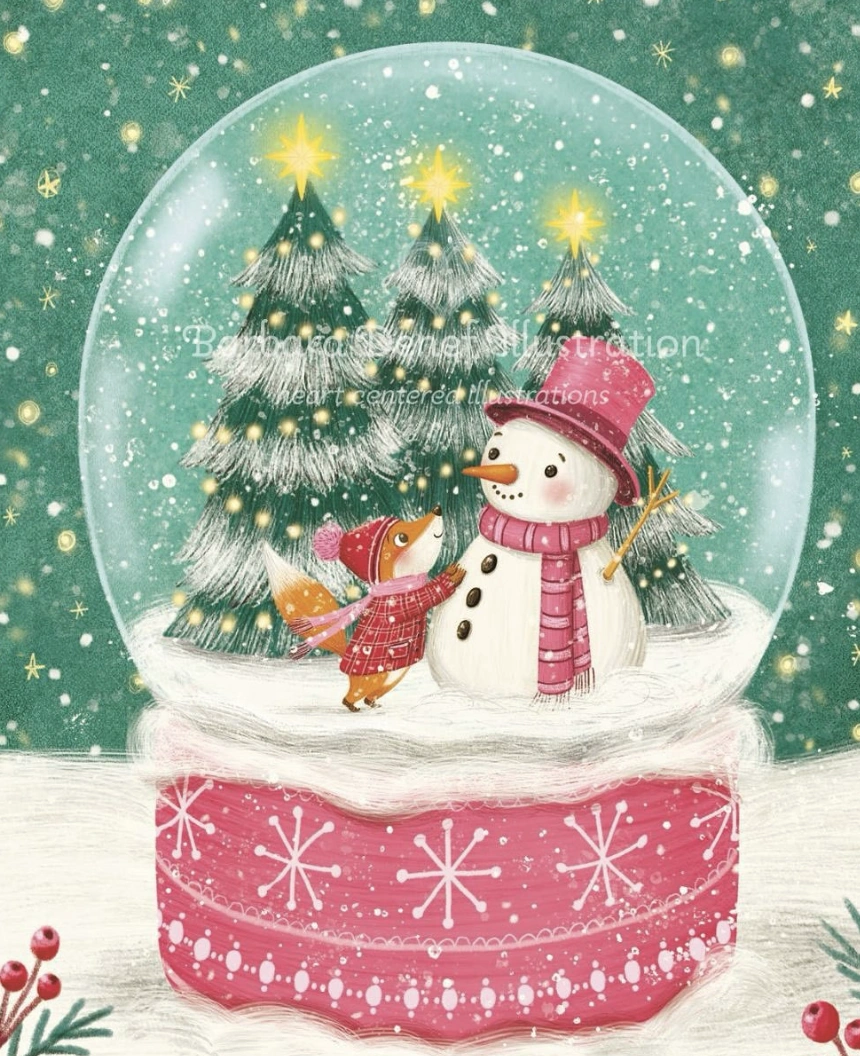
Credit: @barbaradenef
This design is a top contender for this year’s family holiday cards. It captures that sought-after handcrafted feeling without the chaotic aftermath of glitter glued to every surface in the house.
Daydreaming about handmade Christmas card ideas can quickly become overwhelming, but this artwork is purely inspiring. The simplest path to victory is printing this delightful scene and mounting it onto some quality cardstock. Less sticky mess, happy little helpers, and a finished product everyone loves.
How to Make This Craft: Open your favorite illustration program and create a circular canvas. Draw a large, transparent circle filled with a subtle light gradient to simulate the glass of the snow globe.
Sketch three overlapping Christmas trees in the background, adorning them with tiny star ornaments. Illustrate a charming snowman character wearing a pink hat and matching scarf.
Draw an adorable fox in a coordinating outfit standing right next to the snowman. Add a decorative base to the snow globe featuring intricate snowflake details.
Fill the globe’s interior with a scattering of tiny white specks for falling snow. Apply soft shadows and highlights to amplify the three-dimensional effect.
Design a rich background of dark green with a layer of snow at the bottom edge. Import PNG images of foliage and berries to cluster at the bottom for a framed look.
Handcrafted Mickey & Minnie Christmas Card with Die-Cut Wreath
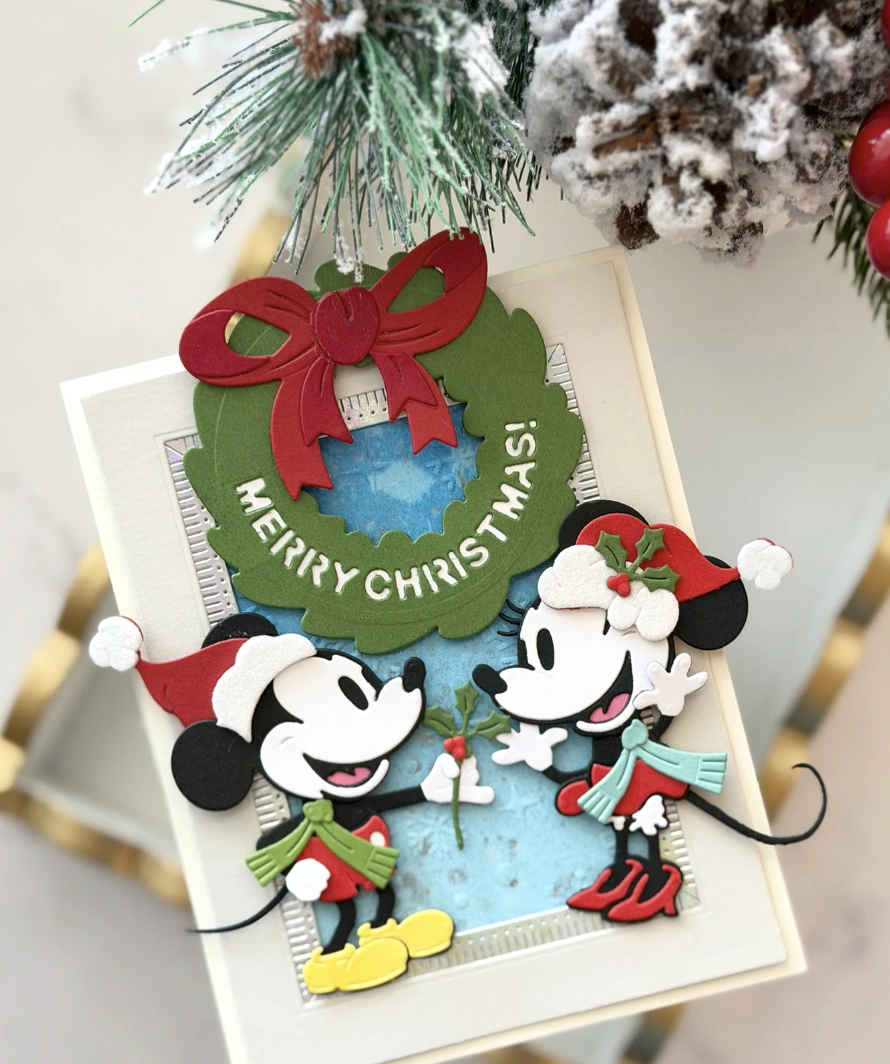
Credit: @sctmagazine
This year is undeniably about celebrating the handmade touch. The layered die-cut wreath is a total obsession, the dimension it creates is just impeccable.
The unexpected wash of blue watercolor peeking out from underneath the wreath adds a surprising and modern twist. For anyone hunting for fresh Christmas card making ideas that visibly demonstrate the effort invested, this Mickey and Minnie themed creation is the answer. It radiates luxury craft energy, and the enthusiasm for it is absolute.
How to Make This Craft: Gather your collection of patterned cardstock, a reliable die-cutting machine, and the coordinating metal dies for Mickey, Minnie, a wreath, and a bow. Die-cut the classic Mickey and Minnie Mouse shapes from crisp black and white cardstock.
Using additional paper scraps, cut out their tiny hats, scarves, shoes, and other charming clothing pieces. Assemble the characters by carefully adhering their clothing and accessories into place.
Die-cut a lush green wreath and a bright red bow. Create a small cut-out banner with “Merry Christmas” printed on it.
Use a rectangular die to cut a background piece from a sheet of light blue marbled paper. Adhere the wreath and the lettering onto the blue marbled background.
Affix the fully assembled layered images to a pre-made cream-colored card base. Add a few tiny holly leaves to Minnie’s head as the perfect finishing accent.
Paper Star Origami: Minimalist Christmas Greeting

Credit: @katharina_tarta_crafts
Are you stuck in a creative rut with the same old holiday greetings? This origami-inspired card serves as a wonderful antidote to generic, mass-produced sentiments.
It presents a thoughtful, handcrafted alternative that sidesteps the waste of excessive packaging. When the search is on for unique Christmas card ideas, remember that it’s often the quiet, personal gestures that leave the most enduring impact. This project is simple enough to duplicate and create multiple copies at home, making it a lovely option for a small, meaningful gift.
How to Make This Craft: Find or purchase double-sided scrapbook paper printed with a beautiful holiday design, like classic poinsettias. Carefully cut out six identical equilateral triangles with perfectly equal sides.
Fold a triangle neatly in half, point to point, creating a sharp crease down the center. Fold each side point inward toward the central crease line.
Using liquid glue or double-sided tape, begin attaching each folded triangle to the next. Press the folded edges firmly together so they bond flush and create striking 3D depth.
Keep connecting the folded modules until the complete star shape forms. Allow the glue ample time to dry completely. Print a seasonal saying, or handwrite your own greeting, and adhere it to the star’s center point.
Final Thoughts
The excitement to get started on a Christmas card design is already bubbling over. There’s something so special about the thought of crafting a keepsake that someone will actually hold onto and cherish.
Hopefully, a wave of inspiration is washing over you, too. Why not brew a warm cup of tea, round up your favorite supplies, and let your inner artist run completely wild?