


You know that moment when a pile of delivery boxes is just sitting there, begging for a second life? It happens all the time.
Before you break them down for the recycling bin, consider this: those humble sheets of brown have serious creative potential.
Cardboard crafts are wildly versatile, and there’s no shortage of adorable projects just waiting to be made.
No advanced art degree required here. These ideas are completely approachable, whether you’re a crafting newbie or a seasoned maker looking for quick, satisfying wins.
Time to tap into the secret superpowers of all those boxes.
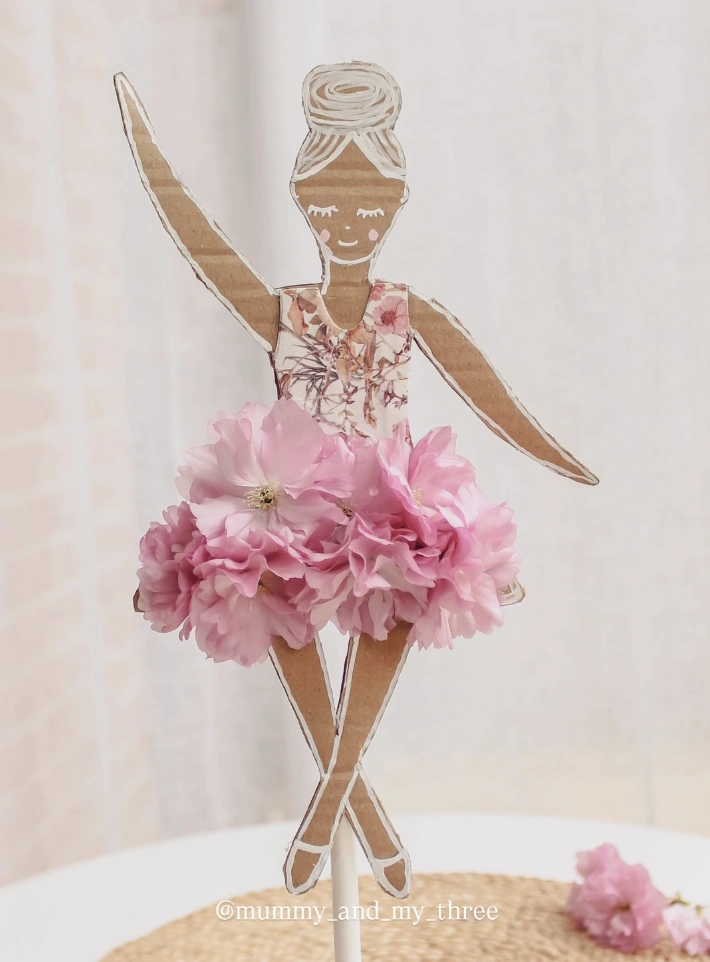
DIY Cardboard Ballerina with Floral Tutu
Credit: @mummy_and_my_three
Is this not the sweetest little thing? For anyone hunting down screen-free activities to keep tiny hands busy, this one’s a gem.
Similar projects have been tried before, and they never fail to delight. A quick search for other easy cardboard crafts will flood your screen with inspiration, too. Even the littlest helpers can get involved with this straightforward design.
How to Make This Craft Sketch the ballerina shape onto cardboard, including head, body, arms, and legs Carefully cut the cardboard ballerina outline with scissors or a craft knife Trace and cut a dress shape out of floral scrapbook paper Glue the floral paper dress onto the ballerina’s torso Attach fresh pink cherry blossoms closely together to form a tutu using craft glue Draw facial features and ballet slipper outlines using a white paint marker Attach ballerina to a cake pop stick using hot glue Add any final details, such as glitter Allow the glue to dry completely
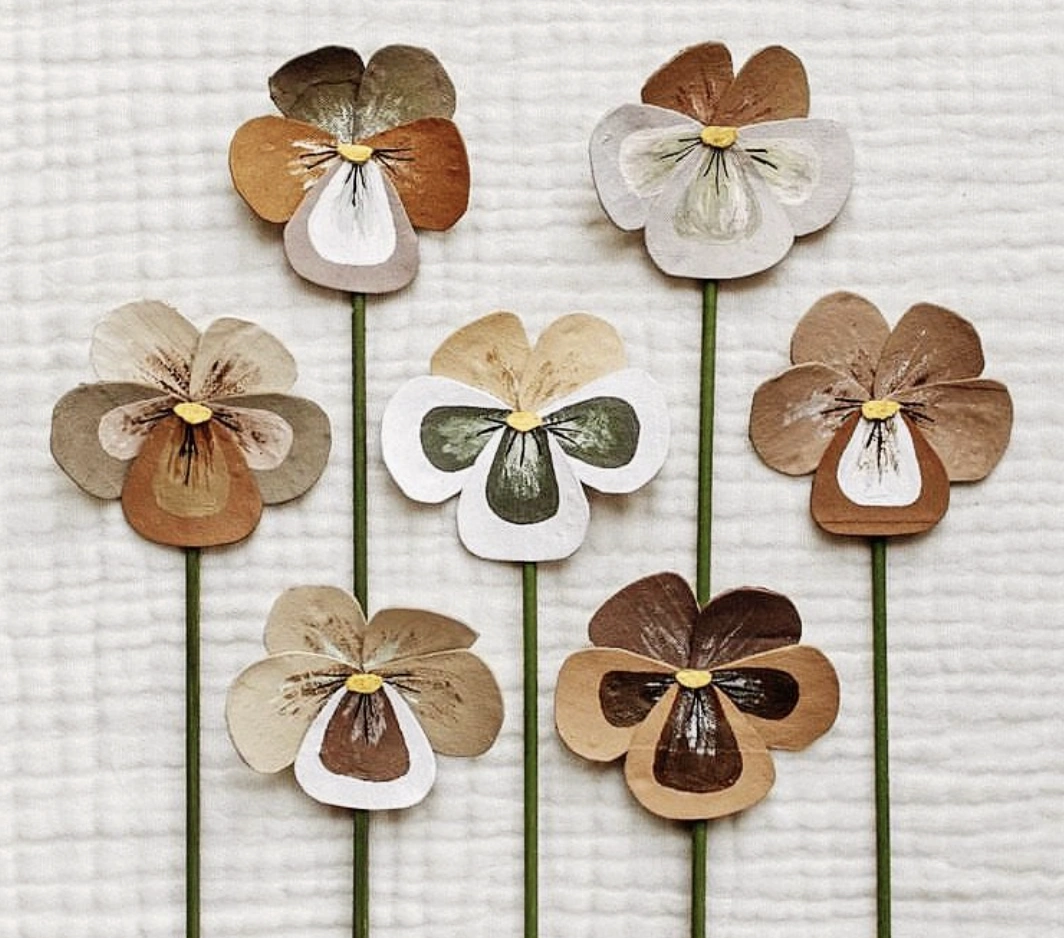
DIY Neutral Tone Floral Pansies: Cardboard Art
Credit: @aandjkids
Walls feeling a little sleepy? These understated blooms are here to wake things up.
It’s genuinely captivating how a splash of homemade color shifts the energy of a room. With nothing more than some old boxes and paint, you can pull together these gorgeous cardboard creations. So wave goodbye to blank walls and welcome a custom floral moment with open arms.
How to Make This Craft Download and print a pansy template or draw your own petal shapes Trace and cut out several petal shapes from thick watercolor paper Mix different shades of neutral paint colors to create various tones and variations Paint each petal with the chosen color palettes and let them dry completely Layer the petals together, starting with the back petals, using craft glue Add a small yellow or brown button to the center of the flower Attach green floral wire to the back of each flower with glue or floral tape Arrange your paper pansies in a vase Secure arrangement into vase with florist’s foam for stability
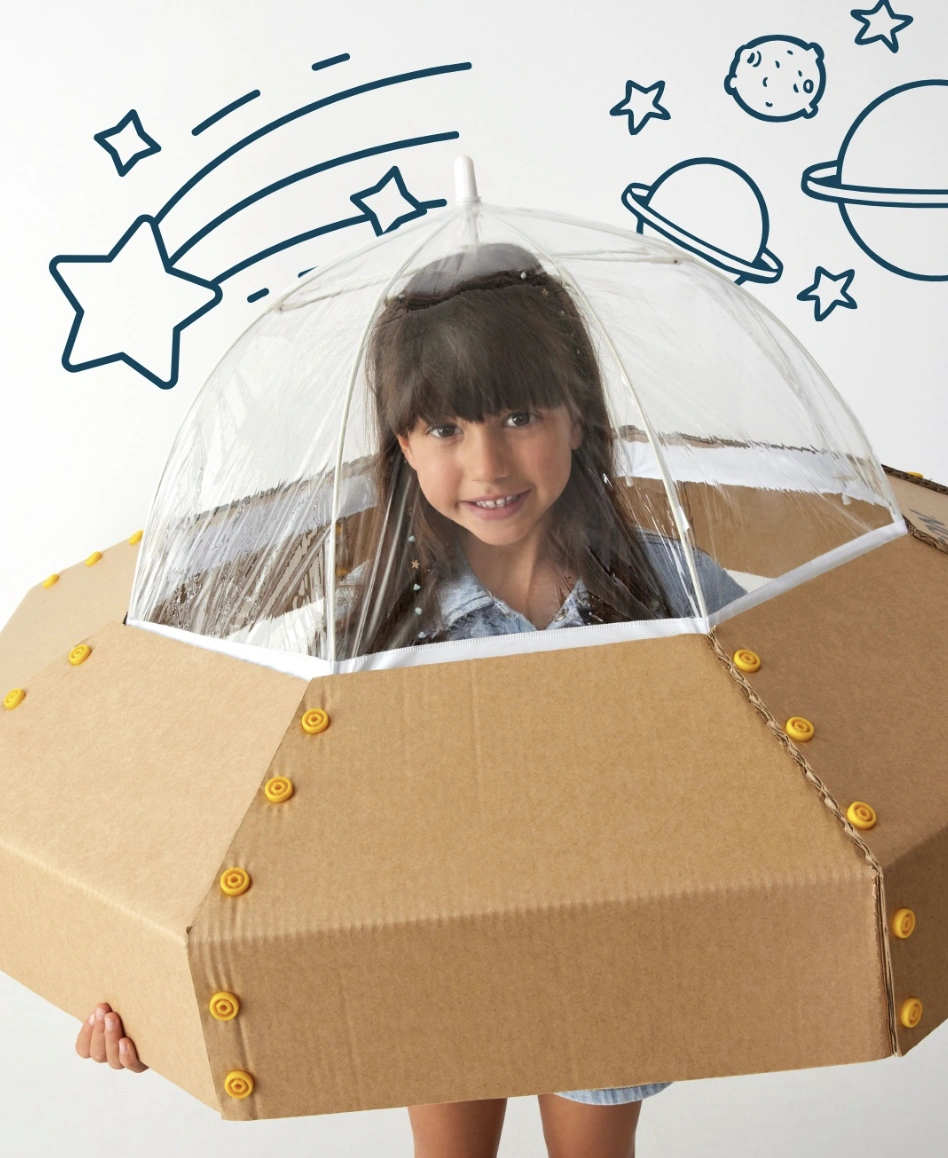
DIY Cardboard Spaceship Costume with Clear Dome
Credit: @i_createcraft
This project speaks straight to the heart of anyone who believes imagination trumps pricey gadgets. If you’re all about simple joys and nurturing creative play, this one lands perfectly.
There’s something profoundly elegant about turning an ordinary box into a full-blown spaceship. These adorable cardboard crafts light up a child’s imagination and launch them into deep space, right from the living room floor.
How to Make This Craft Find a large cardboard box for the base of the UFO Cut a large hole in the bottom of the box, big enough for the child to stand in Cut the sides of the box into an octagonal or circular shape using a craft knife Attach yellow buttons or painted paper fasteners around the edges of the box for decoration Source a clear plastic dome (large salad bowl or umbrella) for the spaceship’s cockpit Attach the plastic dome to the top of the cardboard base using strong tape Add cardboard supports inside the base for extra stability if needed Decorate the background with doodles of stars, planets, and comets using markers Test the UFO by having the child stand inside and move around Add more embellishments like blinking LED lights
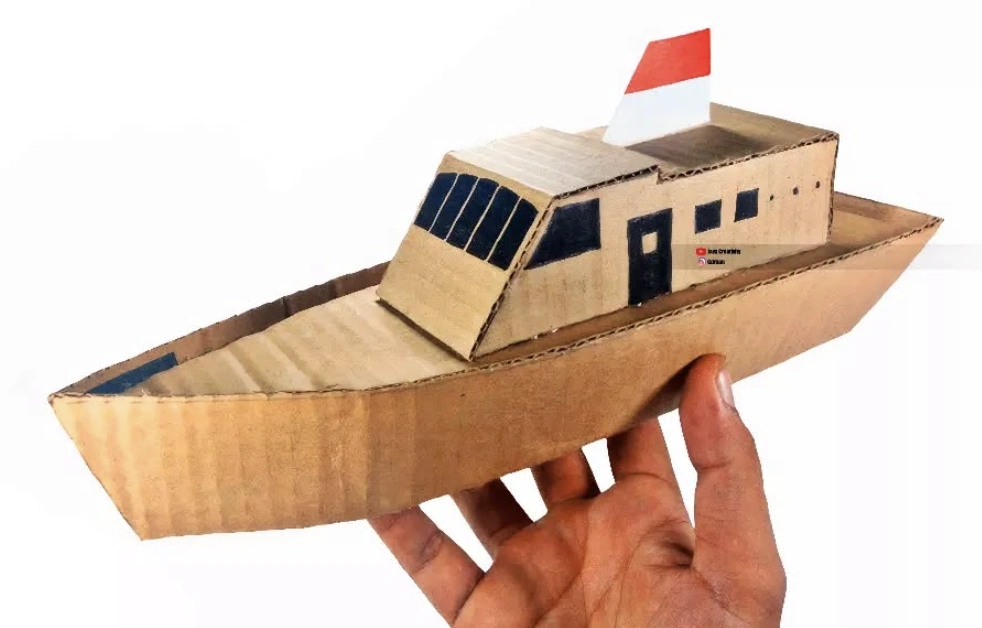
Miniature Cardboard Boat Model with White and Red Flag
Credit: @gditian
The first thought that pops up here is a rainy afternoon rescue plan. This little vessel looks like the perfect shared mission for you and the kiddos.
There were always those stuck-inside days with nothing on the agenda. Now the internet is packed with simple yet clever cardboard DIY ideas to spark inspiration. This is exactly the sort of project that keeps everyone occupied and results in a truly playable treasure.
How to Make This Craft Design and cut out the boat’s hull shape from sturdy cardboard, ensuring a balanced design Reinforce the boat’s sides with additional cardboard pieces, glued securely for strength Create a cabin by cutting and folding cardboard, then glue it onto the boat’s deck Cut out windows and a door on the cabin and paint the cabin white Create the top of the boat with more cardboard, ensuring a balanced design Design and cut out windows and doors to mimic a real boat Make a small flag using paper or cardboard and attach it to a small pole or skewer Paint the entire boat with waterproof paint to protect it from moisture Allow paint to dry completely and add any details, like anchors
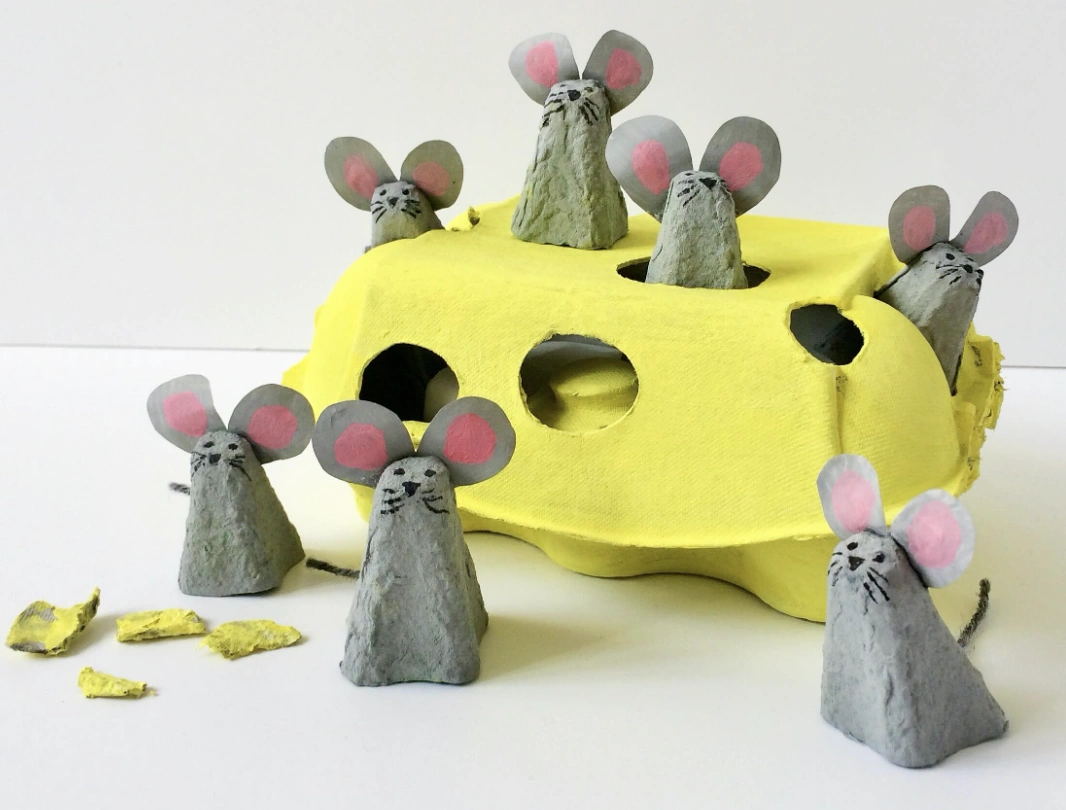
Egg Carton Cheese with Painted Cardboard Mice
Credit: @jumbletree
While experimenting with some cardboard box crafts, this brilliant little scene emerged. The egg carton cheese paired with tiny paper mice is almost too charming.
Everything is upcycled, and it delivers the quirkiest accent to any shelf. It’s an instant conversation piece that guests always smile at.
How to Make This Craft Grab an empty cardboard egg carton (the 12-egg size works well), craft paint (yellow and grey), paintbrushes, scissors, and glue Cut the egg carton in half, discarding the lid Paint the remaining bottom section yellow to resemble cheese Cut out individual cups from another egg carton and paint them grey Cut out small ear shapes from scrap cardboard, paint pink on the inside, and glue them to the grey cups Use a black marker to draw eyes and whiskers on the grey cups, making them look like mice Cut out a thin tail from cardboard for each mouse and glue it to the back of the grey cups Cut small holes in the yellow -cheese- egg carton where the egg cups used to be Insert the grey mice into the holes in the yellow egg carton Cut little pieces of the unused egg carton into triangles and paint them yellow, glue around the mice
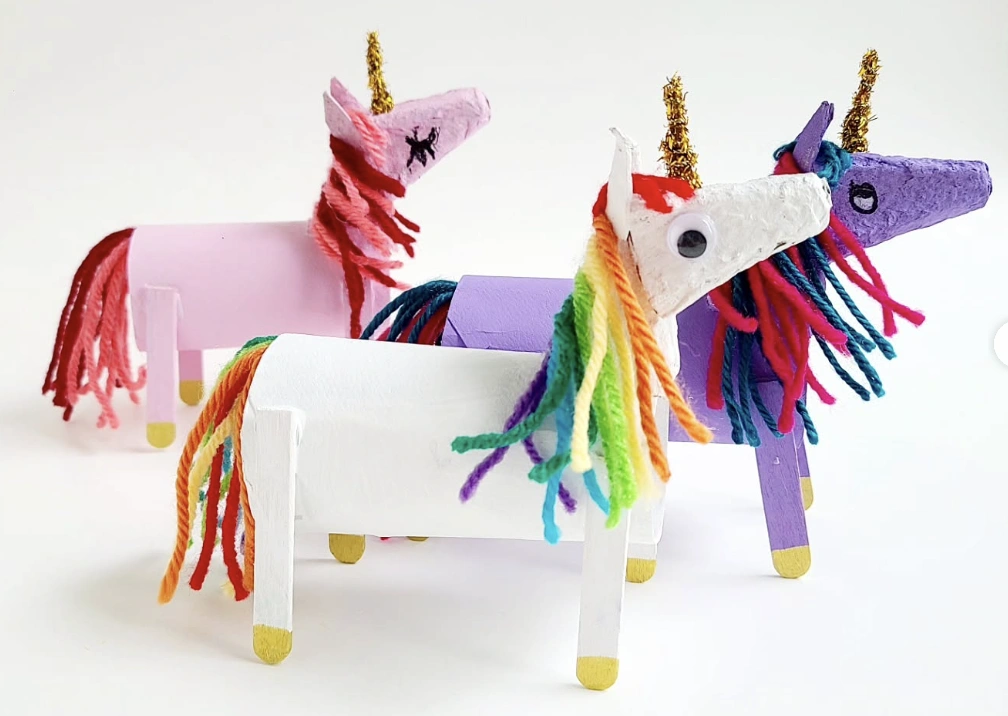
Toilet Paper Roll Unicorn Stable.
Credit: @ecocraftkids
This might just be the most adorable online find ever: toilet paper roll unicorns. They’re so straightforward, anyone can pull them off.
The plan could easily expand to building an entire stable from an old box. A little extra browsing for cardboard craft ideas will fuel the creative fire. It’s shaping up to be a full afternoon of crafting magic, so fingers crossed for glitter everywhere.
How to Make This Craft Get empty toilet paper rolls, acrylic paint (various colors), yarn, popsicle sticks, glue, glitter, and scissors Paint each toilet paper roll a different pastel color and let it dry Cut popsicle sticks in half and paint them gold for the unicorn legs Glue them to the bottom of the toilet paper roll Cut strands of yarn in various colors to create the unicorn’s mane and tail Glue the yarn to the top and back of the roll Twist some yarn and paint with glue, then sprinkle with glitter to form a sparkly horn Glue the horn to the top of the toilet paper roll head Add googly eyes to the front of the unicorn for a fun, whimsical touch Optional: Add additional glitter or paint details for extra sparkle!
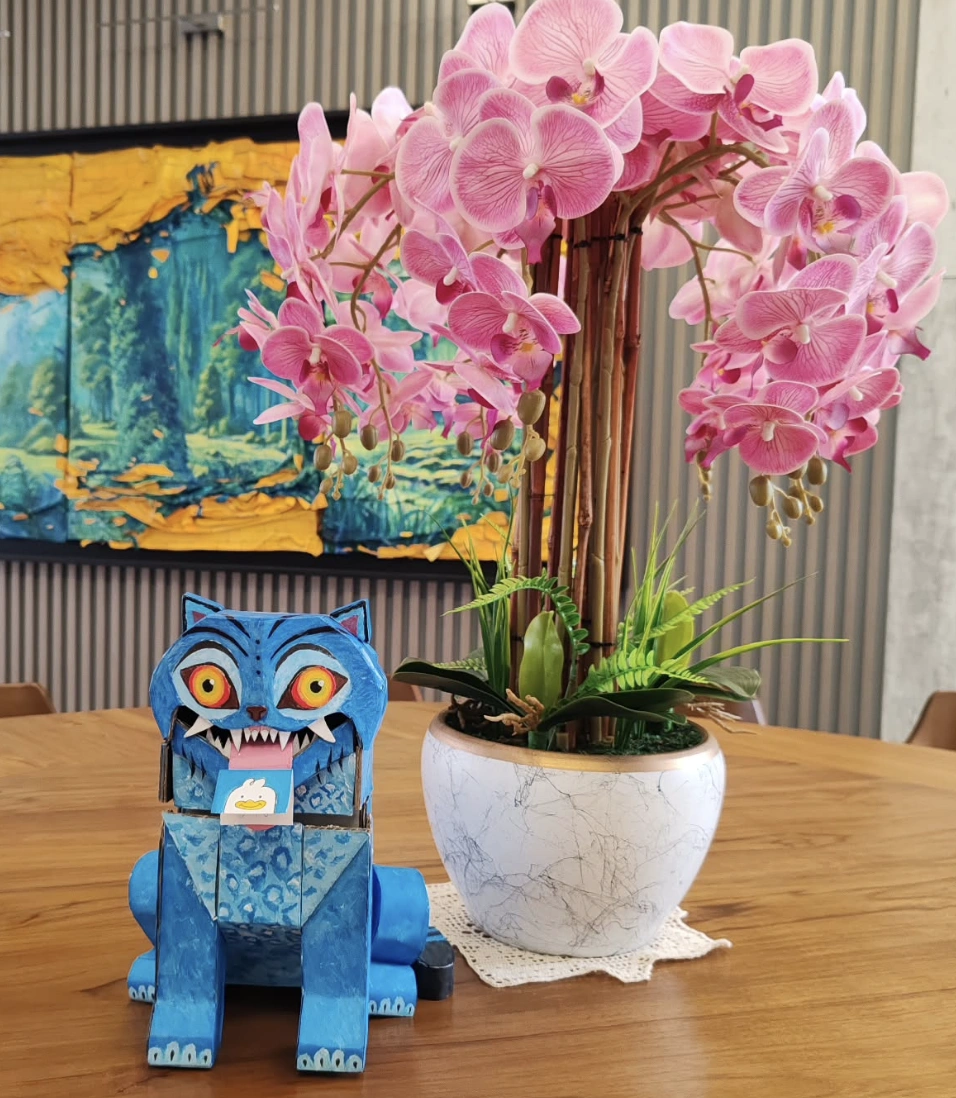
Geometric Blue Feline: A Study in Cardboard Sculpture
Credit: @huijin_art
Placement truly shifts everything. Notice how this blue cat introduces a sense of playful lightness?
Think about using your own collection of cardboard crafts decoration to offer a quiet surprise. The sharp, angular structure plays beautifully against the soft, flowing orchid petals.
That bold, nearly fierce expression gets softened entirely by the delicate pink blooms. A dash of the unexpected always makes a room unforgettable.
How to Make This Craft Acquire pre-cut origami paper in light and dark blue, or solid cardstock Study image of the model to understand the folding and assembly processes Begin to carefully fold blue paper into the geometric shapes required for the tiger’s head, body, and legs Connect the head, body and leg parts Download and print the paper tiger’s eyes from online and glue to the head piece Connect any additional parts using tabs or glue, following a diagram Ensure all folds are crisp and clean for a neat and professional look Place finished tiger on a table, with floral arrangements behind to accentuate the creation
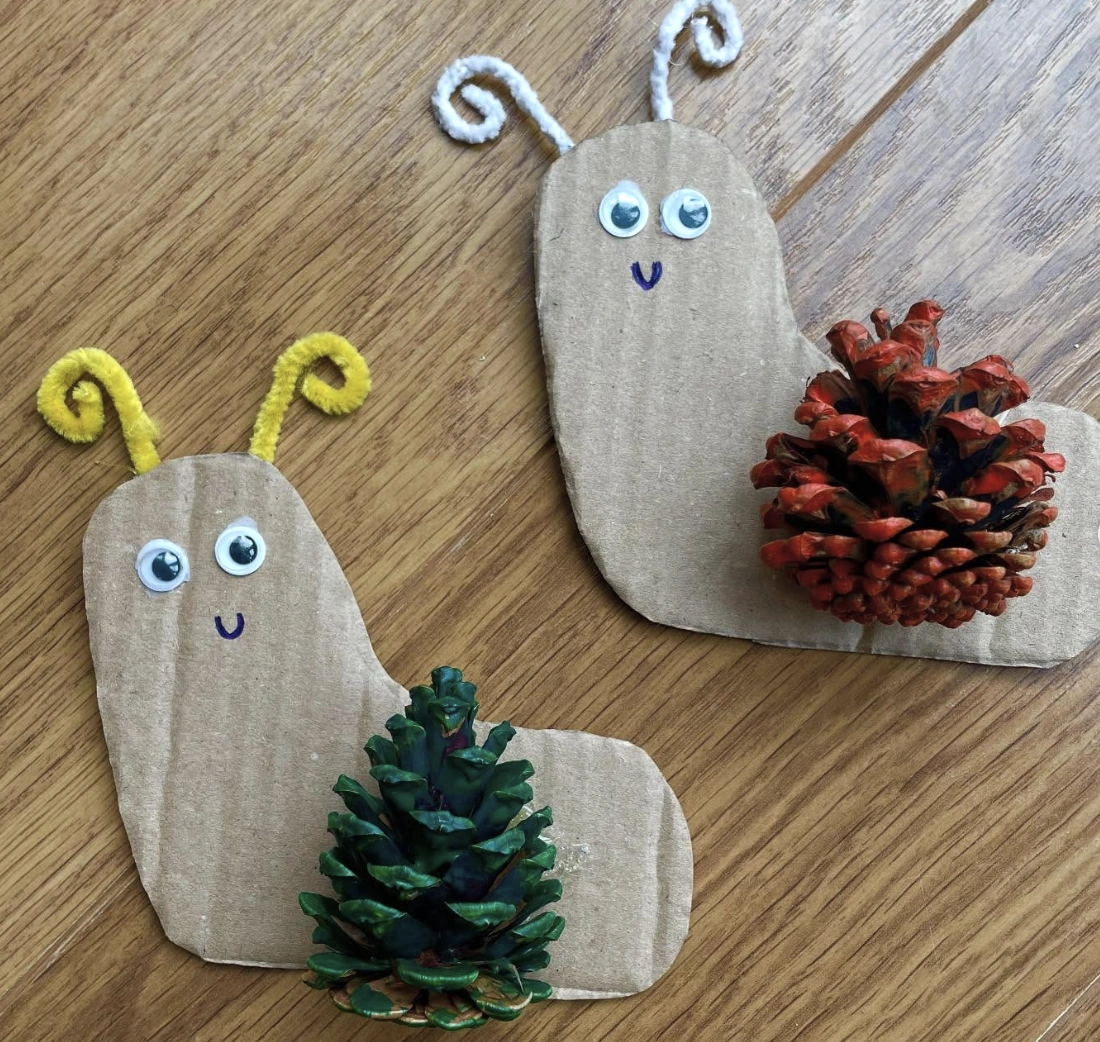
Googly-Eyed Cardboard Snails with Painted Pine Cone Shells
Credit: @ticketyboo_childcare
Simple enough that even a five-year-old can jump right in. The shift toward making things by hand has been so rewarding, and these fit the vibe perfectly.
Those wiggly eyes and pine cone shells are bursting with character. If a no-fuss crafting session is calling your name, especially one focused on cardboard creations, this project delivers serious fun.
How to Make This Craft Find some nice, dry pine cones Give those cones a fresh coat of paint Let them dry Grab some sturdy cardboard and cut out an elongated oval shape Attach googly eyes to the cardboard body using glue Draw a simple smiling face on the cardboard Cut short segments from pipe cleaners and curl one end Glue these pipe cleaners to the top of the snail body Glue the painted pine cone onto the back portion of the cardboard to act as the snail’s shell
Decorated Cardboard Playhouse with Scalloped Roof and Fairy Lights
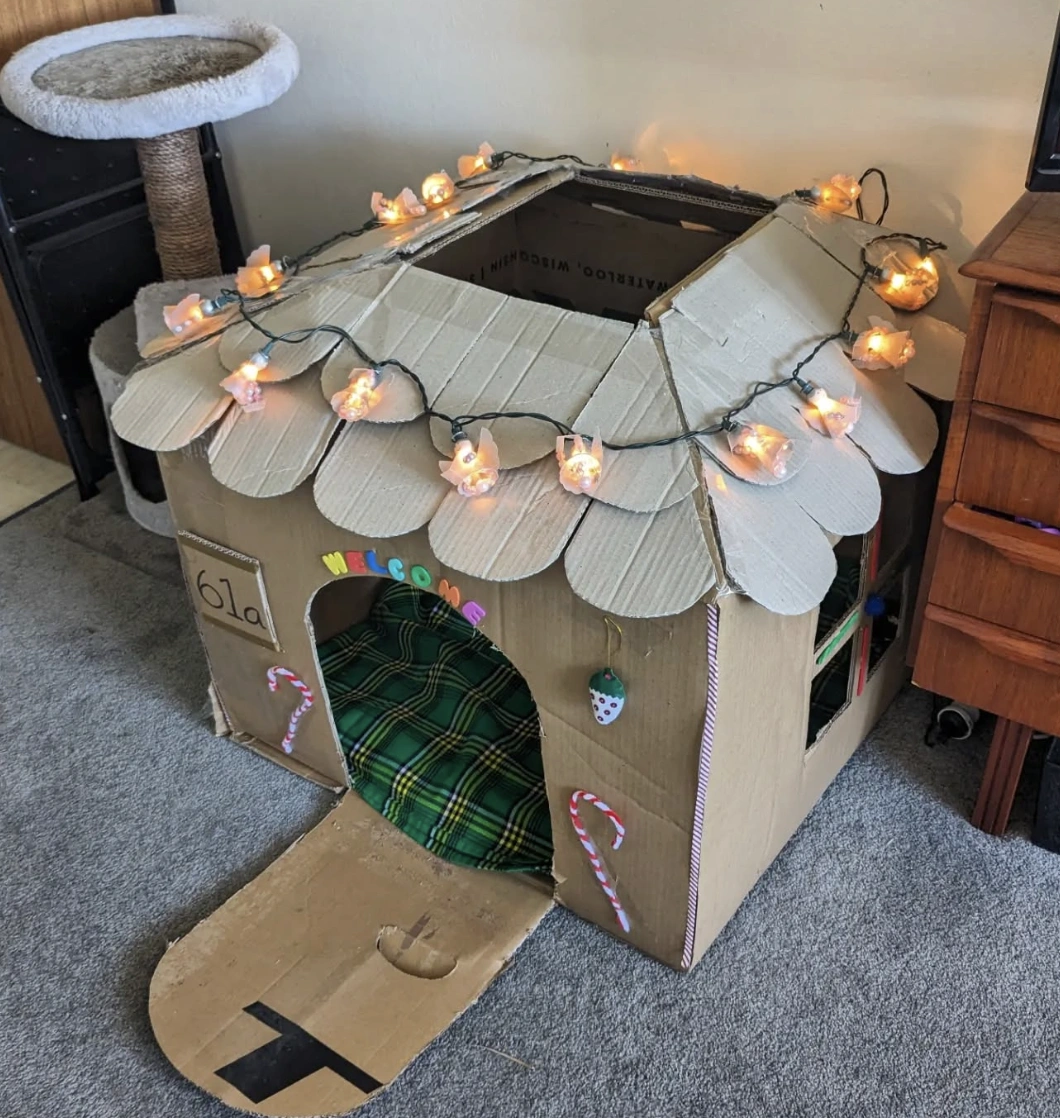
Credit: @missanitacatherine
Sure, you could click “buy” on a fancy fabric playhouse. But here’s the truth: the kids will adore this version infinitely more.
It’s fundamentally a giant box, yet the scalloped roofline and twinkly lights transform it into something magical. The best part comes later, when the fascination fades, it can be recycled guilt-free. Easy cleanup, zero regrets.
How to Make This Craft Acquire large cardboard boxes and duct tape, your structural supports Cut out doorway and window openings using a craft knife Assemble the box to create the basic house shape using tape Cut triangular pieces to form a pitched roof using scissors Overlap and tape the roof pieces securely Cut scalloped edges along the roof line to mimic shingles Add a cardboard ramp leading into the house Decorate the house exterior with paint, markers, or fairy lights Place a soft blanket or bed inside the house
Colorful Beaded Snail: A Cardboard Art DIY Project
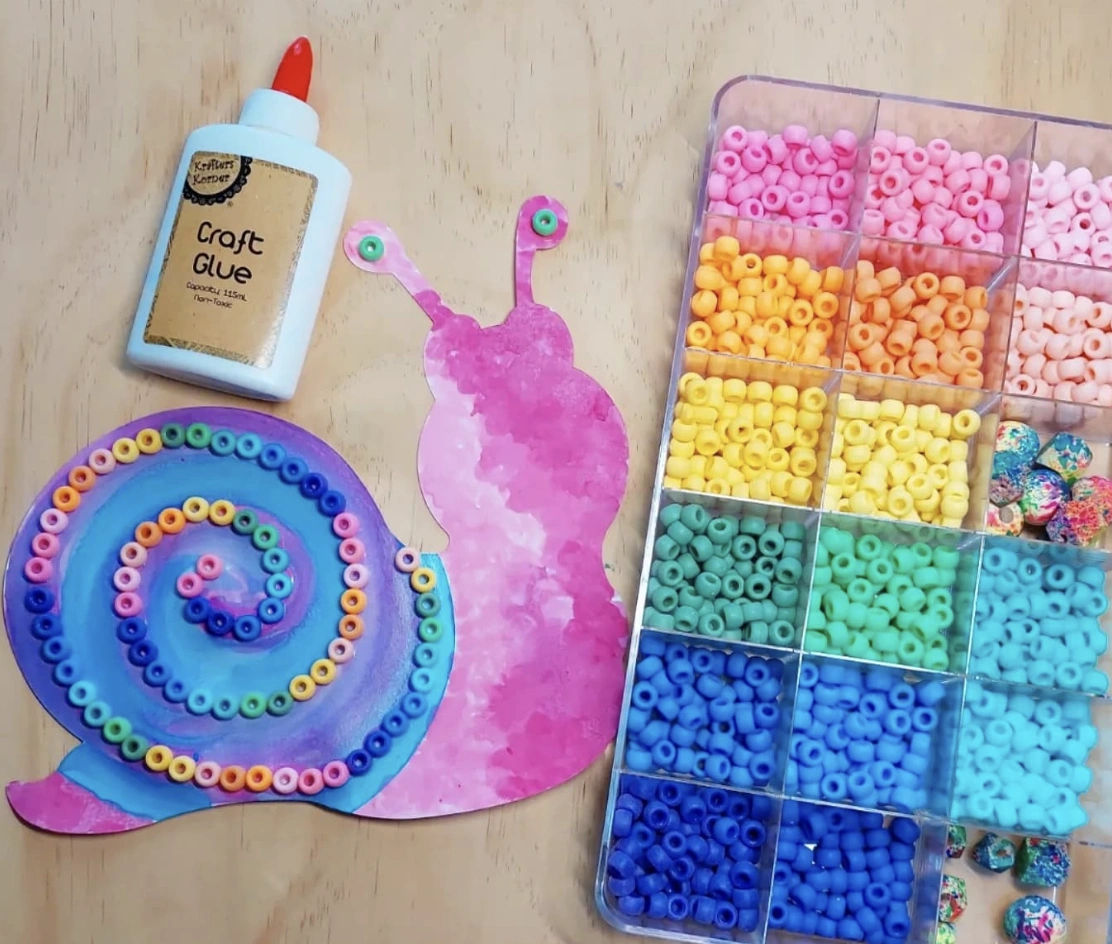
Credit: @emaloukidsartcraft
The act of gluing each tiny bead feels almost meditative just to imagine. That watercolor wash on the snail’s body brings such a gentle, dreamy texture. This is cardboard art elevated to an entirely new level of detail.
How to Make This Craft On sturdy paper, sketch a snail body Paint the snail body with shades of pink, blue, and purple watercolors and let dry Apply craft glue in a spiral shape within the snail’s shell area Begin placing seed beads, starting from the center of the spiral and working outward, carefully gluing each bead Continue filling in the spiral with seed beads in various colors, ensuring full coverage Affix small green beads to the snail’s antennae
Whimsical Unicorn: Egg Carton Florals and Origami Star Accents
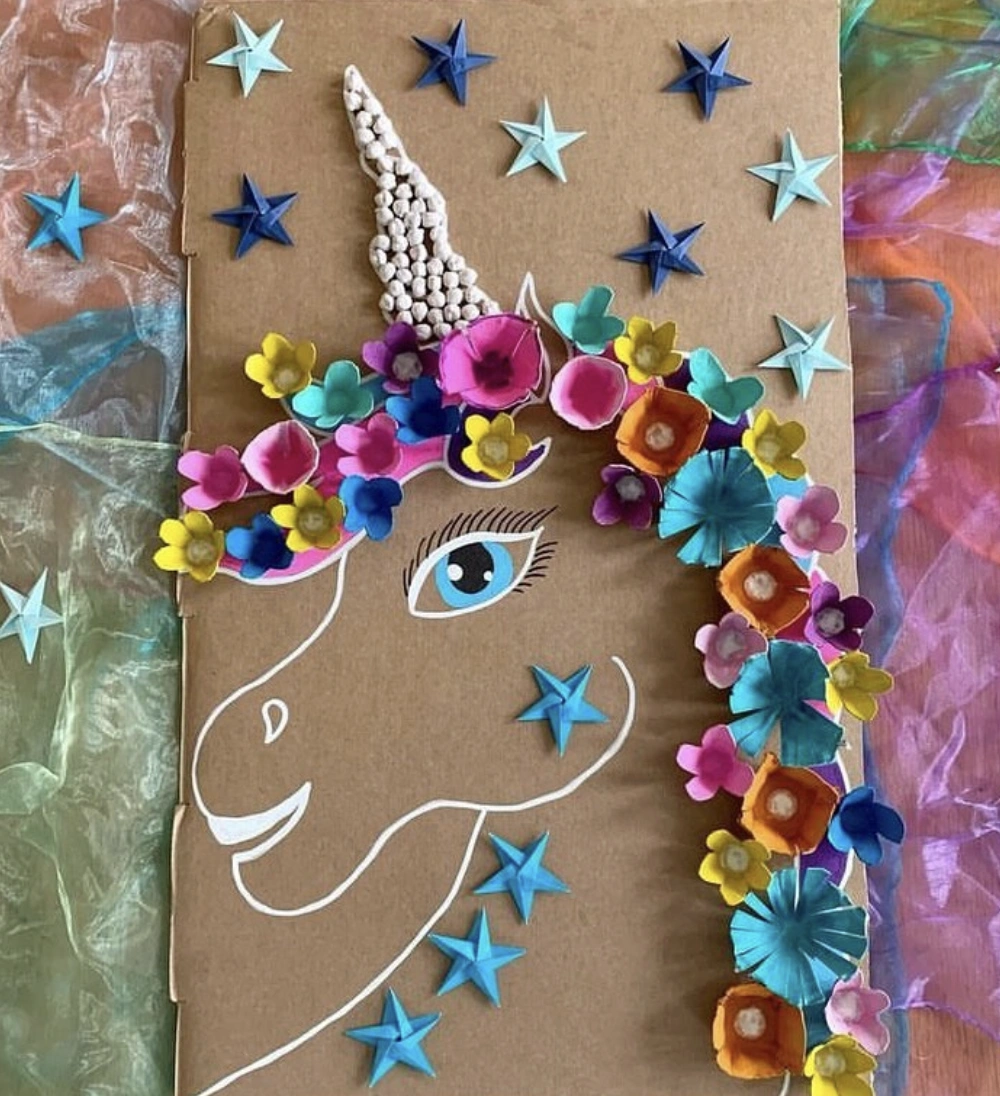
Credit: @charlotte_and_the_boys
Those paper origami stars offer a polished, refined touch. The upcycled egg carton blossoms bring the playful energy that mirrors current maximalist design trends.
This level of customization? Absolutely brilliant. Playing with varied textures through similar cardboard crafts decoration projects will create a true statement piece.
How to Make This Craft Draw a unicorn head silhouette onto a large piece of cardboard Cut out the unicorn head shape using a box cutter Cut out individual cups from an egg carton Paint the egg carton cups with vibrant acrylic paints and let dry Glue the painted egg carton cups onto the unicorn’s mane to resemble flowers Cut out small stars from colored paper and glue them around the unicorn’s head and neck Roll up a small piece of cardboard to create a cone and glue this on the unicorn to be the horn Cover cone with white craft beads to look like the unicorn’s horn is made out of crystals Draw a simple eye on the unicorn using a blue marker
Cozy Winter Village DIY: Mini Cardboard Houses with Snowy Roofs
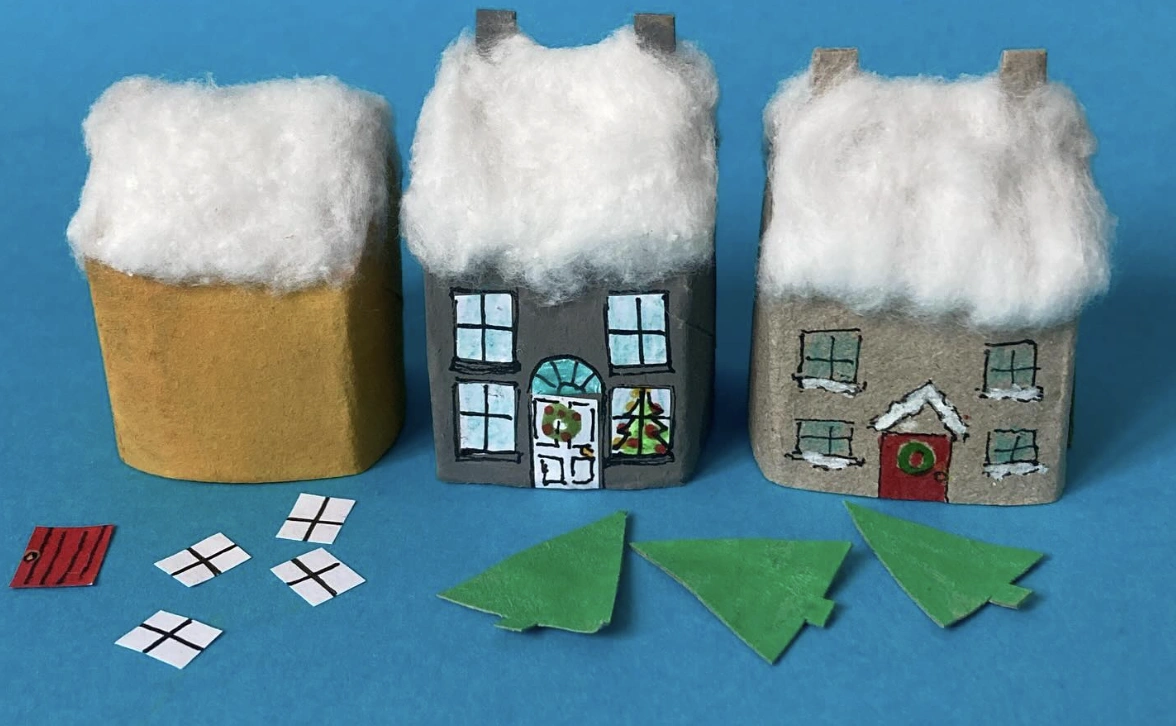
Credit: @jumbletree
These miniature cardboard dwellings are absolute treasures. They strike the perfect note for scattering a little enchantment across any surface.
Imagine a cozy afternoon dedicated to crafting your very own tiny winter wonderland. Skip the mass-produced shelf decor, because this is where the true cardboard crafts enchantment lives.
How to Make This Craft Scrounge up those empty cardboard boxes Cut off the tops to form the roofs of varying heights Paint the boxes in shades of gray, brown, and maybe a splash of color Sketch windows, doors, and Christmas trees onto colored paper Glue the paper decorations onto the painted boxes Form roofs using cotton batting, adhering them with adhesive Cut the shapes of the doors and the roofs from colored paper Glue the doors and the roof pieces in place Arrange your charming little town on a shelf or table
Oversized Frog Head Mask Made from Cardboard, Featuring Large Googly Eyes and Rectangular Mouth
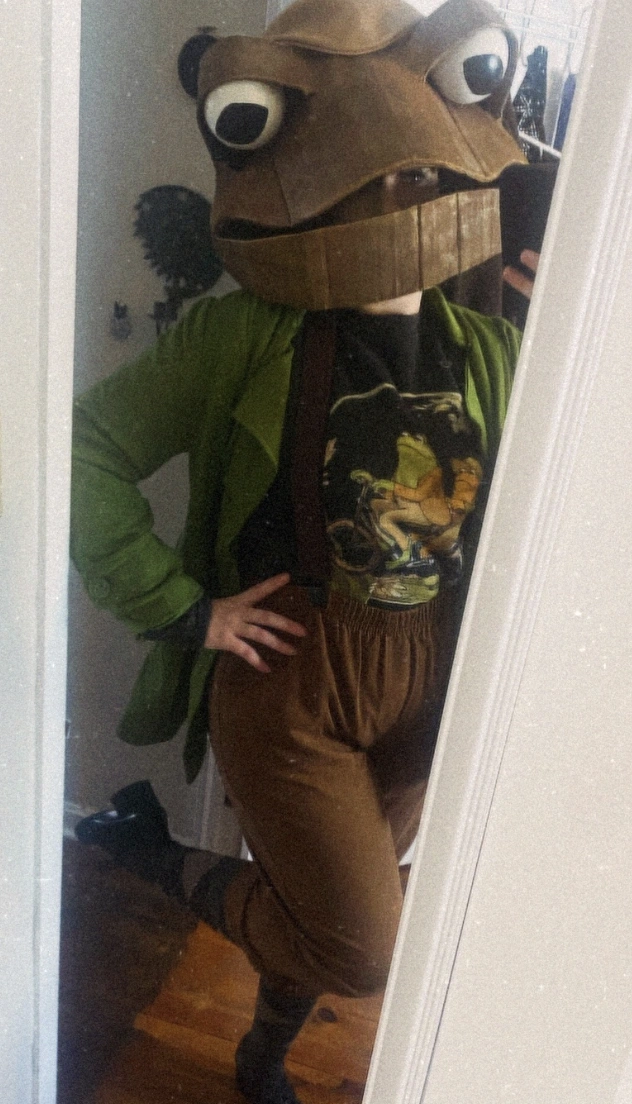
Credit: @lindseybryanart
Stick with this idea because it’s a total game-changer. It’s flawless for anyone who needs a seriously unforgettable Halloween look or perhaps teaches drama.
Stop draining your wallet on flimsy costumes, this is where cardboard DIY ideas truly dominate. It looks like a passionate creation, and any kid would be ecstatic to collaborate on building one of these.
How to Make This Craft Start by downloading or creating the frog mask templates from online resources Transfer the patterns to a strong sheet of cardboard Meticulously cut out each piece using a box cutter Assemble the pieces, including a hinged jaw section, using glue and reinforcement Paint the entire mask with acrylics in realistic froggy hues Integrate repurposed materials for detailing like buttons for eyes Attach elastic straps for a secure and comfortable fit Test articulation and adjust hinges as needed
DIY Cardboard Triceratops Mask with Turquoise Fasteners
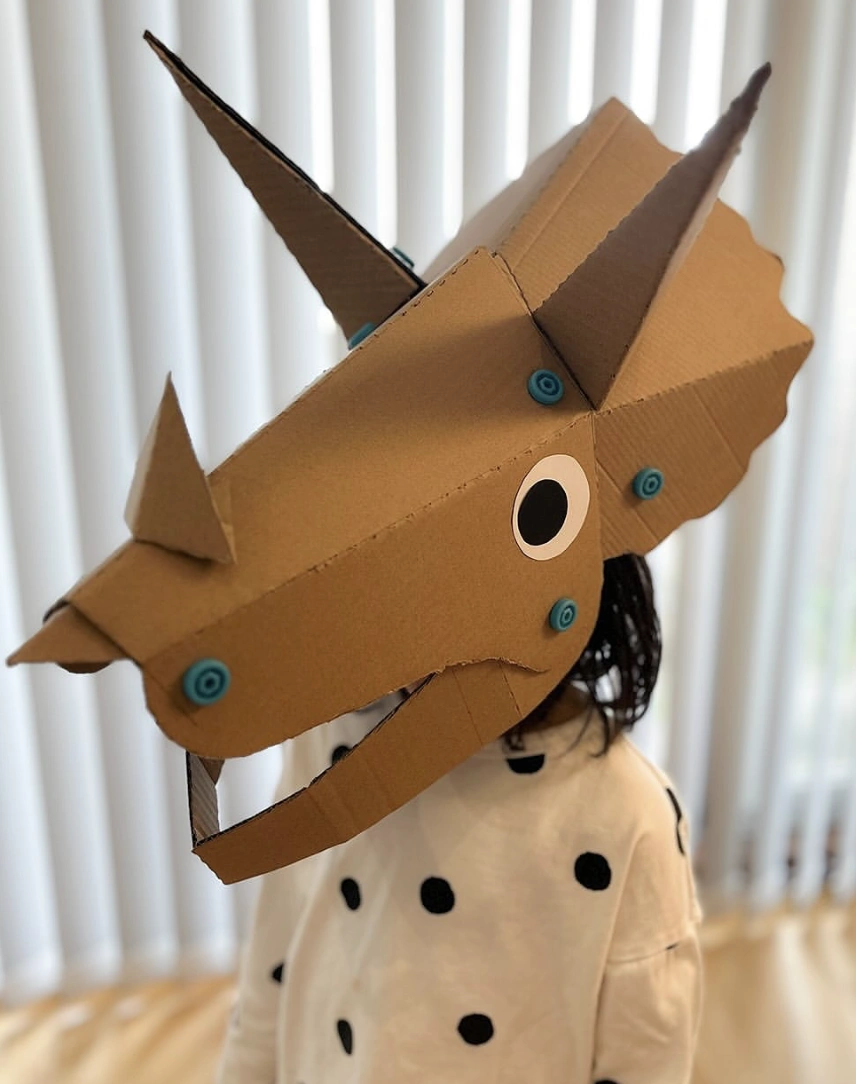
Credit: @makedo
A lot of care clearly went into the construction of this dino disguise. The turquoise fasteners are a genius addition, injecting a bright jolt of color.
If you’re scouting for striking yet simple cardboard crafts ideas creative, this mask is a prime example of achieving major wow-factor with minimal supplies. It blows those standard cereal-box projects straight out of the water.
How to Make This Craft Locate triceratops mask template (search online) Print and enlarge template to desired size Trace template pieces onto thin cardboard Cut out cardboard shapes carefully with scissors Align and attach facial features using brads Paint details like eyes and nose holes with markers Attach the horns using brads or glue
Round Woven Yarn Art on Cardboard with Beads
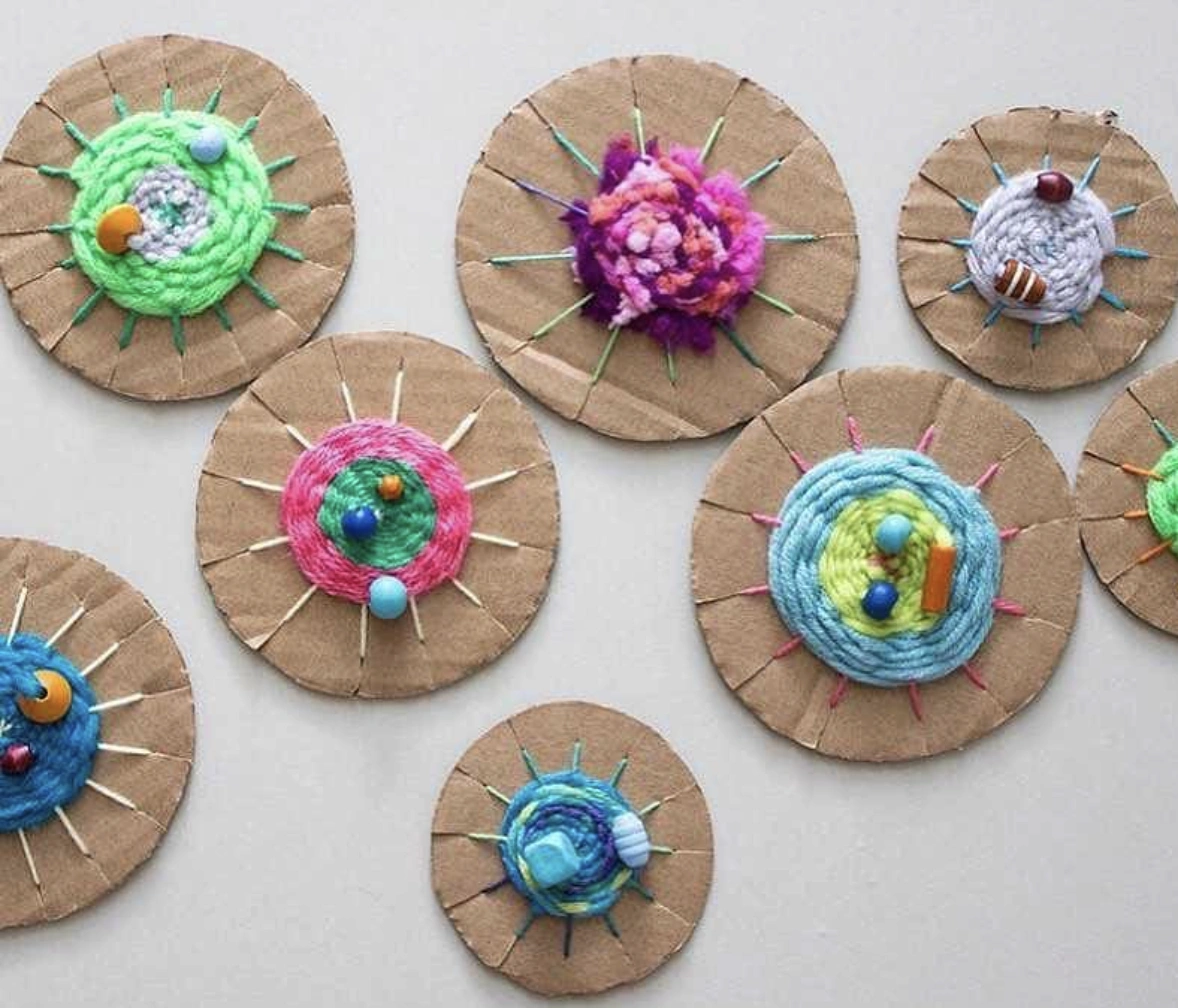
Credit: @upcyclingkidz
Unearthing an activity that holds attention spans longer than a fleeting moment feels like striking gold. These woven circles are just the thing for a drizzly afternoon rescue.
How to Make This Craft Cut a circle out of cardboard Cut notches around the edge like a sun Thread yarn from center to a notch and weave around to the opposite Keep weaving across the center, filling in space Alternate colors for more interest Glue beads or any decorative craft pieces to the top Tie off the end on the back Trim any excess yarn tails
Adorable DIY Reindeer Ornaments Made from Cardboard, Pom-Poms, and Googly Eyes
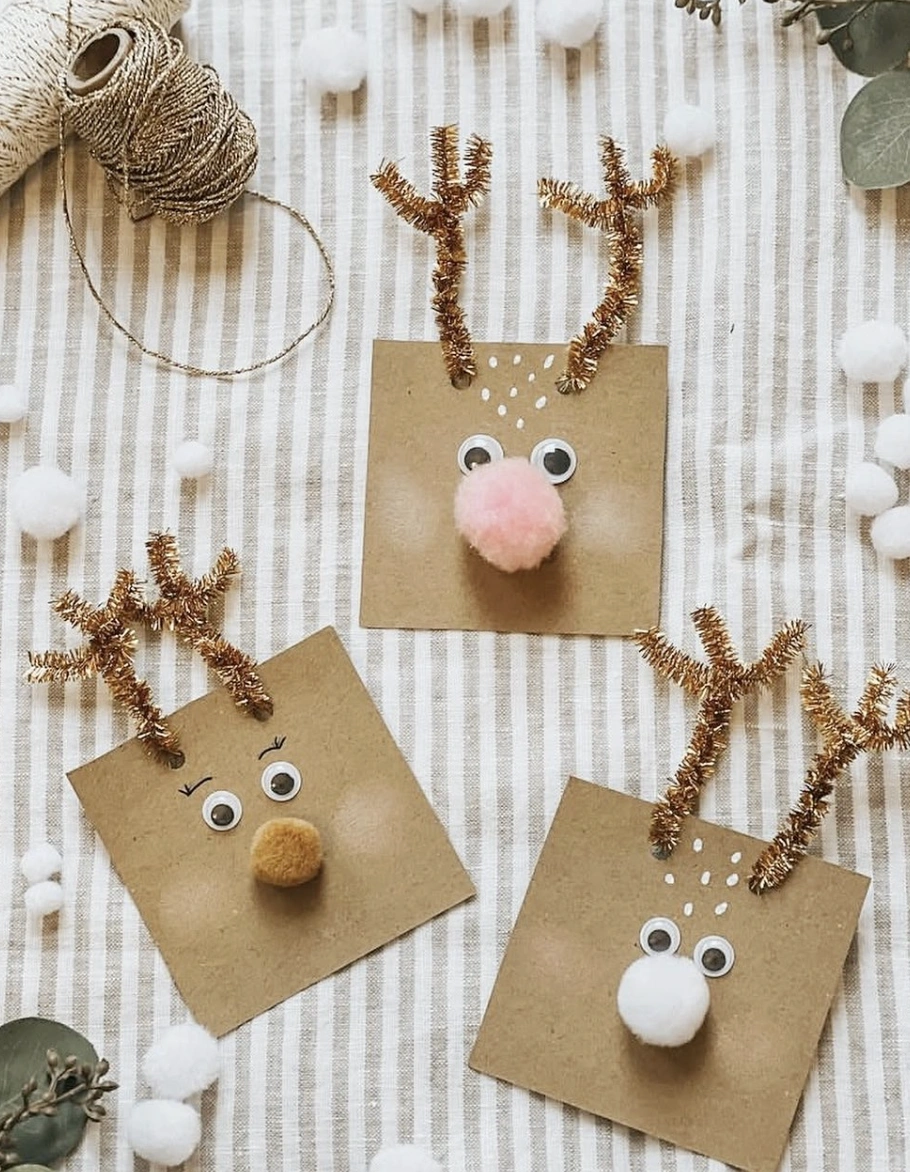
Credit: @aandjkids
So much cuter than those mass-produced store baubles, don’t you think? Pushing aside the usual felt or wood, these put cardboard front and center.
Those tiny pipe cleaner antlers are an absolutely perfect detail. A simple search for easy cardboard projects can unlock so many similar gems.
These would also double as the most delightful gift tags. The temptation to craft an entire fleet is strong.
How to Make This Craft Snag some square pieces of brown construction paper Raid your craft bin for googly eyes; attach with glue Plop a colorful pompom right beneath the eyes as a Rudolph nose Use glittery pipe cleaners as antlers; bend them into shape Fiddle with mini pompom sizes to achieve balance Hot glue on the antlers in the back Add white dot detailing for a finishing touch
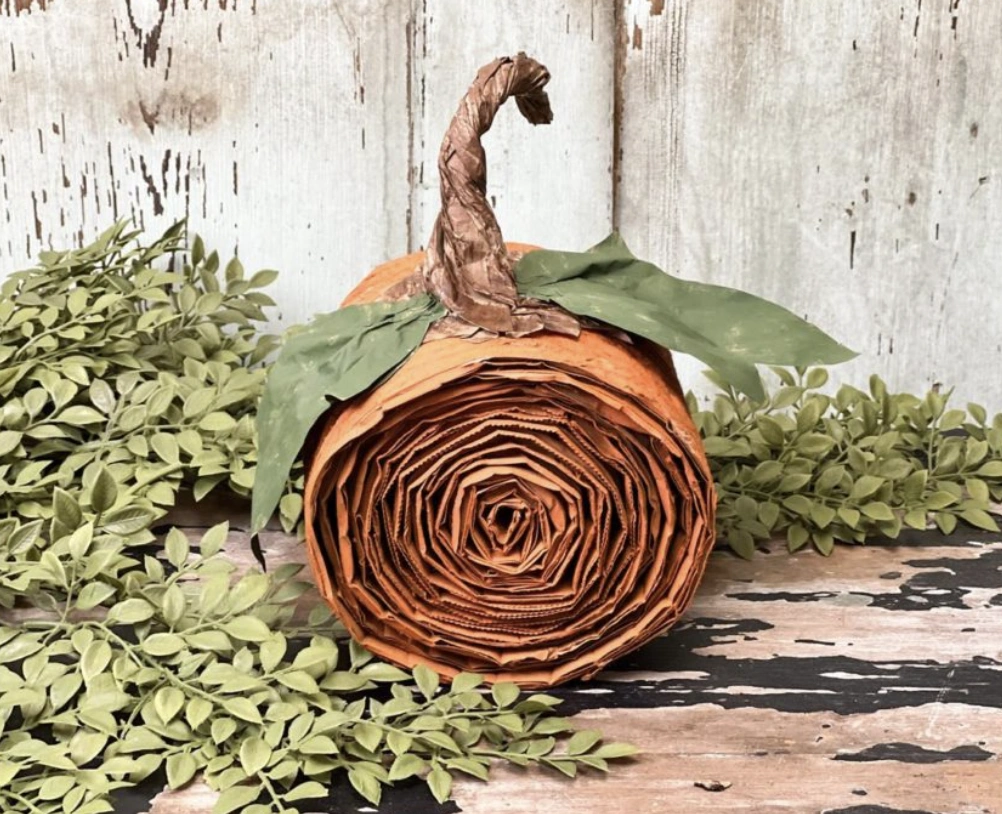
Rolled Cardboard Pumpkin Decor with Paper Leaves
Credit: @theshabbytree
Picture this styled alongside dried gourds and moody pillar candles. Or, shift the vision to a fall-themed bridal shower.
Absolutely adorable. Setting up a DIY station for party guests to try their hand at simple cardboard crafts ideas creative would be a massive hit. Everyone loves a tiny hands-on creative moment.
How to Make This Craft Securely spiral and roll corrugated cardboard to create the pumpkin shape Glue the rolled edges together to hold form Form a stem by twisting brown construction paper; glue to the top Use craft knife to shape paper stem if needed Affix green paper leaves around the stem base Position the pumpkin on a decorative rustic surface
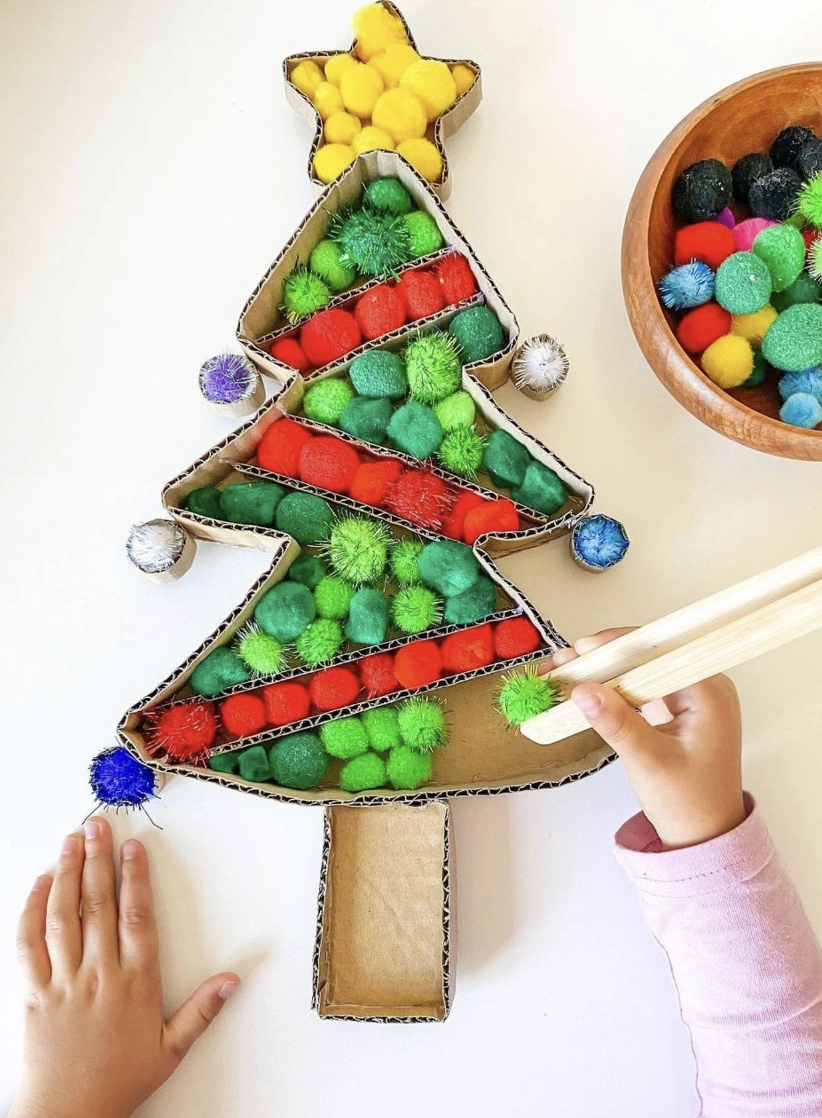
Cardboard Christmas Tree with Pom-Pom Color Sorting Activity
Credit: @_simply_bea_
The sensory bin trend has been popping up everywhere, and this puts a seriously charming spin on it. It’s a cardboard tree sectioned off and filled with red and green pom-poms, ready for a kid to transfer them using tongs.
Remember those conversations about keeping the kids engaged during winter break? This is fuel for some truly spectacular cute cardboard crafts.
How to Make This Craft Use recycled cardboard box to make a Christmas tree shaped Cut dividers to make rows within the tree shape Paint the tree a base coat green Acquire a bowl full of colorful pom-poms Arm your eager helper with a pair of kid-friendly tongs Encourage color coordination Place a star made of cardboard on top for a festive touch
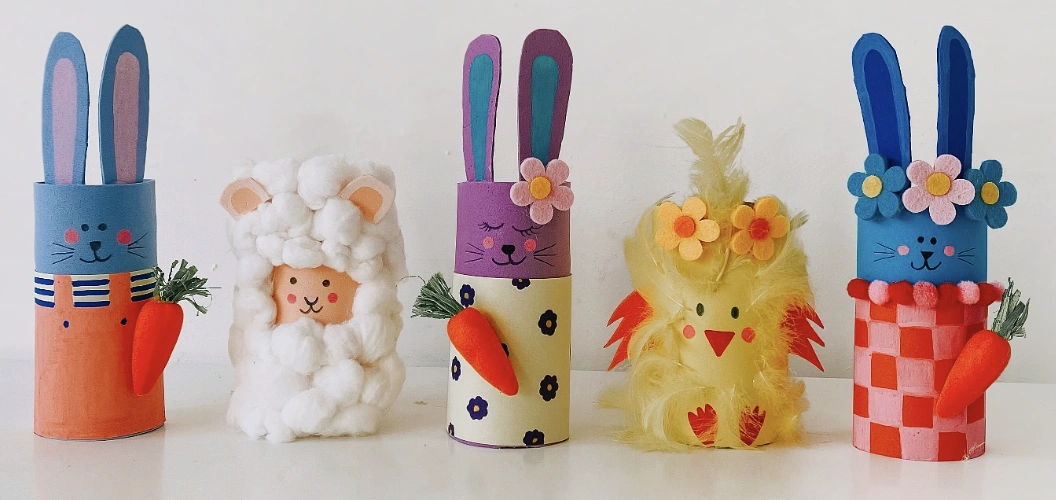
Toilet Paper Roll Spring Animals: Bunnies, Lamb, and Chick
Credit: @liddierowl
It’s honest truth that those cardboard rolls used to go straight into the trash without a second glance. Then designs like these adorable critters surfaced.
Scouting for budget-friendly kids’ crafts can be a challenge. But with a stash of toilet paper rolls and a deep dive into cardboard DIY ideas, a world of tutorials opened up.
Now, instead of waste, bright spring decorations have taken over. A total victory for the budget.
How to Make This Craft Collect cardboard tubes (toilet paper or paper towel) Paint the tubes with acrylic paint Cut out animal ears from colored cardstock Glue ears to the top of painted tubes Add embellishments such as felt flowers, or faux feathers Cut carrots out of orange cardstock Glue on miniature carrots Draw faces with markers Add details like whiskers
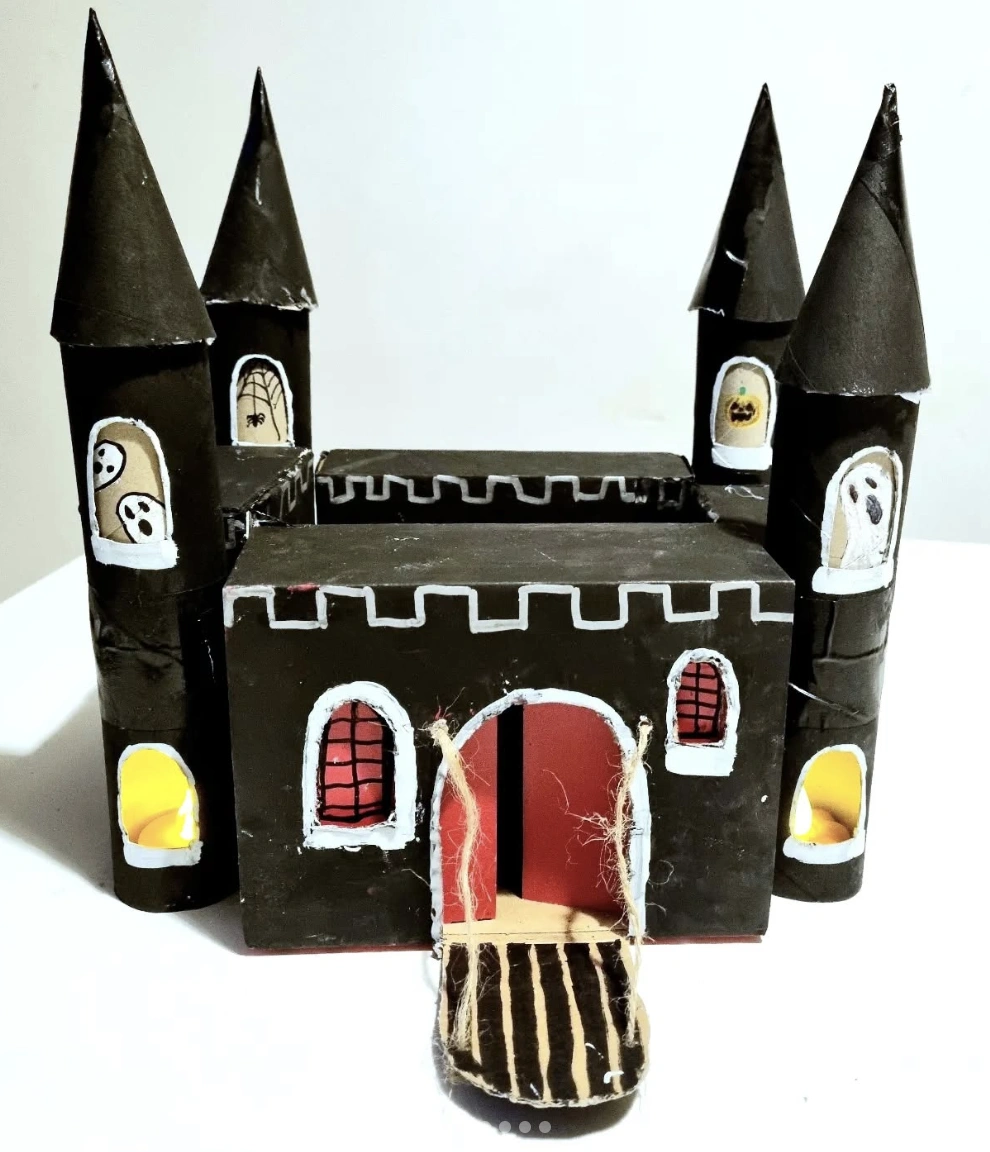
Halloween DIY Haunted Castle: A Recycled Paper Roll Project
Credit: @craftymessymom
This Halloween-inspired fortress proves presentation is everything. Elevate your spooky setup by spraying everything down in black and relying on white paint for the highlights.
Skip those generic store shelves, because homemade cardboard crafts deliver that personalized flair everyone is secretly craving. The tiny details carry the whole design. It walks the line between sophisticated and playfully eerie.
How to Make This Craft Gather cardboard boxes and tubes of varying sizes Cut and shape the boxes to form a castle structure Glue the structure together Cut out cone shapes from cardboard for turrets Paint the entire structure black with acrylic paint Draw windows and doors with white paint Add spooky details like ghosts and spiderwebs Cut a section for a drawbridge Attach twine to create a working drawbridge Embellish with red paint to mimic brickwork
Cardboard and Wood Sculpture with Blue Tape Detail
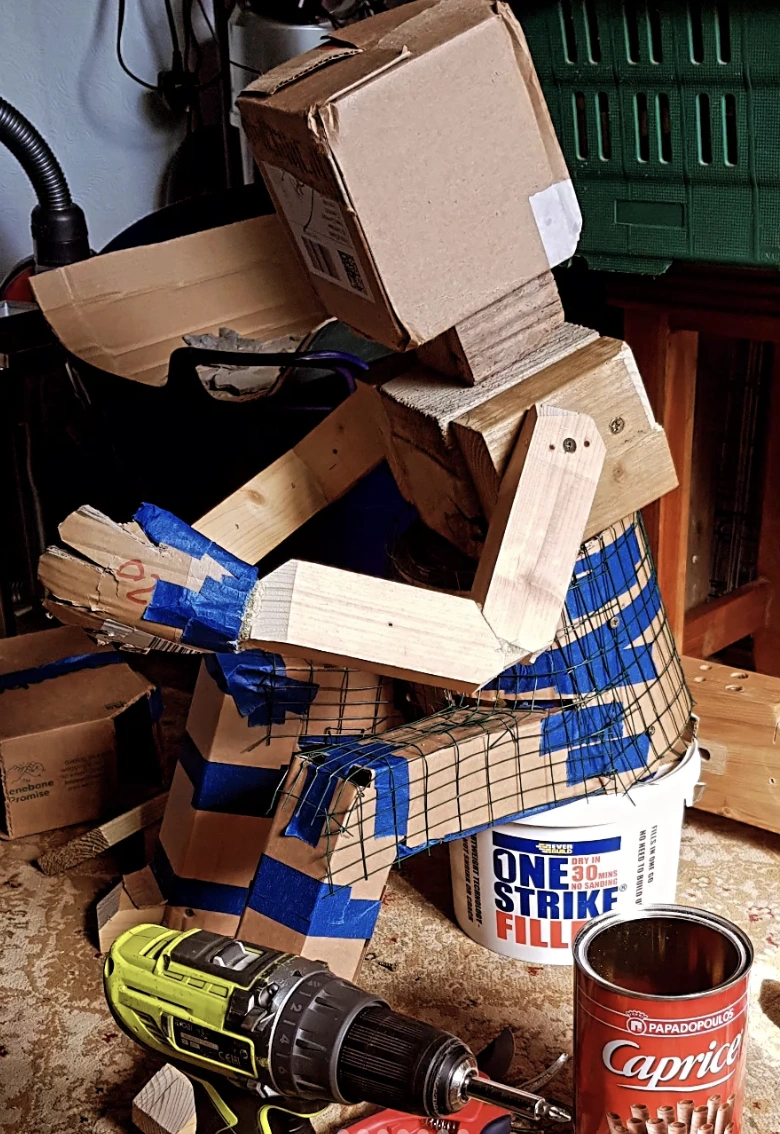
Credit: @bob_and_wee.jerry
It might not be gallery-bound, but the resourcefulness deserves a standing ovation. That square cardboard head has a quirky charm all its own.
The blue tape stripes across the cardboard body are a fantastic detail. Seeing some truly impressive easy cardboard craft projects online suggests this is absolutely the right path.
How to Make This Craft Scavenge for cardboard boxes and wood scraps of various sizes Start by assembling the body using cardboard, securing with tape and glue Craft the head with wood scraps, layering different pieces Cut arms and legs from thin pieces of wood Attach limbs to the body using screws or nails Use blue painter’s tape to decorate the arms, legs and chest Add hardware accents like screws and bolts for visual interest Position robot in a seated, thoughtful pose Optional: Add a coat of sealant for longevity
Spooky Light-Up Stone Cottage – A Halloween Craft
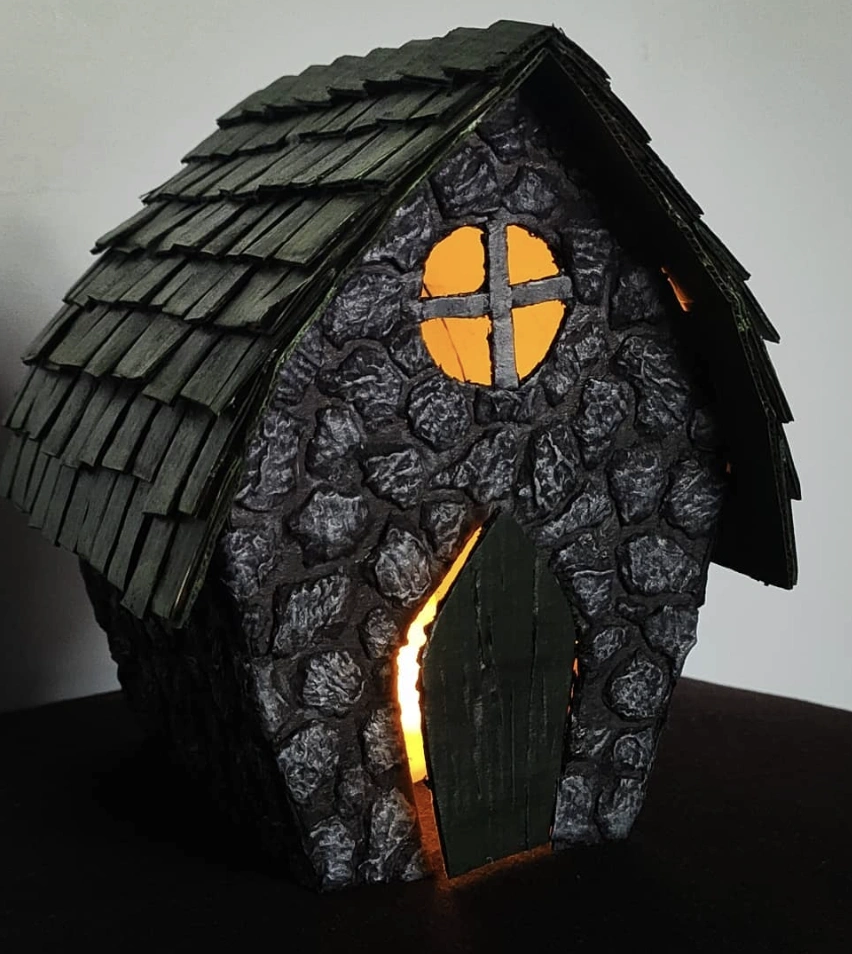
Credit: @raksha_creativeworld
The request was for a project that was affordable, simple, and kept the kids engaged for longer than a hot minute. The answer arrived in the form of cardboard creations.
This eerie stone cottage was built entirely from materials already lying around the house. The kids tapped into their creativity, and now a charming seasonal decoration sits on the mantle. A complete victory on all fronts.
How to Make This Craft Construct a simple house shape from cardboard scraps using glue and tape Cut small paper strips and layer them to create a shingled roof effect, glueing them to the top Crumple paper and glue it all over the cardboard house to give it a textured base Paint the entire house black, let it dry completely, then dry brush with grey and white paint to mimic stone Cut out a circular window and a door opening Glue an LED tea light inside the house to illuminate it Paint window panes over the circle with black paint Add details such as moss or vines for extra spookiness
Cardboard Laundry Scene with Felt Clothesline
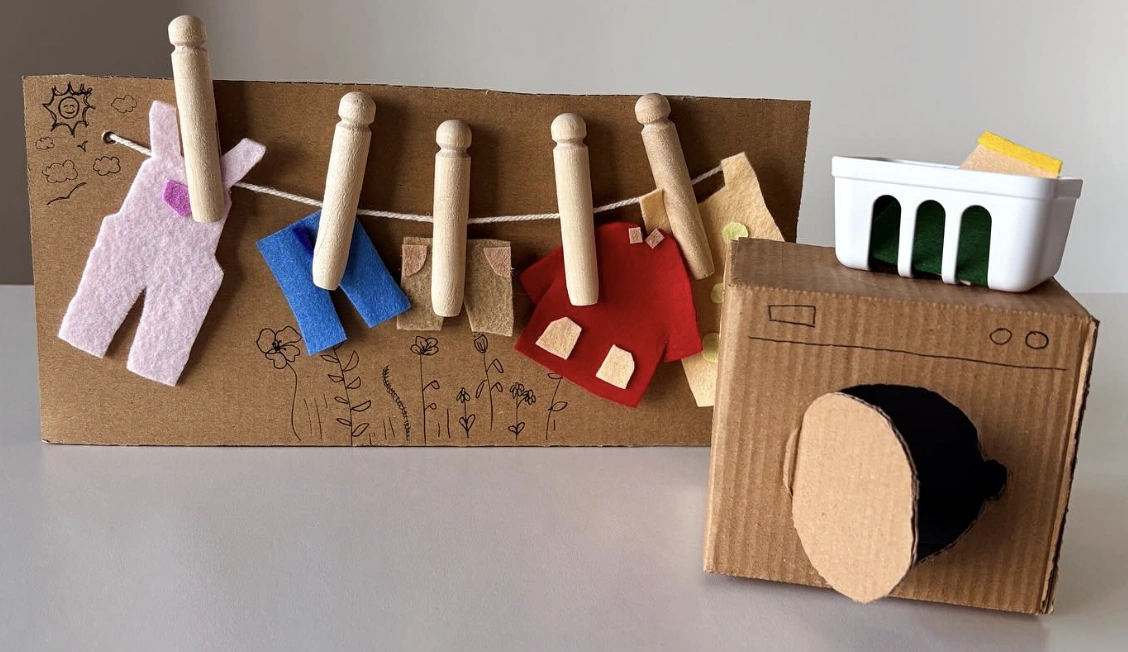
Credit: @sewingjunior
This little setup feels perfectly at home in a child’s play corner, doesn’t it? It sparks imaginative play while serving as a soothing element in a calm, minimalist space.
The muted tones blend effortlessly with almost any design palette. It serves as a gentle nudge that genuine joy is often simple, discovered while exploring things to make out of cardboard side by side.
How to Make This Craft Find a small cardboard box for the washing machine Cut out a circular door on the box and decorate with markers Make a cardboard clothesline with clothespins attached Cut small clothes shapes from felt and decorate with buttons or markers Draw a background scene on a large piece of cardboard to attach the clothesline to Cut out a cardboard laundry basket with colored felt Have kids hang the felt clothes on the line with the clothespins Decorate the background with markers or crayons to look like outdoors Use small cardboard scraps to create extra accessories such as an iron
DIY Halloween Characters from Toilet Paper Rolls
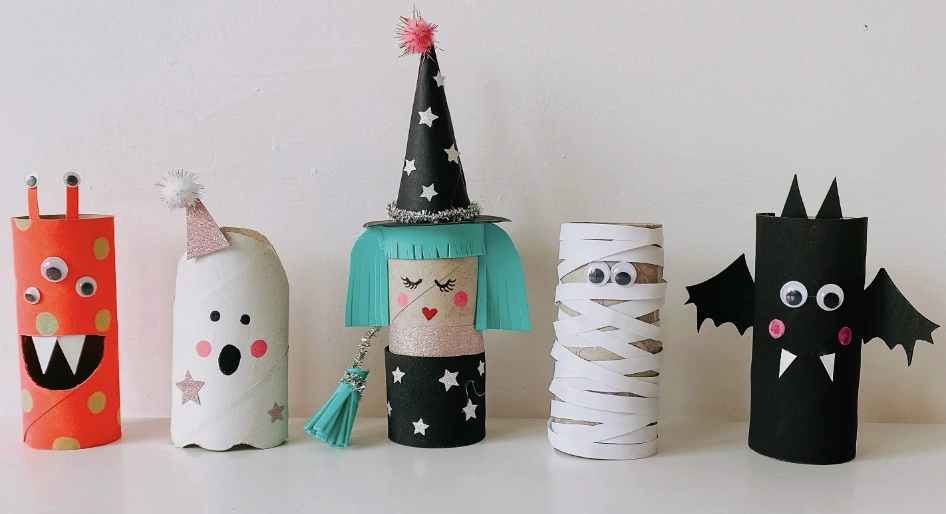
Credit: @liddierowl
These spooky little charmers are absolutely perfect for the creative pal who lives for a touch of Halloween whimsy. Think ghosts, witches, mummies, and bats, all crafted from supplies already stocked at home.
Who ever guessed toilet paper rolls could look this adorable? These cardboard box crafts are a brilliant strategy for using up those paper towel tubes when spooky season rolls around.
How to Make This Craft Gather empty toilet paper rolls Paint each roll a different color (orange, white, black, beige) Add details like eyes, mouths, and accessories using paper cutouts, markers, and googly eyes For the mummy, wrap white crepe paper or masking tape around the roll To make the witch, create a paper hat and fringe hair Add wings, for the bat, by cutting paper Create a monster by adding different sized googly eyes and cut out teeth Use cardboard or glitter to add extra details and decoration
Miniature Illuminated Thatched-Roof Cottage
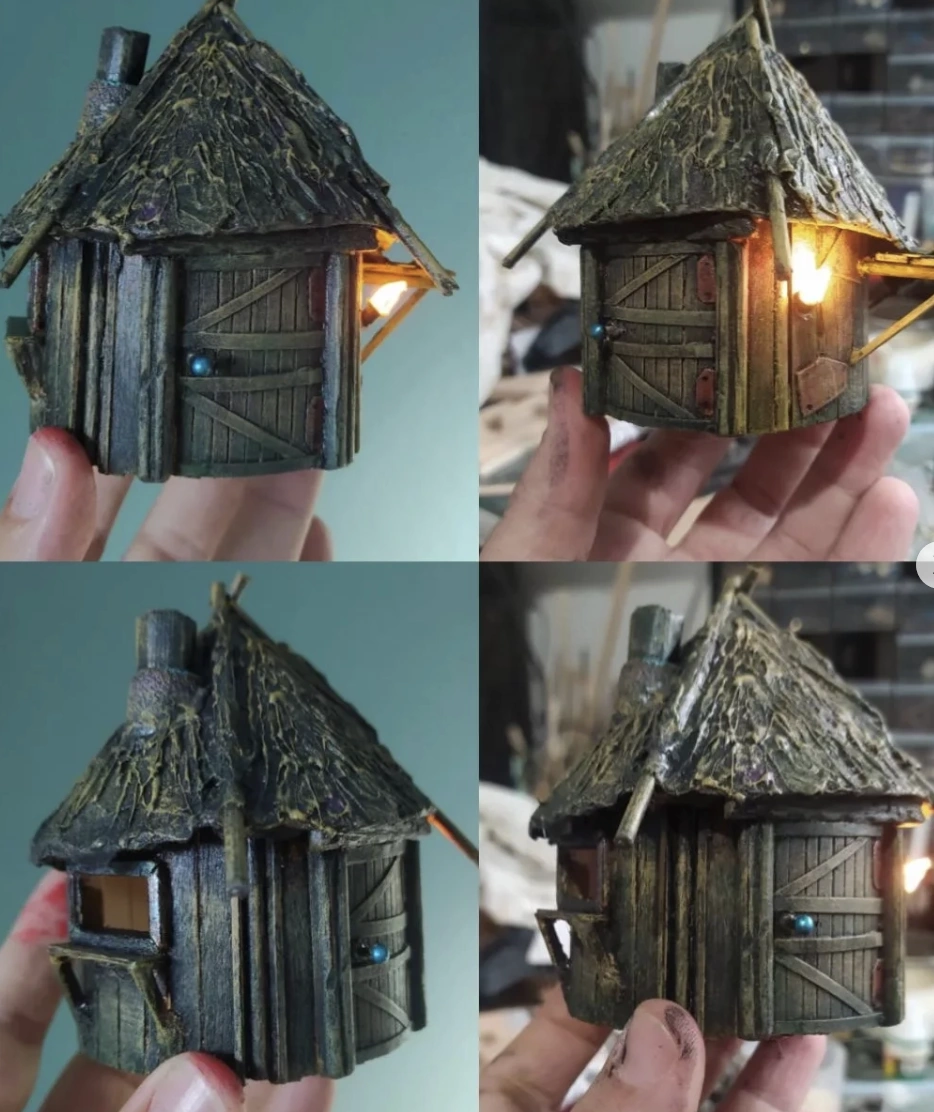
Credit: @cucos.crafts
Those tiny blue bead windows are beyond endearing, and the deep texture on that thatched roof is spectacular. You’d never guess this falls into the category of easy cardboard craft project supplies.
It’s a mystery how such a detailed finish was achieved, but the glowing interior lights make this little cottage truly magical. Consider this inspiration officially ignited.
How to Make This Craft Begin by building a basic cottage structure from a dense foam board Apply a thick layer of texture paste to the exterior walls While the paste is wet, press small stones or pebbles into it to create a stone wall effect Construct the roof from layered pieces of wood or thick cardboard, creating a shingled appearance Paint the entire structure with shades of brown and gray, allowing the paint to settle into the cracks and crevices Use a dry brush technique to highlight raised areas with lighter colors Add miniature details such as a tiny door, windows, and chimney Use small wood sticks for window panes Consider adding moss, vines, or other foliage to enhance the fairy cottage feel Install a small LED light inside to create a warm glow
Upcycled Cardboard Camper Van for Miniature Travelers
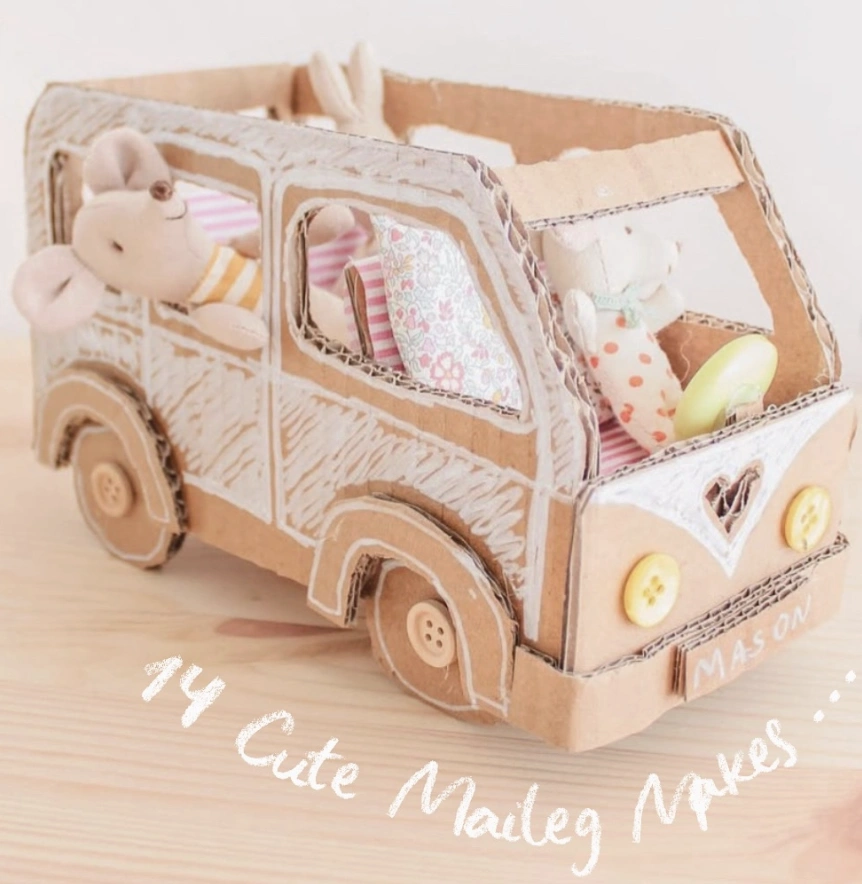
Credit: @mummy_and_my_three
The DIY space is absolutely saturated with sweet crafts, but this cardboard camper operates on a different level entirely. The meticulous details are what elevate it, like the button headlights and that tiny heart-shaped cutout in the back.
It sparks a whole train of thought about the extraordinary things to make out of cardboard with just a spark of motivation. This is crafting, but refined into an art form.
How to Make This Craft Collect a large cardboard box and cut out the basic van shape Reinforce edges with extra cardboard strips and glue Cut out windows and the heart shape on the back for detail Use white paint to highlight edges and add accents Attach button -hubcaps- to the wheels using hot glue Fashion a simple cardboard base for the interior Embellish the interior with fabric scraps for cushions
Recycled Corrugated Cardboard Cactus in Hand-Painted Pots
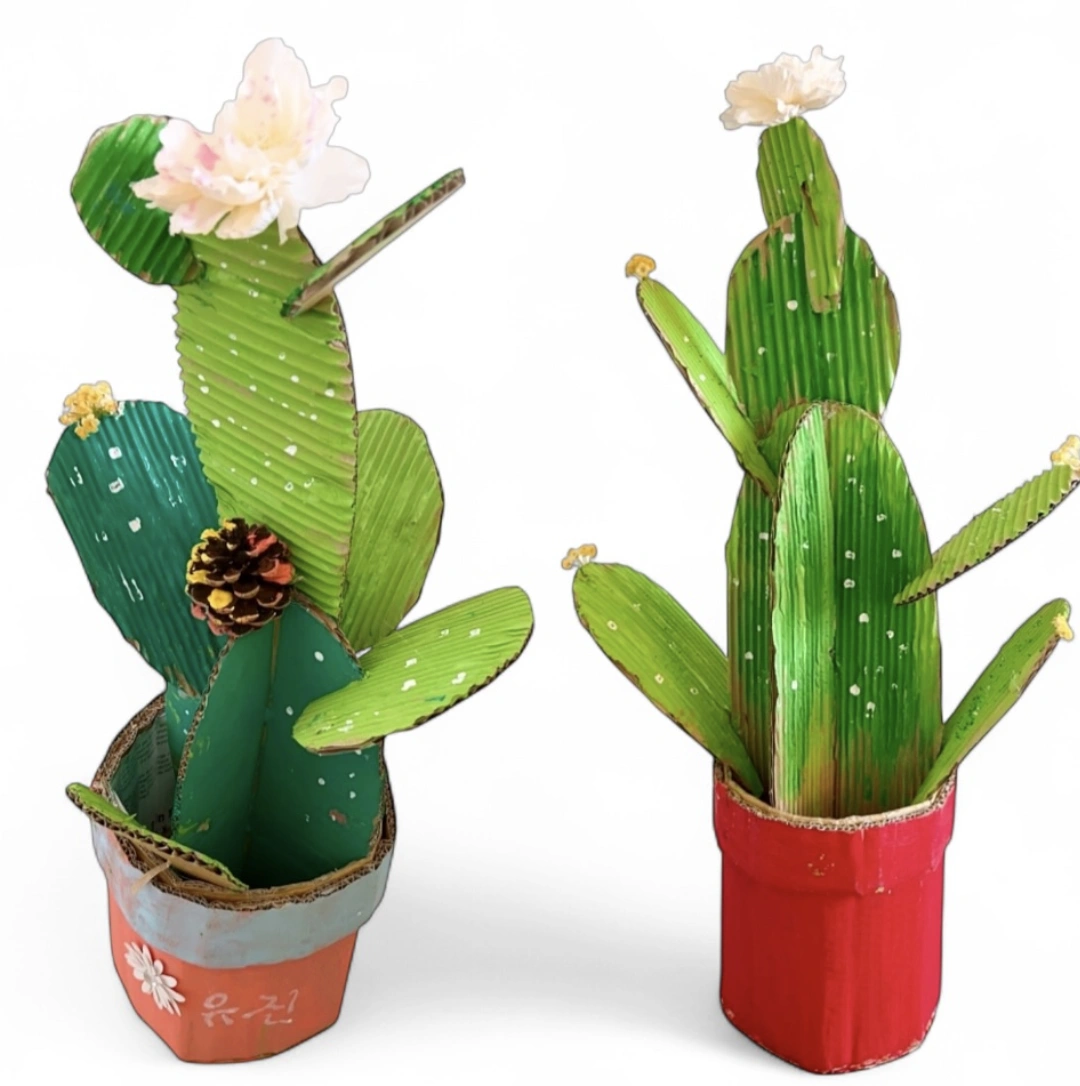
Credit: @petitepalette_nj
Forget everything you know about typical desert plants. The standout feature here is the ingenious use of corrugated cardboard, lending authentic texture and structure to the cacti.
Take a close look at those hand-painted pots. Notice the visible brushstrokes and the charmingly imperfect finishes that scream handcrafted, not factory-made. This level of thoughtful execution lifts these cardboard crafts far beyond basic hobby territory.
How to Make This Craft First, gather corrugated cardboard and sketch various cactus shapes Cut out the shapes, layering pieces for added dimension Paint the cardboard pieces using shades of green acrylic Dry brush with white paint for a speckled effect Cut cardboard pieces into the shape of small pots Assemble the pots and paint in vibrant colors Hot glue the cacti into the pots Add faux flowers or pine cones to give the cacti character
Cardboard Sun Hair Clip Organizer DIY
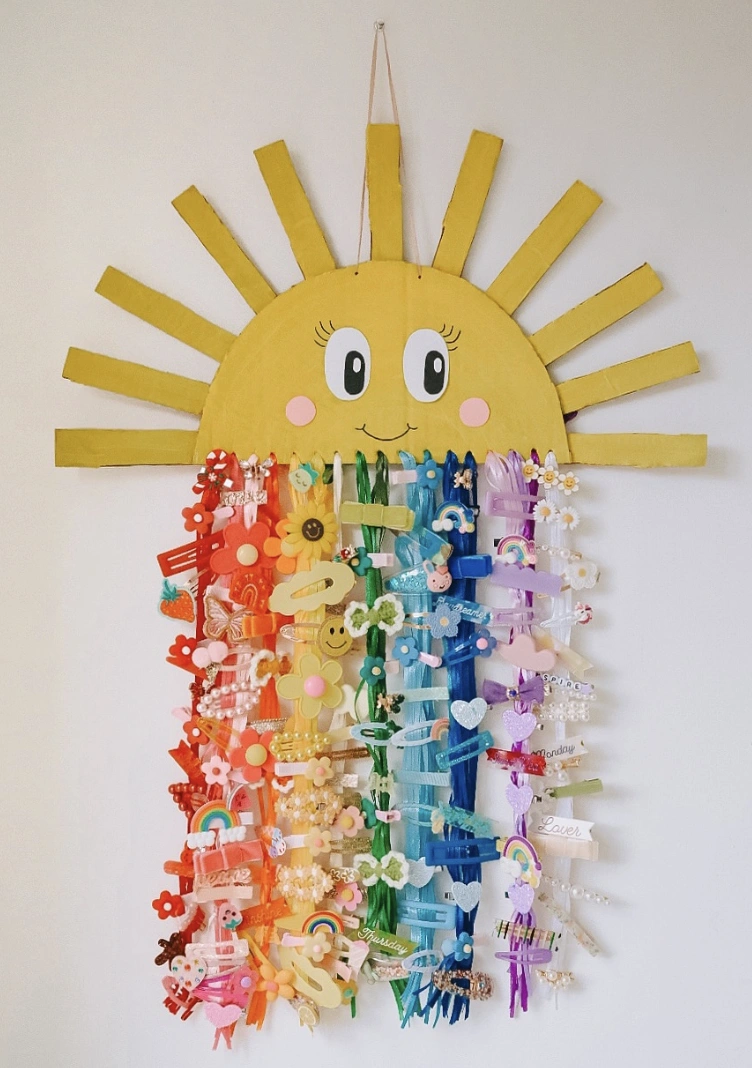
Credit: @liddierowl
Your niece Lily would go absolutely wild for this one. It’s a sunshine-shaped hair clip holder, brilliantly organized by rainbow color.
Imagine how much fun it would be for her to choose her accessories every morning from this glowing creation. Whoever dreamed this up is a total mastermind. The rainbow arrangement is pure joy, and it all begins with a basic shape drawn for some cardboard crafts decoration, just like this sunny face.
How to Make This Craft Cut a large half-circle shape from cardboard as a base Cut strips of cardboard and attach around the half-circle to form the sun’s rays Paint the sun yellow and allow it to dry completely Draw a smiling face onto the sun with black marker Add pink cheeks using colored pencils or paint Attach a hanging mechanism to the back of the sun Place each of your hair accessories across the sunshine rays
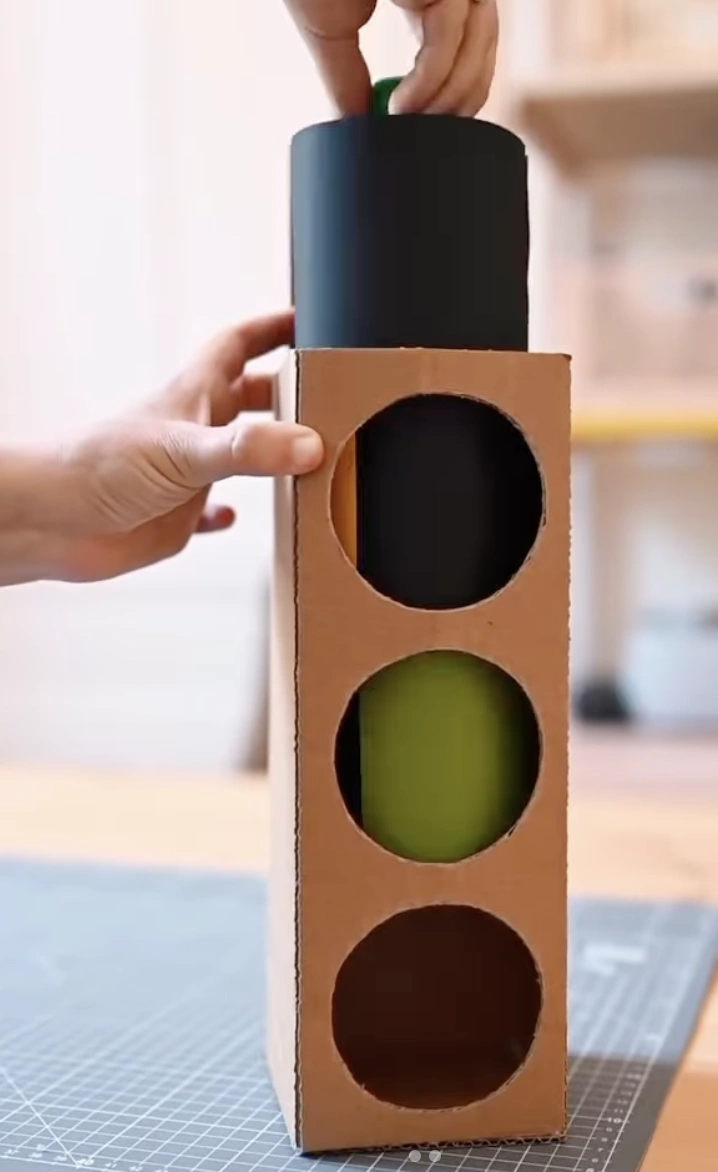
DIY Cardboard Traffic Light with Rotating Color Discs
Credit: @keep.kids.busy
This homemade cardboard traffic light is a seriously exciting project. It features a brilliant spinning mechanism that cycles through the signals.
The anticipation of seeing a little one’s reaction is sky-high. For anyone hunting down engaging and educational cardboard crafts ideas creative, this could be the star activity for a weekend session with the young ones. It’s absolutely captivating.
How to Make This Craft Obtain a sturdy cardboard box, taller than it is wide Cut three circular holes in the front of the box, spaced evenly apart Create cardboard tubes which will be wrapped in paper and placed in the holes Wrap one tube in red paper, another in yellow, and a third in green Wrap the remaining part of the tubes in black paper Slide the tubes into the holes in the box and make sure that they can rotate freely Add a cardboard circle on top for easy rotation Decorate the outer box with markers or paint to resemble a traffic light Ensure smooth rotation of paper tubes to show red, yellow, and green Add labels to the back of the traffic light indicating the meaning of each color
Diving into the world of cardboard craft ideas has been genuinely fulfilling. It’s remarkable what emerges when a dose of imagination meets repurposed materials.
The process has shown that the real treasure isn’t just the finished object, but the pure delight found in building something completely one-of-a-kind. Hopefully, this sparks the urge to grab some cardboard and jump right into a project. Share what you make, because seeing those creations is the absolute best part.