


Feeling that pull to spruce up your space for the season? Maybe your soul is searching for something that breaks the mold this year.
Step away from the predictable evergreen and channel your inner maker with some wood Christmas trees DIY projects.
We’re diving into ridiculously charming Christmas tree wood crafts that’ll transform your home into a winter workshop wonderland.
Spanning farmhouse rustic to sleek modern, these wooden Christmas tree ideas will light up your imagination. Fire up that glue gun.
Tiered Wooden Christmas Tree with Gold Star and JOY Base

Credit: @knotsofpine
Picture a weekend afternoon crafting session with the little ones, turning scrap wood into a tiny forest. This piece practically screams “Christmas wood crafts to sell” at your local holiday market.
It brings a special handmade energy to your festive display. Perch it on a bookshelf, desk, or let it command the center of the table. So beautifully adaptable.
How to Make This Craft
Cut three triangle shapes from plywood, graduating in size
Cut a star from thin wood
Sand all pieces to smooth the edges
Paint each triangle a different color (red, white, green)
Add painted polka dots or squiggle designs to the triangles
Apply glue to stack triangles, largest on the bottom, smallest on the top
Paint the star gold and attach it to the top triangle
Glue the tree to a square wooden base
Cut a dowel and paint stripes, then insert it to tree and base
Use stencils or paint to add the word JOY to the base
Rustic Emerald Green Wood Christmas Trees DIY Project

Credit: @craftyourchristmas
That deep emerald shade is surprisingly sophisticated. Skip the expected metallics because this is pure mountain lodge magic, darling.
Let it greet guests on your entryway console during a festive get together: effortless yet completely intentional. You can practically feel the crisp alpine air. Or gather your best pals for a night of making wood Christmas trees DIY, because crafts with friends always bring the laughs.
How to Make This Craft
Grab some 1×3 lumber and cut two long pieces and a shorter piece at 45 degree angles
Assemble the wood into a triangle shape using wood glue and brad nails
Cut wood to create base feet and glue with brad nails
Allow the wood glue to completely dry
Sand any rough edges or splintered spots
Apply two coats of dark green paint, letting each coat dry
Make a burlap bow and add some berries and greenery
Hot glue the bow to the center of the tree
Decorate the tree with additional greenery and ribbon
Place the tree on a mantle or table for display
Minimalist Wooden Christmas Tree with Neutral Ornament Palette

Credit: @retreejoy
This creation speaks directly to anyone craving a whole mood, not just a seasonal prop. If your style leans toward uncluttered lines, organic materials, and quiet beauty, you’ve found your match.
Ditch the loud, classic palette. This approach lets you build a sophisticated holiday atmosphere purely through your own Christmas tree wood crafts. The subdued ornament colors are a brilliant finishing detail as well.
How to Make This Craft
Collect sturdy, evenly spaced branches of varying lengths
Secure the thickest branch as the base in a planter filled with sand
Drill holes in the center of the branches and slide them onto a central pole
Add some hot glue to secure the branches in place
Wrap the structure loosely with delicate white fairy lights
Select a collection of ornaments in neutral tones such as beaded strings
Hang ornaments sparingly on the branches, distributing evenly
Affix small sprigs of dried greenery around the tree using wire
Use different sized ornaments for visual interest
Set the tree in a spot where light can highlight its airy design
Minimalist Wooden Christmas Tree with DIY Advent Calendar Ornaments

Credit: @retreejoy
Get a load of this spectacular tree. It radiates a pure Scandinavian spirit, right?
The current minimalist Christmas decor movement has completely captured the imagination. Those dangling little gift boxes are pure brilliance; imagine counting down with a homemade advent calendar.
It’s such a breath of fresh air. For those hunting for wooden Christmas trees rustic charm, this nails it by mixing modern sleekness with a cozy farmhouse feel. A serious contender for this year’s DIY list.
How to Make This Craft
Get a premade wooden tabletop tree structure
Gather small, lightweight boxes or containers
Number the boxes 1 through 24 with stickers or paint
Place a small treat or message inside each box
Attach a ribbon or string to each box for hanging
Randomly hang the boxes onto the branches of the twig tree
Add other small ornaments like snowflakes or felt balls
Use small clothespins to clip cards on the tree
Adjust arrangement for visual balance
Place on table and enjoy the month of Advent
Upcycled Wood Plank Christmas Tree with Stenciled Holiday Message
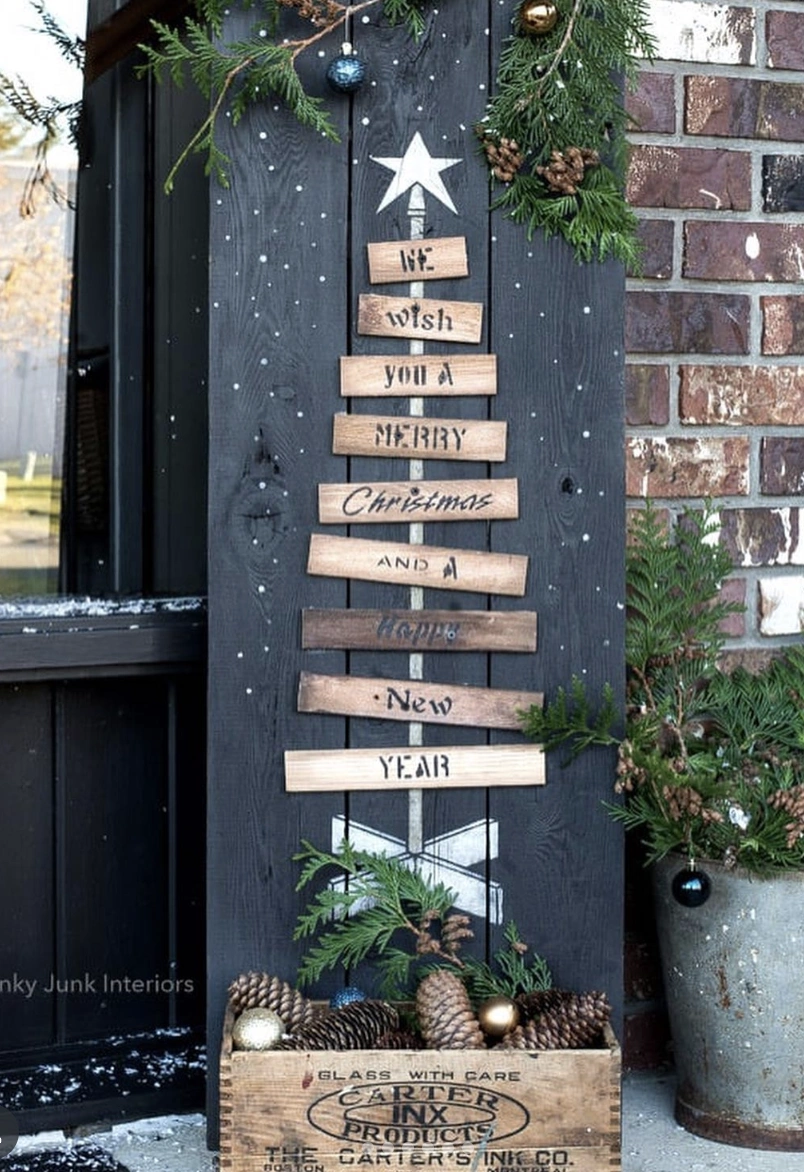
Credit: @funkyjunkinteriors
How brilliant is this display? The salvaged wood plank backdrop is completely captivating, painted nearly black yet still whispering the story of its wood grain.
Each little wooden tier carries a stenciled phrase from a holiday greeting, and that’s just adorable. This sends major wood Christmas tree ideas inspiration for a front hall makeover next season.
And that vintage-inspired crate at the bottom? Absolute perfection.
How to Make This Craft
Salvage weathered wood planks and cut them to varying lengths
Arrange the planks in a descending order, creating the shape of a Christmas tree
Cut star from scrap wood for top of tree
Sand down rough edges, but leave some texture
Paint the background plank with dark charcoal gray or black exterior paint
Use stencils and paint to write out “We Wish You A Merry Christmas And A Happy New Year” on separate planks
Nail or screw the planks to the background board
Stain the planks with a light brown hue
Glue a star to top and arrange pine cones on bottom
Lean the completed sign against a wall for festive front porch charm
DIY Personalized Scrap Wood Christmas Tree with String Lights
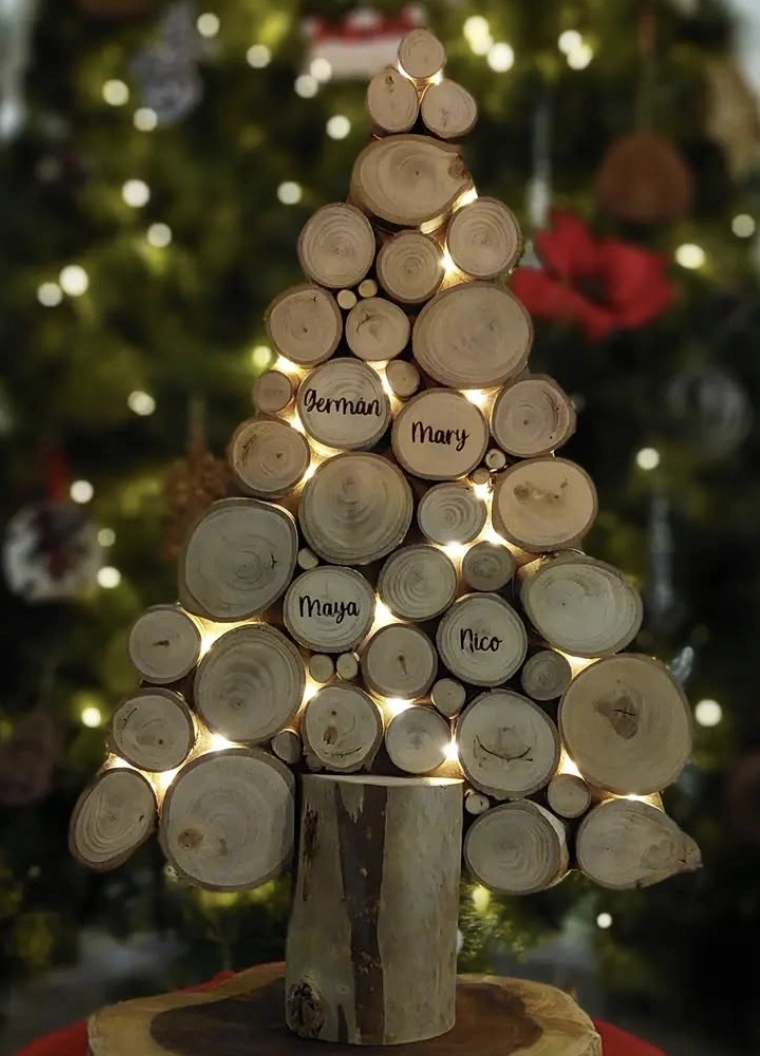
Credit: @artmony.co
The craving for personalized holiday accents often clashes with a distinct lack of free time. Something adorable and swift is the only acceptable solution.
This scrap wood Christmas tree project absolutely delivers. The tiny wood rounds become personal keepsakes with just a sharpie and a name, a wonderfully simple act of making something meaningful. The process looks delightfully straightforward, and a pile of scrap wood already lives in the garage; total victory.
How to Make This Craft
Collect various sizes of dried wood slices (approximately 20-30)
Cut one larger wood slice and attach a thicker wood trunk for the base
Arrange the slices in a tree shape on a flat surface, starting with larger slices at the base
Using wood glue, secure each slice to the slice below it
Drill small holes into some slices for string lights
Weave battery-operated warm white string lights through the tree
Use a wood burning tool to carefully write names on select wood slices
Seal entire tree with clear varnish spray
Let dry completely before placing
Add a star to the top
DIY Wooden Christmas Tree with Gold Star Topper and Ornament Decor

Credit: @la.carpenteria
Scrolling through countless sleek, Scandinavian style wood xmas trees online reveals a common pattern, but this one carries a distinct personality. Rather than rigidly symmetrical shelves, this handmade version uses naturally uneven wood lengths, creating a more textured and organic feel. The addition of a gilded star and gentle fairy lights injects a level of celebratory warmth rarely seen on similar concepts.
How to Make This Craft
Begin by cutting planks of wood, diminishing in length, to make the tiered effect
Sand the planks until smooth
Stain all the wood planks a medium brown and let dry completely
Screw or nail planks together starting with the longest at the bottom, and then work your way up
Attach a wooden star shape to the top
Drill small holes into each plank for lights
Weave string lights through the planks
Hang small, lightweight ornaments from the planks
Add a wooden start on top
Wrap a string of lights around it
Stacked Driftwood Christmas Tree with Starfish Topper

Credit: @jnwood_art_craft
This would feel right at home in a cozy coastal cottage. The endless scroll for manageable wooden Christmas tree ideas ends here.
This project is perfectly suited for a quick craft session during a quiet afternoon, destined for a prime spot on the console table. It’s infinitely more interesting than hauling a full sized tree into a small space.
And the best part? Zero fallen needles to sweep up. A colossal win.
How to Make This Craft
Gather an assortment of driftwood pieces in varying lengths and shapes
Find a sturdy log slice or suitable base
Using a hot glue gun or strong adhesive, start attaching the longest driftwood pieces to the base
Overlap and stagger the driftwood pieces as you work upwards to form the tree shape
Drill small holes into some of the driftwood branches for the string lights to go through
Wrap the tree with warm white lights
Embellish with a starfish tree topper
Hang small snowflake ornaments on branches
Whitewashed DIY Pallet Wood Christmas Tree Decor

Credit: @stenhousemarket
Farmhouse chic dominates the decor scene, but adding a personal signature elevates the entire look. These petite whitewashed Christmas trees are completely captivating.
It’s a flawless method for weaving a strand of rustic elegance into your seasonal setup. Finding inspiration for a pallet wood Christmas tree on visual platforms like Pinterest or TikTok is incredibly easy. Toss on some tiny jingle bells and rustic twine, and it’s an instant heart stealer.
How to Make This Craft
Cut 2 identical tree shapes from plywood using a saw
Cut the wood base from 1×4 lumber
Sand the tree shapes and base for a smooth finish
Paint the tree shapes and the wood base with white acrylic paint
Sand the edges to create a distressed or weathered look
Attach a wooden dowel to the bottom of the wood tree
Attach the dowel to the wood base
Glue faux evergreen sprigs, berries, and jingle bells to the top
Add some twine to create a bow around the bells
Attach a decorative tag to the twine
Wall Mounted Rustic Wooden Xmas Tree with Ornament Accents

Credit: @karenramon
The exposed, untreated timber planks lend a fabulously raw, edgy texture. Weaving sparkle lights along the borders transforms the entire silhouette into an instant celebration.
A clever upgrade would involve swapping those standard baubles for heirloom glass treasures, truly lifting the whole presentation. When you lean into alternative wooden xmas trees, the lighting choices become absolutely critical.
How to Make This Craft
Gather pallet wood planks and cut into lengths decreasing from base to the treetop
Sand planks to remove splinters; stain with desired color (optional)
Mount wood planks to the wall to form tree shape
Arrange the planks on the wall in the shape of a Christmas tree
Drill small holes through each plank for lights to go through
Wrap string lights around the planks to light up the tree
Paint “Merry Christmas” on wood letters and attach to the wall
Hang decorative ornaments on the planks with string or hooks
If desired, add a star on top
Rustic Wood Slice Christmas Tree with Garland and Ornament Accents

Credit: @woodys.ll
Living in a compact apartment usually means waving goodbye to a massive, classic evergreen. Here is your perfect solution.
This wood slice tree delivers the holiday spirit without stealing precious square footage. The stacked circular cuts, trailing greenery, and dainty hanging decor generate a rich, inviting texture. For anyone scouting easy Christmas wood crafts to sell, this piece combines beauty with genuine practicality.
How to Make This Craft
Source varying sizes of wooden tree slices
Begin stacking the largest tree slice as a base
Layer progressively smaller tree slices
Glue each tree slice together
Weave faux evergreen garland in between each tree slice
String fairy lights amongst the tree greenery
Affix small ornaments on branches and tree slices
Top with miniature tree slice rounds
Add additional glue to secure embellishments
Display tree as desired
Rustic Minimalist: Pallet Wood Christmas Tree with Jingle Bell Ornaments

Credit: @rebeccavirginiadiy
This creation connects with someone who holds the holidays dear, yet sidesteps the frantic fluff. The clean geometrical frame and the rhythmic red and green bells provide just the right amount of charm. For the person who treasures handmade authenticity and craves a snug, low-maintenance vibe, this tiny pallet wood Christmas tree brings a whisper of festive joy without a trace of visual noise.
How to Make This Craft
Cut three pieces of wood to form a triangle frame
Assemble the frame and adhere wood glue at each corner
Clamp until wood glue dries
Stain or paint the wooden frame in desired color
Cut several pieces of thin dowel rod to serve as ornament hangers
Affix the dowel rods between the frame every few inches
Place the jingle bell ornaments on dowel rods
Cut out a wooden star
Paint star in desired color
Glue star to the top of the frame
Affix hanging hardware to the back
Rustic DIY Wooden Xmas Trees Decoration for a Cozy Mantel

Credit: @jnwood_art_craft
These sweet little wooden xmas trees would settle perfectly onto a fireplace mantel. They’d inject a straightforward, organic hum of holiday warmth, quiet yet celebratory, which essentially defines the entire decorating philosophy here. Roping the kids into the making process feels entirely possible.
How to Make This Craft
Gather a collection of twigs and small branches from your backyard
Sort the twigs into decreasing lengths
Start with the longest twig and arrange decreasing sizes on top of each other
Use hot glue to attach each twig, forming a tree shape
Cut the stem to the desired tree trunk length
Glue the tree trunk to a wooden circle for stability
Shape small wooden stars
Glue the star to the top of the twig tree
Allow the glue to set
Display your completed twiggy trees
Distressed Wood Christmas Tree Trio with Snowy Greenery Garland

Credit: @lutzgreenhouse
How wonderfully lovely are these little wood Christmas tree ideas? The weathered, timeworn finish creates an impossibly snug, rustic feeling.
Those snowy kissed branch tips supply the perfect frosty gesture. Notice the trailing greenery garland: that icy, sugared texture feels absolutely dreamy, especially next to a humble candle. Recreating this entire mantelscape seems like a brilliant plan.
How to Make This Craft
Purchase a set of three wooden trees
Paint or stain the wooden trees to desired color
Apply a small amount of white craft paint to the branch tips
Purchase an assortment of frosted pine branches, berries, and pinecones
Arrange greenery around the tabletop and trees
Nestle the trees amongst the greenery
Interweave the berries and pinecones within the tree base
Position the LED candle for ambient glow
Use as desired for holiday display
Modern Minimalist Wooden Christmas Tree with Ornaments
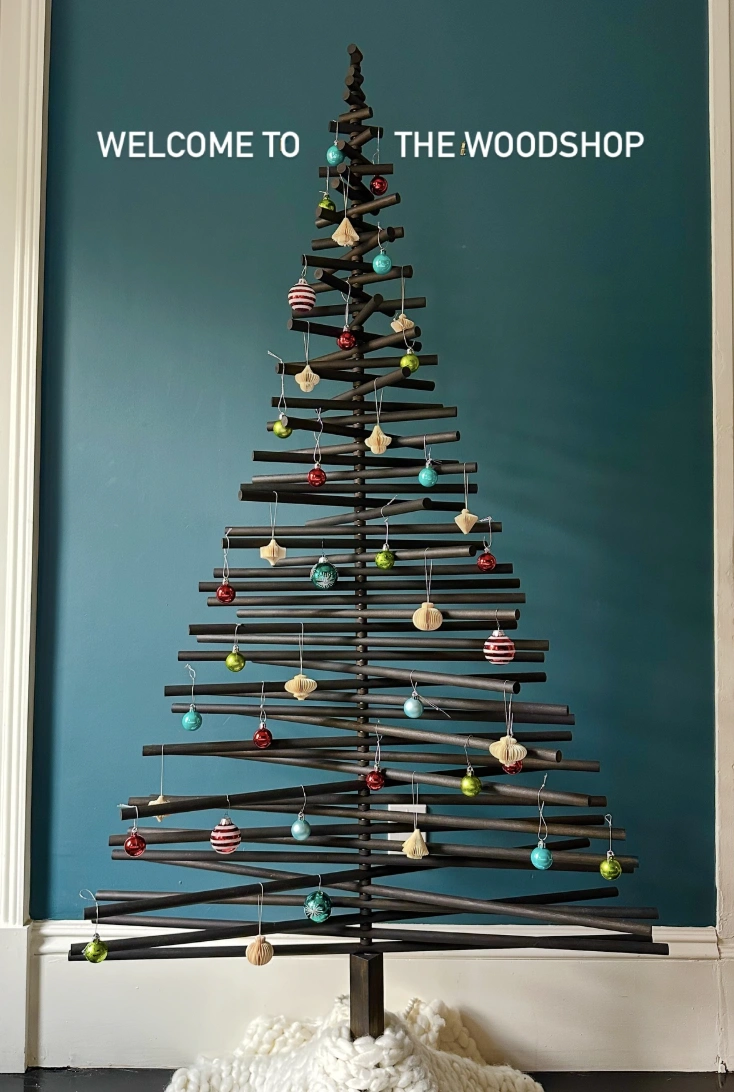
Credit: @welcometothewoodshop
Choose a different path this season. This sculptural object embodies silent sophistication.
The precisely spaced dark dowels sketch a unique outline. The trick is restraint: a handful of baubles in harmonious shades like deep teal, crimson, and forest green will do the heavy lifting.
Leave the gaudy tinsel behind and let the craftsmanship of those Christmas tree wood crafts shine. The design thrives on its glorious simplicity.
How to Make This Craft
Cut dowel rods into decreasing lengths
Drill a hole through the center of each dowel rod
Thread the dowel rods onto a metal rod
Secure the metal rod to a wooden base
Paint the wood in desired color
Choose various Christmas ornaments
Hang the ornaments on the dowel rods with ornament hooks
Style ornaments, alternating colors and sizes
Finish tree with wooden top
Display the tree prominently in desired location
Minimalist Wood Xmas Tree with Twinkle Lights and Matching Star Decor

Credit: @les_imparfaites_lumineuses
Calling all devotees of the clean Scandi look or anyone who gravitates toward the effortlessly chic. The crisp geometric form and gentle illumination radiate cozy, elevated energy.
Imagine this perched on a writing desk or a side table: pure charm. Teachers, dorm dwellers, and minimalist enthusiasts absolutely need these wood xmas trees in their seasonal rotation.
How to Make This Craft
Cut 8 wooden planks of varying lengths (from 6 to 18 inches)
Smooth edges with sandpaper
Drill a hole in the center of each plank
Insert a wooden dowel into the holes, spacing each plank 2 3 inches apart
Secure with wood glue
Attach a wooden base for stability
Wrap the tree with battery operated fairy lights
Decorate with wooden stars
Write festive holiday messages on each wooden star
Display your festive tree on a countertop
Rustic Wood Christmas Trees DIY Project on Display

Credit: @foragedheirlooms
These wood Christmas trees DIY turned out genuinely lovely. The play between contrasting wood tones, a warmer cherry note against a pale oak, creates a pleasing visual push and pull.
A major plus is the sturdy little sled base; they stand perfectly upright without a single wobble. Though the silhouette is simple, it wraps any corner in a soft blanket of coziness.
How to Make This Craft
Cut the basic arrow shapes from plywood using a jigsaw
Cut thin strips of wood to form the tray edges
Glue the edge strips to the base, creating a shallow box
Clamp and allow to dry
Sand all surfaces smooth
Stain the wood with your choice of stain
Apply a sealant to protect the wood and stain
Let dry completely before using
Use decorative vases as styling in the space
Stacked Wood Slat Christmas Trees: Natural and Crimson Hues
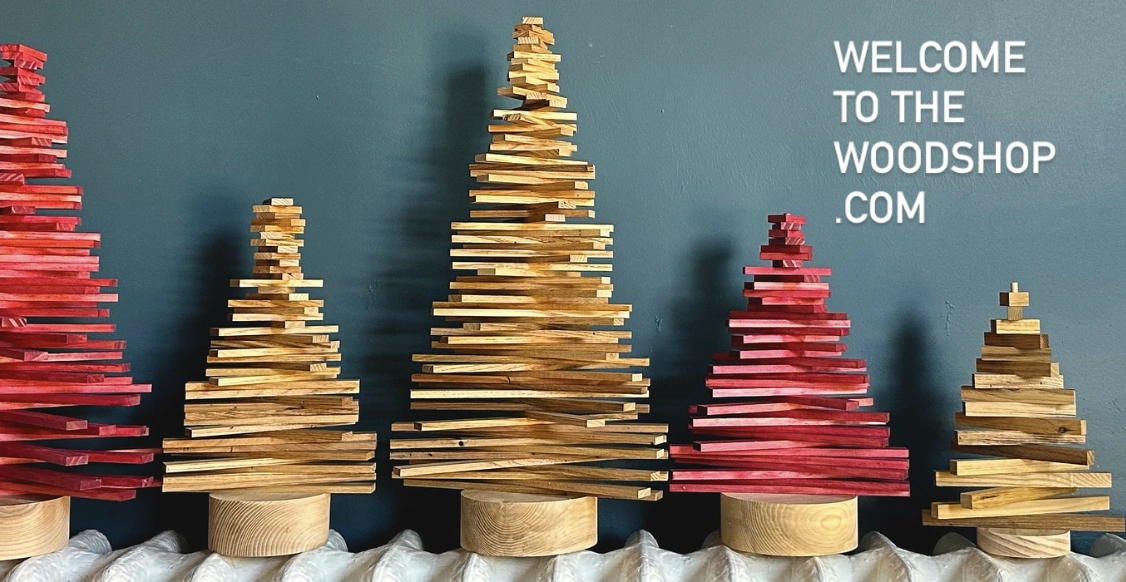
Credit: @welcometothewoodshop
The shift toward planet-friendly decorating has officially reached peak fabulousness. These wooden Christmas trees rustic designs are making serious waves, particularly those punctuated with vivid red accents.
It’s a smart, earth-conscious twist on classic symbols that feels entirely current. They possess a quiet glamour, making them a natural fit for a streamlined aesthetic. Plus, the assembly is genuinely fun.
How to Make This Craft
Gather an assortment of small wooden sticks or dowels
Cut the wood into varying lengths (1 4 inches)
Paint some of the wood pieces with festive colors like red and gold
Let dry
Stack the wooden pieces in a conical shape, glue as you stack
Affix tree to wooden pedestal with hot glue
Let dry completely
Display them as a charming collection
Minimalist Wooden Plank Christmas Tree with Star Topper

Credit: @thechicfarmhousewooddecor
This particular silhouette solves a massive annual headache: storing a giant tree. This clever wooden Christmas tree collapses the storage nightmare into a neat, stackable solution.
It’s a breeze to tuck away, yet offers a hearty dose of rustic soul. If your search history is full of space-saving wooden Christmas tree ideas, the hunt is over. Next year, just reach for a new paint color for an instant refresh.
How to Make This Craft
Acquire several lengths of wooden boards (approximately 2 4 feet long)
Cut each board at the same angle on both ends using a miter saw
Attach the boards to a central wooden pole using screws or nails
Stagger each board slightly to create a layered tree shape
Construct a wooden star for the top of the tree
Attach the star with wood glue
Sand all rough edges
You can paint or stain the wood for a finished look
Add decorations to the finished tree
Set tree on a flat surface for display
Pastel Ombre Scrap Wood Christmas Tree DIY Project
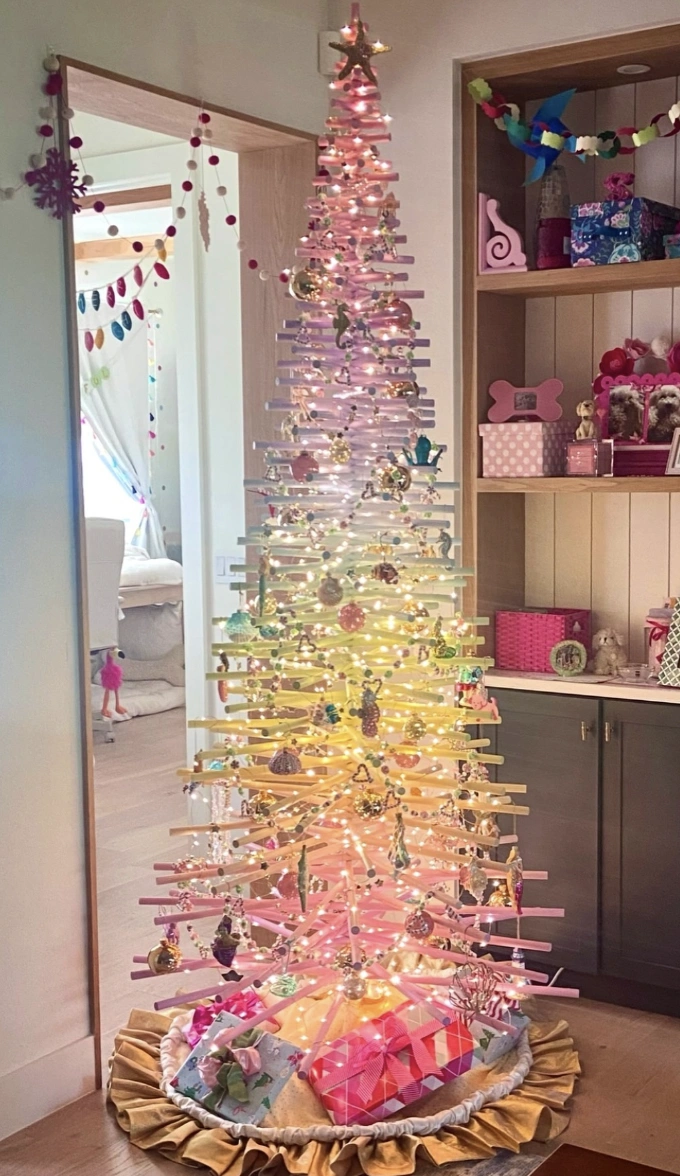
Credit: @welcometothewoodshop
Behold a scrap wood Christmas tree washed in a breathtaking pastel ombre. This is entirely for the soul who adores unconventional holiday flair and wants to invite a sprinkle of enchantment indoors. This feels like a guaranteed hit for a sister who is devoted to adorable crafts.
How to Make This Craft
Gather wooden planks of uniform width
Paint the planks in gradient pastel colors
Cut the lengths of the planks so that they get shorter at the top
Mount the planks horizontally onto a central pole, layering them to form a tree shape
Attach fairy lights, weaving them through the branches
Add pastel themed ornaments to the branches
Cut felt pieces for the bottom of each panel to prevent scratches
Make sure to secure the bottom for stability
Place a decorative tree skirt around the base
Decorate the tree with lightweight ornaments
DIY Dowel Rod Christmas Tree with Felt Pom Pom Garland and Mini Ornaments

Credit: @welcometothewoodshop
The annual battle against a carpet of pine needles is officially over. This dowel rod tree emerges as the champion, especially when hunting for wooden Christmas tree ideas that store flat.
Even better, a wandering toddler experiences significantly more difficulty toppling this masterpiece. Those colorful felt pom pom strands bring a joyful pop, and using those leftover mini ornaments from the stash feels like a stroke of genius. A chic and nearly stress free holiday victory.
How to Make This Craft
Start with a round wooden base and insert a long dowel
Cut dowels of varying lengths
Drill holes through dowels
Thread dowels onto central dowel, spacing evenly
Create felt pom pom garlands
Drape the pom pom garlands across tree branches
Hang individual glass ornaments
Glue snowflake to top of the center dowel
Add string lights for extra sparkle
Arrange paper Christmas trees at the base
Sculptural Birch Branch Christmas Tree with Star Topper

Credit: @artisanmodelmakers
A minimalist mindset is taking center stage. These sculptural, nearly disassembled objects are the moment.
Step away from the chaotic, over decorated holiday look. Instead, embrace soft, powerful gestures.
These wooden Christmas trees rustic components meld seamlessly with a whitewashed, contemporary farmhouse sensibility that remains strong, but with an edgy, surprising silhouette. A brilliant stand in when square footage is scarce or a more restrained palette calls out.
How to Make This Craft
Gather your pre cut wooden tree slices
Sand down any rough edges
Apply wood stain to enhance wood’s color
Begin threading wooden slices onto a sturdy central dowel
Rotate each layer of slices for spiral design
Construct base from wooden block
Attach central dowel to base
Affix star to the very top
Wrap small gifts with twine and arrange around tree
Distressed Wood Christmas Trees on Painted Gift Blocks

Credit: @oldsignstencils
The quiet magnetism of these minimalist Christmas tree wood crafts truly stands out. The weathered, tactile finish on the triangular forms reads as authentic and storied, not something churned out by a machine.
The pedestal design is particularly clever; each tree rises from a block painted to mimic a present, the hues chosen with care and lightly sanded for a vintage patina. They serve as a graceful, refined whisper in a seasonal display.
How to Make This Craft
Disassemble and clean an old wooden pallet
Cut out triangular tree shapes from the pallet wood
Sand down edges to prevent splinters
Paint or stain the wood pieces in desired shades
Gather square wooden blocks to create the bases
Wrap the blocks to look like presents with paint and ribbon
Attach the trees to the tops of the wrapped blocks
Sprinkle faux snow around the finished trees
Modern Minimalist Pallet Wood Christmas Tree DIY with Ornament Accents
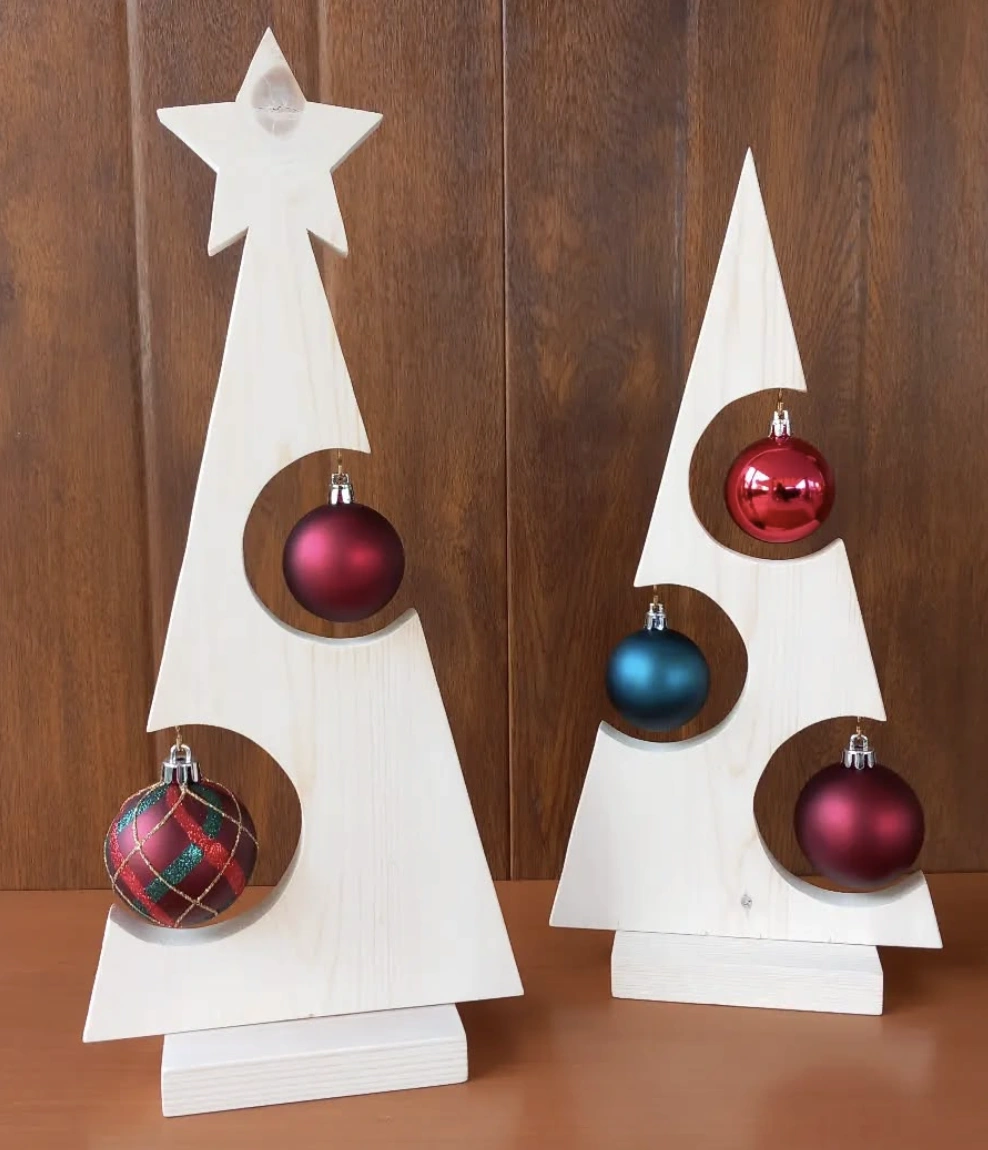
Credit: @riky_carraro
Everyone seems to be tackling those massive, heavily rustic pallet wood Christmas tree projects lately. This concept spins in the complete opposite direction.
Feast your eyes on these sleek, contemporary interpretations. These minimalist cutouts, crafted from pale wood with crisp, clean angles, radiate an airy elegance.
The circular cutouts designed to cup the ornaments? Sheer brilliance.
They are tailor made for small footprint living. An utterly captivating twist.
How to Make This Craft
Cut out tree shapes from a sheet of plywood
Cut out circular holes from tree shapes
Sand the edges to prevent splinters
Paint trees a solid color
Cut out a star shape from wood
Glue the star to the top of the one tree
Construct a base from wood
Attach base to the trees
Insert ornaments into cutout holes
Assorted Wood Tone Tabletop Xmas Tree Set

Credit: @juliachristinehome
Hunting for compact space holiday decor that avoids that cheap, plastic look is a genuine quest. These wood xmas trees solve the dilemma with a simple, modern rustic charm that slips right into an existing interior.
The mixture of wood stains and varying heights generates a dynamic display without visual chaos. Perfectly scaled for a mantelpiece and light enough to shuffle around. A truly dependable choice for holiday magic.
How to Make This Craft
Select wood of varying thicknesses
Cut out tree shapes of different sizes
Sand down all the edges for a smooth finish
Apply various stains to create different tones
Repeat the process for a set of white trees
Allow stains to dry completely before handling
Attach small wooden bases to the bottom of each tree
Arrange trees along a mantel or shelf
Coastal Chic: Driftwood Christmas Tree DIY

Credit: @australian_lifestyle8
Stumbling upon this adorable driftwood Christmas tree instantly sparks a flurry of styling daydreams. The micro lights cast an incredibly soft, golden luminescence.
Picture it resting on a console table, surrounded by a scattering of ocean-tumbled shells draped over a linen runner. It stands as a literal perfect answer for anyone seeking distinct wood Christmas tree ideas.
Let’s not forget the bonus: it’s wonderfully eco-conscious. What’s the verdict?
How to Make This Craft
Gather various sized pieces of driftwood and a small starfish or seashell
Cut a thick driftwood piece into a square for the base
Select a sturdy piece of driftwood to serve as the tree’s trunk
Glue the trunk to the center of the driftwood base
Starting with the largest pieces, glue the driftwood horizontally, stacking and staggering to create a conical tree shape
Use a hot glue gun for the best hold
Once the glue dries, wrap a string of battery operated micro lights around the driftwood
Attach the starfish or seashell to the top with glue
Rustic Wood Christmas Tree Mantel Display with Santa Figurines
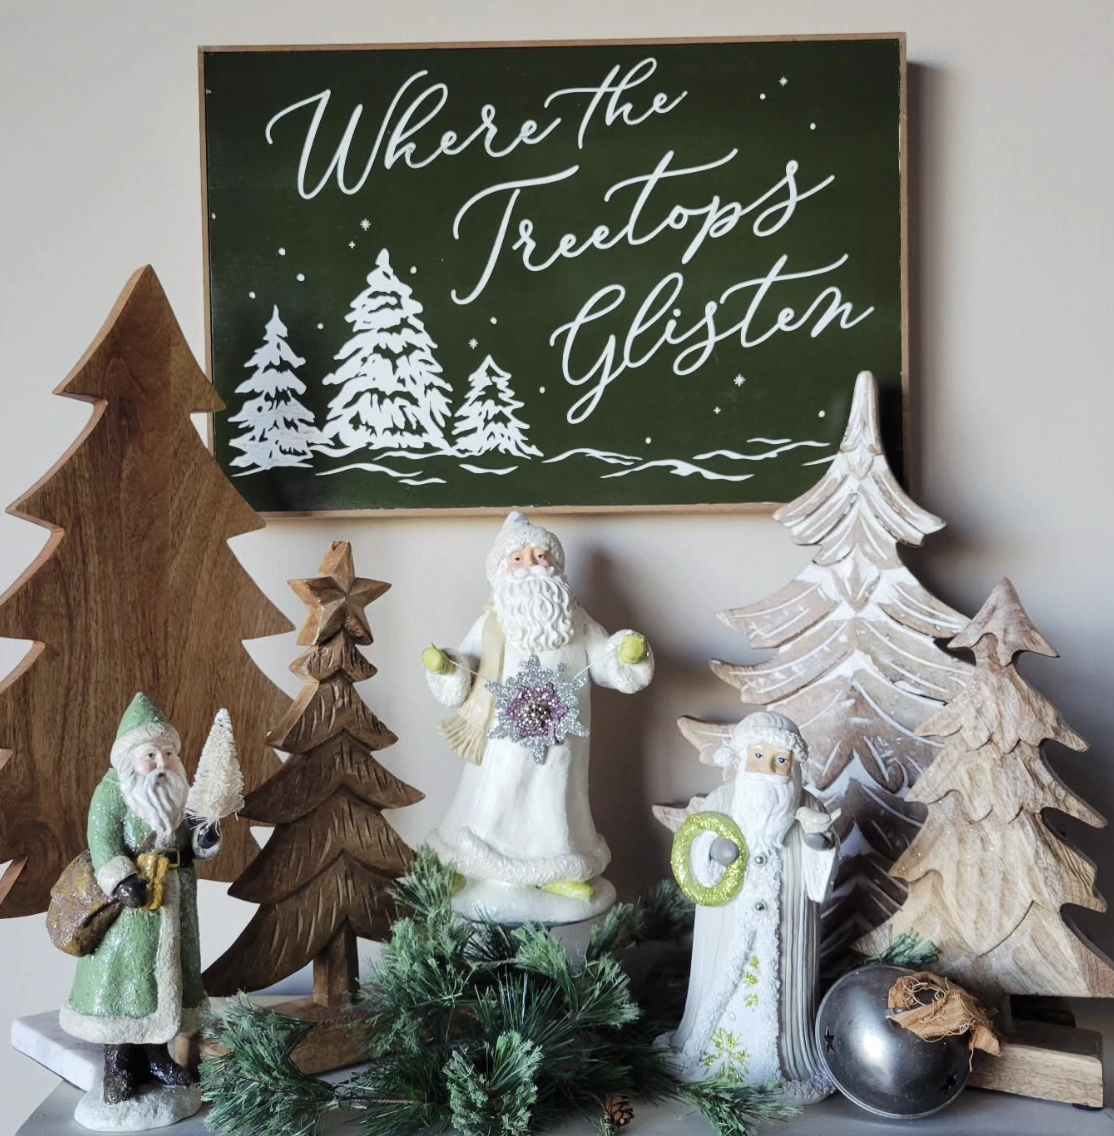
Credit: @farmhouseinthewvmountains
The endlessly flawless, curated Christmas tableau might dominate social feeds, but realistic time budgets crave simplicity. This mantel setup hits that sweet spot perfectly.
The stained and whitewashed wooden trees are wonderfully straightforward to craft, a truly manageable project even during a chaotic week. There’s a growing thought about making a batch of these Christmas wood crafts to sell at the seasonal fair, because simple, charming little trees like these always attract a crowd.
How to Make This Craft
Source several wooden trees of varying sizes from a craft store
Stain the trees with various tones of wood finish
Gather several Santa figures and ensure a cohesive color scheme
Create a chalk board sign and paint with a holiday message
Drape faux pine garlands across a mantle or shelf
Arrange trees, signs, figurines, and ornaments on the display
Coastal Themed DIY Wooden Xmas Trees with Star Ornaments

Credit: @pura_vida_french_touch
A vision of recreating these for a beach house Christmas gathering is taking shape. It’s easy to picture, right?
Getting the children involved seems like a natural fit. They’d adore scouring the shore for driftwood treasures to assemble their own tiny wooden xmas trees.
Those little star toppers are simply charming. The result would give the whole house a truly distinct and jubilant coastal aura.
How to Make This Craft
Collect or purchase multiple sizes of driftwood pieces
For each tree, create a base of stacked wooden blocks
Adhere pieces of driftwood with hot glue or wood glue to form a pyramid shape
Decorate the completed tree structure with stars
Repeat steps for several different sized trees
Display the trees with decorative items like a teddy bear
Add a life preserver as a unique touch
Assorted Wood Christmas Trees DIY Mantel Display
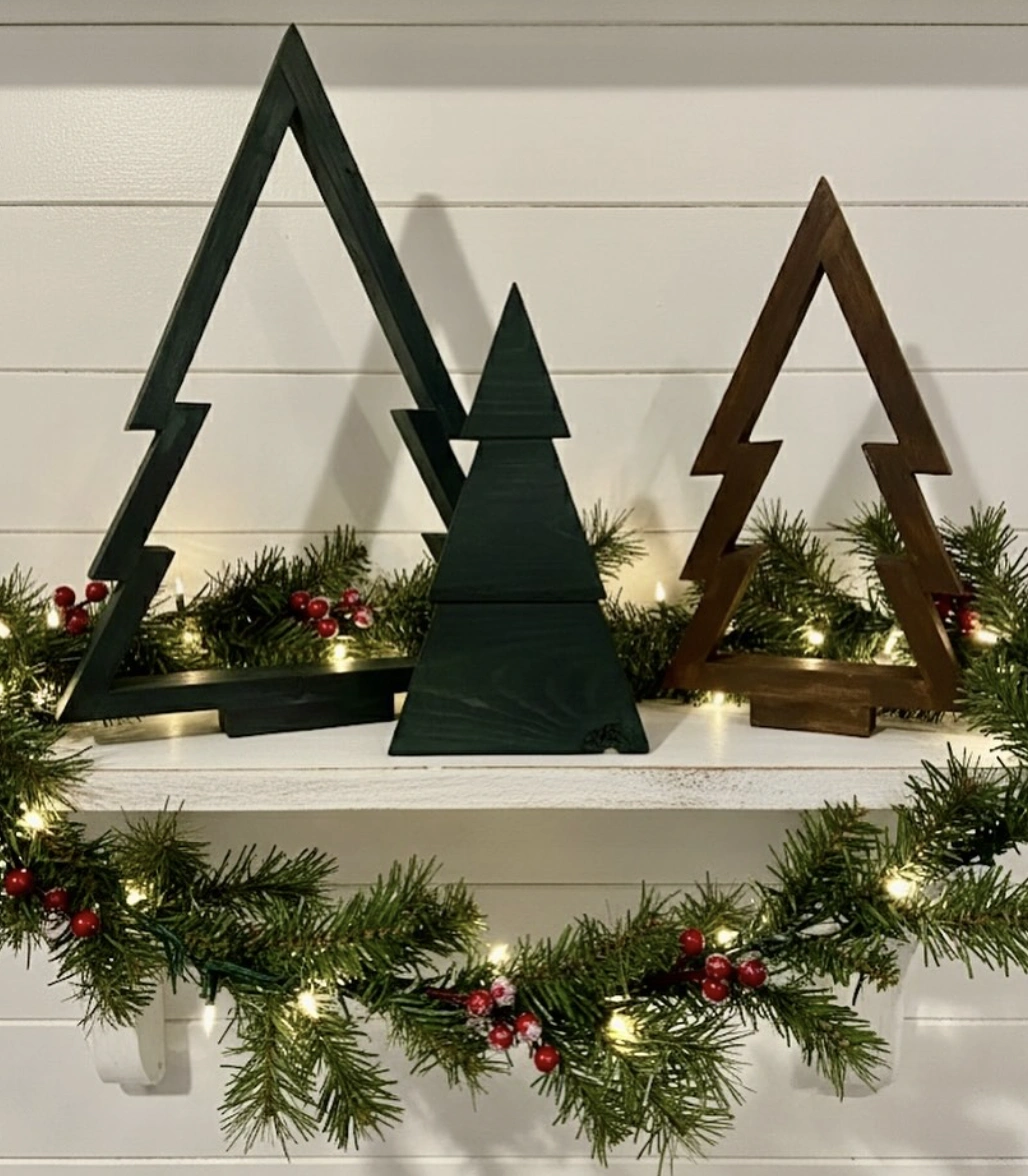
Credit: @thealtmanshoppe
These are destined for the person who flinches at mass produced big box store decor. The soul who finds deep delight in the uncomplicated honesty of handmade objects.
Someone who inherently knows that a handful of carefully selected treasures brings infinitely more joy than a mountain of fleeting trends. These trees radiate a sense of welcome and serene grace. A lover of a quiet yet stunning Christmas would adore these.
How to Make This Craft
Sketch basic triangular tree designs of varying sizes on paper
Cut wooden strips according to your design
Sand all cut edges smooth
Assemble the wood to form the tree outline with wood glue
Allow the glue to set, then reinforce the joints with small nails
Stain the trees with dark green and brown wood stain
Place wooden trees on a shelf or mantle
Accent with pine garland and red berry accents
Hand Carved Wooden Christmas Tree with Hanging Star Ornament

Credit: @block_and_knife
Step away from the uniform, identical trees that flood the market; this creation oozes soul. The intentionally rugged carving technique gives it a distinct, rebellious edge, a stark contrast to the hyper-polished wooden decorations so common today.
The wonky tiers and whimsical star are the defining features here. It sits squarely in that realm of flawless imperfection.
Searching for a unique scrap wood Christmas tree idea? The quest ends here.
How to Make This Craft
Select a block of basswood for carving the tree
Carve the basic tree shape using a carving knife or gouges
Add layers and texture to the “branches” with detailed carving
Select a small block of wood and carve the star
Stain the tree trunk with brown
Paint the “rocks” on the base with grey acrylic paint
Paint the star gold
Attach the star to one of the branches with glue and a hanging hook
Cute Wooden Gnome Figure with Layered Christmas Tree Wood Crafts
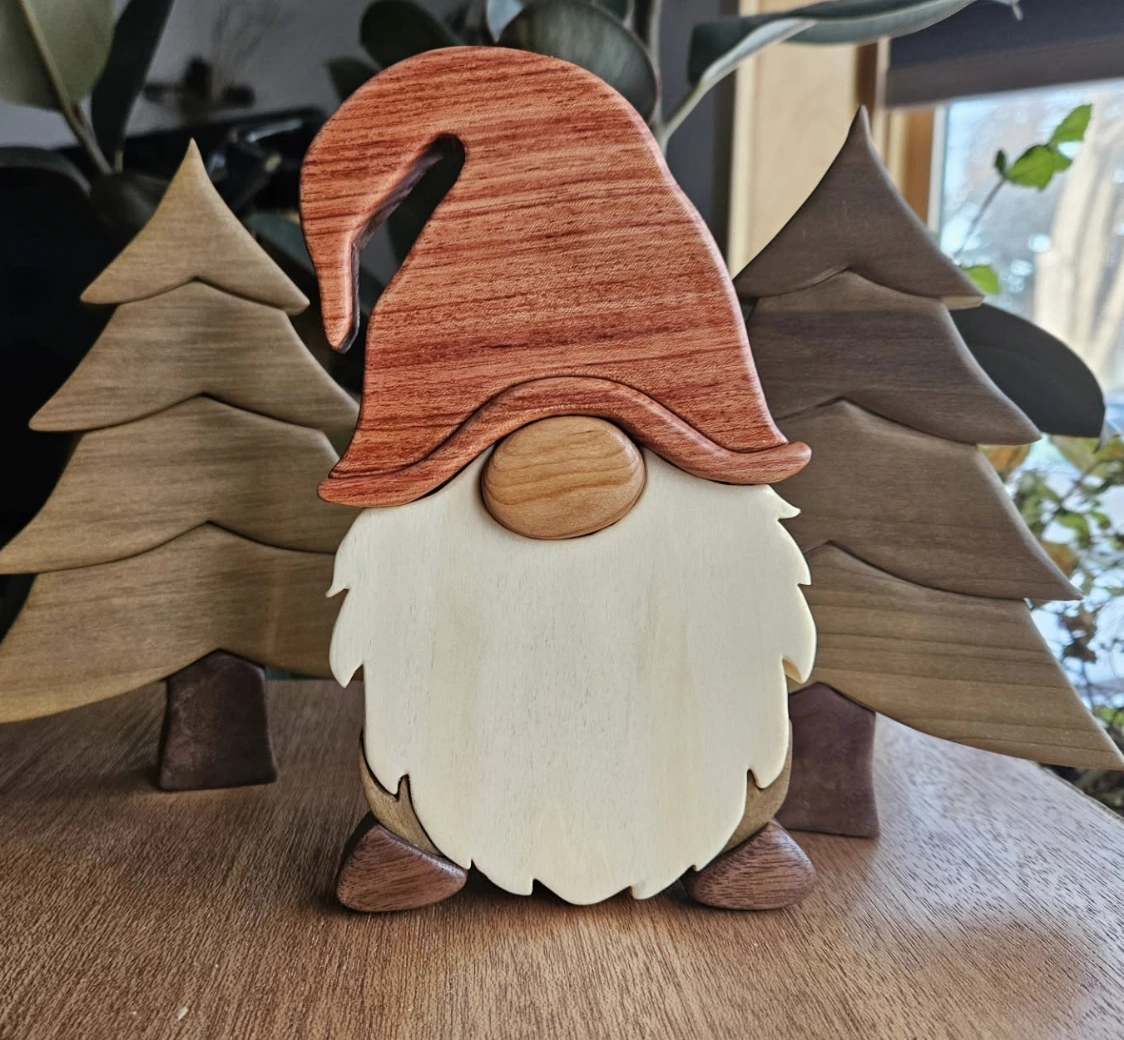
Credit: @humble.hardwoods
This little guy seems destined for a desktop perch throughout the month of December. It’s compact enough to stay out of the way, yet merry enough to spread a dose of seasonal cheer.
The stacked wood segments provide a satisfying, artisanal quality, making it far more special than standard office trinkets. Spotting these kinds of Christmas tree wood crafts makes the end-of-year grind feel slightly more bearable.
How to Make This Craft
Download or create the gnome pattern, separating it into hat, beard, face, body, and feet sections
Trace each pattern piece onto the appropriate wood
Use a bandsaw or scroll saw to carefully cut out each shape
Sand all edges smooth using progressively finer grit sandpaper
Stain or paint each piece to your desired color
Apply wood glue to the back of the face and center on the beard
Glue the hat above the face, ensuring it overhangs slightly
Glue the beard/face to the gnome body
Add feet at the bottom of the gnome body
Let glue dry completely before displaying
Use a sealer to protect the wood
Rustic Raw Wood Holiday Trees with Nutcracker Accent

Credit: @mydreamcolonial_farmhouse
Hitting a wall with standard seasonal decorations? These raw wood Christmas trees deliver that essential human touch without veering into sugary sweetness.
The slightly rough, unfinished surface grants them a low key, yet undeniably cool presence. For anyone looking to generate some extra holiday income, a serious demand exists for unique Christmas wood crafts to sell at gift markets and virtual shops.
The addition of those vintage-style nutcrackers? A stroke of genius.
How to Make This Craft
Gather planks of wood, either new or reclaimed
Using a saw, cut the wood into the shapes of Christmas trees
Lightly sand down the surface of the wood
Apply stain to the wood to enhance the natural grain
Allow the stain to completely dry
Arrange the trees in varying heights to create a layered effect
Add your favorite nutcracker and santa characters
Accompany with some white berries and evergreen elements
Mini Wooden Christmas Trees Rustic Collection: Perfect Holiday Decor
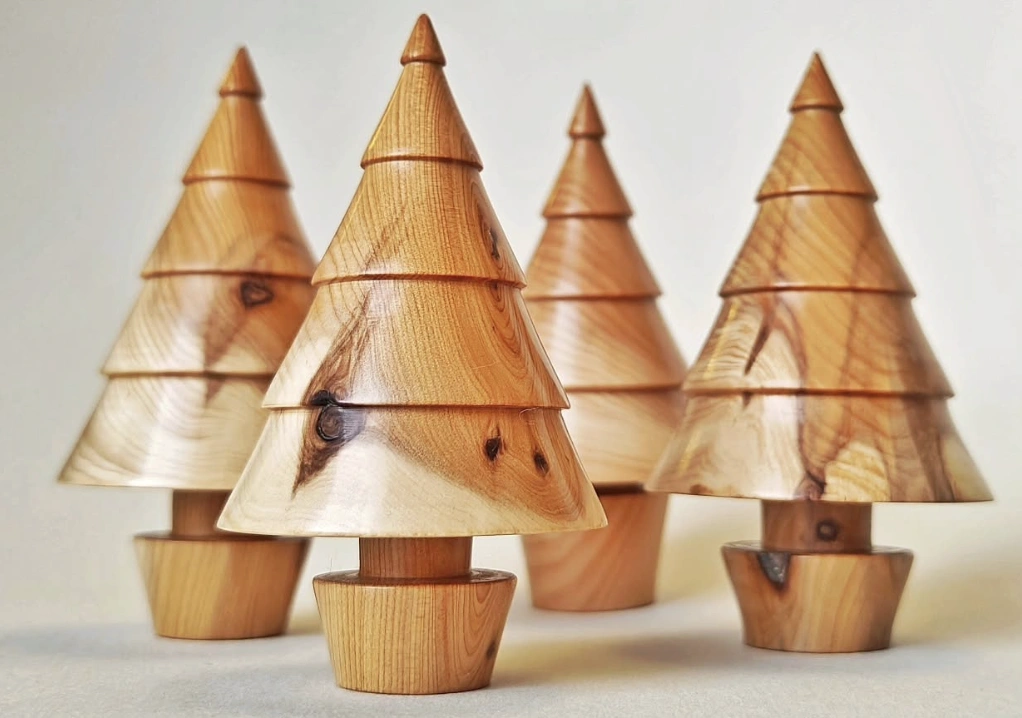
Credit: @hawk_wood_crafts
Examine these spectacular wooden Christmas trees rustic treasures. The tiered construction is the main attraction, particularly how each level gently overlaps the one below.
Pause for a moment and truly study the wood grain patterns; each one tells a different story. The unique knots and swirls guarantee no two trees are identical. This collection channels deep, snug cabin energy, and it is absolutely welcome here.
How to Make This Craft
Select small pieces of wood appropriate for lathe turning
Mount the wood onto a wood lathe using appropriate chucking hardware
Using a roughing gouge, begin to round the wood into a cylindrical shape
Create the profile of the tree by shaping the wood into a series of cones
Use a parting tool to separate each tree section
Use a small gouge to shape the base
Sand each section using increasingly finer sandpaper
Apply a finish, such as wax, oil, or lacquer to the wood
Minimalist Wooden Christmas Trees: Ornament Display

Credit: @lil.nene00
These handcrafted wooden xmas trees, defined by their unblemished lines, present a refined alternative to a bushy evergreen. It fully embraces that less-is-more philosophy, letting your meticulously gathered ornament collection grab the spotlight.
Sustainability is another feather in its cap. Each piece, given its own space, morphs into a focal point, shining a light on the beauty of singular craftsmanship.
How to Make This Craft
Cut six pieces of wood to the same length for the frame sides and bottoms
Assemble each triangular frame by gluing and screwing the pieces together
Attach a short wooden base at the bottom of each triangle for stability
Drill small holes along the inside edges of the frames for hanging ornaments
String a piece of wire or thin twine between the holes
Select a variety of Christmas ornaments and other Christmas decorations
Hang the ornaments and decor from the wire inside the wooden frames
Arrange the trees in a row to create a festive Christmas ornament village
Red and Green Stacked Wood Christmas Trees DIY with Christmas Greeting

Credit: @smc_woodworks
Those small, generic decorations from the craft store aisles simply cannot compete with this. Think of it as the sophisticated upgrade: it carries more heart and looks substantially more high-end.
While it may not be gallery art, it absolutely radiates that coveted handcrafted charm. It’s the ideal platform to showcase a favorite wood Christmas trees DIY project made with the family, right there on the fireplace for all to admire.
How to Make This Craft
Collect several wooden planks of varying lengths
Cut the planks into triangles, starting with the longest and gradually decreasing in size
Paint the planks in Christmas colors, alternating between red and green
Let the paint dry completely
Use stencils or freehand to paint the letters of “We wish you a Merry Christmas” across the planks
Assemble the planks, overlapping slightly, to form the shape of a Christmas tree
Attach the planks together with nails, screws, or glue, using a backing board if necessary
Attach a wooden base to the bottom of the tree for stability
Outdoor DIY Log Christmas Tree with Snowflake Topper
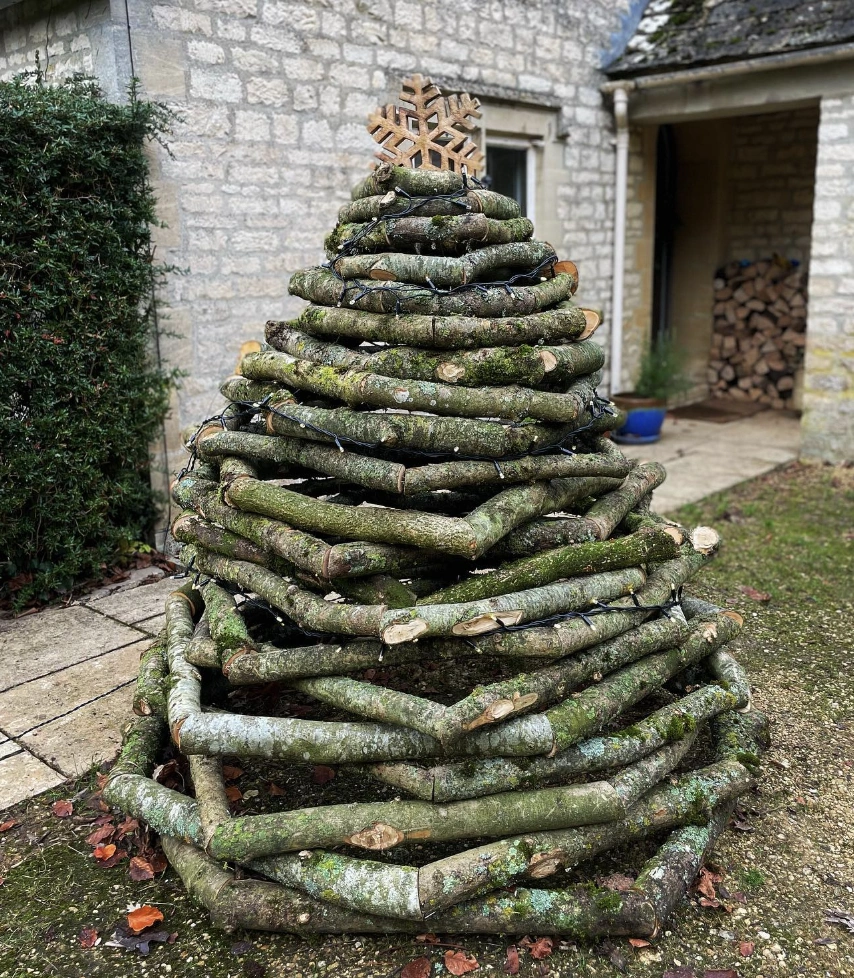
Credit: @vinodiva
This rugged outdoor tree possesses a magnificent, natural presence. It brings a raw, forest-dwelling spirit right to the doorstep.
To achieve a similar look, source some branches and begin stacking them strategically. The key lies in wrapping simple twinkle lights around each tier.
While exploring different wood Christmas tree ideas for a topper is always an option, this snowflake feels absolutely right. It makes a bold declaration without screaming for attention.
How to Make This Craft
Gather logs of varying diameters, from approximately 6 inches to 24 inches
Cut logs into slices about 3 4 inches thick using a chainsaw
Arrange the largest slices in a circle on the ground to form the base
Stack progressively smaller slices, centering each layer, to create a cone shape
Secure each layer with construction adhesive suitable for outdoor use
Allow adhesive to fully dry before decorating
Wrap the tree with string lights
Attach a decorative wooden snowflake to the top using adhesive or small nails
Add pinecones, berries, or other natural elements as desired
Clear space on your lawn to display your completed tree
Simple Whitewashed Scrap Wood Christmas Tree Decorations
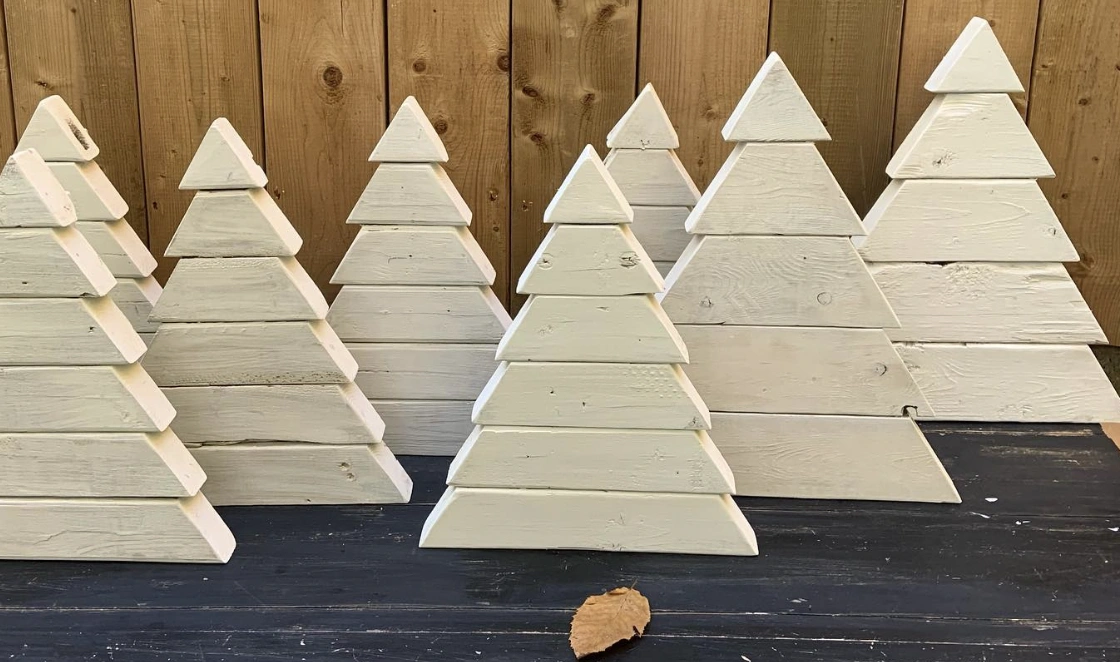
Credit: @nacher.vintage
The pursuit of easy seasonal decor that spares the wallet is a constant mission. These little trees represent a massive victory.
The fact that they’re all slightly mismatched in size actually amplifies their rustic appeal. They are constructed using triangular tiers of wood layered to create the classic festive silhouette.
A straightforward whitewash treatment allows the natural wood grain to whisper through, which is just perfect. A plan is forming to create an entire miniature scrap wood Christmas tree forest, perhaps as soon as the next free weekend arrives.
How to Make This Craft
Grab some inexpensive pine lumber, like 1x4s, and cut into triangle shapes of different sizes
Cut two small boards for the base
Assemble the triangle layers, starting with the largest, using wood glue and nails
Let the glue dry completely before moving to the next stage
Apply a coat of white paint using a dry brush technique for a weathered effect
Lightly sand the edges to enhance the rustic look
Adhere the base pieces to the bottom of each tree
Arrange your cute little wooden forest on a shelf or mantel
Simple Wooden Triangle Christmas Tree Trio

Credit: @homemadebyhansen
These raw, unfinished wooden Christmas trees are aimed squarely at the individual who shudders at excessive holiday tchotchkes. The bare wood and sharp, clean lines sync flawlessly with a minimalist philosophy.
For anyone currently scrolling through wooden Christmas tree ideas, this solution will resonate deeply because it offers a refreshingly uncluttered interpretation of festive decor. They stand beautifully on their own, or wait for a custom coat of paint.
How to Make This Craft
Measure and cut lengths of wood (e.g., 1×2 pine) according to desired tree sizes
Construct three triangular frames using wood glue and brad nails or screws
Cut smaller lengths of wood for crossbars, ensuring they fit snugly inside the frames
Space the crossbars evenly inside each triangle, attaching them with glue and nails
Sand all surfaces for a smooth finish, removing any rough edges
Paint or stain the trees in your preferred color, or leave them natural
Attach short lengths of wood at base for added support and balance
Display your minimalist trees on a table or mantelpiece
Tiered Pallet Wood Christmas Tree with String Lights and Rustic Ornaments

Credit: @thepondsfarmhouse
Navigating a tight floor plan this holiday season? This tiered pallet wood Christmas tree arrives as the perfect spatial solution.
Standard evergreens tend to swallow precious room, but this vertical design delivers full holiday voltage without encroaching on walkways. The freedom to switch up the ornaments and fairy lights to match any evolving color palette is a major bonus. It stands as a truly solid alternative.
How to Make This Craft
Source a variety of wooden planks of different widths and lengths
Sand the planks to smooth any rough edges and splinters
Construct a sturdy base for the tree (An old plant pot works great)
Cut a center pole, long enough for the desired height of the tree
Drill holes in the center of each plank, large enough to slide over the center pole
Start with the largest plank at the bottom and thread the planks onto the pole
Space out the planks, progressively using smaller planks as you go up
Add string lights and various ornaments to decorate the tree
Affix a decorative topper to the top of the pole
Place the finished tree on display and enjoy
Minimalist Wood Christmas Trees DIY with Star Topper

Credit: @la.carpenteria
The sheer adorableness of these minimalist wood xmas trees is undeniable. The naked wood grain channels a deep rustic soul, while that glittering gold star topper steals the whole show.
Watching the fairy lights weave playfully around the staggered horizontal planks conjures an atmosphere of ultimate cozy warmth. This DIY is definitely going on the must-make list for the season.
How to Make This Craft
Acquire a length of sturdy wood for the central spine of the tree
Cut wooden slats of varying lengths, increasing as you go down
Sand the slats and spine for a smooth finish
Stain or paint as desired
Attach the shortest slat to the top of the spine, centered
Progressively attach longer slats below, spacing them evenly and alternating sides
Secure the slats with wood glue and screws or nails
Drill small holes to thread LED fairy lights around the tree
Hang metallic ornaments (stars, baubles) from the slats with ornament hooks
Ensure the tree is stable with a supportive base
Display the tree near a power outlet for easy lighting access
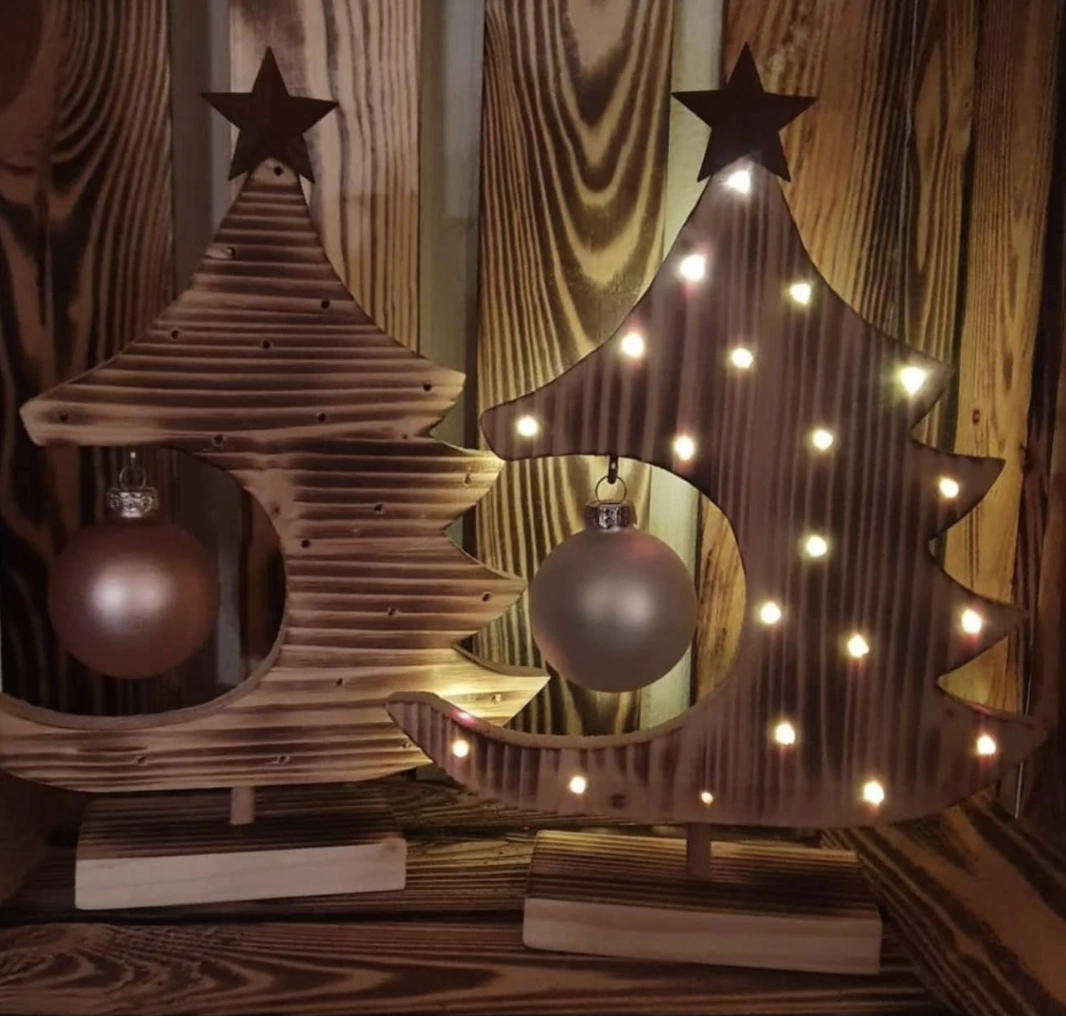
Cute Rustic DIY Pallet Wood Christmas Tree with Ornaments
Credit: @momentztanzania
Envision these sitting pretty on the mantelpiece, their lights softly twinkling. They would also make a fantastic visual statement on a side table in the entryway.
It’s that flawless dash of holiday spirit that doesn’t overwhelm the senses, and it is so wonderfully distinct. The idea of crafting a tiny illuminated village of these trees is taking serious hold. Launching into a pallet wood Christmas tree DIY project feels imminent.
How to Make This Craft
Cut out two tree shapes and two rectangular base pieces from plywood using a jigsaw
Sand all pieces smoothly with fine grit sandpaper
Use a wood burner to create a rustic, charred effect on the tree shapes
Drill small holes along the edge of one tree, spacing them evenly for the LEDs
Insert the small LED lights into the drilled holes
Glue each tree to its rectangular base using wood glue and clamps
Attach a small metal star to the top of each tree
Drill a small hole in each tree for hanging an ornament
Attach the hanging ornament to the string and hang it onto the tree
Place the battery pack with a switch for the LED lights on the back
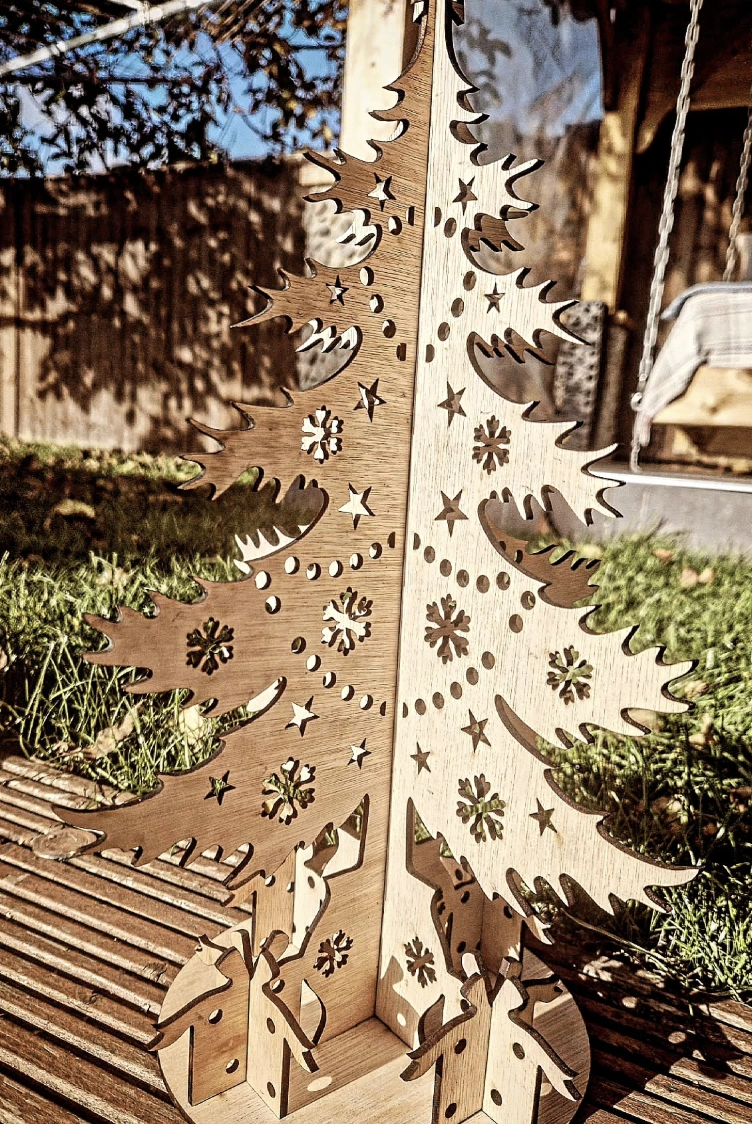
Laser Cut Wooden Christmas Tree with Cutout Stars and Snowflakes
Credit: @mcworkshop88
The absolute highlight here is the blissful absence of a vacuum cleaner constantly chasing fallen needles. It arrives already adorned with intricate stars and snowflakes. It fits perfectly into any quiet corner or demands attention as a stunning table centerpiece.
How to Make This Craft
Download a template for a Christmas tree with cut out designs (snowflakes, stars, houses)
Upload the template to laser cutting software and adjust dimensions for desired size
Place a sheet of plywood or birch wood into the laser cutter
Run the laser cutter with appropriate settings for your material
Repeat steps 3 and 4 to create the second tree cut out
Lightly sand the edges of the cut pieces to remove any charring
Assemble the two trees by slotting them together at the center
Position the interlocking tree on a wooden base
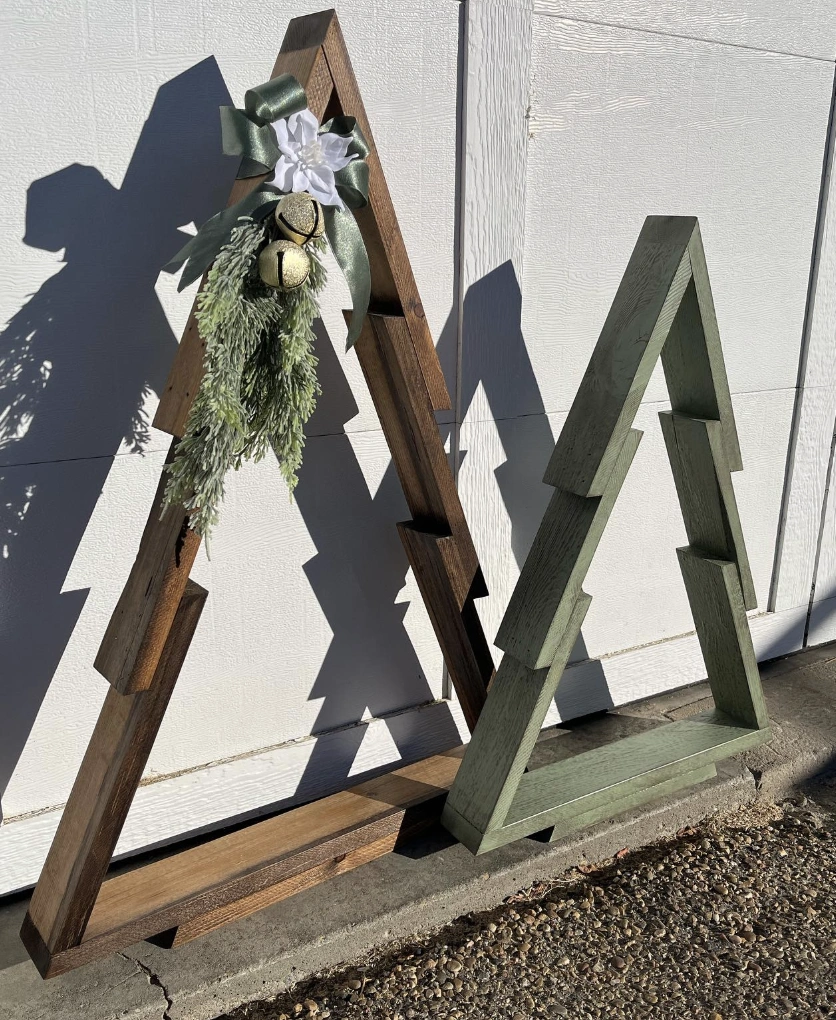
Rustic Wooden Christmas Trees: Two Tone Holiday Decor
Credit: @rafterdiamondw_
The crush on these rustic trees is very, very real. A clear picture forms of them standing on a covered front porch, snuggled amidst a cascade of twinkle lights and maybe a petite wreath.
They would integrate seamlessly onto the fireplace hearth, too. The muted, natural colors align perfectly with the overall aesthetic. These are yet another shining example of an enduring obsession with cute Christmas tree wood crafts.
How to Make This Craft
Gather reclaimed wood pieces: two long for the sides and shorter pieces for shelves
Cut the side pieces at a 45 degree angle at the top to form the A frame
Measure and cut the shelf pieces to fit between the side pieces
Sand all wood pieces to remove splinters and rough edges
Stain or paint each tree (one brown, one green) and let them dry completely
Attach the shelves to the side pieces using wood glue and screws
Reinforce the joints with corner braces for added stability
Add a faux flower, bells, and ribbons for festive decoration
Add an evergreen trimming to complete the look
Final Thoughts
Crafting a pallet wood Christmas tree last season was genuinely one of the most satisfying creative endeavors of the entire year. Building something special and completely original for the holidays offered a deep sense of accomplishment.
It’s also a far kinder choice for the planet compared to purchasing another plastic tree every season. So gather those wood offcuts and prepare to make some lasting memories. The result will undoubtedly be something truly magnificent.