


26 Genius Cheap Diy Furniture Projects for Every Budget
You know that feeling when you flip through a design magazine and your jaw drops at the prices? The sticker shock is real.
That spark of inspiration sent me straight into the world of DIY furniture. As it turns out, crafting beautiful, stylish pieces doesn’t require a trust fund.
From transforming forgotten pallets into a stunning coffee table to assembling shelves from reclaimed lumber, the universe of cheap DIY furniture stretches in every direction you can imagine.
And let’s be honest, nothing compares to that little rush of pride after conquering home DIY projects and declaring to the room, “Yeah, I made that!”
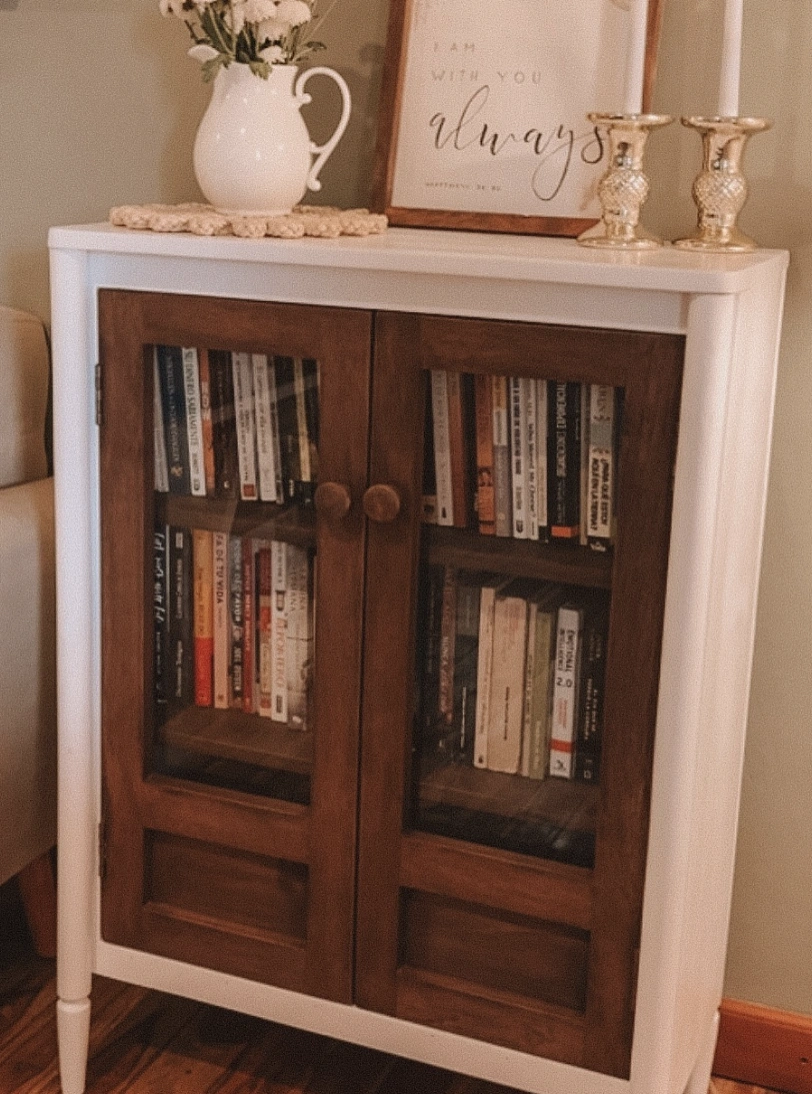
Upcycled Glass Door Cabinet with Round Wooden Knobs
Credit: @memorieshomeandliving
Proof that a complete room transformation can happen on a shoestring. Those chunky round wooden knobs are seriously charming, aren’t they?
The glossy white paint playing against the warm wood tones of the doors works so well. A little vision and sweat equity can produce something genuinely inspiring. This piece has me seriously planning even more Cheap DIY Furniture adventures.
How to Make This: Carefully remove the doors from the cabinet. Give the whole cabinet a light sanding to prep the surface for its new look.
Roll on two layers of white paint, making sure each coat dries completely before the next. Lightly sand the wood trim and the doors themselves.
Work a wood stain into the doors and trim until you reach the desired depth of color. Seal the entire cabinet with a polyurethane finish to guard the paint.
Rehang the doors on the cabinet. Swap out the old knobs for fresh hardware.
Let the piece cure fully before you load it up. Arrange your favorite books and decorative treasures inside.
Tree-Shaped Wall Bookshelf with Angular Dark Wood Shelves

Credit: @dieschreinermagdeburg
A tree sprouting right out of the wall is so creative and unexpected. That rich dark wood really pops against the lighter back panel behind it.
A piece like this would absolutely reinvent a dull living room, wouldn’t it? The fact that someone crafted this as Homemade Furniture blows my mind.
Imagine styling your favorite reads or cascading plants across those branches. You need to bring this into your space.
How to Make This: Sketch out your tree bookshelf design on paper to match your intended dimensions. Cut pieces of walnut wood according to your specific measurements.
Sand every single edge until they feel like silk. Build the central tree trunk structure using wood glue and clamps to hold everything tight.
Construct the shelf branches at the required angles, relying on wood glue and clamps for a solid bond. Connect the shelf branches to the central trunk with wood glue and precise joinery.
Reinforce each joint from the back side using screws. After the glue sets, sand away any rough patches.
Stain the entire sculptural unit and wait for it to dry thoroughly. Secure the completed piece to the wooden backing board with screws.
Granite Console Table with Curved Legs

Credit: @ecoset.concept
This table practically announces that an artist lives here, doesn’t it? Anyone leaning into a modern or eclectic aesthetic would fall hard for this design.
It’s a clear choice for those running away from cookie-cutter decor. You’re looking at that rare breed of Creative Furniture that actually starts conversations.
This isn’t the soulless, mass-produced stuff flooding the market. It radiates personality and carries an authentic handcrafted energy.
How to Make This: Source a granite slab that has the right dimensions and a pattern you love. Create a template for both the table top and the sculptural legs.
Trace those templates onto the granite slab with careful, precise markings. Cut out the table top and leg pieces using a wet saw.
Grind all the granite edges until they feel completely smooth. Polish the granite with a diamond polishing pad kit to bring out a luminous shine.
Affix the legs to the table top using a heavy-duty epoxy formulated specifically for stone. Clean the assembled table with a granite cleaner.
Allow the epoxy to fully cure according to the manufacturer’s recommended timeline. Position your finished masterpiece in the hallway.
Live Edge

Credit: @pasquale_h
How to Make This: Find a wooden slab that boasts a truly unique live edge. Sand both surfaces of the slab until they feel uniformly smooth.
Apply a clear coat of epoxy resin to enhance and protect the natural wood grain. Measure and mark the precise placement for the hairpin legs.
Pre-drill pilot holes at each location you marked. Attach the hairpin legs using screws paired with washers for a secure hold.
Ensure every leg is fastened tightly. Add leveling feet to the bottom of each leg to banish any wobbling. Stand back and admire the raw, natural beauty of your completed coffee table.
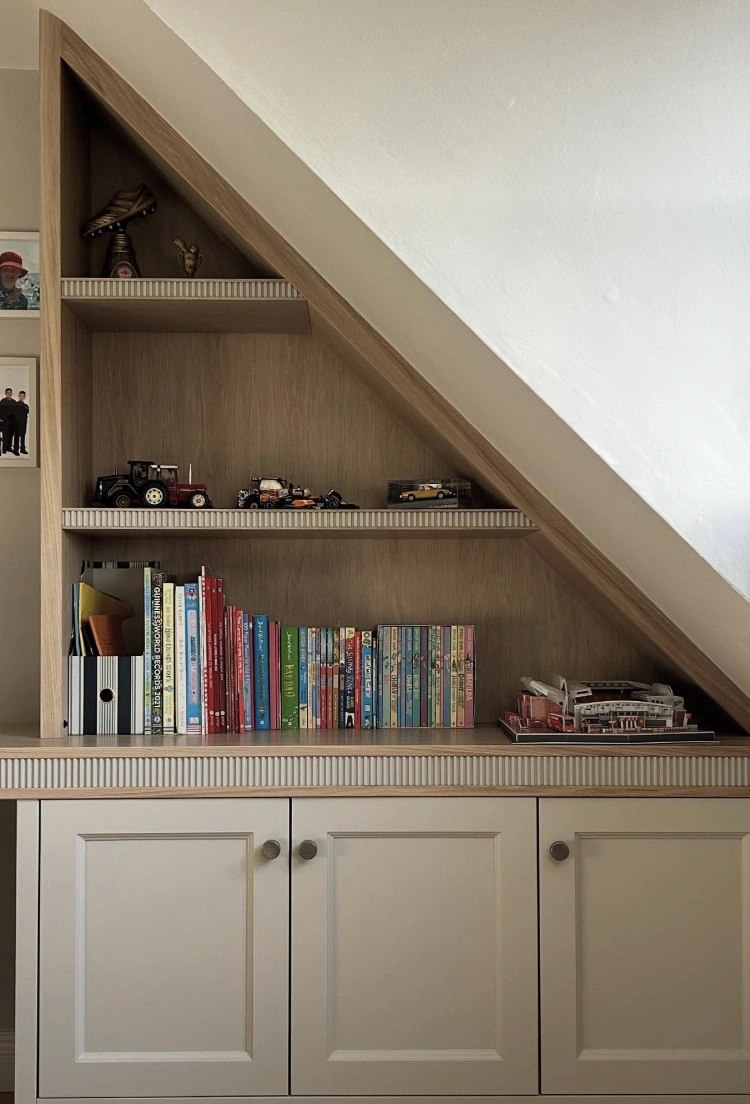
Cozy Nook: Triangle Shelves and Cabinets
Credit: @jlbespokeinteriors
Talk about squeezing every ounce of potential out of a tricky space. The triangle construction is wonderfully unique, injecting a dose of modern minimalism.
This setup delivers major #shelfie goals in a big way. The subtle details deserve a moment of appreciation, too.
That fluted trim introduces texture without ever feeling loud or demanding. Discovering singular Handmade Furniture like this is what gives a room its voice, don’t you agree?
How to Make This: Measure the exact available space for your new shelving unit. Design the shelves to fit those dimensions perfectly, paying special attention to the slant of the ceiling.
Cut plywood pieces down to your desired shelf sizes. Assemble the main frame for the shelving unit using screws and wood glue for durability.
Install shelves into the assembled frame, spacing them evenly or tailoring the gaps to your storage needs. Cover the exposed shelf edges with decorative trim.
Sand down any rough spots that catch your eye. Prime and paint the entire unit in a calming neutral color.
Attach the assembled shelf unit directly into the wall studs for maximum stability. Fill it up with books, toys, and curated decor pieces.
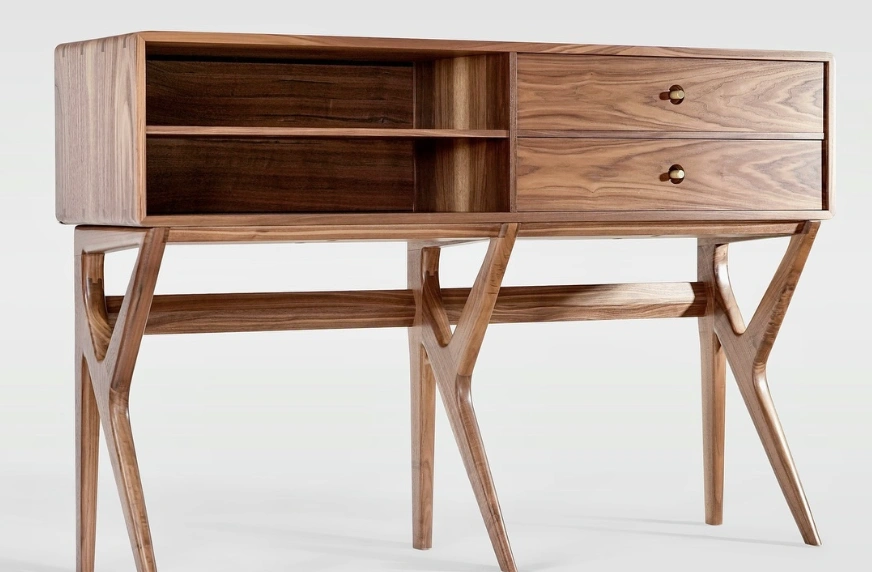
Mid-Century Modern Wood Entryway Table
Credit: @sawyer_design
This walnut console table features two petite drawers and open shelving tucked off to one side. I’m fully obsessed.
You know someone like Sarah, the friend who’s perpetually showing off her apartment? She would move mountains to get her hands on a piece like this.
It’s completely her aesthetic, and she’s been dropping hints about needing new Diy Furniture for ages. Plus, those legs are an absolute showstopper. Seeing this piece in person would be a dream.
How to Make This: Mill and dimension your walnut lumber to the specified sizes for the table top, drawer fronts, and those iconic legs. Cut the curved elements of the table top with a band saw and sand them smooth using fine-grit sandpaper.
Assemble the drawer boxes using dovetail joints for enduring strength; glue and clamp them until they set completely. Construct the leg assembly by joining the angled legs to a center support beam with mortise and tenon joints.
Carefully glue and clamp the top to the leg assembly, checking for perfect alignment. Fabricate custom drawer pulls from brass stock, drilling and tapping them to accept screws.
Install the drawer slides onto both the drawer boxes and the table’s interior frame. Apply several coats of a durable clear finish to protect the wood, sanding lightly between each layer.
Affix the drawer pulls with screws to the drawer front and slide them into place. Attach felt pads to the bottom of the legs to keep your floors pristine.
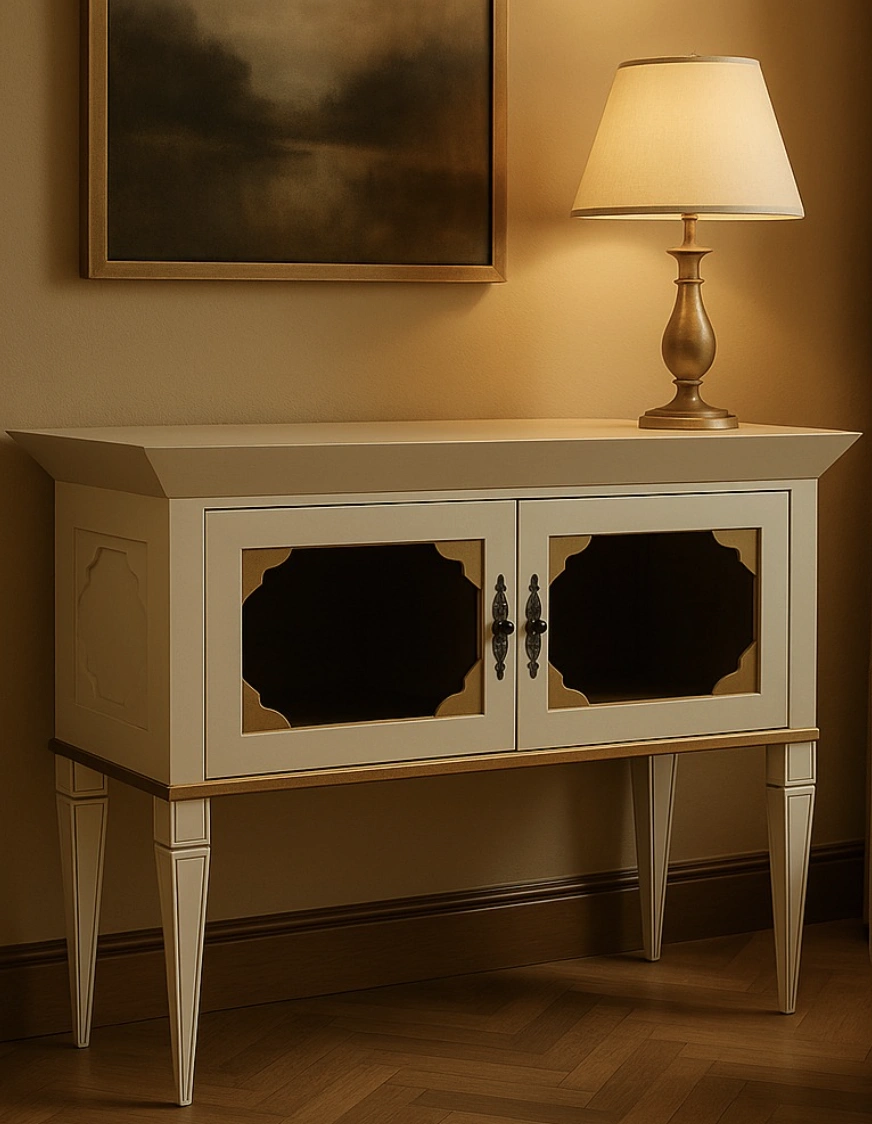
Cream Buffet Table with Decorative Doors and Tapered Legs
Credit: @artkomad
I’m fully captivated by its vintage sensibility. The neutral palette lets it harmonize with practically any design style you throw at it.
If refreshing your space is on your mind, you should explore some killer Home Diy Projects. Try hunting down a similar vintage gem and then putting your own creative stamp on the doors. The directions you could go are genuinely endless.
How to Make This: Clean the entire cabinet surface thoroughly to strip away any dirt, grease, or remnants of the old finish. Lightly sand the existing finish to give the new paint a better surface to grip onto.
Apply two coats of high-quality primer to the entire cabinet, giving each coat ample time to dry. Paint the cabinet with two coats of your chosen cream-colored paint, once again allowing for complete drying time between applications.
Measure and cut decorative trim to frame the door panels, mitering the corners for a flawless fit. Attach the trim using wood glue or small finishing nails, ensuring the trim sits flush against the door surface.
Paint the trim with a gold accent paint and let it dry. Apply a clear sealant over the painted surfaces to defend against scratches and daily wear.
Replace the old cabinet hardware with decorative pulls or knobs. Consider adding a brand new interior shelf to multiply your storage capacity inside the cabinet.
Walnut Five-Drawer Cabinet with Integrated Pulls
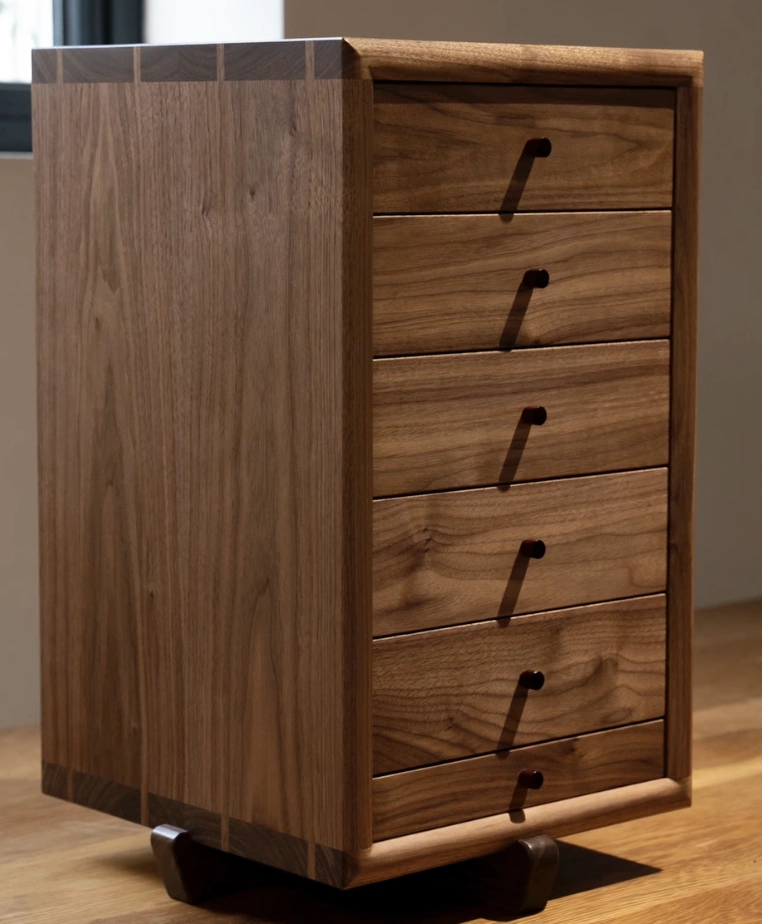
Credit: @letternoon_furniture
So many “Diy Furniture Ideas” chase speed and simplicity, often trading away quality in the process. This cabinet walks a completely different path.
The walnut was selected for its deep, luxurious grain pattern. Even the drawer pulls are seamlessly integrated, appearing as subtle recesses rather than protruding hardware. There’s a quiet confidence here, a devotion to craft over fleeting fads that you just have to respect.
How to Make This: Meticulously select and dimension premium walnut lumber, paying obsessive attention to how the grain matches across the piece. Construct the cabinet carcass using robust joinery techniques like mortise and tenon or dovetail joints.
Craft the drawer boxes from solid wood with dovetail joints for unmatched strength and longevity. Integrate finger pull slots into the drawer fronts using precision routing or CNC milling techniques.
Install high-quality soft-close drawer slides so the drawers glide effortlessly and silently. Carefully sand all surfaces to a silky smooth finish, devoting special attention to edges and corners.
Apply multiple coats of a durable, low-VOC clear finish, sanding lightly between coats for a flawless final surface. Assemble the drawers into the chest and ensure perfect alignment and a smooth gliding motion.
Create a pedestal base or attach furniture feet to lift the chest and provide stability. Consider adding felt or cork liners to the drawer bottoms as a gentle bed for delicate items.
Upcycled Bicycle Plant Stand with Playful Wall Art

Credit: @shilpshilpabhii
Alright, design mavens, this one has your name written all over it. This isn’t just a bicycle moonlighting as a plant stand; it’s a full-blown manifesto.
It’s that brand of quirky cool that only a true creative spirit can execute. This speaks directly to the maximalists, the fearless souls who embrace riotous color and pattern.
And anyone with an appreciation for a clever DIY project will instantly recognize the sheer ingenuity on display. The contrast between the repurposed bicycle frame and the delicate greenery?
Absolute perfection. If you’re hunting for a similar vibe, plenty of tutorials exist for building a “Diy Sofa” from salvaged materials, but this feels infinitely more chic, doesn’t it?
How to Make This: Track down an old bicycle with a frame that’s still solid and sturdy. Clean it ruthlessly with soap and water.
Sand away any rust spots or chipped paint on the bicycle frame and let it dry completely. Paint the bicycle frame and rims with your chosen colors of spray paint.
Allow the paint to dry fully. Cut a wooden board (or repurpose a reclaimed board) to fit securely between the bars of the bicycle frame.
Sand the wooden board until it’s flawlessly smooth to the touch with zero splinters. Apply a sealant or varnish to protect the wood from moisture and let it dry.
Attach the wooden board to the bicycle frame using screws or a powerful construction adhesive. Position the bicycle against a wall, double-checking that it feels completely stable.
Arrange your favorite plants, a small lamp, or other decorative objects on the new shelves. Secure the bicycle to the wall with brackets if you need extra peace of mind for stability.
Floral Ottoman with Storage – Mustard and Pink
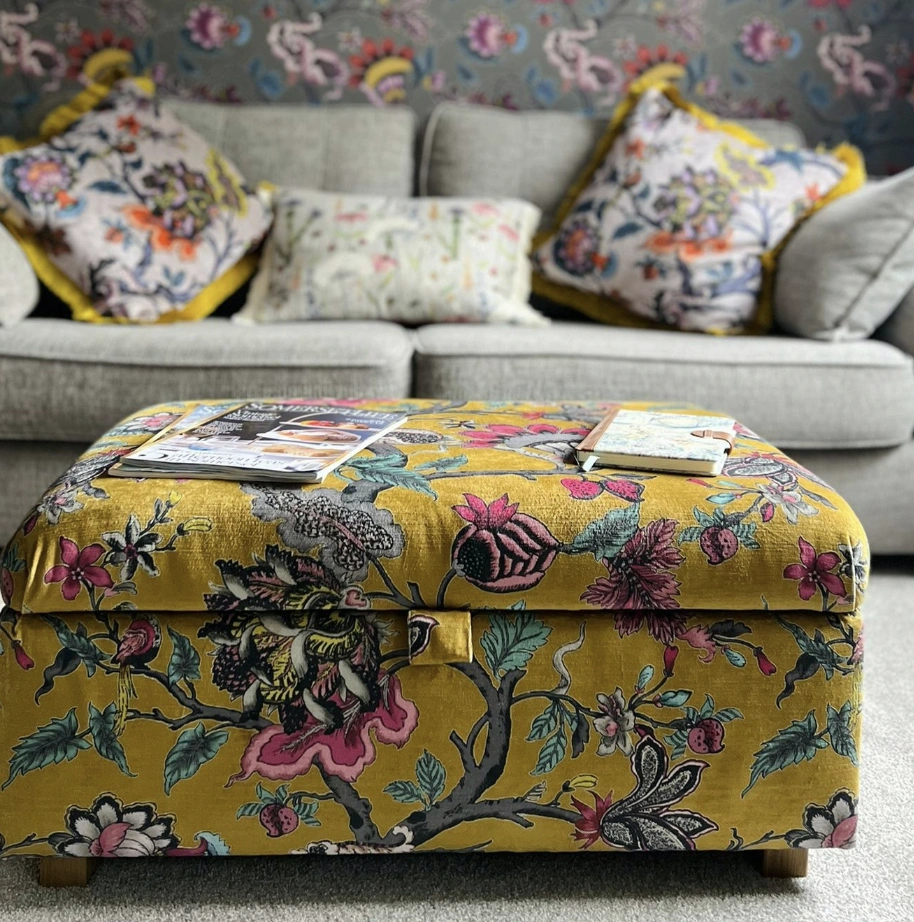
Credit: @sparrowandplumbhome
This ottoman is a genuine statement piece, yet it’s shockingly practical at its core. The mustard backdrop paired with the pink floral print channels a vintage vibe that I find deeply appealing.
And the very best part? It opens up for storage, meaning you can stash blankets or stacks of magazines out of sight.
A perfect reminder that I need to hunt down some “Diy Furniture Easy” projects. Maybe a matching throw pillow is in my future. It’s the eternal quest for furniture that looks stunning and works tirelessly.
How to Make This: Strip off any existing fabric from the ottoman frame. Inspect the frame for any hidden damage and make repairs if needed.
Measure the ottoman frame precisely and cut foam padding to cover each surface. Adhere the foam to the frame using spray adhesive, ensuring a smooth and even layer of coverage.
Measure and cut your floral fabric, leaving generous extra material around all sides for stapling to the frame. Center the fabric on the ottoman and begin stapling it to the frame, starting in the very middle of each side.
Pull the fabric taut and smooth as you staple, working your way methodically toward the corners. Fold the fabric neatly at the corners to create a clean, professional finish and staple it securely down.
Trim away any excess fabric, leaving a small amount to tuck discreetly under the edges. Attach decorative trim or piping around the base of the ottoman for a touch of extra flair and to conceal the staples. Install the hinges and hardware for the storage compartment, ensuring the lid opens and closes smoothly.
Intricate Floral Bone Inlay Dresser on Metal Legs
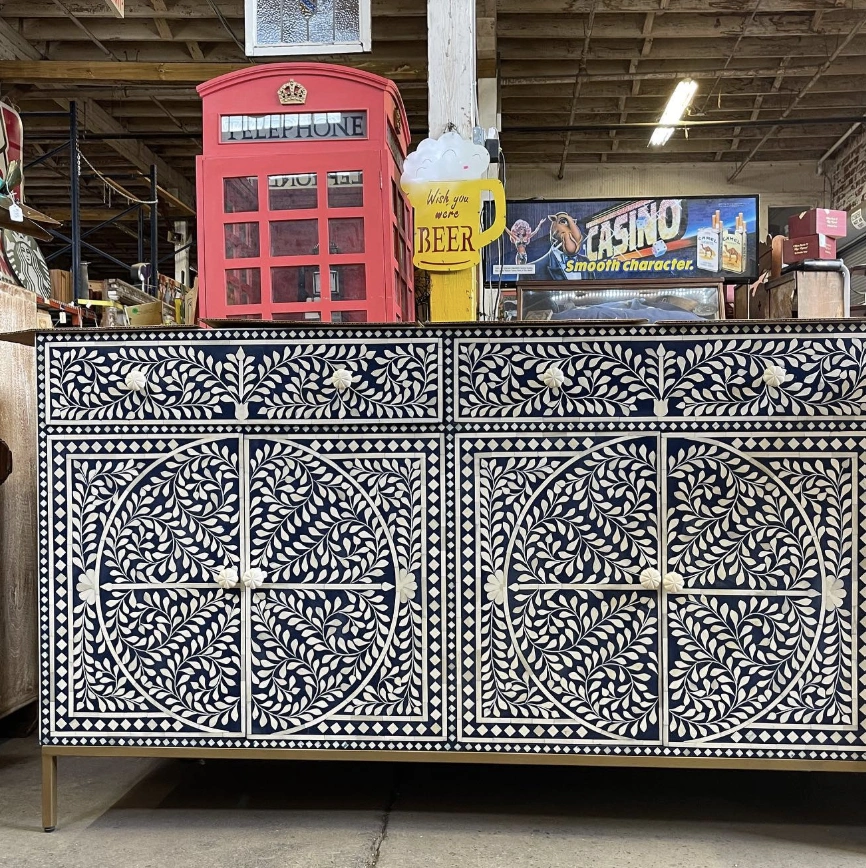
Credit: @ecorelics
This bone inlay dresser radiates pure Anthropologie energy, though it’s almost certainly way cooler than anything mass-produced. The floral pattern is simply insane.
The level of detail? Breathtakingly intricate!
Could this actually be Home Made Furniture? It manages to be a total statement piece while feeling completely timeless, you know?
It would inject some serious soul and personality into any room. Tell me honestly what you think!
How to Make This: Source a solid wood sideboard or dresser with good bones. Clean the furniture thoroughly with a degreaser and remove all the old hardware.
Apply several coats of deep blue paint, sanding lightly between each coat for a glass-smooth base. Using stencils or transfer paper, map out the full floral design across the surface.
With a fine scroll saw or rotary tool, carefully remove small sections within the drawn pattern. Cut the inlay material (bone, resin, or a similar alternative) to fit those removed sections perfectly.
Glue the inlay pieces into the carved spaces, ensuring they sit flush with the surrounding surface. Sand away any imperfections and apply a protective clear coat varnish over the entire piece.
Reattach the original hardware or switch things up with decorative new knobs and pulls. Attach brass legs to the base for that final hit of visual appeal.
Rattan Frame Chair with Bouclé Cushion
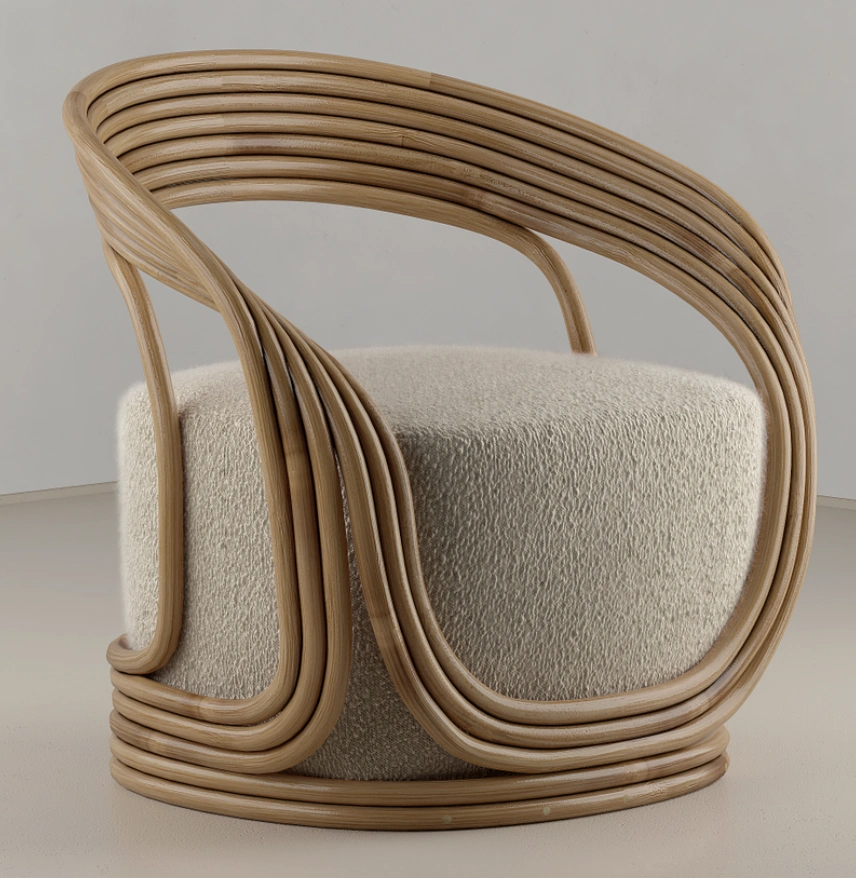
Credit: @simply_mojoboutique
This is boho-chic energy elevated to a fine art, right? It’s the chair that belongs in the “cool aunt’s” apartment, and I am one hundred percent here for it.
The rattan frame is wonderfully unique, and that bouclé cushion looks like an invitation to sink in and stay awhile. Anyone who has a passion for rich textures and authentic Creative Furniture will literally obsess over a find like this. Picture it paired with a plush rug and a jungle of thriving houseplants!
How to Make This: Source stalks of naturally grown rattan. Soak the rattan thoroughly in warm water until it becomes fully pliable, a process that can take about a week.
Construct a mold to serve as the framework for shaping the chair. Use clamps to carefully bend the soaked rattan around the form to achieve the circular seat shape.
Once the rattan is dry, connect the frame sections with screws to build the base structure. Fabricate a circular seat platform from a piece of plywood.
Cut and glue foam to the circular platform and cover it with plush sherpa fabric, securing the material underneath with staples. Attach the finished cushion to the base with screws.
Finish the rattan frame with varnish or a coat of tung oil to keep its natural luster alive. Allow the rattan to dry completely before the final assembly.
Teak Wood Accent Table with Scalloped Edges
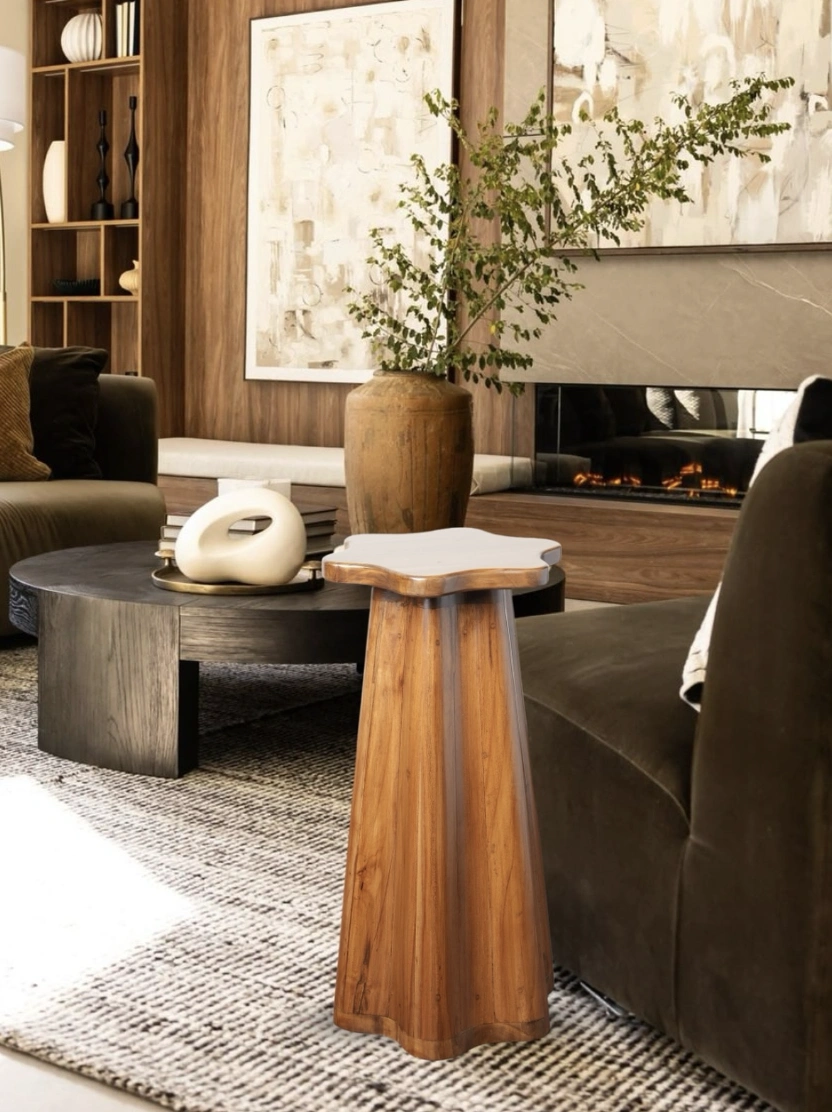
Credit: @the_studiograin
This teak wood number has a completely different kind of energy. It holds a warmth that feels anchored and grounded.
Chances are high it began its life as nothing more than a discarded hunk of scrap wood. It strongly resembles some of the most artistic, beautifully crafted Homemade Furniture you can stumble upon. It’s practical, it’s sturdy, and it’s undeniably pretty!
How to Make This: Start with a solid wood block of an appropriate size. Use a table saw to cut angled edges along the bottom of the wood block, creating the multiple sides that will form the pedestal.
Attach wooden panels using wood glue and screws to fully form the pedestal base. Fill any gaps between the panels with wood filler and sand the entire surface until it’s flawlessly smooth.
Apply wood stain in layers, sanding gently between coats, until you reach your desired depth of finish. Select a marble slab for the top.
Attach the marble to the top of the wood pedestal using a strong construction adhesive. Let the glue cure for a full 24 hours.
Seal the marble surface and polish it to a soft sheen. Position your creation in its chosen spot and enjoy the view.
Refinished Wood Dresser with Hairpin Legs
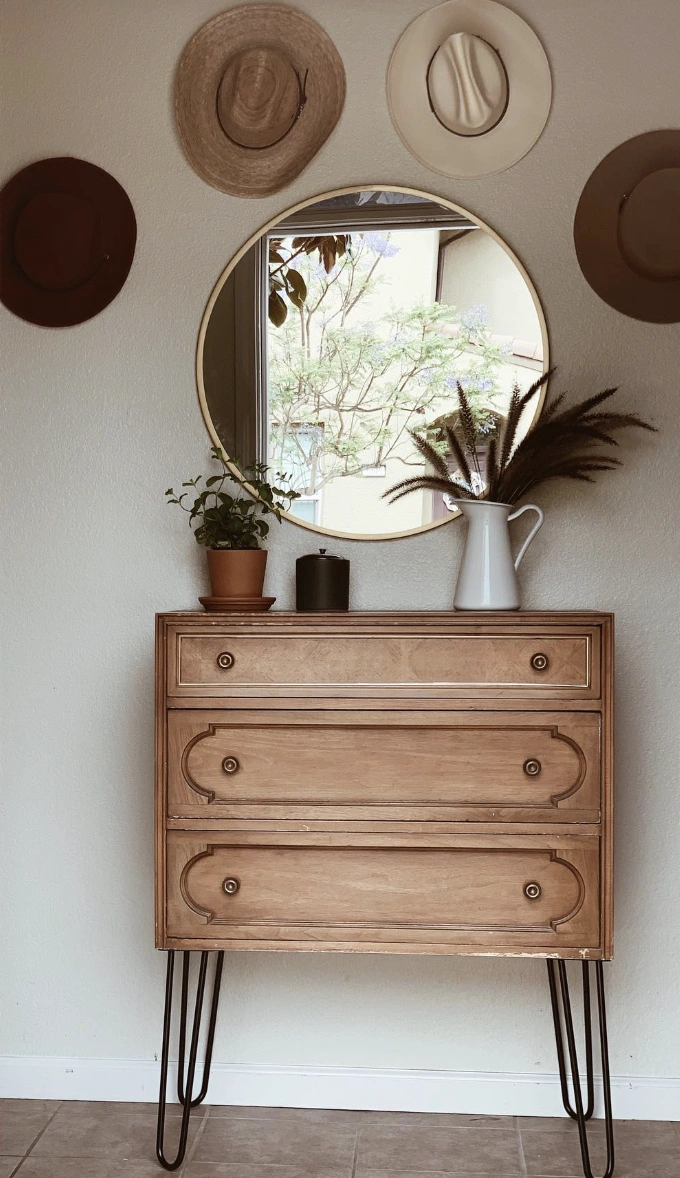
Credit: @msmaryshouse
This dresser earns a solid, confident “B.” The wood stain is genuinely beautiful, and the hairpin legs inject that mid-century modern flair that feels so relevant right now. The hardware appears to be original, which is a nice detail to preserve.
It looks like a relatively approachable piece to refinish. I’d bet there were some satisfying Home Diy Projects that sparked this total glow up. A few touched-up nicks, and this piece would be absolute perfection.
How to Make This: Procure a vintage dresser, ideally one with a strong, sturdy frame. Remove all the existing hardware and give the dresser surface a deep, thorough cleaning.
Lightly sand the existing finish to create a smooth base that will accept the new stain. Apply a light wood stain, allowing it to penetrate for a moment before wiping away the excess.
Seal the stain with a clear matte varnish. Measure and mark the precise locations for attaching the hairpin legs.
Attach the hairpin legs securely using screws and a power drill. Find a round mirror, preferably in a gold or brass finish.
Style the top surface with plants, candles, and other curated decorative items to complete the entire look. Consider giving the drawer pulls a fresh coat of paint if you’re feeling adventurous.
Unfinished Pine Dresser with Six Drawers
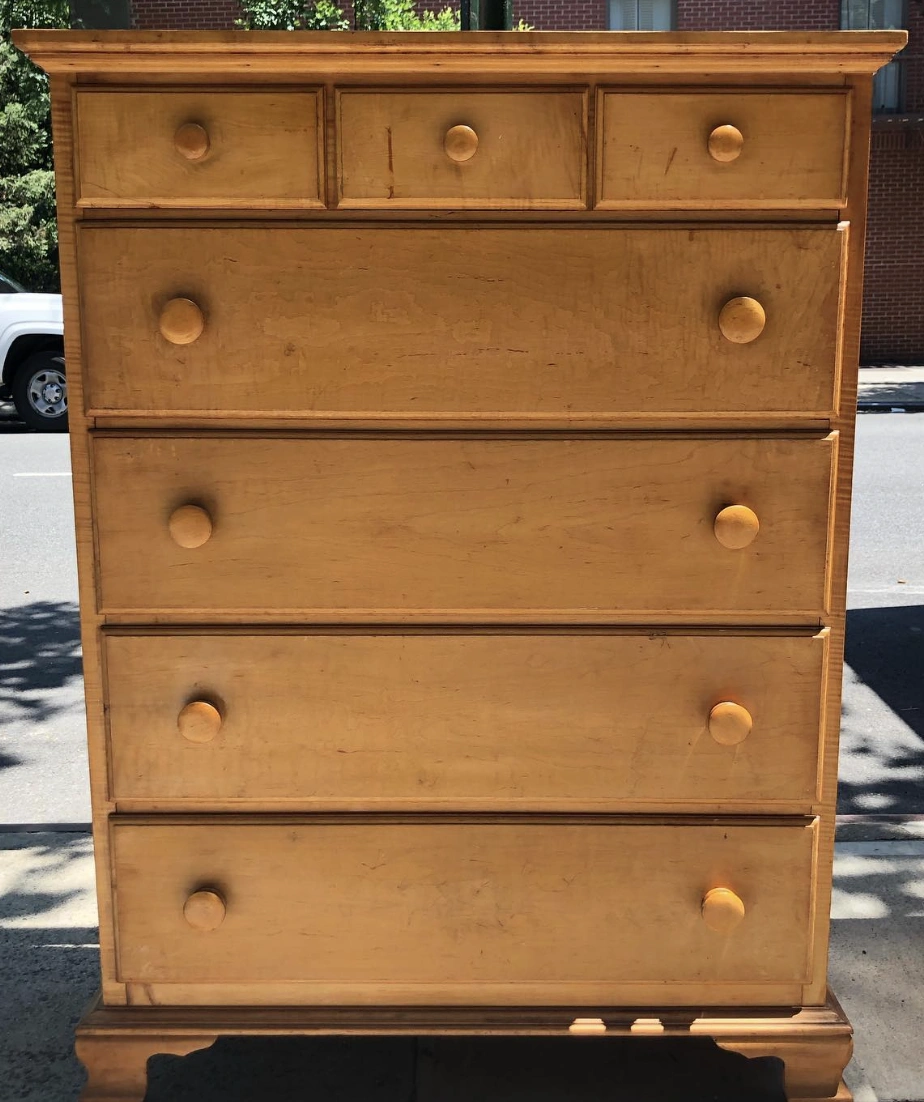
Credit: @yesterdaysnewsbk
Is your wardrobe bursting at the seams? This straightforward chest of drawers presents a real solution.
It might not wear the label of a designer piece quite yet, but never underestimate its latent potential. A fresh coat of paint, or perhaps some completely new hardware, will utterly transform its presence.
It’s wonderfully easy to upcycle and a perfect starting point for anyone wanting to create some cheap diy furniture. The effort you invest will pay back tenfold.
How to Make This: Secure a solid wood dresser; any style works, though a simpler silhouette is best. Remove all the hardware, including knobs, handles, and drawer pulls.
Sand the dresser all the way down to the bare wood, stripping away every trace of old varnish or paint. Apply a honey-colored stain in thin coats to preserve a natural, warm wood look.
Dry brush the stained dresser with white acrylic paint to create a beautifully weathered effect. Use steel wool to gently scuff up the edges and raised details of the furniture, adding to the timeworn look.
Allow the paint to dry completely. Protect the entire surface with a clear matte sealer.
Distress the original knobs or find some new rustic knobs to match the vibe. Reattach the original knobs, swapping them out if they don’t suit your vision.
Light Wood Slat Crib with Pastel Mobile
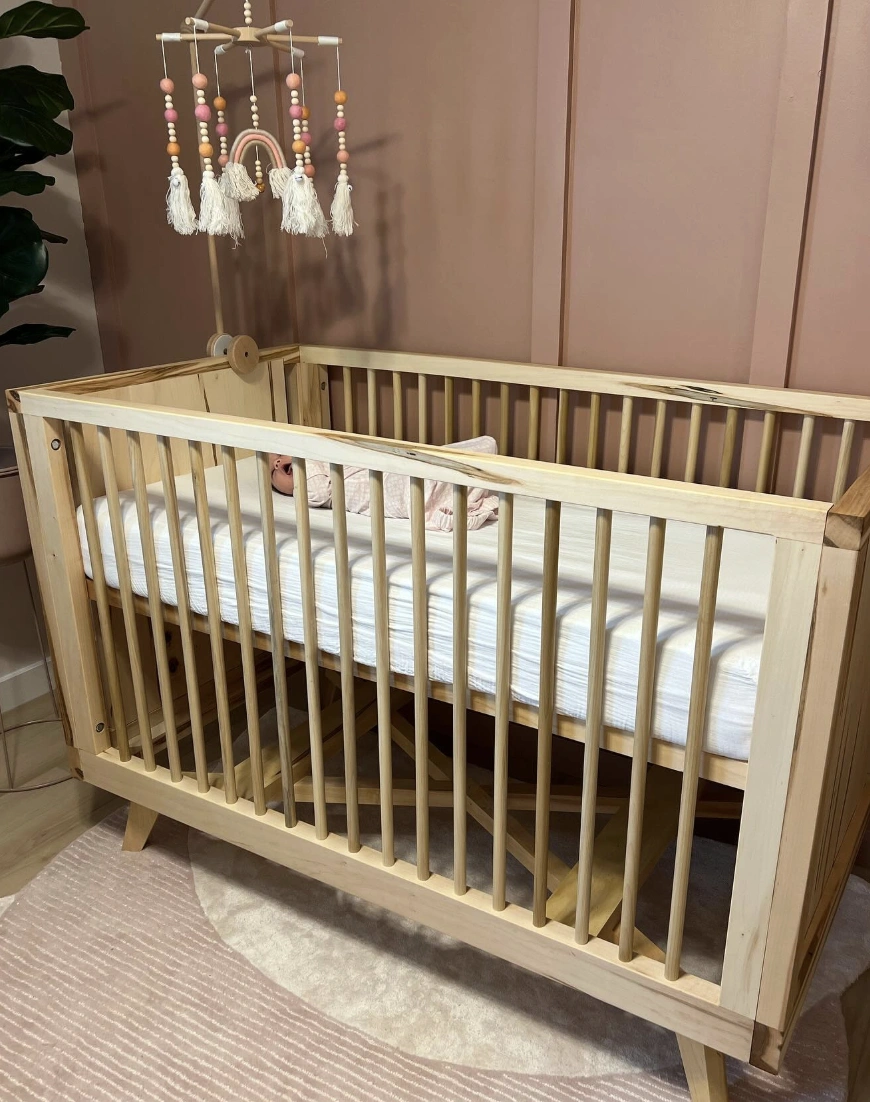
Credit: @simpsonfamilywoodworks
The light wood feels crisp, clean, and modern. She’s been eager to dip her toes into some “Diy Furniture Easy” projects, and customizing one of these would be the perfect entry point. This look radiates pure “cool mom vibes,” don’t you think? 🤩
How to Make This: Gather 12 wooden beads, some acrylic paint, and clear varnish. Paint the wooden beads in a spectrum of pastel hues and let them dry for about 2 hours.
Apply a clear varnish to give them a soft, lasting shine. Assemble the hanging armature using a few lightweight wooden dowels.
Cut cotton yarn into 12 equally sized lengths for creating tassels. Tie each tassel securely onto the armature in equal segments.
String the painted beads onto a strong nylon thread. Create a miniature rainbow shape using felt and strong fabric glue.
Attach the felt rainbow so it hangs between the strands of beads. Check every knot and connection point to ensure everything is absolutely secure.
Southwestern Cactus Bench with Repurposed Spool Tables
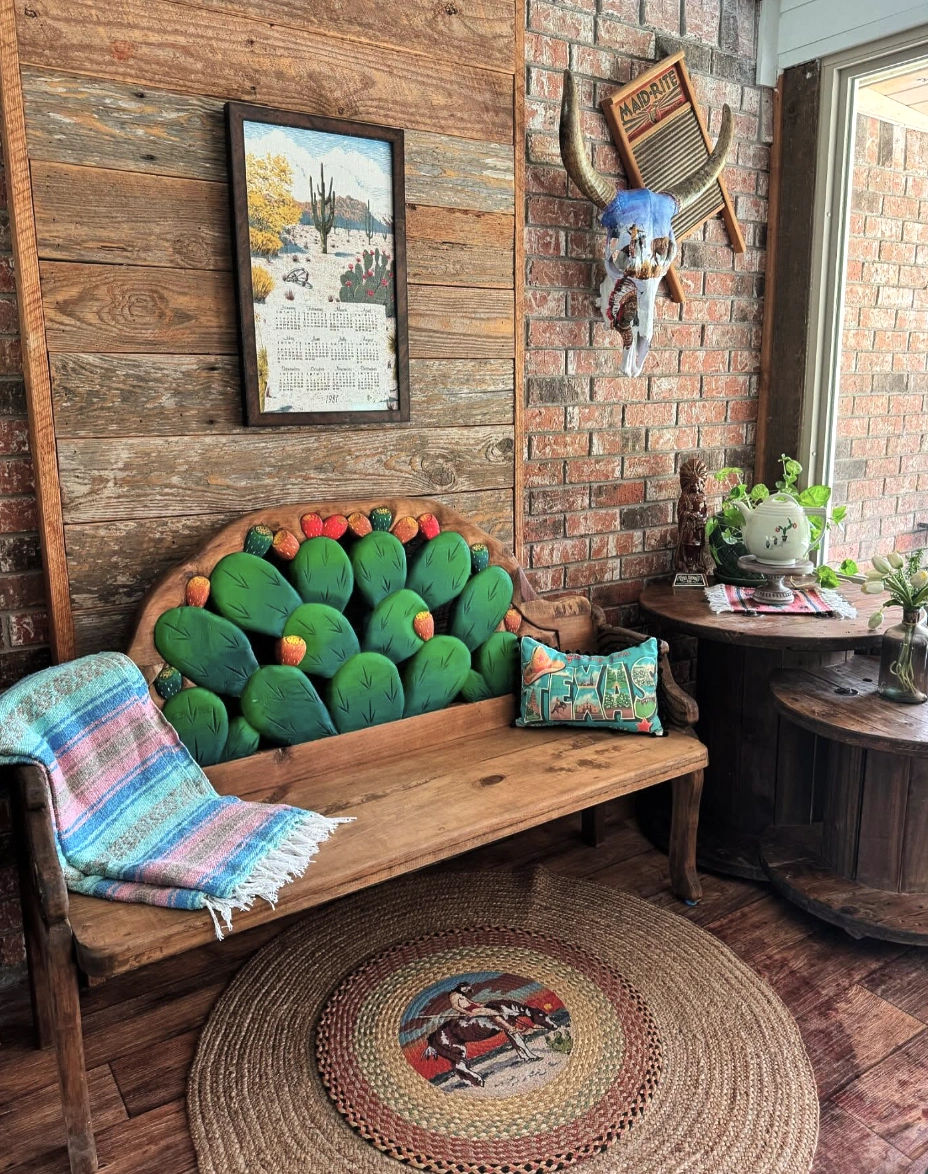
Credit: @texasgirlalways
Let’s be honest for a second, most “rustic” decor these days feels a little forced, doesn’t it? This bench, however, lives on a completely different plane.
The handcrafted cactus design is playful and spirited, yet the distressed wood keeps the whole thing from feeling overly precious. And those cable spool tables?
Infinitely more interesting than any mass-produced side table. For anyone hunting for genuinely unique Diy Furniture Ideas, this corner setup is the ultimate jackpot.
How to Make This: Source a solid, reclaimed wooden bench that feels substantial. Sketch out a cactus silhouette across the backrest.
Carve the cactus shape carefully using the appropriate wood carving tools. Sand the carved areas until they are perfectly smooth to the touch.
Paint the cactus with acrylic paints in various shades of green. Add detail to the cactus fruit using small dabs of red and yellow paint.
Apply a weather-resistant sealant to the entire bench to protect it from the elements. Place the bench on a covered porch or patio area. Consider adding a colorful, Southwest-inspired throw pillow for an extra pop of comfort and style.
Industrial Style Three-Tiered Wooden Shelf
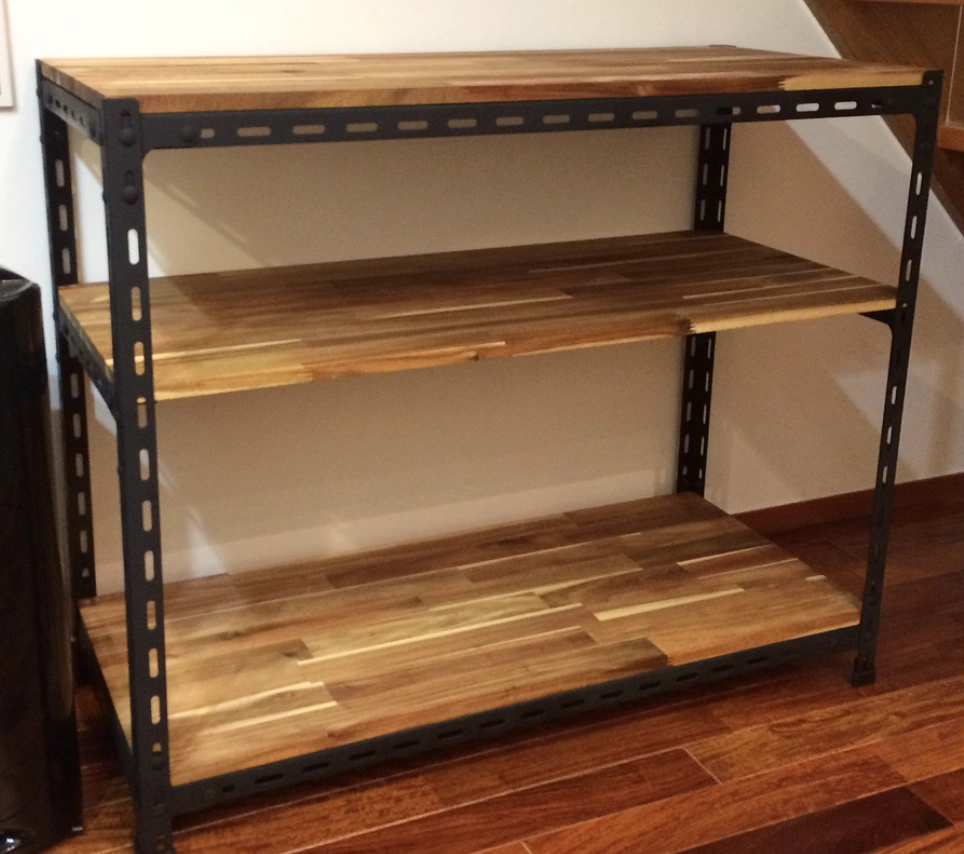
Credit: @yutaro_sugisaka
I need storage solutions that don’t make me wince when I look at them, and this shelf actually looks really good. It’s sturdy, no doubt about it.
Finding clear, well-written Diy Furniture Plans is absolutely essential if I’m going to attempt a build like this. What I appreciate most is how the open shelving design makes grabbing whatever you need a completely effortless motion. Functionality takes the crown every single time, folks.
How to Make This: Purchase pre-cut lumber and matching steel angle brackets. Measure and cut the wood down to your precise shelf dimensions.
Sand the wood boards and finish them with your chosen stain or sealant. Assemble the steel angle brackets securely using bolts and washers.
Level the steel frame and pre-drill guide holes for all the screws. Secure the wood shelves to the steel frame using screws.
Double-check that the screws are level to prevent any annoying wobble. Tighten every single connection to guarantee structural integrity. Load test the completed shelves to confirm they are stable and ready for use.
Unfinished Pine Wood End Table with Storage Nook
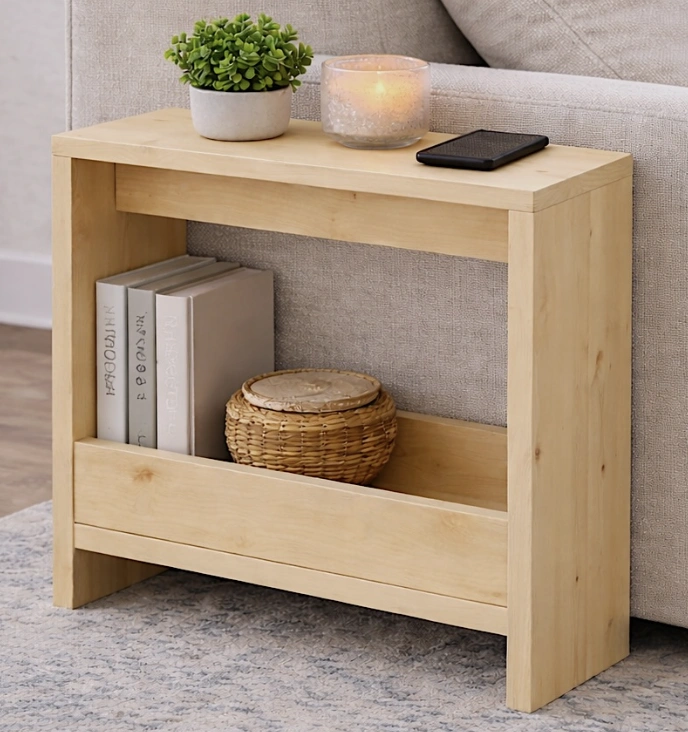
Credit: @anawhiteplans
Picture this: you’re relaxing on the couch, a glass of wine in hand, Netflix rolling, and this little cutie is standing by, holding all your evening essentials. It’s just perfect!
The design is super simple, meaning it plays nicely with literally any decor style. I’d absolutely snag one from that little downtown shop known for its gorgeous Handmade Furniture.
I’m also scheming about bringing this to a BYOB painting class so I can completely personalize it. You know, to make it undeniably, truly mine.
How to Make This: Cut all the wood pieces according to your desired dimensions. Sand every single wood piece until it feels smooth to the touch.
Assemble the frame of the table using wood glue and screws for a strong foundation. Attach the legs to the frame, making sure they are perfectly even.
Install the lower shelf using wood glue and nails. Fill any gaps or nail holes with wood filler.
Sand the entire table again after the wood filler has completely dried. Apply your desired paint or stain and let it dry.
Finish with a protective sealant to guard against damage from daily life. Decorate the finished table with a stack of books and a plant.
Sage Green Hutch with Wine Storage & Marble Countertop

Credit: @cutlerandberry
Just look at this gorgeous sage green hutch. The gold hardware pops so brilliantly against the color, forging a true statement piece.
And can we talk about those wine racks framing the cooler? Absolutely chic. I’m completely on board with this rising trend of bespoke, unique-looking Diy Furniture that has the power to genuinely lift a room and mirror your personal style.
How to Make This: Design full-scale blueprints of the hutch, including every precise measurement. Construct the upper cabinets with glass doors, demanding precision cuts throughout the process.
Build the base cabinet frame, carefully integrating the cavity for the wine fridge and the surrounding wine racks. Install the drawers equipped with soft-close glides.
Wire all the electrical components for both the fridge and the cabinet lighting. Assemble the hutch in distinct sections, constantly ensuring everything is level and square.
Install the countertop, paying close attention to the material and finish you selected. Paint or stain all the components to match your chosen aesthetic vision.
Install the brass knobs and drawer pulls. Add a bead of caulking to any visible seams for a flawless finish. Secure the hutch to the wall for total stability.
Sage Green Dresser with Gold Hardware and Decorative Trim
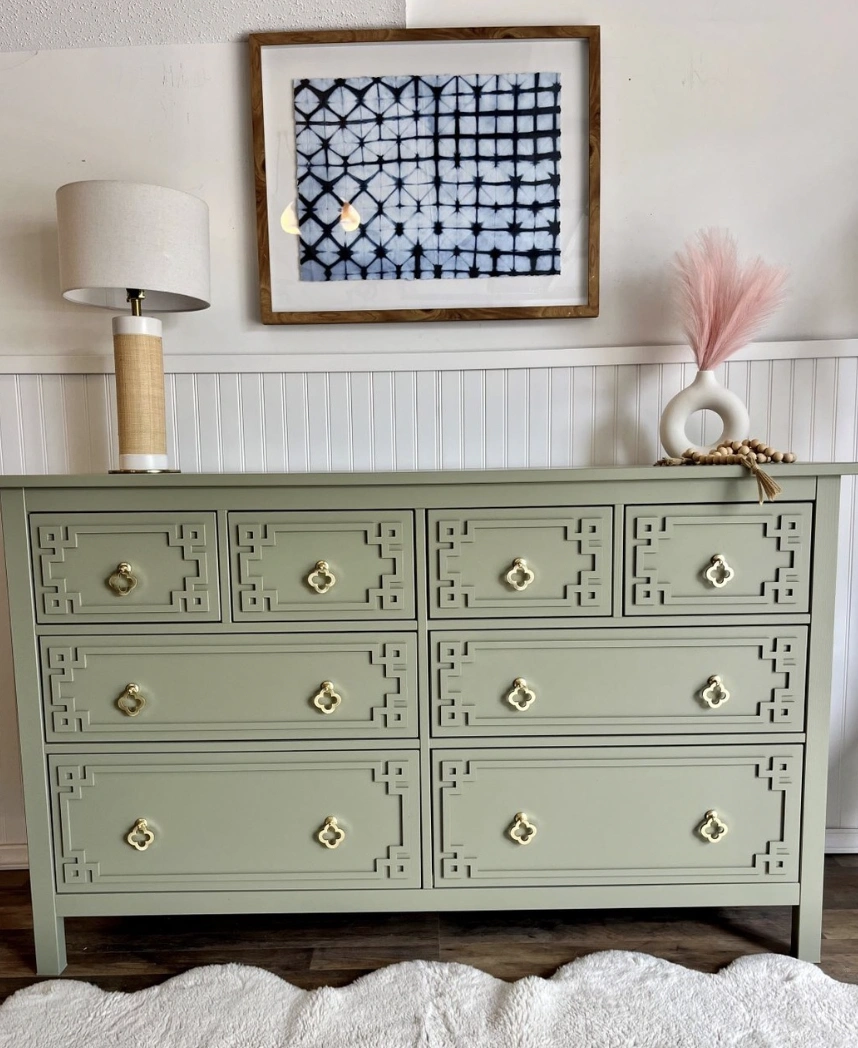
Credit: @myoverlays
Finding a dresser that fits a modern aesthetic without feeling cold and sterile is a constant battle, right? The options always seem to fall into two camps: chilly and clinical or hopelessly outdated.
This dresser completely solves that dilemma with its beautiful sage green finish, eye-catching trim, and updated hardware. It stands beautifully on its own, or you could pair it with a “Diy Sofa” in complementary colors. Trust me on this.
How to Make This: Remove all the existing hardware from the dresser. Lightly sand the entire dresser surface to create a smooth, receptive base.
Apply a coat of primer specifically designed for furniture and let it dry completely. Paint the dresser with sage green furniture paint and let it dry fully.
Apply the geometric trim according to your design plan. Add a second coat of paint for even, solid coverage and let it dry.
Apply gold leaf to accent the trim. Reattach the gold hardware to the freshly painted drawers.
Lightly distress the edges with sandpaper to reveal a hint of an aged, storied look. Protect the entire finish with a clear topcoat or a coat of furniture wax.
Distressed Teal Buffet with Gold Accents & Statement Mirror

Credit: @diyfurnituremakeovers
This buffet confidently shouts, “I’m one of a kind!” I’m completely taken with the distressed teal paint job punctuated by those gleaming gold details. But here’s a key piece of advice if you’re considering a similar project for your own home made furniture: make absolutely sure you find the right shade of teal that works within your space.
Also, don’t shy away from embracing the imperfections; that’s precisely where the character lives. Finish the look by accessorizing with bold, dramatic florals to create a warm and inviting atmosphere.
How to Make This: First, banish every speck of dust, grime, and old finish residue from that buffet. Sand the buffet table down using medium-grit sandpaper to really rough up the original finish.
Apply a primer in a color that is compatible with teal paint, then allow it to dry completely. Paint two coats of your preferred teal furniture paint, waiting patiently for each coat to dry.
Use fine-grit sandpaper to gently distress the paint along the edges, corners, and any raised details. Stain the top surface with a wood stain that complements the teal hue and let it cure.
Seal the table with a protective topcoat to prevent wear and tear over time. Swap out the old hardware for some jazzy new gold knobs and handles. Give the whole finished piece a good buffing with a soft cloth to bring up a subtle sheen.
Upcycled Cream Sideboard with Brass Hardware
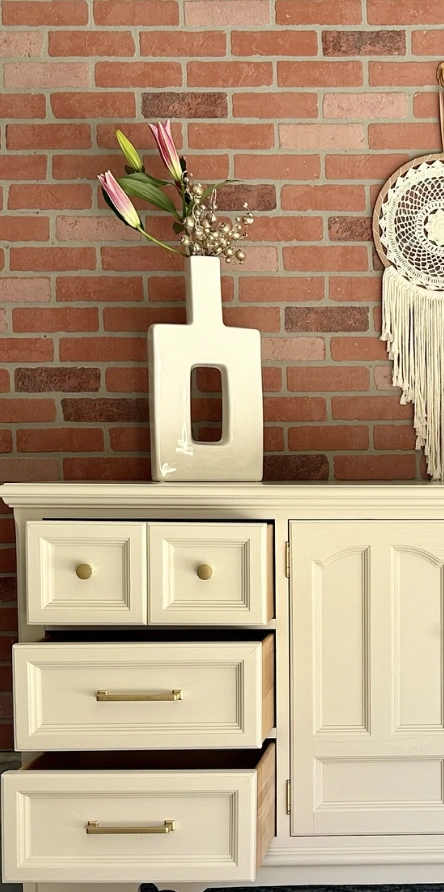
Credit: @redumbrella_designs
The beauty of imperfection truly radiates here. I find myself so drawn to the muted cream tone of this piece; it whispers of a simpler time and looks stunning set against that exposed brick wall.
The brass hardware brings a welcome touch of contemporary warmth to the mix. It feels like the kind of piece you would thoughtfully restore over time, maybe even adding a few deeply personal touches along the way. Refurbishing or creating your own Diy Furniture gives you the power to curate a space that feels truly personal.
How to Make This: Begin by emptying the cabinet completely and removing all the hardware. Give the cabinet a rigorous scrub with warm, soapy water to lift away any accumulated dirt or grime.
Lightly sand the cabinet to rough up the surface and promote better paint adhesion. Apply a coat of primer to the cabinet, ensuring even coverage across every surface.
Let it dry completely. Paint the cabinet with your chosen creamy color using a brush or spray paint.
Apply multiple thin coats for an even, drip-free finish. Sand the edges gently for a lightly distressed effect.
Stain the drawer interiors with a wood finish to introduce warmth and contrast. Let it dry thoroughly.
Install the new brass hardware. Consider adding decorative details such as stencils or decals if the mood strikes. Apply a final topcoat for protection.
Reimagined Taupe Armoire with Brass Hardware
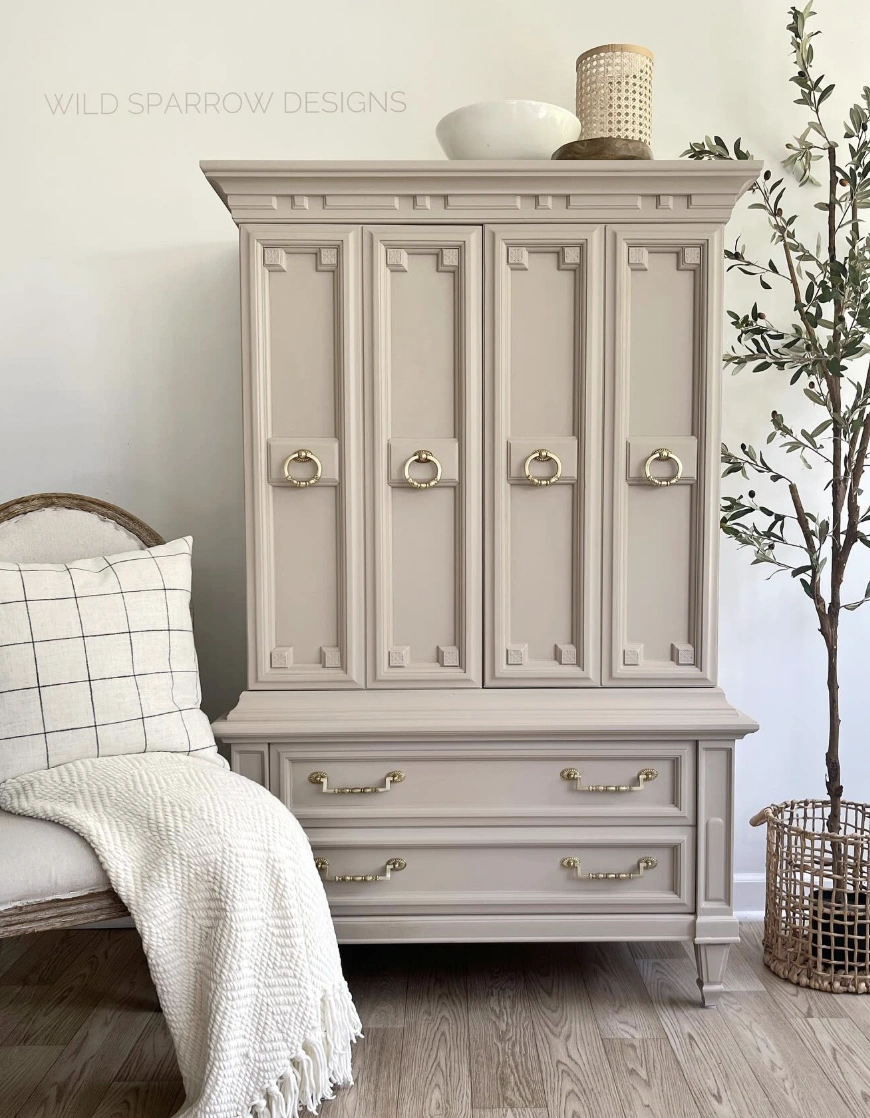
Credit: @wild_sparrow_designs
This color, though… it’s the most perfect soft taupe, and the brass hardware absolutely POPS against it. You spot similar pieces at high-end retailers like Arhaus, but this one feels so much more unique.
Someone poured love and attention into this transformation. It’s serving major “expensive” energy while simultaneously whispering, “I built this with my own two hands.” Talk about next-level Home Made Furniture!
How to Make This: Start by liberating that armoire from its original finish; sand it down smooth. Give it a coat of primer that will grip that taupe shade like a champion.
Now, brush on that taupe color, let it dry thoroughly, and repeat for maximum coverage. Pop off those old handles and bring in the gleaming golden rings.
Protect your beautiful new finish. Give the surface a good final wipe-down with a clean, damp cloth.
Add any decorative details like moldings or trim that speak to you. Style your transformed armoire with your favorite clothing and accessories.
Refinished Vanity with Cream and Natural Wood Tones
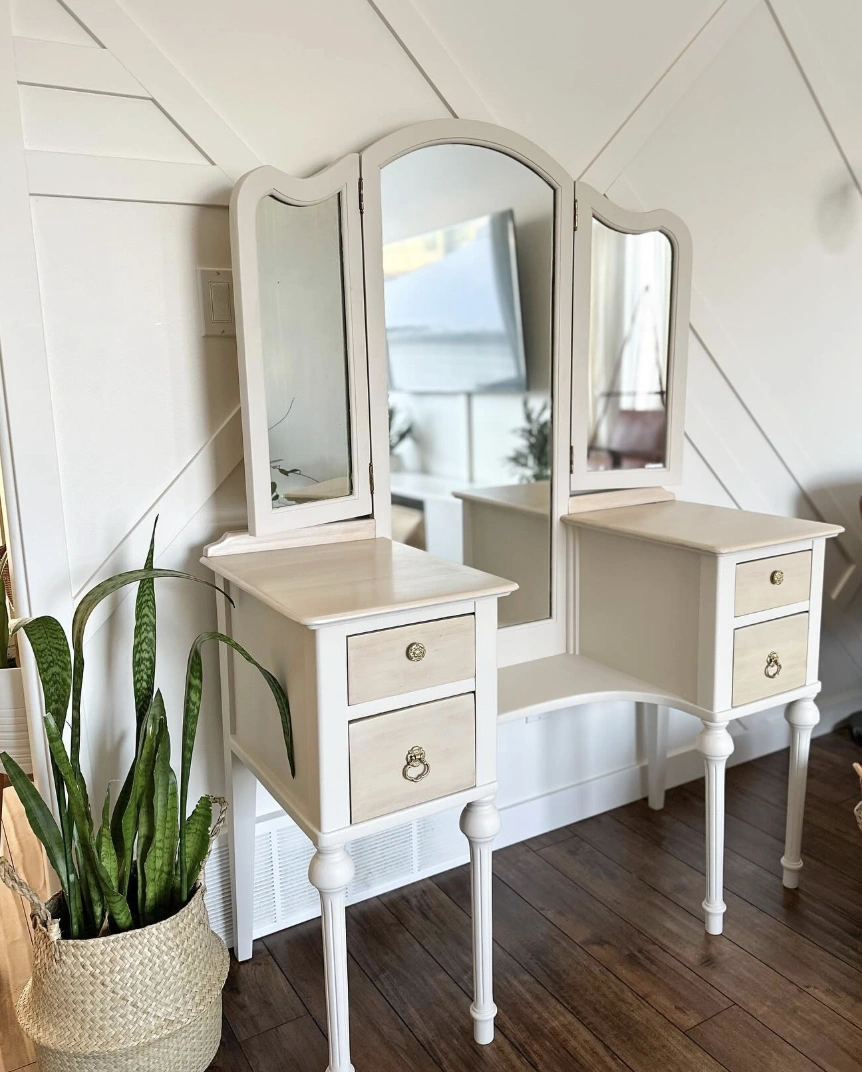
Credit: @everyday_kait
Those two-toned drawers paired with antique brass pulls are an absolute chef’s kiss. And take a peek at those delicate fluted legs—such a simple detail, yet they completely lift the entire piece.
This genuinely makes me want to start some Home Diy Projects of my own right this second. This vanity feels fresh, looks expensive, and sits perfectly on trend.
How to Make This: Unscrew those drawer pulls and hinges, then give the whole piece a solid scrub-down. Swirl on two layers of a creamy base paint on the legs and the body of the cabinet, but leave the drawer tops untouched.
Sandpaper the tops thoroughly. Slap on your chosen wood stain.
Seal the entire piece to protect your hard work. Reattach the original drawer pulls.
Position the mirror centered perfectly above the vanity. Add some architectural snake plants for life and height. Style the surface with your favorite everyday objects.
Retro-Style Rounded Brown Headboard with Olive Nightstand
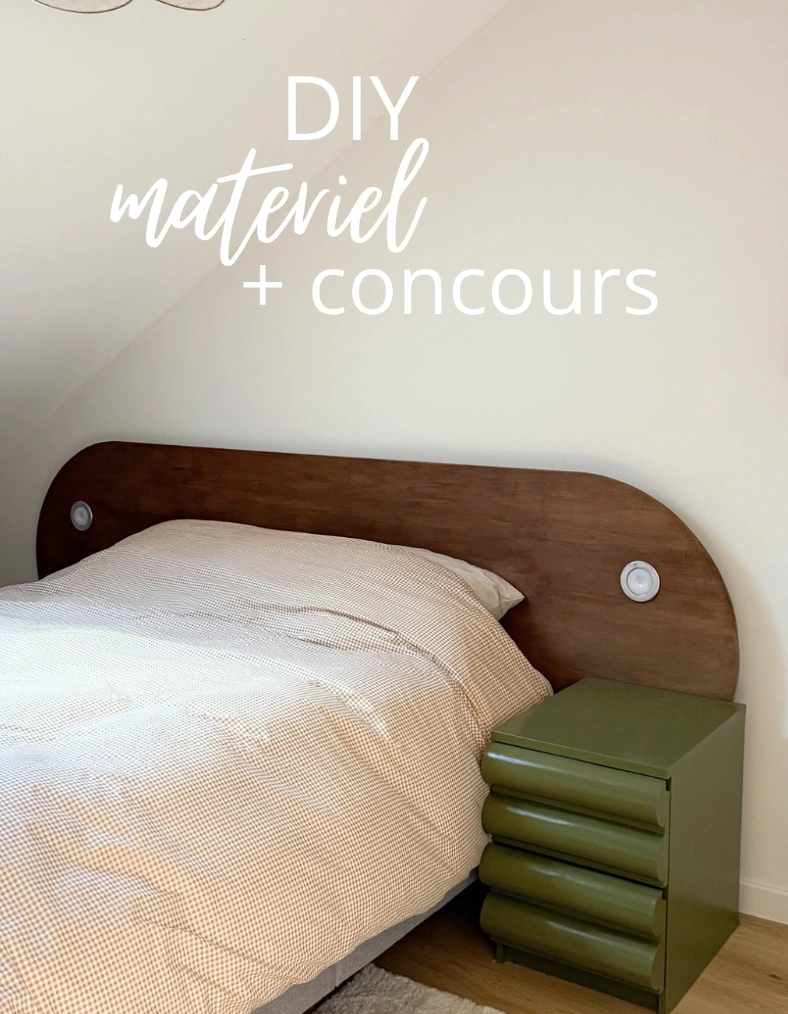
Credit: @flavie_peartree
This headboard and nightstand combo solved the room’s design problem instantly. The project was manageable because the approach to executing DIY Furniture Easy was already in my toolkit.
I felt a bit nervous about cutting the headboard’s curved shape, but it turned out to be surprisingly straightforward. Now my room finally feels like a true reflection of me.
How to Make This: Measure the width of your bed frame to determine the perfect headboard size. Cut a piece of plywood to your desired dimensions and shape, taking care to round the edges smoothly.
Sand the plywood with 120-grit sandpaper, then step up to 220-grit for a fine finish. Apply wood stain in your chosen color, following the product’s specific instructions, and let it dry.
Seal the piece with a coat of clear polyurethane varnish. Drill holes for the LED lights according to the dimensions of your chosen light fixtures.
Install the LED lights and wire them up following the manufacturer’s instructions. Attach the finished headboard securely to your bed frame using the appropriate hardware.
Distressed Floral Decoupage Dresser and Accent Chair
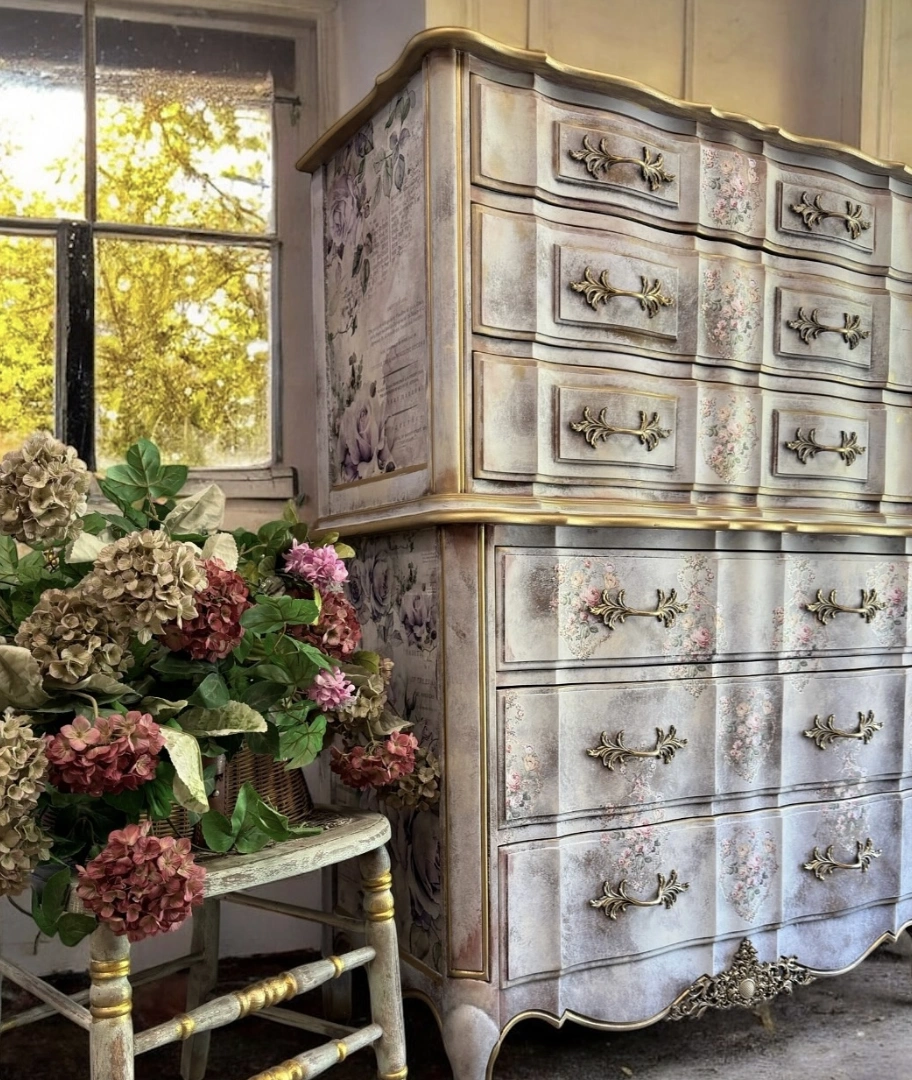
Credit: @lauradesignsshop
This upcycled dresser and chair pairing? It’s the perfect solution for those of us who adore a vintage aesthetic but don’t possess a fortune to spend.
If you’re currently mapping out your next Diy Sofa project, this would serve as a brilliant accent piece. It speaks to anyone who treasures the character of something old being made new again, especially when the project involves florals and a healthy dose of elbow grease.
How to Make This: Thoroughly clean the dresser to lift away every bit of dust and grime. Lightly sand the existing finish to create a rougher surface for the paint to grip onto.
Apply a base coat of chalk paint in a neutral color like gray or cream, then wait for it to dry. Select your decoupage paper featuring beautiful floral motifs.
Cut out the desired images and arrange them on the dresser to plan the final composition. Apply Mod Podge to the back of each image and adhere it carefully to the dresser, smoothing away any wrinkles as you go.
Once dry, apply a thin, even layer of Mod Podge over the entire decoupaged surface to seal it. Distress the edges and details of the dresser using sandpaper to let the underlying layers peek through.
Highlight the decorative hardware with gold gilding wax. Seal the entire piece with a coat of wax for lasting protection and a soft, luminous shine.
Two-Piece Gray Hutch with Patterned Backing
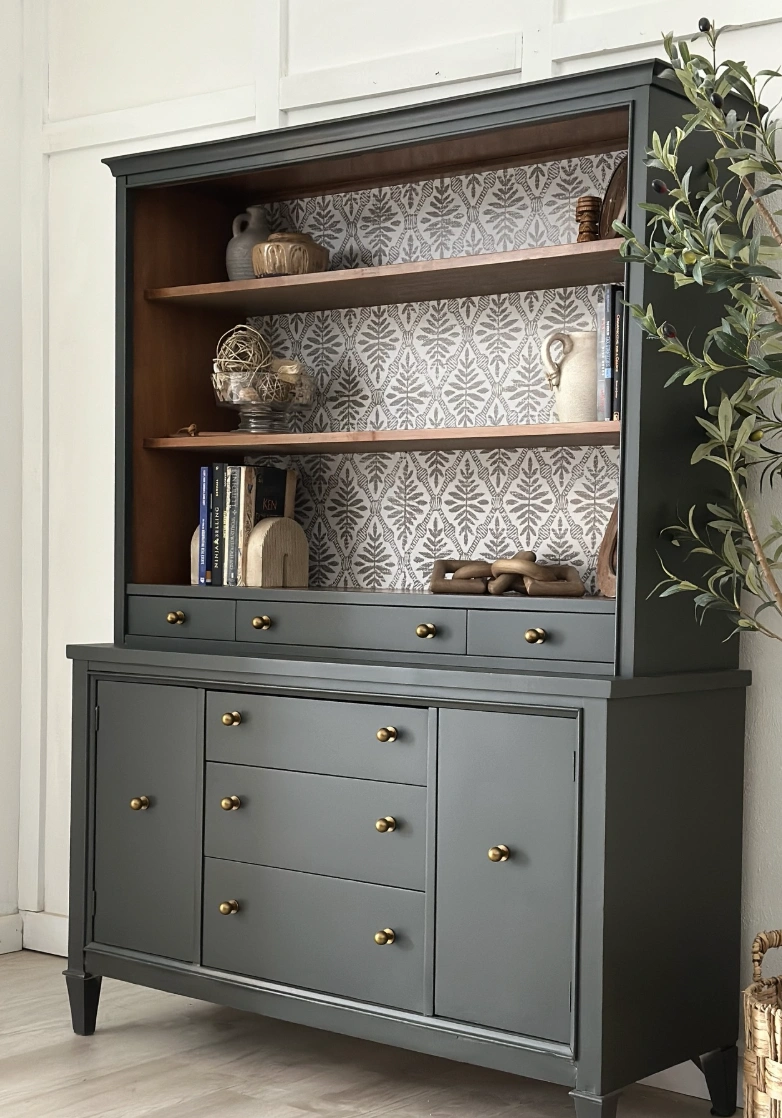
Credit: @whiteoak.lane
Notice the thoughtful placement of objects on those warm wood shelves. Here’s the secret, though: that subtle wallpaper backing introduces texture without ever overwhelming the visual space.
That kind of careful balance is exactly what separates ordinary decor from truly intentional design. You can track down countless diy furniture plans out there in the wild, but achieving this level of detail requires real vision and a sharp attention to the small things—like the hardware selection and the precise spacing between shelves.
How to Make This: Remove all the shelves, drawers, and hardware from the hutch. Clean the hutch thoroughly with a degreaser to get it spotless.
Lightly sand the entire piece to prepare it for the new paint. Apply two coats of dark gray paint, giving each coat plenty of time to dry completely.
Select a patterned wallpaper and measure the inside back panel of the hutch’s upper cabinet. Cut the wallpaper to size, leaving a small amount of excess for final trimming.
Apply wallpaper paste to the back of the wallpaper and carefully adhere it to the back of the hutch. Smooth out any air bubbles with a smoothing tool.
Trim away the excess wallpaper with a sharp utility knife. Reinstall all the shelves, drawers, and your chosen hardware.
There’s something deeply special about filling your home with handmade furniture. It represents so much more than just a table or a chair; it’s a piece of your own spirit, a tangible fragment of your story.
The imperfections, the little quirks—they add a depth of character that you simply can’t purchase in a store. So go ahead, gather your tools, get wildly inspired, and let’s build something truly amazing together!