


Have you ever been scrolling through Instagram, completely frozen by those amazing clay earrings everyone seems to be flaunting? It’s hard not to be instantly hooked. Polymer clay jewelry has absolutely taken off, and the pull to get involved in this trend is seriously strong.
Crafting your own beautiful Fimo earrings actually turns out to be more than a relaxing creative outlet. It also has the potential to become a wonderfully profitable little business. So here is exactly how your crafting passion can turn into real cash.
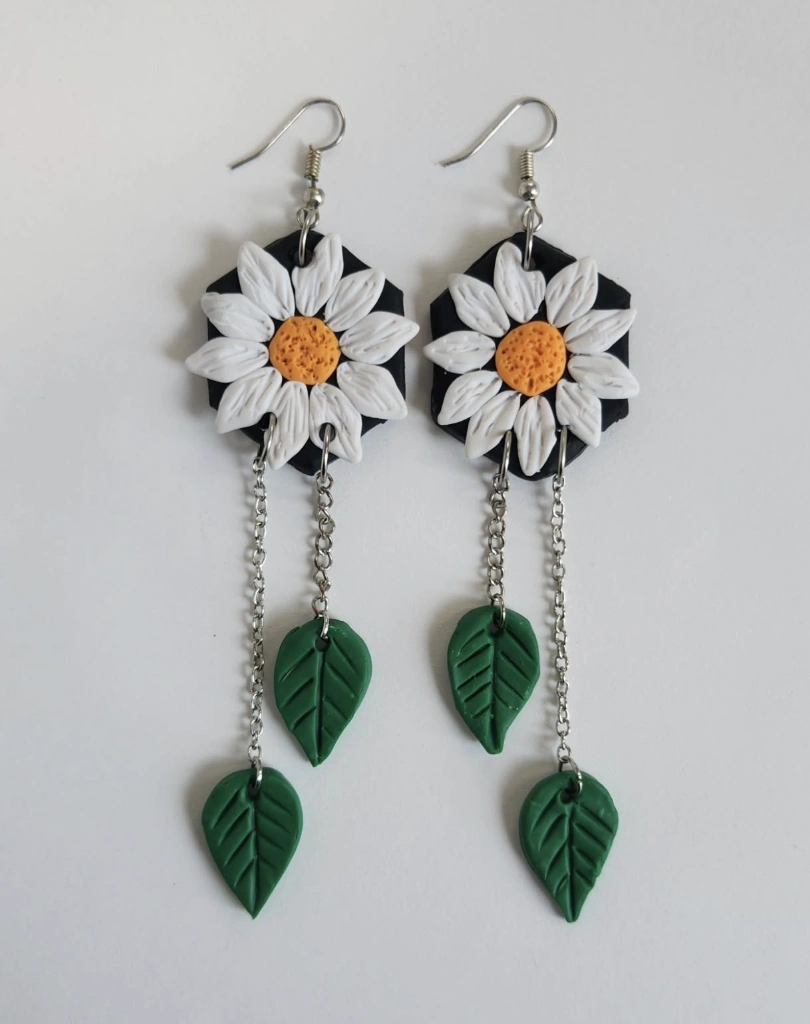
Daisy Delight: Polymer Clay Earrings with Dangling Leaves
Credit: @clazybyms
These earrings instantly shouted “festival season” the moment they appeared. I’m already mentally assembling an outfit for the next outdoor show, with these funky earrings playing the starring role.
That black hexagon base supporting the cheerful daisy is a total obsession. And the dangling green leaves?
They add exactly the right dose of earthy, playful movement. Picture this scene: golden sunshine, live music, and these beauties swinging along with every dance beat.
How to Make This: Begin by conditioning black, white, yellow, and green polymer clay. Roll the black clay flat and slice out two hexagon forms. Fashion the petals by molding tiny bits of white clay. Adhere the petals around a small ball of yellow clay on the hexagon base. Cure the clay following the package directions. After everything has cooled, fasten jump rings to the bottom of the hexagon. Measure and snip two lengths of jewelry chain, each about 1 inch long. Sculpt the green clay into delicate leaf forms. Link jump rings to both the chain segments and the leaves. Connect the leaf chains to the hexagon bases. Finish by attaching earring hooks to the top of each hexagon.
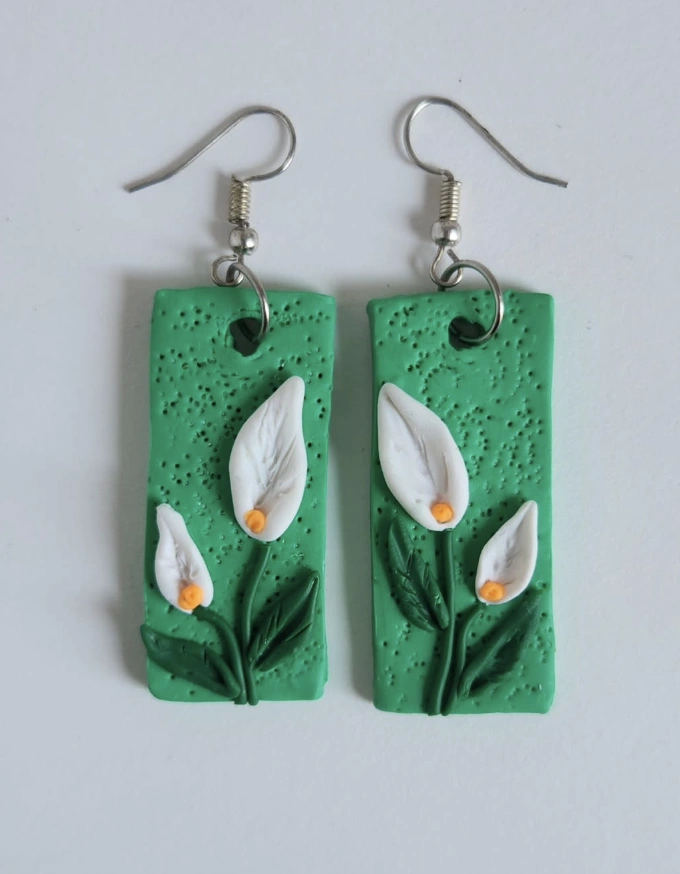
Textured Green Clay Earrings with Lily Accents
Credit: @clazybyms
Skip past those flat, single-shade clay designs. A richly textured green surface genuinely raises the bar here.
Crisp white lily accents then step in, lending a refined, nearly botanical elegance. A quick search for polymer clay earring ideas online reveals that most creations simply miss this level of intricate artistry. This feels like a wonderfully modern interpretation, doesn’t it?
How to Make This: Condition a block of green polymer clay as your starting point. Roll the green clay out into an even slab. With a cookie cutter, stamp out neat rectangle shapes for the bases. Imprint texture onto the surface using a needle tool or a stiff brush. Prepare white and green clay to craft the lily petals, little stems, and leaves. Carefully position the white petals onto the green stems. Place a tiny speck of yellow clay at the base of each flower. Artfully arrange the sculpted calla lilies and leaves across the textured green base. Cure the pieces according to the clay brand’s guidelines. Once fully cool, pierce a small hole for the jump rings. Connect jump rings and finish with your choice of earring hooks.
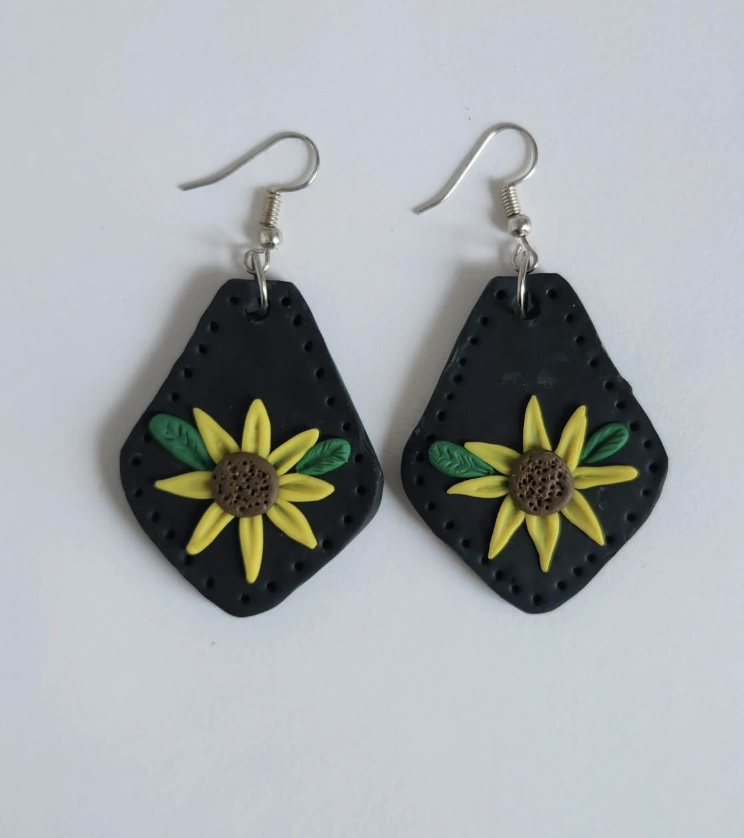
Diamond Black Clay Earrings with 3D Sunflower Detail
Credit: @clazybyms
These earrings occupy a truly distinct lane. The matte black clay edged with those tiny dotted details offers a wonderfully cool touch.
That miniature sunflower is shockingly intricate for something built by hand; the cocoa-toned center and sunny yellow petals practically leap off the shadowy background. These definitely belong in the charming, quirky category of tiny polymer clay crafts that broadcast a playful personality.
How to Make This: Knead black polymer clay until it reaches a soft, pliable state. Flatten the black clay out to roughly 1/8 inch thickness. Slice diamond shapes to form the earring foundations. Work the yellow clay until soft and sculpt a series of tiny petals. Circle the petals together to build the sunflower shape. Press a small, flat brown clay disk right into the middle of the yellow petals. Form petite green leaves from conditioned clay. Thoughtfully place the leaves to finalize the flowery design. Use a toothpick to gently poke a series of dots along the diamond’s border. Harden the earrings by baking per the manufacturer’s directions.
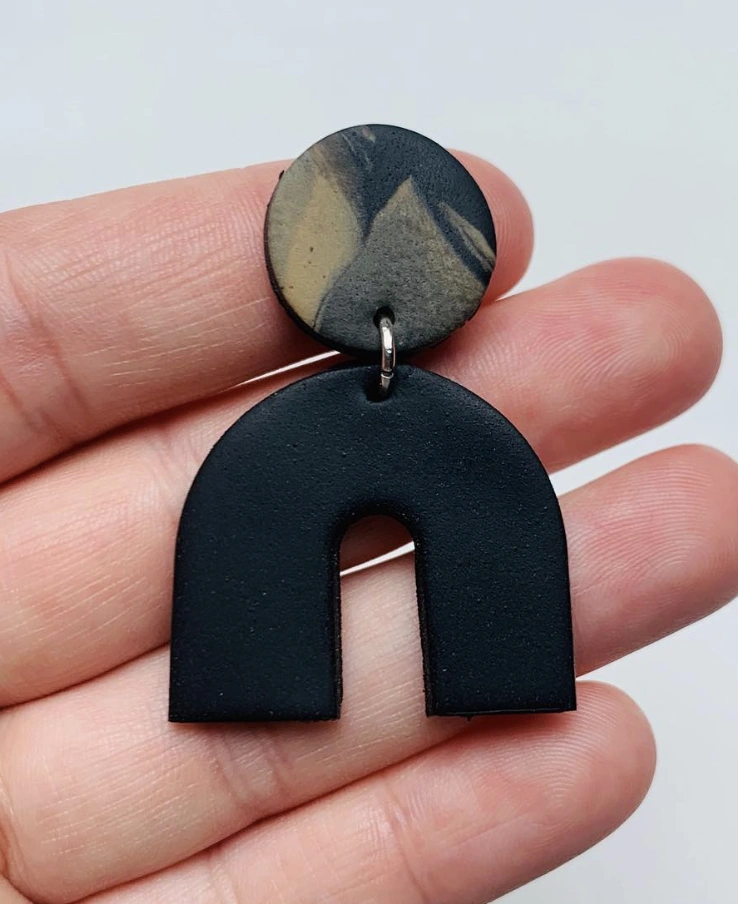
Minimalist Black Arch with Neutral Swirl Fimo Earrings
Credit: @claytec_boutique
These are incredibly chic Fimo earrings with a marbled upper section paired against a matte black arch. Anyone who loves clean silhouettes would absolutely adore wearing these. They are compact yet deliver a powerful visual punch and unmistakably radiate an artsy sensibility.
How to Make This: Knead black polymer clay along with a marbled clay blend until smooth. Roll both clay colors out to approximately ¼ inch thickness. Press a tiny circle cutter into the material to shape the top pieces. Gently bend and smooth the black clay into elegant arcs. Harden the clay in the oven based on what the package says. After the pieces have cooled, drill a minute hole at the base of the circle and the peak of the black arch. Link a jump ring between the arc and the circle. Complete the earring by attaching the hook.
Powder Blue Clay Earrings with Retro Floral Pattern
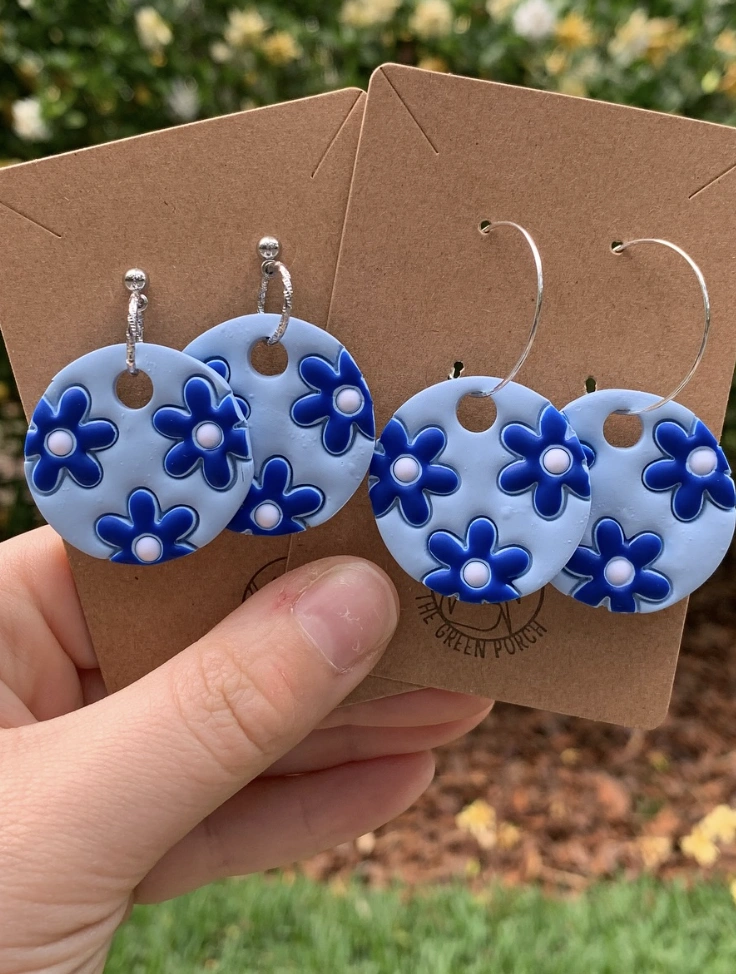
Credit: @thegreenporch
How delightfully groovy do these look? They channel pure 70s energy in the best possible way.
The powdery blue canvas hosting that navy floral pattern is simply perfection. Pair these with a floaty vintage sundress or even a stark white t-shirt and watch the ensemble spring to life.
I have a deep love for these singular, spirited cute clay earrings. They deliver the ultimate dose of flower power to any look you can dream up.
How to Make This: Start by softening the light blue polymer clay. Roll the conditioned blue clay out to a moderate, even thickness. Deploy a circular cutter to stamp out the round shapes for the earrings. Condition dark blue and white clay separately. Form little flower motifs using the dark blue material. Push a tiny dot of white clay into the core of every dark blue blossom. Position the floral patterns across the pale blue surface. Pierce a hole toward the top for the hardware. Bake the earrings based on the maker’s recommendations. After cooling fully, secure jump rings and your chosen earring hoops.
Nude Angled Drop Earrings with Grooved Texture
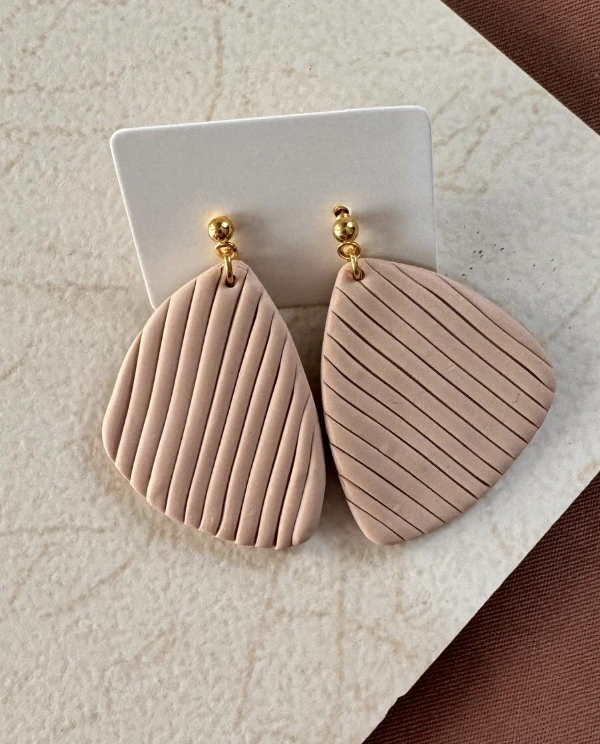
Credit: @olivka_artworks
These nude, angled drop earrings serve as the quintessential brunch accessory, especially when your style goal is subtle, understated polish. Visualize them hanging beside an oversized linen button-down and high-waisted denim.
The grooved texture is what sets them apart, pushing them far beyond ordinary jewelry. Sometimes the most surprising pieces of polymer clay jewelry manage to land the biggest visual impact. Utterly simple, yet impossible to forget.
How to Make This: Condition a block of pale pink polymer clay thoroughly. Shape the clay into a log and slice it into two matching halves. Sculpt each portion into a tapered teardrop form and press it flat. Use a carving tool to etch parallel grooves across the entire surface. Bake the pieces following the directions on the packaging. Allow them to cool down entirely. Drill or pierce a small hole at the narrow top of each pendant. Secure gold earring bails and jump rings into place. String a gold bead onto a jump ring and link it to the earring hook. Your custom, ultra-stylish earrings are ready to debut.
Funky Blue Flower Drop Ceramic Earrings
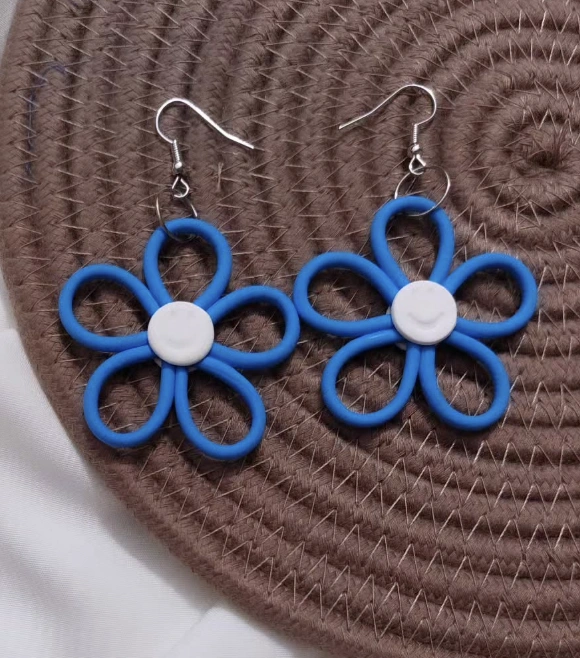
Credit: @lenora.handmade
Plenty of floral earrings lean into a super fragile, dainty aesthetic, but this pair takes a completely different path. These ceramic earrings carry a nostalgic retro spirit while staying firmly rooted in the present.
That striking blue hue radiates energy, and the crisp white core punches up the contrast brilliantly. They deliver infinitely more personality than those ubiquitous basic studs everyone seems to own.
How to Make This: Gather some blue and white polymer clay for this project. Work the blue clay into a long, slender snake shape. Divide that snake evenly into five identical segments. Sculpt each segment into a petal shape, aiming for a fluid teardrop look. Lay the petals out in a circular formation. Roll a tiny sphere of white clay and press it directly into the flower’s center. Bake those little creations based on the clay manufacturer’s guidelines. Once they are totally cool, pierce a hole at the top using a needle. Fasten your earring hooks through the holes with jump rings. Step out and flaunt your spectacular new floral earrings.
Burnt Orange and Marbled White Geometric Air Dry Clay Earrings
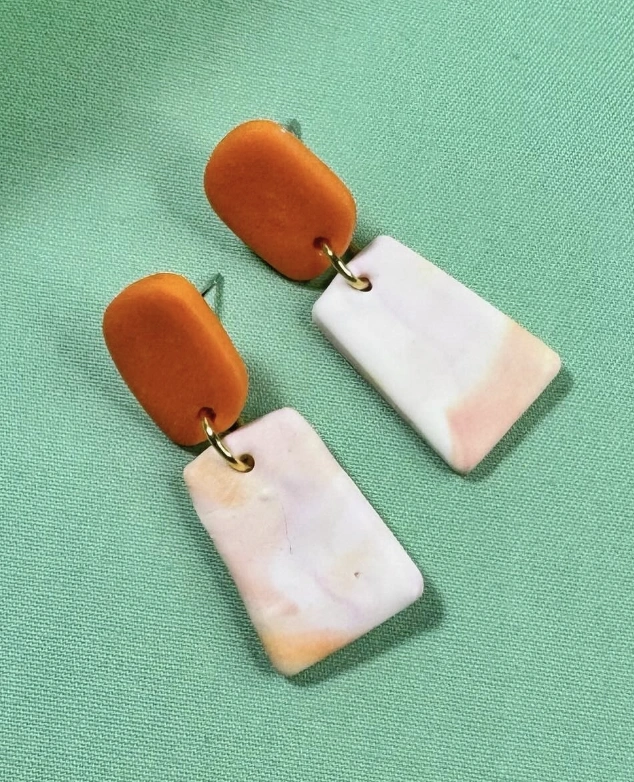
Credit: @olivka_artworks
Throw out any preconceived notions you hold about clay jewelry. These are not your grandmother’s craft projects and the burnt orange topper, featuring a contemporary rounded rectangle silhouette, is a stroke of genius.
The marbled white clay dangle is the feature that truly sends these air dry clay earrings into another stratosphere. Examine the delicate veining, those whispers of blush pink and soft apricot, which impart a luxurious, almost semi-precious stone aesthetic. Exceptionally cool.
How to Make This: Mix peach and white polymer clay together as the first step. Roll both colors out on a flat work surface into separate sheets. Twist the two clay colors together loosely to generate the marbled effect. Compress the twisted blend with a roller to spread the marbling. Slice out rectangles for the dangles and softly curved shapes for the posts. Harden the clay in the oven as directed on the package. Allow everything to cool fully, then drill a tiny hole into each separate piece. Connect the clay components together using small gold jump rings. Secure an earring post onto the back of the rounded top piece.
Geometric Sage and White Polymer Clay Earrings
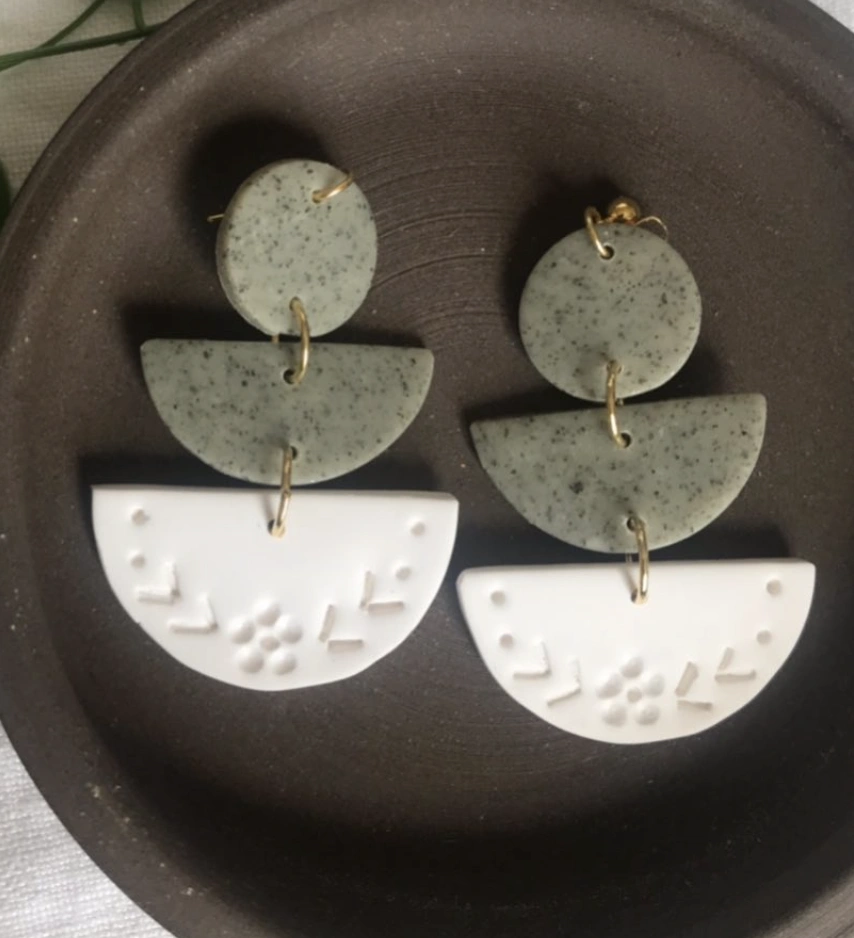
Credit: @nativemakes
The absolute perfect pair of earrings for a weekend brunch date with friends has just been discovered. These geometric clay earrings are the real deal.
Imagine rocking these alongside a flowy white dress topped with a cute denim jacket. The sage and white palette feels incredibly fresh and seasonally perfect, broadcasting major laidback chic energy.
I am genuinely excited to wear these out in the wild. What’s the verdict?
How to Make This: Work the sage green clay until smooth, then roll it into a flat sheet. Punch out two matching circles using a round cutter. Shape a pair of half circles from the white clay. Imprint the surfaces with a geometric patterned stamp. Cure the clay shapes based on the manufacturer’s baking directions. Cool them, then carefully drill a hole into each form. Link the shapes together with golden jump rings. Secure the earring findings onto the tops of the assembled pieces using more golden jump rings. Check that the backs feel secure before wearing. Bask in the confidence of your polished style.
Honeycomb Top and Bee Dangle Terracotta Earrings
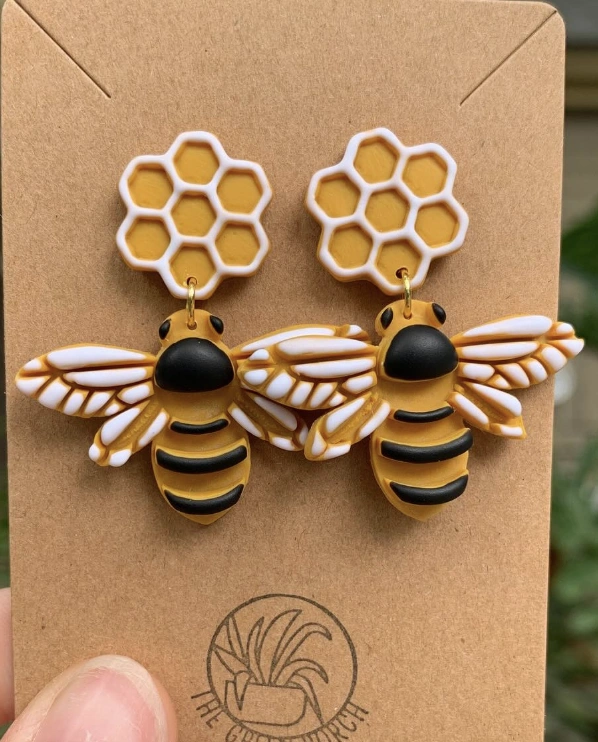
Credit: @thegreenporch
There are days when all you need is that singular magical piece to tie a whole look together. For busy moms wanting something quick and effortless, this is the answer.
Say goodbye to the stress of endlessly coordinating hues or hunting for the ideal necklace. These utterly charming honeycomb and bee terracotta earrings wipe that problem away. They offer a shot of instant cuteness and remain lightweight enough to carry you comfortably from morning coffee to evening wind-down.
How to Make This: Kick things off by conditioning a block of yellow polymer clay. Split the clay, forming small yellow hexagons to assemble into a honeycomb pattern. Shape a bigger portion of the yellow clay into two plump bee bodies. Add black stripes using thinly rolled ropes of black clay and bake. Roll a couple of tiny black clay balls for heads. Bake again for roughly 15 minutes at a low temperature setting. Allow everything to cool entirely before touching. With care, bond the honeycomb and bee pieces together using a strong craft glue. Attach earring posts directly onto the top edge of the honeycomb.
Slate Blue Air Dry Clay Earrings with White Botanical Detail
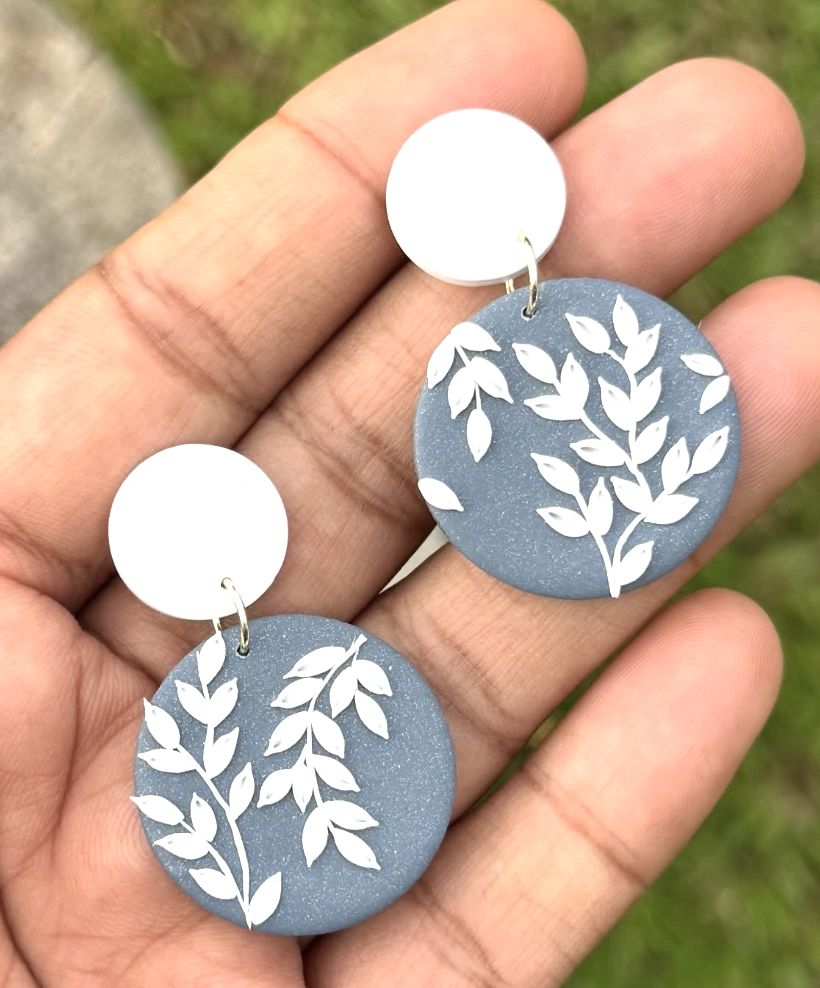
Credit: @clay_blings
A lot of handmade earrings rely on vivid colors or intricate, busy patterns. This pair offers something entirely different: a soft whisper of sophistication.
The muted slate blue forms a serene stage for the faint white botanical sprig. These transcend the typical air dry clay earring category; the matte surface and pared-back design layer in a polished grace, making them spot-on for daily rotation. They feel airy, refined, and manage to stand apart in a quiet way.
How to Make This: Condition grey polymer clay until it feels soft and pliable. Roll the clay out to reach your ideal thickness. Guide a circular cutter through the clay to generate two symmetrical shapes. Sculpt delicate white clay leaf sprigs separately and bake them. Use super glue to permanently adhere the leaves onto the grey circles. Employ a small round cutter to stamp out the white circle posts. Cure both of those parts in the oven and glue them onto the main assembly. Attach jump rings and the earring hooks. Bake the final combination once more and let everything cool completely.
Whimsical Dangle Earrings: Striped & Slime-Dripping Clay Discs
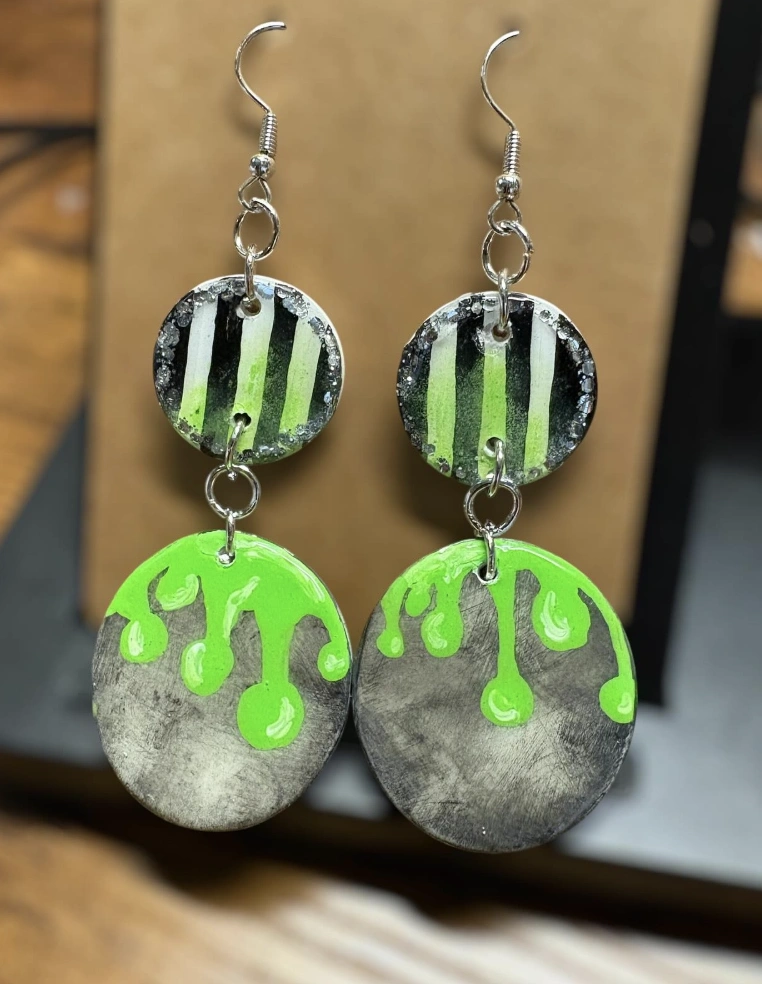
Credit: @mizzfrenchy
These earrings without question operate as bold statement pieces. The most brilliant feature?
The stark contrast delivered by the top disc. It rocks those bold black and white lines alongside a sparkling glittery edge.
Your gaze then tumbles downward to encounter the vivid green slime effect. They are wonderfully quirky. It becomes obvious how stepping into the world of tiny craft undertakings like this proves so captivating.
How to Make This: Source some wooden discs from any local craft supply shop. Paint precise stripes with a fine liner brush using black and neon green hues separated by a shimmery silver line. Decorate the surrounding areas with splatters of neon paint layered over a grey and black base tone. Apply resin on the lower layer to create that gooey, dripping slime illusion. Connect a silver chain and an earring hook onto the end. Sprinkle some glitter across the top disc to amplify the spooky, playful effect. Let every painted and resined component dry fully before moving on to assembly.
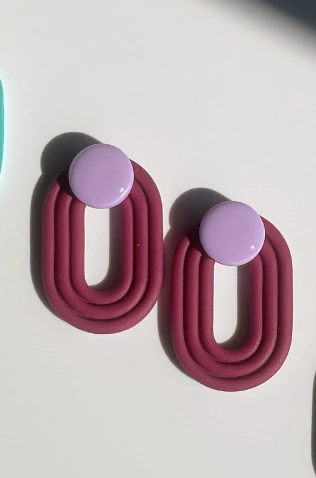
Burgundy Arches: Minimalist Clay Earrings with Lilac Studs
Credit: @funky_preja
Right now, the focus is intensely on handmade artistry and singular, one-of-a-kind accessory pieces. These earrings bottle that exact mood, with the deep burgundy clay curving into an unexpected architectural silhouette.
A petite lilac stud introduces a dash of spirited contrast. These handmade terracotta earrings will quickly become a wardrobe constant. They present an understated method for feeling completely put together without any visible strain.
How to Make This: Condition and flatten your clay into a smooth, uniform slab. Create a long sausage shape from the clay and flatten it with acrylic tools. Curve it tenderly into an elongated arch form. Duplicate this process two more times so you have three distinct arches. Bake them for the period specified by the clay type, then carefully layer additional clay around the joins to fuse the rings together. Attach the post using a matching adhesive. Bake the assembled earrings once more and they are ready to wear.
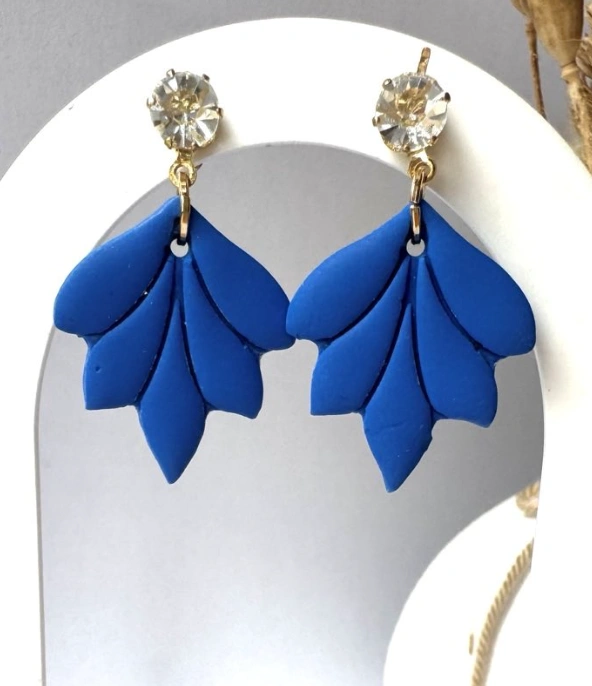
Royal Blue Fan Ceramic Earrings with Rhinestone Detail
Credit: @aureaclay_design
The saturation of that royal blue is just breathtaking. These ceramic earrings sit perfectly at the sweet spot of being interesting without veering into overly bold territory for a professional setting.
Picture these swinging next to a sleek black dress or a casual denim jacket. A sparkly rhinestone adds the hint of shine you want, while the clay keeps the whole vibe grounded and earthy.
How to Make This: Begin with a portion of blue polymer clay. Roll it out and slice the distinctive fan design freehand or with a template. Lift the outer edges of the fan upward to introduce a gentle, dimensional curve. Place them in the oven to bake at a low temperature. Apply resin to secure a crystal rhinestone right at the top edge. Grab your pliers to link a small hanging component to the crystal. They’re ready to step out with your most special outfit.
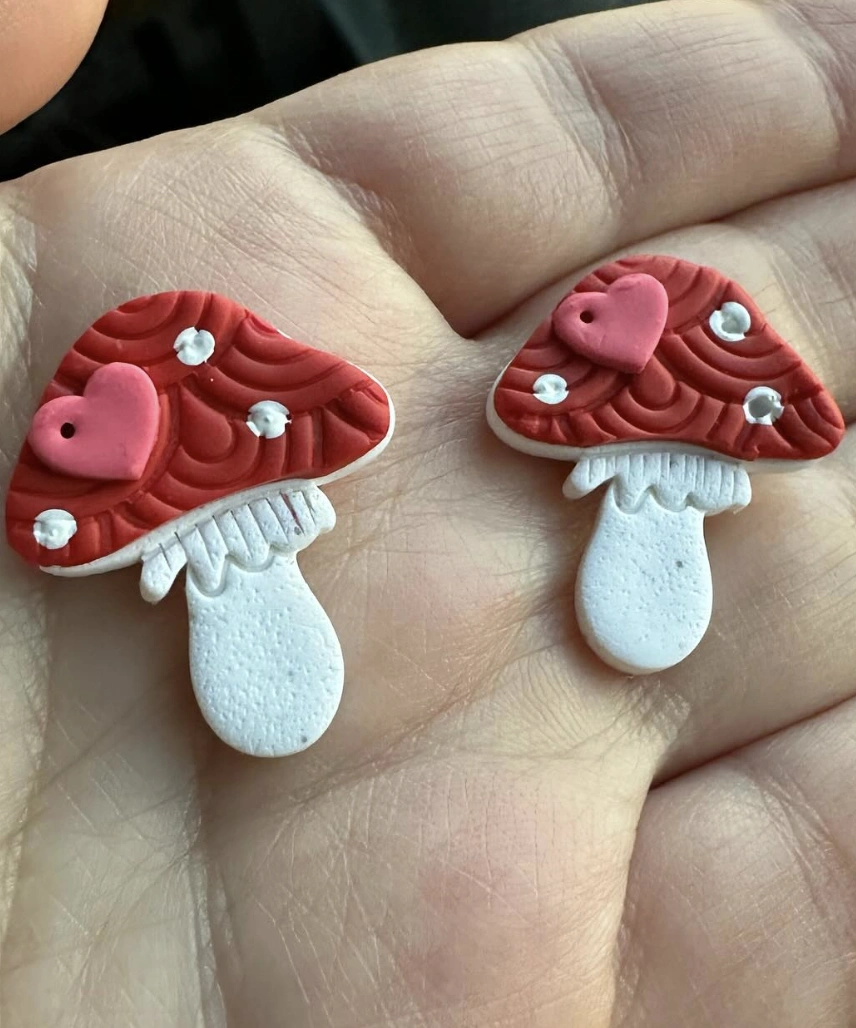
Cottagecore Aesthetic: Mushroom Shaped Fimo Earrings with Hearts
Credit: @clayessentialsbykim
These are unapologetically, impossibly cute. The mushroom silhouette taps directly into the entire cottagecore movement that is dominating right now.
This specific pair of Fimo earrings incorporates an adorable heart detail, which softens the whimsical design beautifully. They represent a lovely method for injecting a little fairy-tale charm into your daily rotation. Be aware, these will definitely pull focus.
How to Make This: Soften red polymer clay and sculpt a rounded mushroom cap. Use a needle tool to tap tiny dotted indentations across the curved top. Soften white clay and roll a small, stout log for the stem. Press the white log against the underside of the mushroom cap to create a secure bond. Shape a tiny red heart and attach it to the cap. Form jump rings to string the pieces onto earring findings. Use a fine brush to dot on small painted details for extra visual texture. Bake based on the package instructions printed on the clay. Let the earrings fully cool before putting them on.
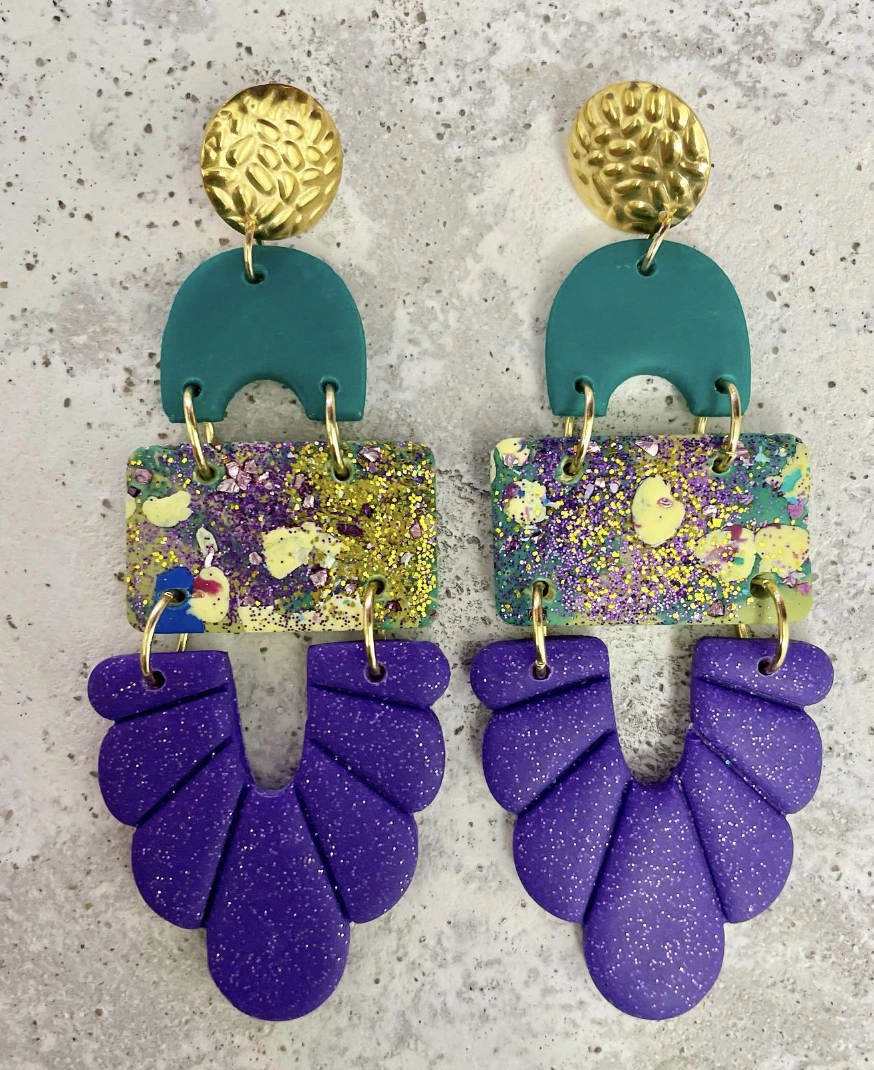
Teal, Gold, & Purple Dangle Clay Earrings
Credit: @melange___atelier
The textured gold at the very top is truly the star of the show. These earrings are undeniable showstoppers.
Looking into various polymer clay earring ideas to maybe craft a personal version is tempting, but these right here are the ultimate goal. They feel like a miniature celebration dangling right from your ears.
How to Make This: Condition three separate blocks of polymer clay: teal, a speckled mixed media blend, and purple. Roll every color out to roughly 1/8 inch of thickness. Grab cookie cutters or a sharp craft blade to chop out your chosen shapes: half-moons, rectangles, and petal-like forms. Bake the clay pieces based on the manufacturer’s guidelines, then let them cool down entirely. Drill tiny holes into the tops and bottoms of every hardened clay component. Link jump rings through the holes to connect the clay shapes in your preferred cascading sequence. Fix ear studs onto the highest piece using a strong jewelry-grade adhesive. Test the durability carefully before wearing. Apply a coat of resin for a bonus glossy finish. Clean the jewelry delicately with a soft cloth as needed.
Swirled Clay Doughnut Funky Earrings
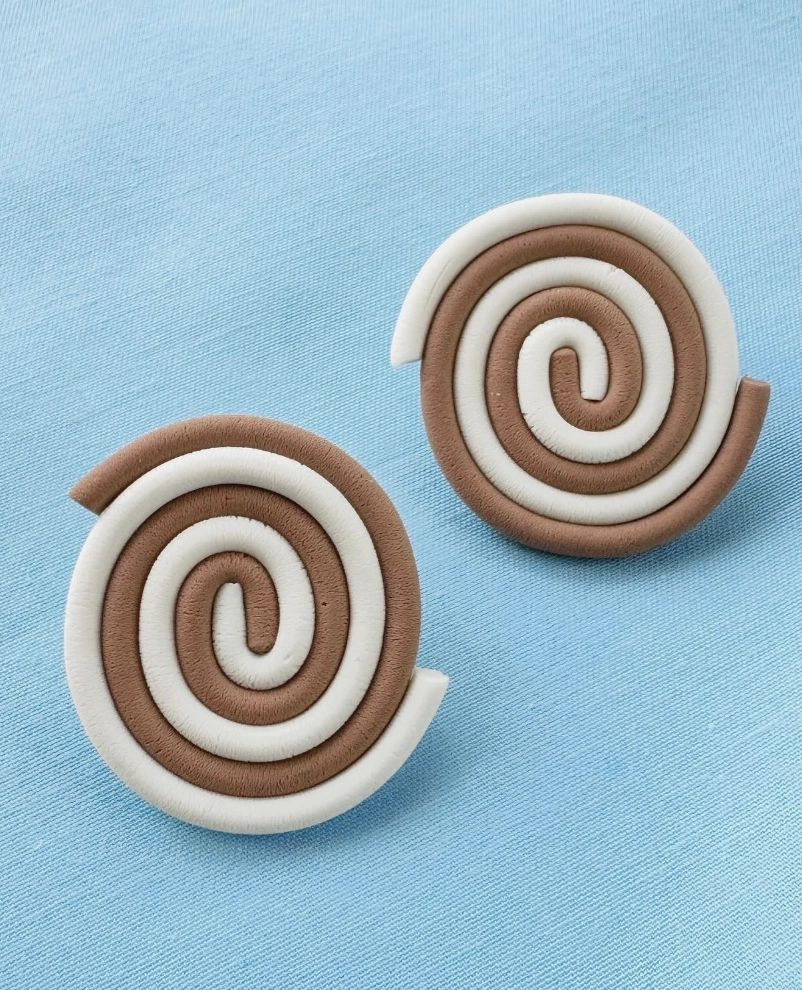
Credit: @olivka_artworks
These funky earrings are the ultimate accessory for someone who never shies away from a playful vibe. Think of a creative artist, a boundary-pushing designer, or that effortlessly cool vintage boutique owner you follow.
They stand firmly as an “it girl” statement accessory. Throw these on to inject a spark of whimsy into a neutral outfit, or whip them out when you want to layer some unexpected charm over an already daring ensemble.
How to Make This: Soften matching amounts of white and brown polymer clay. Roll both colors out into lengthy, skinny ropes, roughly 6 inches in length. Twist the white and brown ropes together loosely so they intertwine. Spiral the twisted rope into a flat coil shape, pressing down gently to make it adhere. Carefully slice away two even segments from the spiral to serve as the earrings. Softly sculpt and smooth the freshly cut edges with your fingertips. Bake following the specifications on the clay wrapper. After the pieces have cooled, glue earring posts onto the back using super glue or liquid clay, baking once more very briefly to strengthen the connection. Sand the pieces lightly to erase any rough bumps. Let the adhesive fully cure before you wear them.
Mosaic Round Polymer Clay Jewellery with Natural Wood Studs
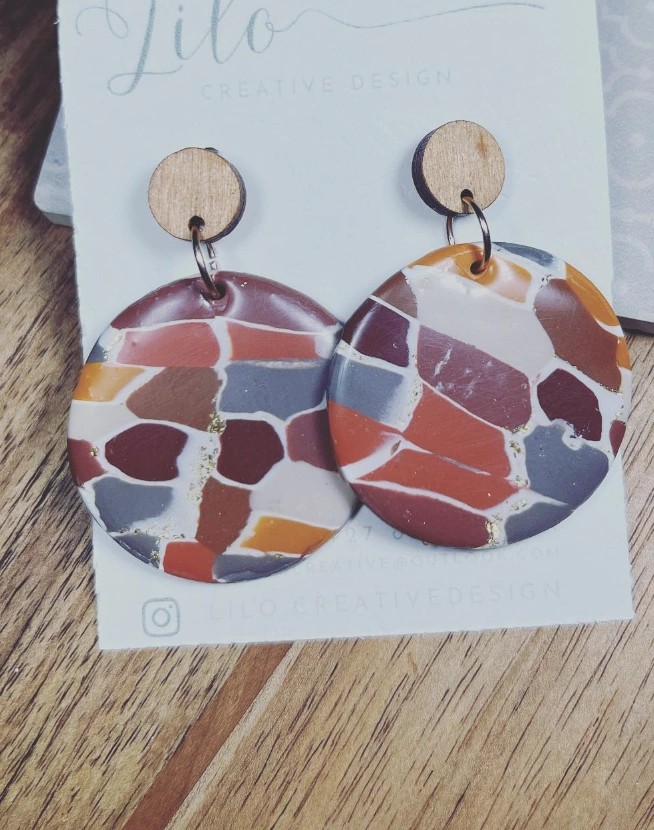
Credit: @lilo
The earthen, organic shades woven through these polymer clay earrings are absolutely perfect for autumn. And those tiny gold specks?
Such an unexpected, high-end touch. The slightly mismatched pattern on each individual earring transforms them into a miniature work of art. These would look incredible propped against a cozy chocolate brown sweater.
How to Make This: Condition multiple small portions of polymer clay in diverse earthy tones. Roll out every color into a thin sheet on a non-stick surface. Wield a blade to cut the clay into small, jagged, irregular shards, mimicking mosaic tiles. Arrange the mosaic bits onto a larger clay sheet, pressing lightly so they grab hold. Use a circle cutter to stamp out the final earring silhouette. Cure the clay disc in the oven according to the brand’s guidelines. Once baked and cooled, sand the exterior softly until it feels silky. Drill a small hole toward the top of each disc. Loop a jump ring through and attach your earring hook to wrap things up. Lock the findings with a dab of clear jewelry sealant if you want extra staying power.
Statement Clay Earrings: Botanical Print Hoops
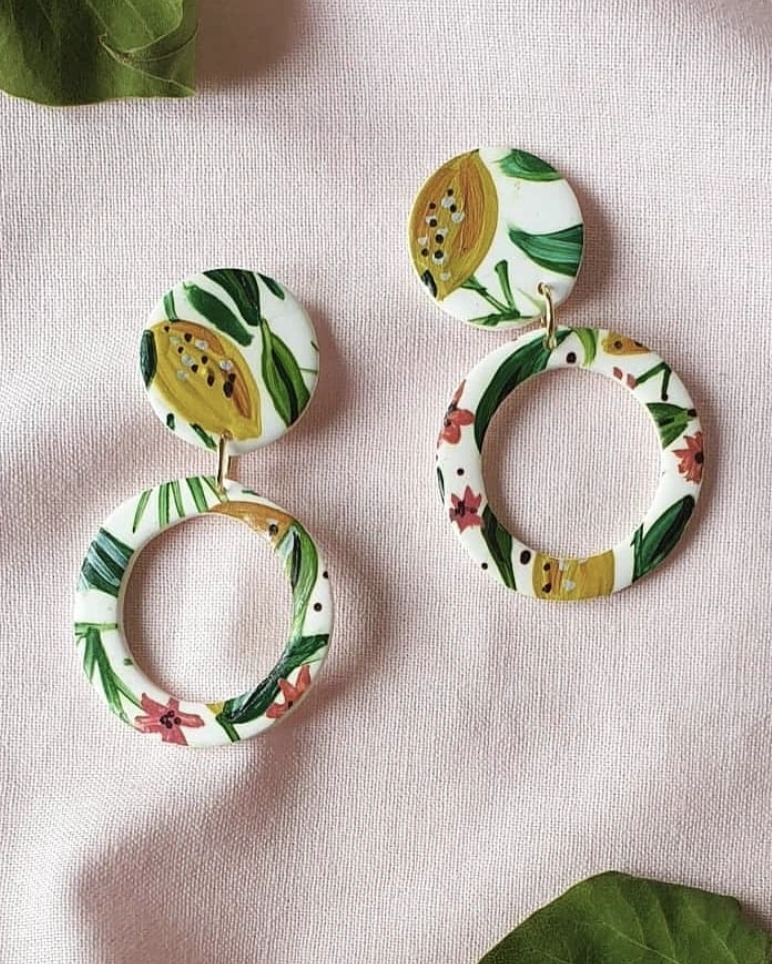
Credit: @clay_craze
Envision this scene: a lazy Saturday morning, you are grabbing coffee with your crew before wandering through the farmer’s market. You want the outfit to feel cute, but zero part of you wants to labor over getting ready.
That’s when you reach for a basic white tee and your favorite jeans, but then pow, you clip on these statement clay earrings. They deliver that exact splash of color and personality with practically zero measurable effort. Sold.
How to Make This: Roll white polymer clay out to a thickness hovering around 1/8 inch. Guide a circular cutter through the clay to stamp out the earring surfaces and a larger circle for the hoop structure. Harden the clay circles in the oven according to the manufacturer’s guidelines, then let them cool. Sketch your botanical pattern onto paper first as a reference guide. Using acrylic paints or fine-tipped paint pens, render your leafy patterns across the clay circles. Let the paint dry completely without rushing. Protect the artwork by sealing it with a clear acrylic varnish or a thin coat of resin. Drill a tiny hole in the painted circles. Fasten jump rings to attach the round painted piece to the bigger hoop. Connect the earring backs onto the circles to finish the build. Store the earrings flat in a dedicated jewelry box.
Botanical Print Clay Earrings with Gold Accent Rings
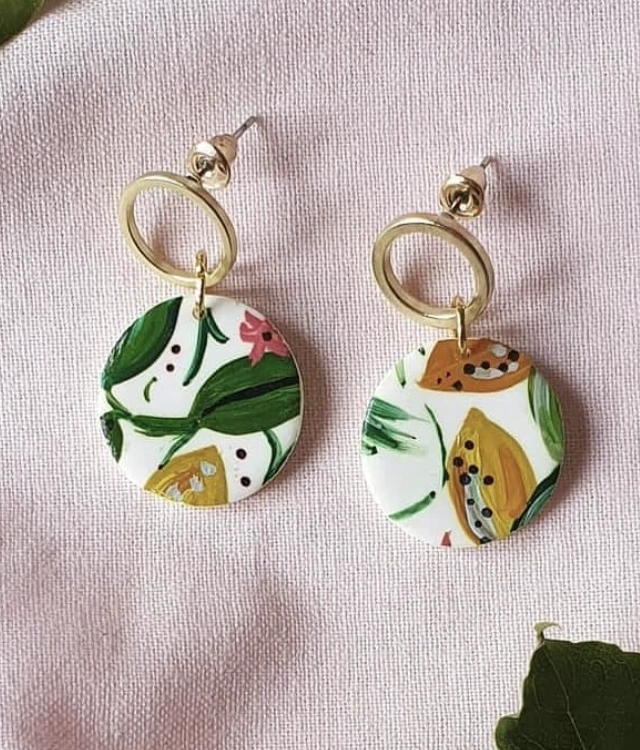
Credit: @clay_craze
The botanical motif is wonderfully distinct, and one earring even features a tiny papaya design. The featherlight feel is also immediately noticeable; you can just tell they won’t weigh your lobes down.
If adding a burst of color and a dose of character to a simple look is the goal, these cute clay earrings are unmistakably your speed. Picking up a pair feels like a personal necessity.
How to Make This: Condition and roll out white polymer clay to a delicate 2mm thickness. Utilize circle cutters to punch out two matching circles for each earring. Bake the clay circles based on the clay’s printed guidance and allow them to cool. Sand them softly to buff away any small flaws and wipe clean with a damp cloth. With ultra-fine paint brushes and acrylic paint, illustrate cross-sections of citrus fruit. Add delicate highlights and soft shadow lines using fine-tip pens. Allow the paint to dry fully, then lock in the design with a layer of clear gloss varnish. Drill a tiny hole close to the upper edge of each circle. Open a jump ring to link the earring onto a small gold hoop. Affix the earring hooks, double checking that they are oriented the right direction. Squeeze the jump rings tightly to ensure they are firmly sealed.
Diamond-Shaped Clay Earrings with Tassel Detail

Credit: @thecraftdaddies
You have probably noticed the trendy polymer clay earrings spreading absolutely everywhere. This pair manages to break the mold completely.
The diamond profile immediately distinguishes them from the sea of standard circles. That subtle marbled green touch?
It adds a flair that feels genuinely hard to track down. Plus, the uncomplicated tassels introduce an unexpected boho twist. For anyone hunting for funky earrings that broadcast their true personality, this is the match.
How to Make This: Condition white polymer clay and roll it into a flat slab. Work a tiny amount of turquoise clay into the white, gently swirling to get a soft marbled effect. Cut out a pair of diamond forms using a paper template and a craft knife. Bake the clay per the manufacturer’s directions. After cooling, drill a tiny hole through the bottom tip of each diamond. Trim twelve strands of cotton cord, measuring each to a length of four inches. Fold the bundle of strands in half and push the folded loop through the drilled hole. Secure the cords into a firm knot positioned snugly against the clay. Snip the dangling tassel ends evenly with a pair of sharp scissors. Attach your earring hooks through jump rings at the top.
Funky Orange Disc & White Flower Polymer Clay Earrings
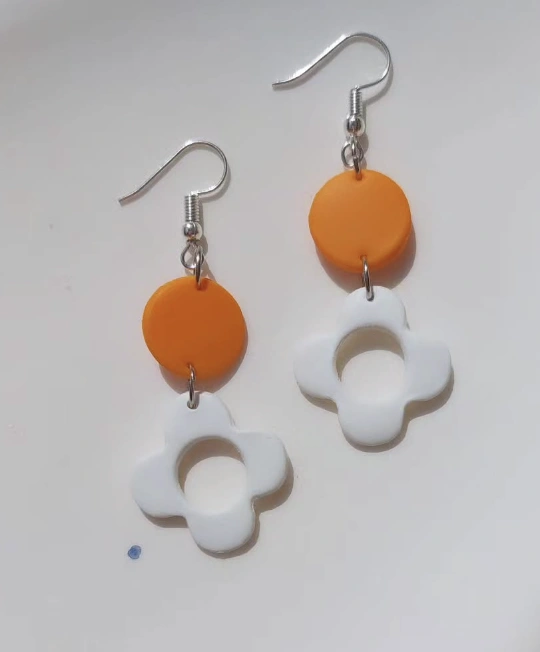
Credit: @lenora.handmade
The pairing of vibrant orange and crisp white creates such an enticing mood. Visualizing these with a flowy white dress or just a simple tee and denim to pop a bright focal point comes easily.
Honestly, these could single-handedly lift any outfit. The very best part is how incredibly lightweight they feel, even though they are polymer clay jewelry, allowing you to sport them all day without that familiar ear fatigue settling in. What’s your take?
How to Make This: Roll orange polymer clay out into a smooth, flat sheet. Press a small circle cookie cutter or trace a template to create four circles. Roll out the white polymer clay and use a flower-shaped cutter to stamp out four matching blossoms. Bake all of the clay components based on the directions listed on the packaging. After the pieces are totally cool, gently bore small holes near the top of every shape. Link each orange circle to a white flower using a jump ring. Affix the earring hook directly to the top circle’s jump ring. Duplicate the entire process for the second earring.
Whimsical Reindeer Polymer Clay Dangle Earrings
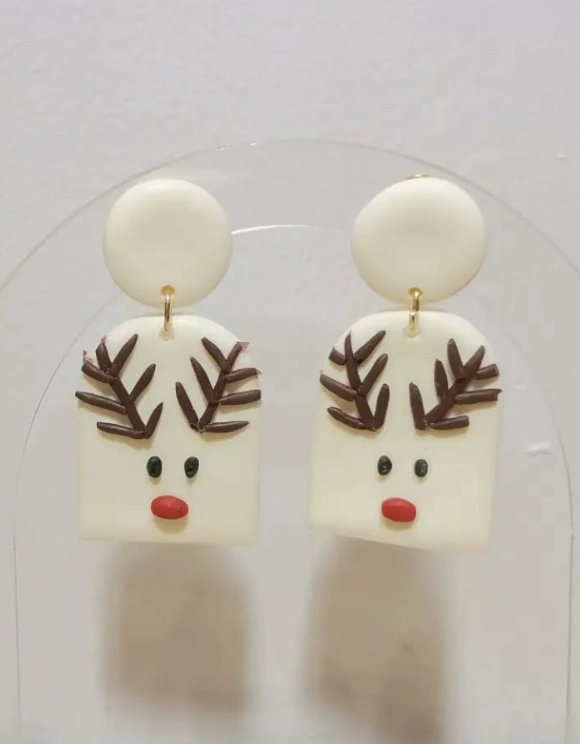
Credit: @salt.sundesigns
These reindeer earrings, meticulously shaped from polymer clay, plug right into the playful charm that is totally trending. They craft the ideal festive holiday statement without pushing things into tacky territory. If the search for unique, standout pieces is on, loads of fantastic polymer clay earring ideas exist online to jump-start your own creative journey.
How to Make This: Roll white clay out into a chunky circle and compress it with a roller. Roll a flat rectangle, positioning it beneath the white circle. Roll brown clay into skinny logs, then slice small angled pieces. Place those angled pieces onto the rectangle to resemble a set of antlers. Press two little red spheres onto the rectangle to form the nose. Add a pair of tiny dark pieces onto the rectangle to simulate the eyes. Bake the piece in accordance with the instructions, add a connector circle to the top, and link gold loops through. Let the piece cool, then fasten the earring hooks in place.
Cream and Confetti Statement Ceramic Earrings
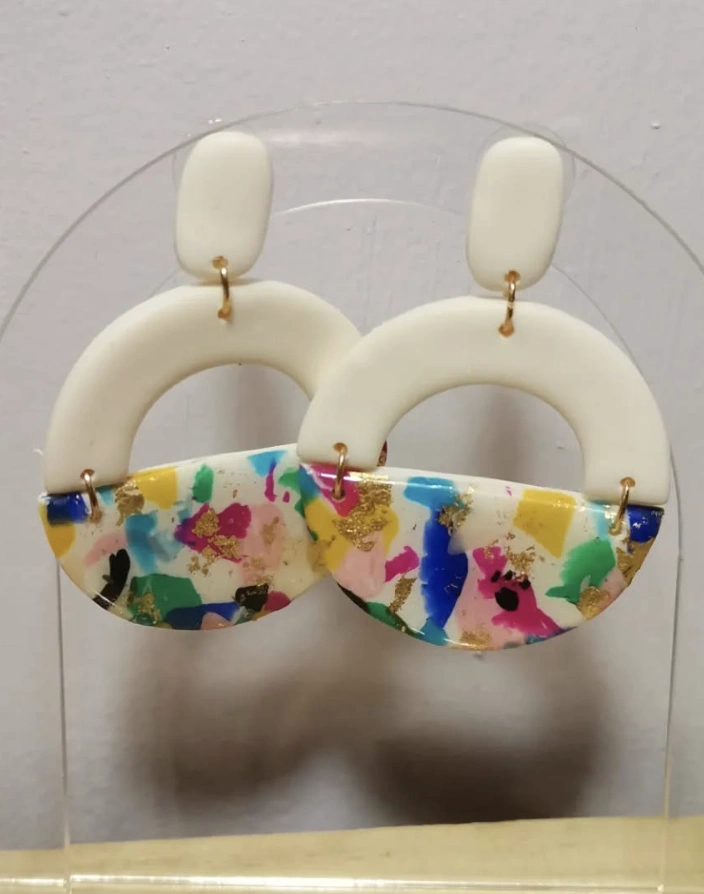
Credit: @salt.sundesigns
Sometimes the work week forces you into recycling the same fundamental uniform on repeat. An easy method I discovered for shaking things up without much fuss is deploying a pair of standout earrings.
These cream and confetti ceramic earrings are playful, airy, and inject a shot of color that never crosses into overwhelming territory. They lift a basic look without demanding hours of strategic planning. A definitive win-win.
How to Make This: Begin by conditioning a block of white polymer clay. Work tiny bits of vibrant, leftover clay scraps into the white base to develop that sprinkly confetti effect. Blend small flakes of gold leaf into the mixture. Roll the confetti-studded clay into a smooth, consistent sheet. Use a semi-circle cutter or template to slice out four matching half-moon shapes. Roll out extra plain white clay and cut it into four compact rectangles. Bake all the prepared clay components. Drill tiny holes at the top of every shape to accommodate the jump rings. Attach a semi-circle to a rectangle for each earring. Secure an earring hook using the jump rings. Repeat the process to complete the matching pair.
Fuchsia and Gold Glitter Clay Earrings
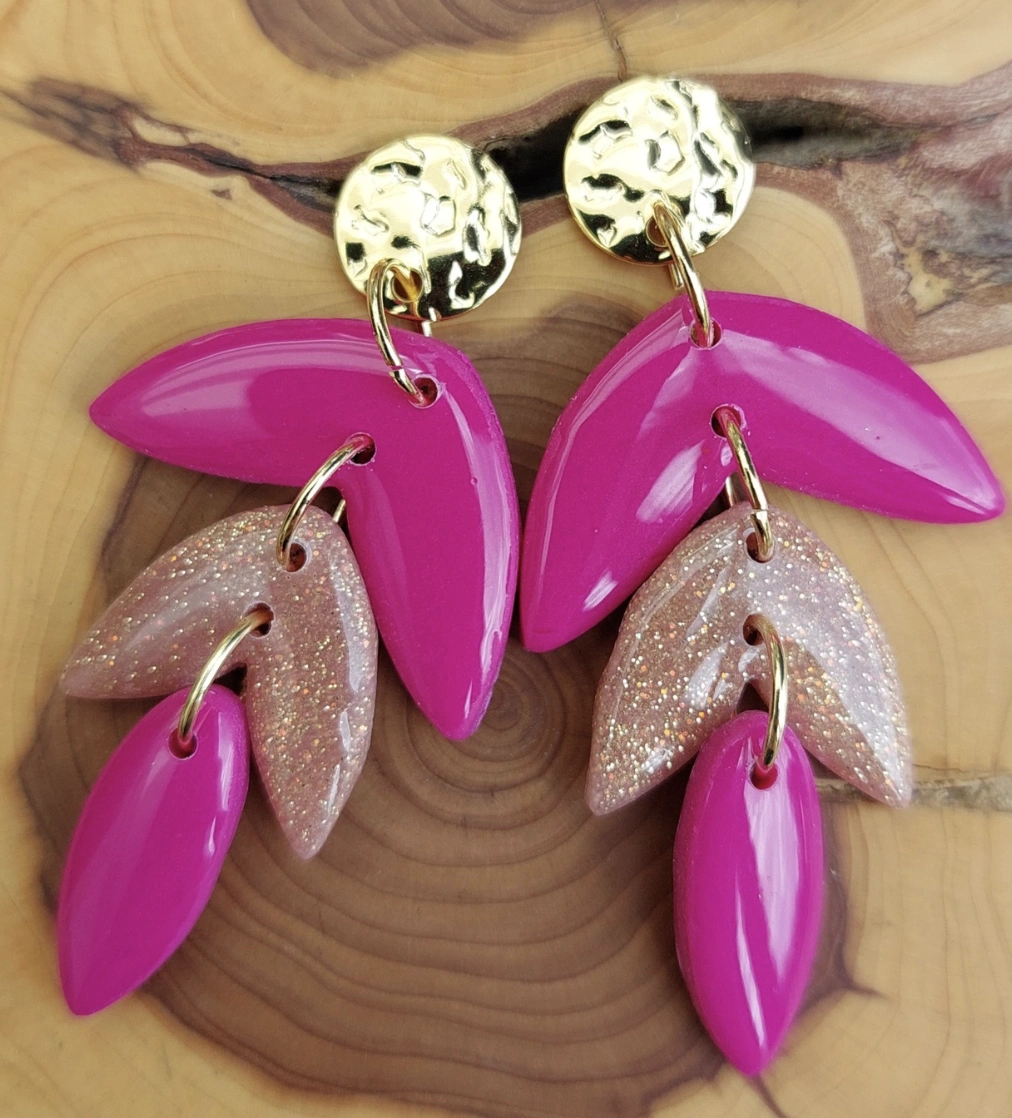
Credit: @les_petits_bazars_de_cris
My immediate first thought upon seeing these concerns weight. So many oversized earrings look stunning in photos, but then they painfully tug on your earlobe the entire day.
These clay earrings look intentionally light and airy. The way the gold metal findings make the fuchsia and glittering gold tones shine is incredibly appealing. These are infinitely more intriguing than your standard run-of-the-mill dangles.
How to Make This: Grab your block of fuchsia polymer clay and flatten it to roughly 1/8 inch thickness. Duplicate the rolling motion with your glittery gold clay sheet. Using a sharp craft blade, slice out the leaf silhouettes. You will want to cut two large fuchsia leaves, two medium gold leaves, and two small fuchsia leaves. Tenderly smooth the jagged edges of every individual leaf form. Bake all the clay pieces following the timing and temperature on the product packaging. Wield your jewelry pliers to pry open a jump ring and link the small fuchsia leaf onto the medium gold leaf. Mirror that action for the other earring. Connect the medium gold assembly to the large fuchsia leaf. Affix your earring hook, and you are fully ready to step out flaunting those head-turning earrings.
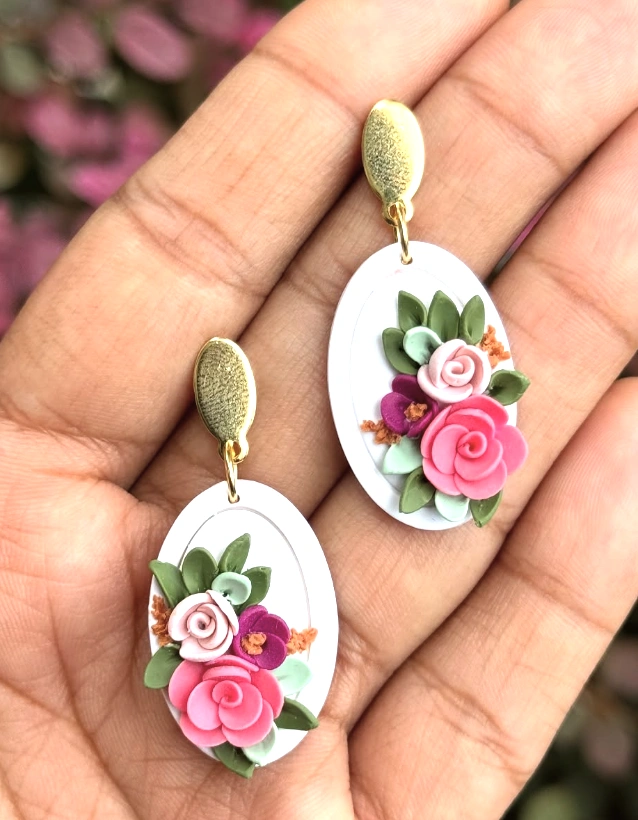
Floral Relief Drop Earrings: White Oval Base with Rose Detail
Credit: @clay_blings
The cottagecore movement remains powerfully alive, and these earrings embody it flawlessly. Here’s the key though: the fragile floral detailing feels shockingly sophisticated when set against that stark white oval backdrop.
The gold-toned hardware contributes precisely the right industrial polish. That they are visibly handmade means the gently organic, slightly imperfect finish practically shouts “artisan.” If flexing those creative muscles sounds tempting, launching into your own tiny clay undertakings might be the next step. These pieces are an investment in personal style and true individuality.
How to Make This: Condition pink, pristine white, deep green, and soft purple polymer clay until each one feels bendable and smooth. Roll out the pink clay and create tiny, layered roses by swirling flattened petal strips. Fashion miniature green leaves, using a clay sculpting tool or a simple toothpick to press realistic vein textures. Prepare pristine white ovals with a rolling pin to act as the foundational backdrop. Organize the pink roses and green leaves across each white base in a layout that pleases the eye. Harden the clay in the oven based on the manufacturer’s parameters, typically around 275F for about half an hour. After everything has cooled, glue gold earring studs onto the reverse side of each floral oval. Hook jump rings through the bottom loop of the studs, connecting them to the baked clay assembly. Brush on a protective sealant if you’d like to safeguard the colors and surface texture. Dot on tiny brown clay sprinkles for an additional tactile element if desired.
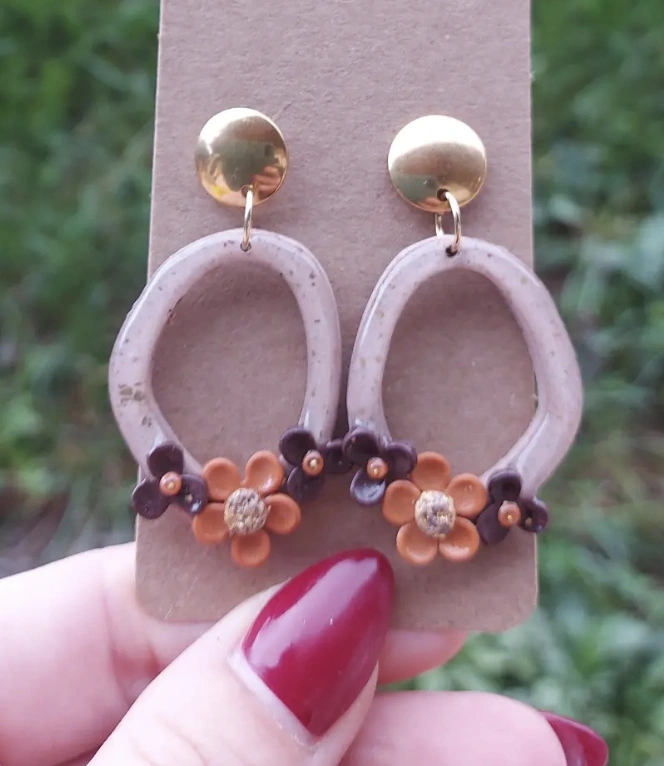
Unique Clay Earrings: Beige Hoops with Brown and Orange Flowers
Credit: @sasastravs
The beige clay body speckled with pieces of gold leaf possesses a totally singular look. Then, the impact hits.
Tiny brown and orange flowers deliver the quintessential autumnal detail. Adding these straight into the online shopping cart feels like the only logical move right now.
Picture how adorable these would look in action. Someone was spotted selling comparable Fimo earrings on a handmade marketplace, but this particular pair is infinitely cuter.
How to Make This: The process begins by blending translucent and beige polymer clay to reach that distinct speckled effect. Seize a tiny pinch of gold leaf flakes and knead them into the mixture to generate those luminous pops. Roll the clay out flat and slice two coordinating donut shapes, freehanding the design is totally fine. Warm the hoops in the oven cautiously according to your clay’s specific rules. While the hoops cool, mold little brown and orange flowers from fresh polymer clay. Bake those miniature flowers separately, following the same temperature rules as before. Using an industrial-strength adhesive, press the baked floral accents onto the base portion of the cooled hoops. Next, glue the gold earring posts directly to the backs of the clay shapes. Give the adhesive a full 24 hours to cure and bond permanently. Slip on your newly fabricated, groovy retro floral earrings.
Final Thoughts
The adventure of diving into the world of air dry clay earrings has been profoundly fulfilling, on a creative level and financially as well. Watching people wear and genuinely adore the designs brings an indescribable amount of joy.
My hope is that this inspires you to explore your own creative spark, and perhaps even launch your personal clay earring journey. Ready to jump in and give it a try?