


Store bought ornaments can be lovely, sure, but they often lack that certain something, a bit of soul maybe.
This season, you can fill your tree with decorations that actually tell a story, pieces made by your own hands.
Diving into handmade holiday cheer is far simpler than it might seem, and the results are pure magic.
If you’re craving a truly easy entry point, DIY felt Christmas ornaments are a wonderful place to begin. The focus here is on DIY Christmas ornaments easy enough for anyone to master, right from the start.
Assorted Macrame and Knitted Christmas Ornaments Set

Credit: @macramelif
Want your tree to radiate cute, festive energy without emptying your wallet? This collection delivers exactly that.
The varied macrame patterns bring a lovely layer of visual texture, and that tiny knitted hat is pure charm. It feels like a thoughtful upgrade from mass produced plastic, and a fresh departure from basic felt christmas ornaments, which can sometimes fall a little flat. All in all, it’s a brilliant choice for cultivating a warm, handmade atmosphere.
How to Make This Craft To form the snowflake, begin by knotting six strands of macrame cord together at their midpoint Next, build the snowflake’s arms by knotting each cord section into small triangular shapes For a wreath, coil the macrame cord into a circular form, then fix it in place with glue Add a small plaid ribbon and a strand of gold tinsel for a touch of refinement Shape the hat by weaving macrame cord around a small, round base Attach a macrame tassel to the snowflake’s base, and trim the ends evenly Embellish the wreath with faux greenery and red berries Secure a small gold thread loop to each ornament for hanging Confirm all knots are tight and uniform for a clean, finished look Let the glue dry completely before you show off your handiwork
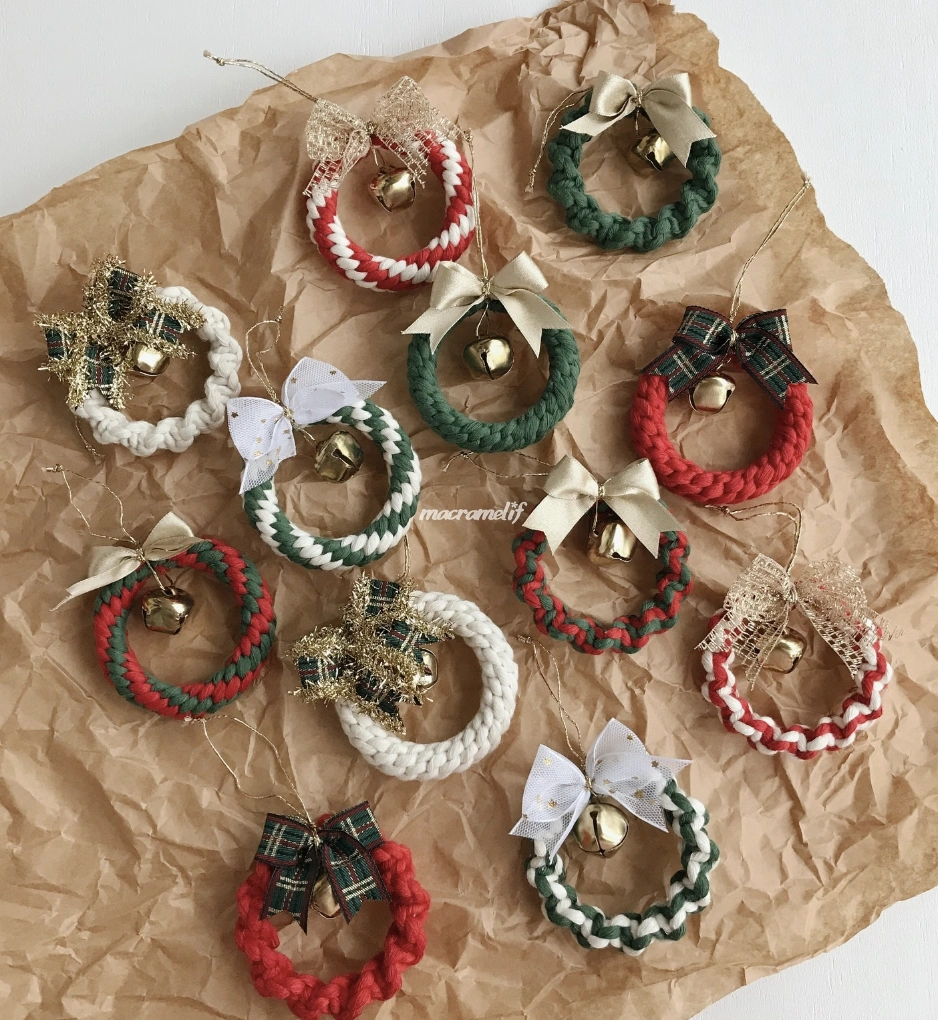
Mini Macrame Wreath Ornaments with Jingle Bells and Festive Bows
Credit: @macramelif
These macrame wreaths might just be the most adorable DIY Christmas crafts ideas around. That little golden jingle bell suspended in the middle is such a flawless detail.
And how delightful is the mix of ribbon styles? Serious inspiration is flowing for making these and scattering them across every branch of your tree. Or, thread them together to create an absolutely charming garland!
How to Make This Craft Gather some colorful, braided rope Red and green are timeless picks, but feel free to experiment Form a small circle with the rope and carefully glue the ends together A hot glue gun is perfect for this Cut small squares from fabric scraps for the ribbons Think plaid, burlap, or even shimmering tulle Fold and tie the fabric scraps into sweet little bows Glue the bows to the top of each wreath Use some thin wire to attach tiny bells to the center of each bow The jingle is a huge part of the fun! Cut short pieces of gold or silver ribbon for hangers Loop the ribbon through the top of the wreath and tie a knot Ensure everything is securely glued down Set them on parchment paper until fully dry Spread these beauties all over your tree!
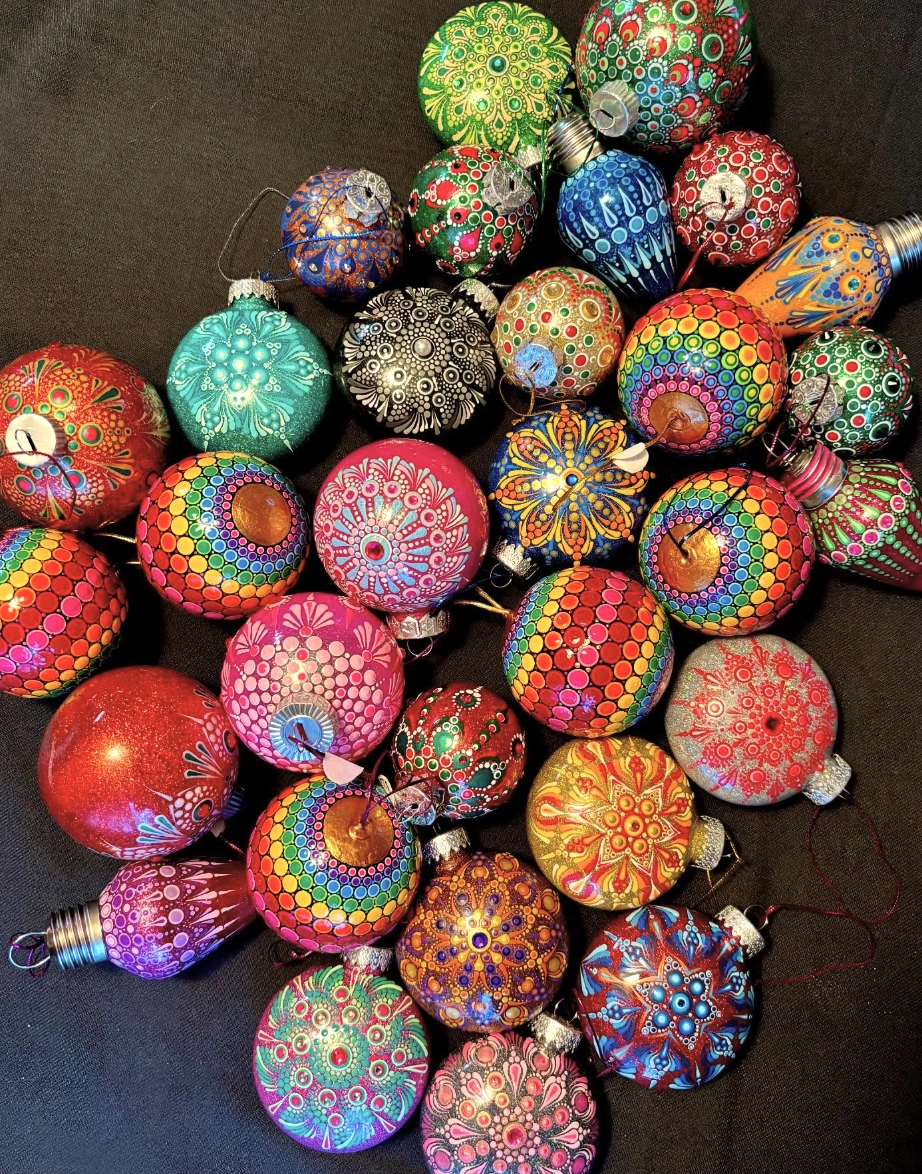
Hand-Painted Dot Mandala Christmas Ornaments
Credit: @kcl_dotdesigns
Creating these yourself is completely achievable, you know that? Plenty of resources are out there to get you started, and a quick online search will reveal how to make some diy Christmas ornaments easy. Just picture how stunning an entire tree covered in these would look.
How to Make This Craft Start with simple glass or plastic Christmas balls Apply a base coat of acrylic paint to each ball and let it dry thoroughly Select a palette of acrylic paint colors for your mandala pattern Using dotting tools of different sizes, start building the mandala design from the center and move outward Place the largest dots first, spacing them evenly around the core Add smaller dots to bridge the spaces and build intricate detail Continue building layers of dots, progressing out to the edges of the ball Let the paint dry completely, ideally leaving it overnight Seal the design with a clear acrylic varnish to protect your artwork Reattach the bulb caps and add a ribbon or hook for hanging
Personalized Acrylic Christmas Ornaments with Red Ribbon

Credit: @elanahir.art
Imagine this scene: it’s family Christmas, and everyone is eagerly searching for their designated stocking. Instead of a generic tag, each child discovers their very own personalized ornament, their name rendered in elegant lettering.
The search for simple Christmas ornaments ideas is over, as these are perfectly suited for a DIY craft night. Even the mother in law would likely be quite impressed with the results!
How to Make This Craft Gather clear acrylic ornament blanks and a fine-tipped white paint marker With a steady hand, write each family member’s name onto an ornament Add small star embellishments dotted around the names for a festive feel Let the paint cure thoroughly to avoid any smudging Cut lengths of jute twine or ribbon to form the ornament hangers Thread the twine or ribbon through the hole at the top of the ornament Tie the twine or ribbon ends to create a secure loop for hanging Cut lengths of narrow red ribbon for decorative bows Tie a small bow around the base of the hanger on each ornament Display your personalized ornaments proudly on your Christmas tree
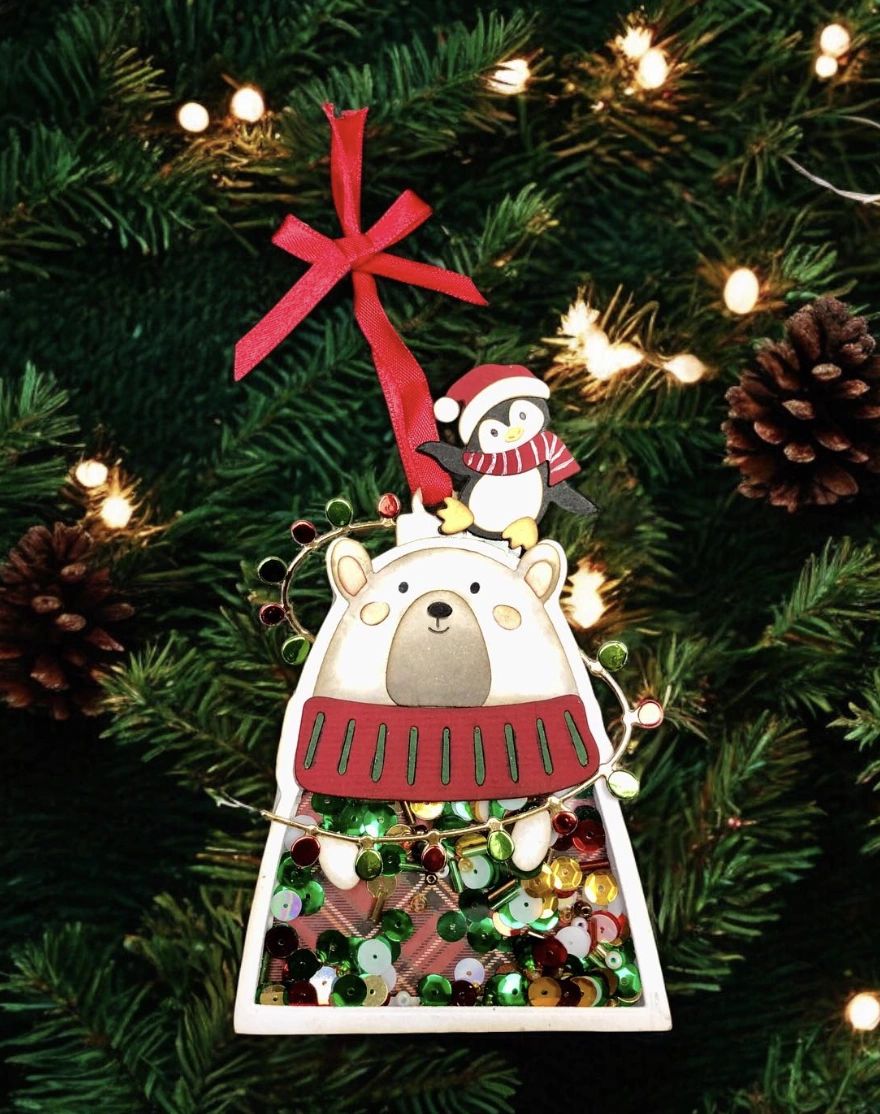
Bear Shaker DIY Christmas Ornament with Penguin Accent
Credit: @atouscrap
Remember all those DIY kits from the early 2000s? They are experiencing a major revival, in the most delightful way.
But this isn’t a basic bead kit; think of it as an elevated craft with high quality materials and thoughtful design. This adorable shaker ornament is a perfect showcase, ideal for the tree or presented as a gift. These DIY Christmas ornaments for kids are about making something truly meaningful, a keepsake that feels completely on trend.
How to Make This Craft Find a plain wooden bear ornament blank at your local craft store Paint the bear with white acrylic paint and allow it to dry fully Cut a small piece of red felt to fashion a sweater for the bear Glue the felt sweater onto the bear’s body Locate a small penguin figurine to place on top of the bear’s head Attach a tiny red cap and scarf on the penguin for extra charm Glue the penguin securely onto the bear’s head Cut small pieces of plaid fabric for the background Glue the plaid fabric to the inside of the ornament’s frame Add sequins to the inside of the ornament for a dose of festive sparkle Attach a red ribbon to the ornament’s top for hanging Display your whimsical bear and penguin ornament on your Christmas tree
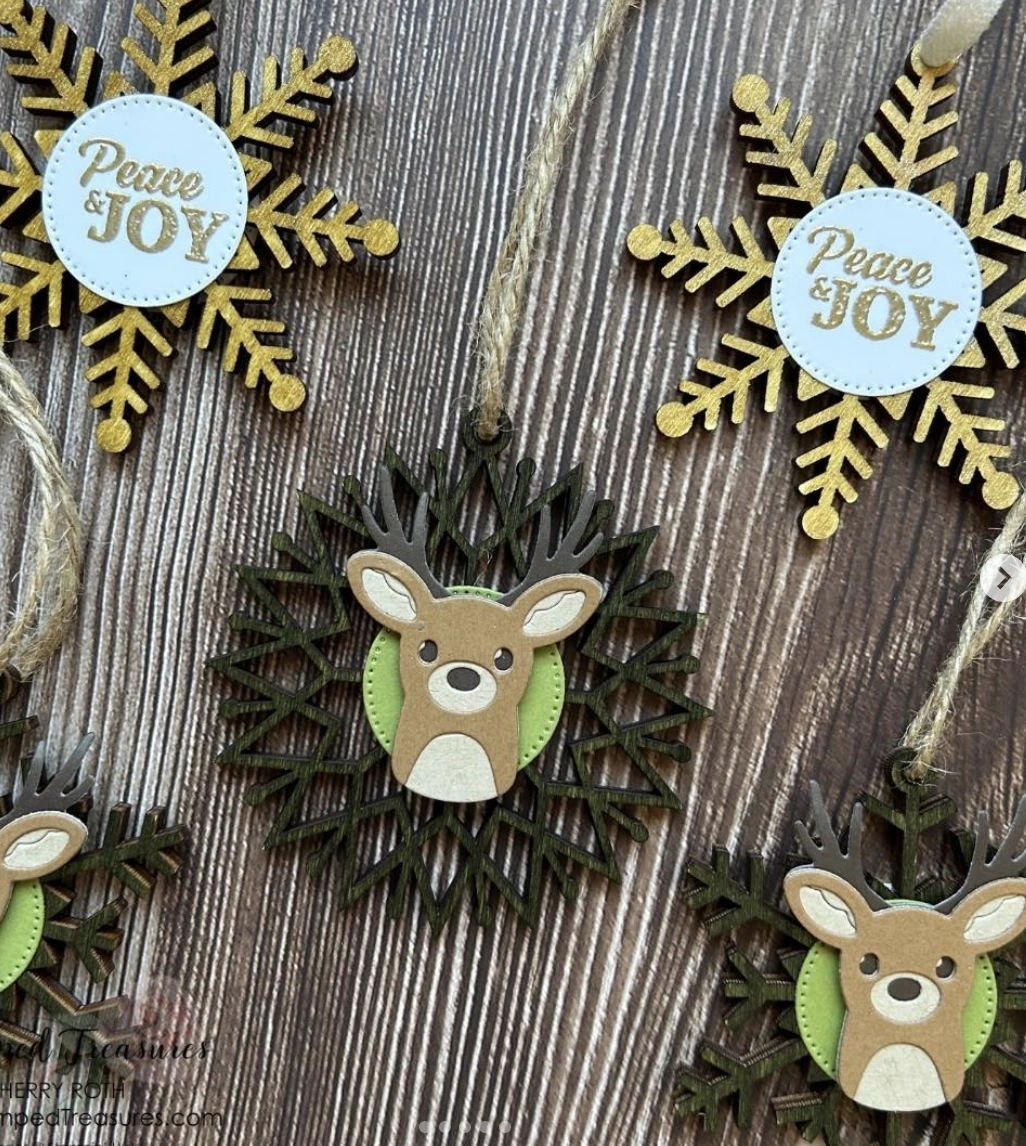
Wooden Snowflake and Reindeer Ornament Set with Jute Twine
Credit: @sherrystamps
This set offers something truly distinct. These wooden ornaments, featuring snowflakes and reindeer, bring a palpable sense of warmth and character to your tree.
What distinguishes them from most homemade Christmas decorations is the remarkable attention to detail. The layered components and thoughtful color palette lift them far above the standard DIY project. The jute twine hangers are a lovely detail too!
How to Make This Craft Download or create your preferred snowflake design Using a laser cutter, cut the designs from thin plywood sheets Cut distinct layers in varying sizes and colors Paint or stain each layer of snowflake shapes Adhere a paper cut out to one layer with glue Cut the reindeer design from a different color of plywood Glue the reindeer to the front of the snowflake Attach twine or string through a pre cut hole Secure the string end with a simple knot Let the ornaments dry completely before hanging
Hand-Painted Pastel Ornament Centerpiece with Pine Accents

Credit: @cheerfulvibes_byvanessa
These ornaments possess such a quiet, understated charm, don’t they? They stand as the perfect opposite of the typical glitter overload.
The suggestion here is to bypass hanging them on the tree altogether. Instead, artfully place them in a shallow bowl, nestled among pine sprigs and tiny pinecones.
This arrangement builds a serene, minimalist centerpiece. The muted tones of these diy Christmas ornaments will produce an elegant display, just right for a dining table or mantelpiece.
How to Make This Craft Gather plain ceramic ornaments in an assortment of shapes and sizes Select a palette of light colored chalk paints Apply two coats of chalk paint, making sure each layer dries in between Add metallic gold details to the tops of each ornament Use small dots of gold paint to create a starry pattern Attach faux pine sprigs with a dab of hot glue Sprinkle faux snow generously around the base of the ornaments Attach a simple ornament hook to each piece Place the ornaments in a decorative bowl Add extra pine cones and decorative trees to complete the display
Handmade Crochet Christmas Tree Ornaments with Snowflake Button Detail

Credit: @isabelcraftdesigns
These have a genuinely sweet appeal! There is something incredibly charming about handmade items, especially when decking the halls for the holidays.
For those drawn to a more rustic or cottagecore aesthetic, these crochet ornaments will seamlessly fit your vibe. The effort and fine detail that go into these kinds of Christmas diy crafts are truly admirable, and they absolutely bring a personal, heartfelt touch to your tree.
How to Make This Craft Crochet the tree form using various shades of green yarn Begin at the apex and work downwards with a basic single crochet stitch Create a small brown rectangle to serve as the tree trunk Sew the trunk onto the bottom of the green triangle Weave in all loose ends and fasten off the yarn Glue or sew a snowflake button onto the top of each tree Cut a length of twine or yarn for the hanger Loop the yarn through the top of the tree Tie the yarn ends together firmly Trim any excess yarn with scissors
Hand-Painted Gingerbread Ornament Decorations for Mini Christmas Trees

Credit: @creative_xroads
Oh my goodness, you absolutely HAVE to see these! The thought here is to grab a few small tabletop trees and decorate them exclusively with these for a desk at work.
How unbelievably cute would that be? The inspiration to craft your own versions is strong too.
The desire to try making some unique diy felt Christmas ornaments has always been there. They would be just perfect for adding that homemade touch to the tree next year, and just imagine all the fun of making them together!
How to Make This Craft Purchase or create small wooden slice rounds Lightly sand the surface of each slice to ready them for painting Apply decoupage medium or glue to the surface of the wood slice Attach gingerbread character stickers to the wood slices Apply a top coat of Mod Podge to seal the design Drill a small hole at the top of each ornament String a piece of twine or ribbon through the hole Tie the ends together to form a loop Place a beaded embellishment over the knot to conceal it Hang the finished ornaments on a miniature bottle brush tree
Handmade Neutral-Toned Macrame and Yarn Christmas Ornaments

Credit: @macramelif
They are simple, undeniably chic, and look easy enough to recreate after the kids are tucked into bed. Some yarn at the craft store was initially intended for a paper ornaments diy project, but the new direction is leaning firmly towards these yarn and twine ornaments instead. These would also look stunning with neutral decor, and the bonus is that the kids can lend a hand!
How to Make This Craft Gather a variety of neutral-colored yarn and macrame cord Craft small gnome bodies by wrapping yarn around cardboard forms and adding wooden bead noses Cut strands of yarn for gnome beards and glue them to each face Knit tiny hats for the gnomes and attach them to their heads Create macrame Christmas trees using basic knotting techniques Craft stars with yarn using the woven star method String wooden beads and yarn-wrapped candy canes to make a garland Knot the yarn at the top of each ornament to form a hanging loop Hang the ornaments on a bare branch or tree for display Adjust the spacing until the aesthetic feels just right
Chic Hand-Lettered Christmas Ornaments with Burgundy Ribbon Accents

Credit: @nurseryroadblog
Forget those mass produced, glitter drenched ornaments; these operate on a completely different wavelength. This is all about that effortlessly personal touch.
These matte white spheres, graced with simple black lettering and a perfect burgundy ribbon, project a curated, impossibly cool feel. Truly, the font choice alone elevates the whole look!
This is a serious upgrade from the usual diy Christmas ornaments for kids projects. These pieces feel bespoke, never basic.
How to Make This Craft Gather your supplies: plain white ornaments, a fine-tipped permanent marker, thin red ribbon, and scissors Gently wipe each ornament clean with a soft cloth Using the marker, carefully write a holiday-themed word like Joy, Peace, or Noel onto the center of each ornament Cut the ribbon into short segments, about 4 to 5 inches in length Tie each ribbon piece into a neat bow Using a dot of glue or by tying it directly, secure a bow near the ornament’s hanging loop Allow the glue to fully dry if it was used, before handling Hang these charming ornaments on your Christmas tree!
Assorted DIY Christmas Ornaments: Stars, Tree, Moon and Heart Shapes

Credit: @_evas_creations_
These ornaments feel absolutely perfect for a casual, cozy Christmas celebration. Picture breaking these out during a relaxed crafting session surrounded by friends and family.
Making paper ornaments diy is wonderfully simple, but these offer a fantastic alternative! Imagine a crackling fireplace and steaming mugs of hot cocoa as the backdrop while stringing these up! They would also look incredibly adorable hanging on some mini Christmas trees.
How to Make This Craft Round up your tools: Wire ornament forms like stars, trees, and hearts, yarn in assorted colors, jute twine, scissors, a dried orange slice, and cinnamon sticks For the yarn-wrapped ornaments, tightly wind yarn around the wire frame, securing it with hot glue at the start and finish For the jute ornaments, attach the jute at the top of the wire frame and wrap it around and down, securing it to the frame with glue For the star, glue the orange slice and cinnamon sticks together with a dab of glue Then, glue the back of the oranges to the left point of the star Tie bows from the jute and glue them at the top of the wire forms Cut a desired length of string from the jute and create a hanging loop by tying the ends together Glue the hanging loop to the top of each form Embellish with beads, small pine sprigs, or anything else that sparks joy
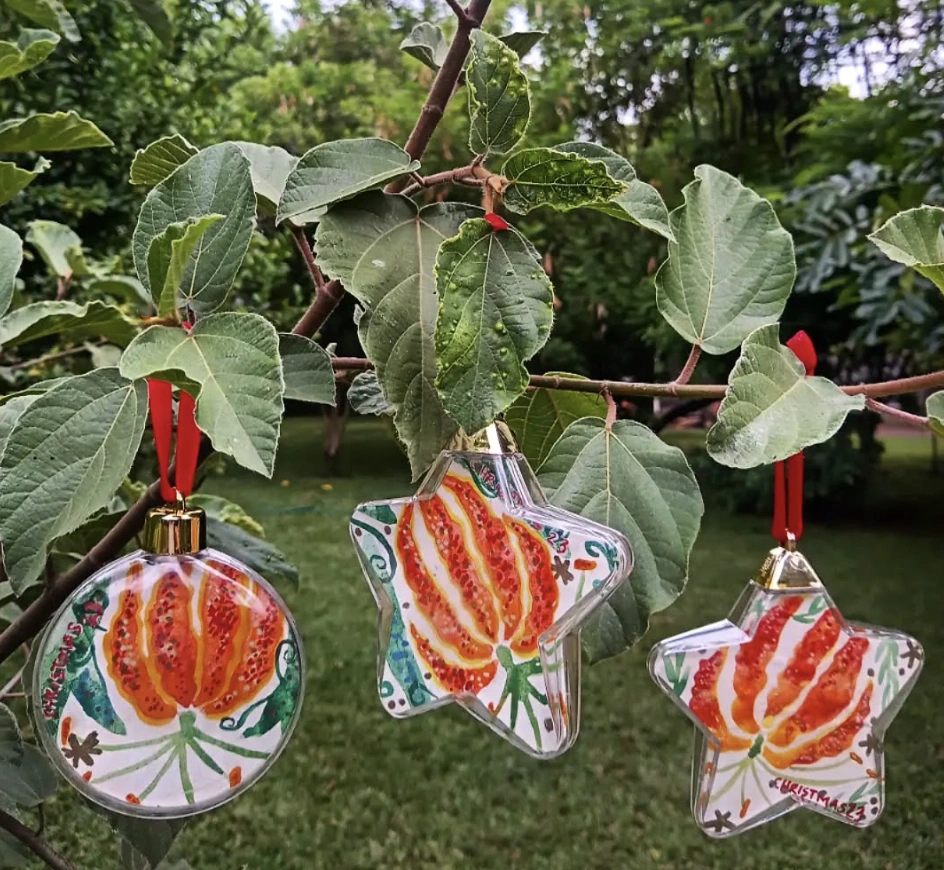
Transparent Baubles with Hand-Painted Flame Lilies
Credit: @mokudicollection
The hand painted flame lilies are what make these ornaments so extraordinary. The delicate watercolor effect creates a stunning contrast against the clear plastic of the baubles.
There’s a real appreciation for the unexpected choice of displaying these homemade Christmas decorations outdoors, set against the vibrant green foliage. It offers a unique glimpse of holiday cheer woven into the natural world, a beautiful juxtaposition that hints at warmth and artistry.
How to Make This Craft Acquire your canvas: Purchase clear, fillable plastic or glass ornament shells Procure your supplies: Gather acrylic paints in various greens, oranges, whites, and browns, along with fine-tipped paintbrushes, a water cup and paper towels Unleash your imagination: Begin with light washes of green to sketch the leafy stems inside the ornament Introduce the floral focal point: Carefully paint the orange flowers, using lighter shades for highlights and darker shades for depth Let it breathe: Allow the paint to dry completely between each layer Add tiny accents: Use white paint for delicate details and highlights on the leaves and petals Secure the deal: Carefully close and seal the ornament shell Trim the ties: Attach a ribbon for easy hanging Hang it in a tree or place it on a windowsill
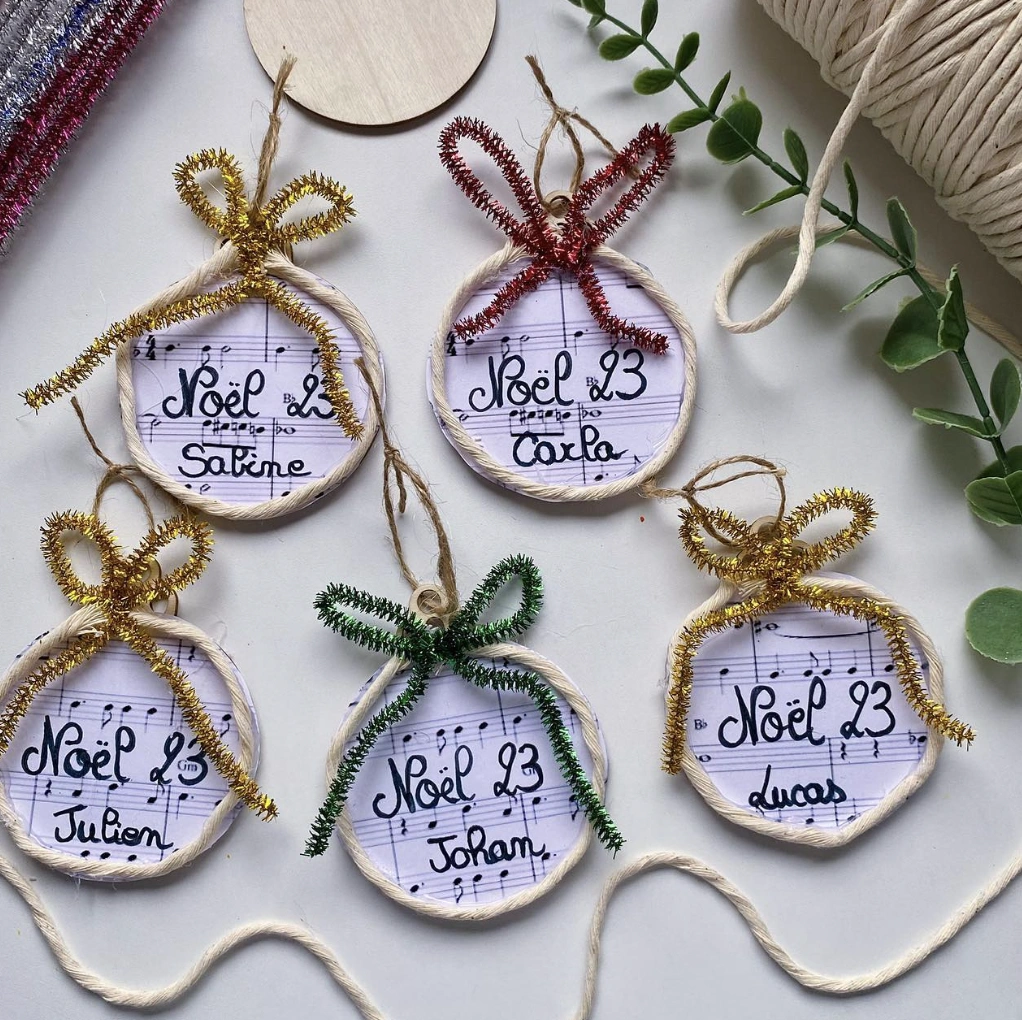
Personalized DIY Christmas Ornaments with Sheet Music Backgrounds
Credit: @the.mother.of.two
Who on earth wouldn’t adore a personalized ornament? The kids would be absolutely thrilled to pitch in and help create these treasures.
They look like such enjoyable diy Christmas ornaments easy enough for even the youngest family member to manage, probably with just a tiny bit of support, of course! The sheet music background adds a completely unexpected layer of elegance.
How to Make This Craft You’ll need: Pre-cut round wooden bases, copies of sheet music, scissors, a glue stick, a permanent marker, pipe cleaners, and twine Prep the base: Cut circles of sheet music that are slightly larger than the wooden bases Glue time! Apply the glue stick generously to the wooden bases and attach the sheet music circles Trim away any excess paper Personalize it: Write the word Noël and the year 2023 at the top of the sheet music, and write the name of each child on the bottom Twist and shout with pipe cleaners: Cut short lengths of colorful pipe cleaners and twist them into small bows Add a pop: Glue the pipe cleaner bows to the tops of the ornaments Loop-de-loop: Cut short lengths of twine and create hanging loops by tying the ends together Finish Strong: Secure the twine loops to the back of the ornaments with glue or tape
Paper Fan Ornaments with Velvet Ribbons and Wooden Beads

Credit: @amiizaki
For the person who adores a minimalist, slightly Scandi-inspired Christmas, these are absolutely for you. They are flawless for tackling as Christmas diy crafts.
Just imagine how incredible they would look on a tree lit with nothing but simple white lights. You probably know someone who is eager to refresh their Christmas aesthetic this year!
How to Make This Craft Gather materials: Select origami paper in a range of neutral colors You’ll need string or thread, beads, and scissors Choose your design: Pick from various origami ornament tutorials online, like stars, fans, or mini paper shapes Follow instructions: Adhere to the origami folding instructions with care, creating crisp, sharp folds Create the loops: Once folded, carefully poke a small hole through the top of each ornament String beads together: Create a hanging loop by threading string through the hole and adding a bead on either end Tie it off Tie ribbons: Cut a piece of ribbon, string a bead at the end, and tie it at the top of the shape Arrange carefully: Lay the ornaments on a flat surface for display
Eclectic DIY Christmas Ornaments: Avocado, Sequin Moon, and More

Credit: @mothertide_
Move over generic, mass produced ornaments; these pieces are bursting with genuine character. While standard christmas crafts ideas are common, that sequined crescent moon stands out as a cool alternative to the usual angel themes.
And the avocado? It’s completely unexpected and wonderfully playful.
These objects aren’t merely decorations; they are conversation starters. They boldly declare a sense of personality and make a distinct statement.
How to Make This Craft Gather diverse materials: old ornaments, corks, ribbon scraps, paint, and glitter Select your base: upcycle an old ornament or use a wine cork for smaller designs Paint your base colors and let them dry completely Decorate using paint, glitter, and glue Attach googly eyes or small beads for an extra touch of detail Cut ribbon pieces and glue them to create bows or wings Seal with Mod Podge to preserve the finish and prevent glitter from flaking off Add a twine or wire loop for hanging Allow to dry completely Hang on the tree and share your brilliant creations!
Crochet Snowman Christmas Tree Ornaments

Credit: @nuokkuja
You simply HAVE to see these tiny crocheted snowmen! They are truly the cutest things!
They are sized perfectly for a tree, but honestly, they deserve to be hung everywhere. They radiate such a warm, cozy, handmade vibe, don’t they?
A browse for unique Christmas ornaments ideas confirms these surpass everything else! They also give a charming nod to that whole cottagecore Christmas trend that’s so popular right now. The obsession is real!
How to Make This Craft Start with white yarn Crochet six rounds into a sphere for the head Decrease stitches on the next row to pull in the shape Stuff the head firmly with polyfill stuffing Switch to black yarn for the hat Crochet a tube and fold over the edge Create a small green scarf using slip stitches Sew the hat and scarf onto the snowman head Embroider a simple mouth and eyes with black embroidery floss Crochet a body from white yarn Stuff the body with polyfill Sew the head onto the body Attach a loop of twine to the top of the hat for hanging Repeat the process to create more snowman friends Attach to the tree alongside dried orange slices for a more natural decoration
DIY Rudolf Ornament with Googly Eyes and Fuzzy Red Nose

Credit: @anannyforu
Oh my goodness, how cute is this creation?! The shimmery gold pipe cleaner antlers completely make this easy Rudolf ornament a success.
And that little fuzzy red nose just pops so perfectly against the brown glass. The thought of basic store bought decorations can be forgotten this year.
A full-on obsession with making unique diy felt Christmas ornaments has taken hold, and maybe some that aren’t felt, too! It’s time to get wonderfully crafty!!
How to Make This Craft Grab a plain brown bauble ornament Use hot glue to attach two large googly eyes onto the ornament Attach a bright red pom-pom directly beneath the eyes to serve as Rudolph’s nose Cut two brown or gold pipe cleaners in half Twist each pipe cleaner half around the top of the ornament to form the antlers Trim the antlers to your desired length Let the glue cool completely Hang it on the tree for instant holiday cheer
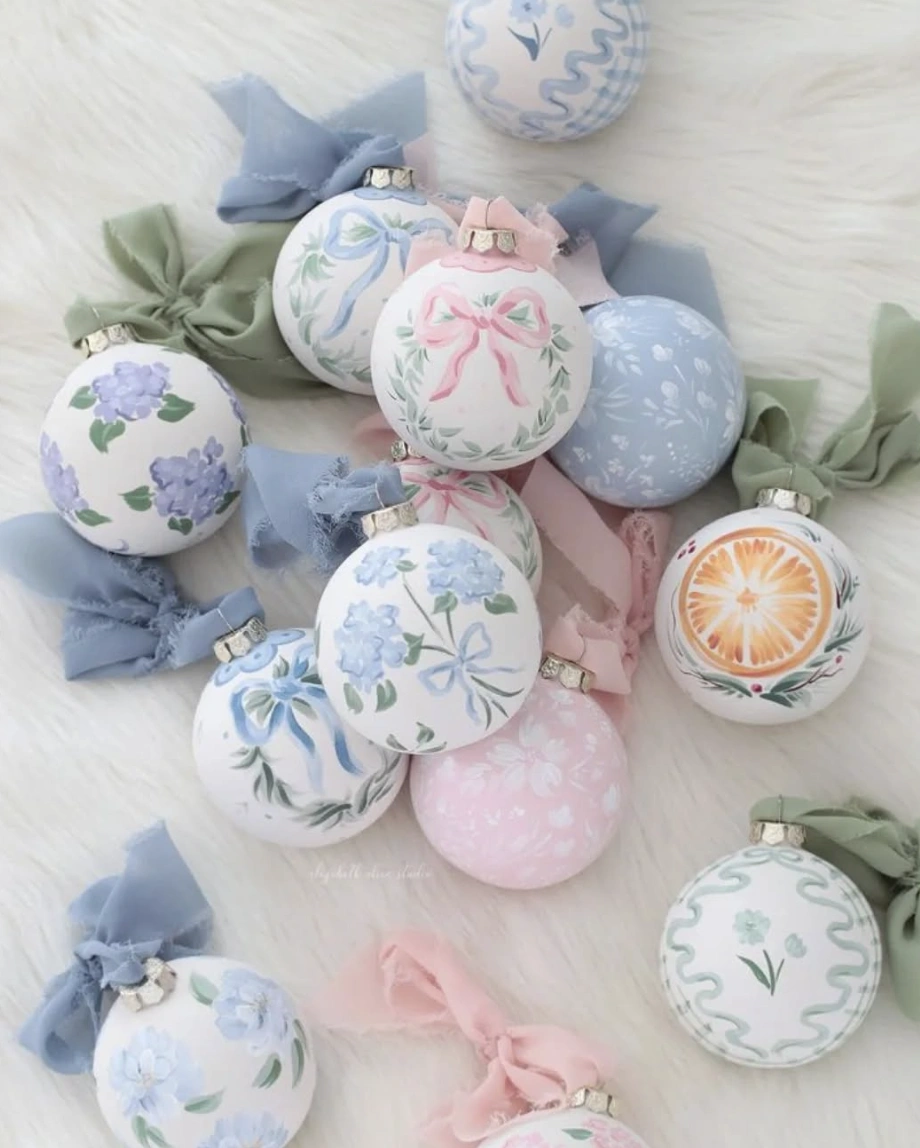
Hand-Painted Floral and Ribbon DIY Christmas Ornaments
Credit: @_christmas_mail
These are practically shouting “chic” for a winter wonderland-themed tree. Picture hosting a sophisticated brunch the week before Christmas, with the tree as a sparkling backdrop, adorned with these stunning beauties.
So lovely, right? This year is all about diving deep into crafting unique diy Christmas ornaments, and this serves as pure inspiration! These would also be the most delightful gifts for friends and family!
How to Make This Craft Purchase smooth white ceramic ball ornaments Lightly sketch your floral designs onto the ornaments with a pencil Use acrylic paints in soft pastel shades like blues, pinks, and greens Paint the outlines of the floral designs with a fine brush Add shading to create a sense of depth and dimension within the petals and leaves Allow the paint to dry thoroughly between each layer Seal the painted ornaments with a clear varnish spray Cut various ribbons from silk or chiffon material Tie the ribbon bows around the metal toppers of each ornament Arrange them among a fluffy white cloth to create a winter scene display
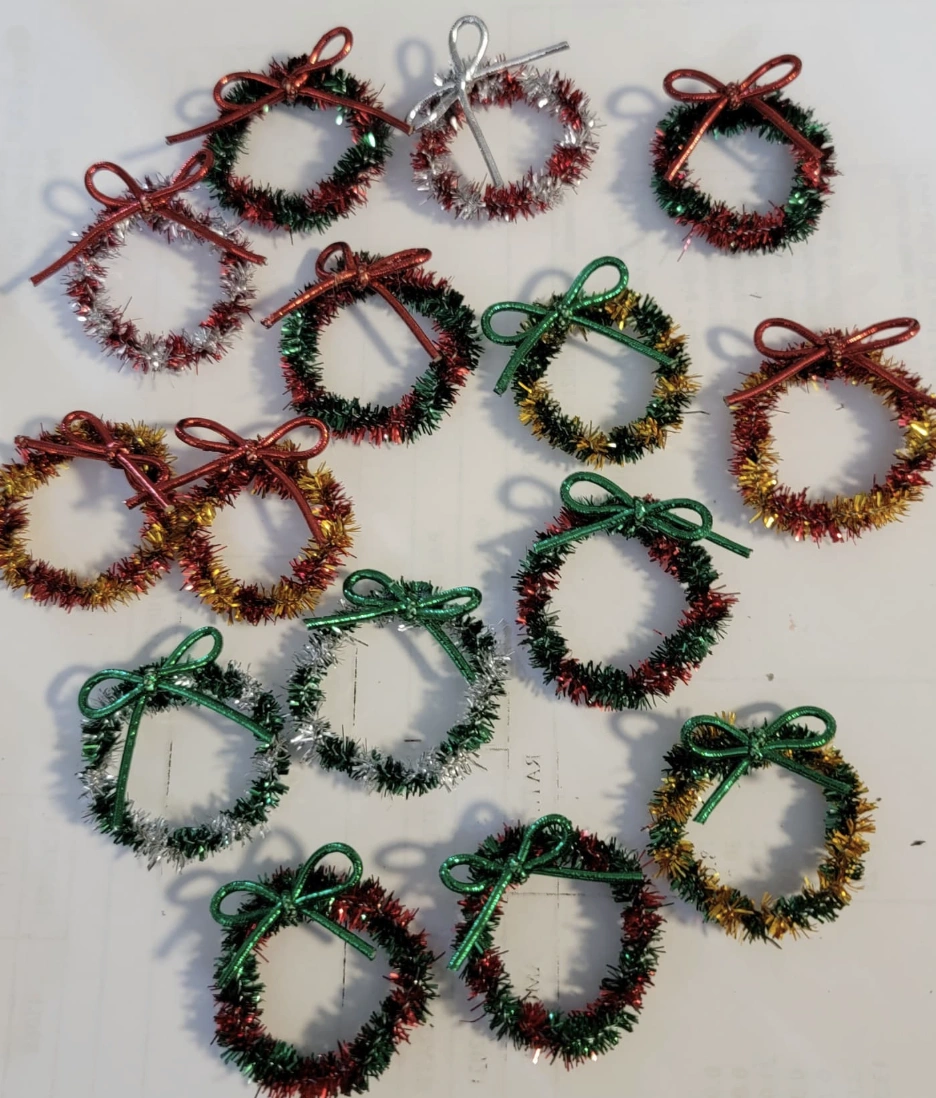
Miniature Wreath Ornaments with Metallic Tinsel and Bows
Credit: @weirdlifeofv
Let’s be honest, a lot of the overly cute stuff out there is simply too much, isn’t it? Unlike those chunky, mass produced ornaments, these miniature wreaths possess a distinct handmade charm.
They are a clear departure from your average felt Christmas ornaments; these are beautifully adorned with metallic tinsel and a simple, perfectly tied bow. The array of color combinations keeps the look fresh and interesting, projecting a curated feel rather than a cookie-cutter vibe. It’s a truly unique addition.
How to Make This Craft Cut pipe cleaners into short lengths, about 4 to 5 inches each Form each pipe cleaner piece into a circle Twist the ends together to secure the circular shape Wrap colorful tinsel around each pipe cleaner ring until it is fully covered Cut small ribbon pieces Tie a small bow to the top of each wreath using the ribbon Trim the ribbon ends neatly Add a jump ring to attach it to a necklace Or, loop twine to create hanging ornaments for the tree Hang the miniature decorations and spread the joy!
Hands Modeling Acrylic Christmas Ornaments: Gingerbread House, Stocking, Snowman, Tree, and Ugly Sweater
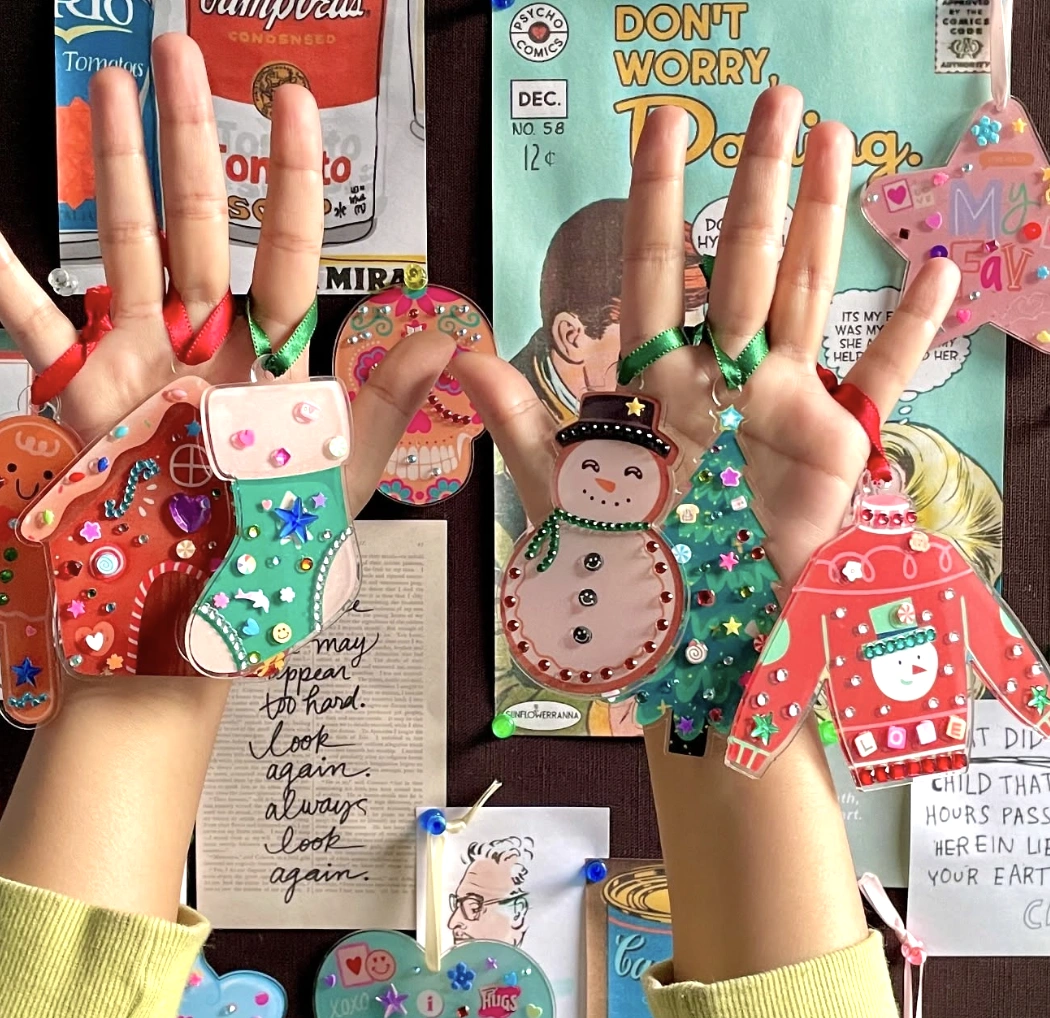
Credit: @aubergine.create
Let’s get real: keeping the kids entertained during holiday break without resorting to screen time is a genuine challenge. These adorable acrylic ornaments are the perfect solution and can easily become a family crafting project.
The idea is to have the little ones create a bunch of diy felt christmas ornaments. It’s surprisingly engaging and keeps those little hands happily busy for hours.
Plus, you wind up with wonderfully cute decorations. A total win-win, right?
How to Make This Craft Start with clear acrylic shapes or cut your own from a sheet Sketch out your desired holiday designs using a permanent marker Using a strong adhesive, carefully apply sequins and gems to the acrylic, following your sketched guide Let the glue dry completely Punch a small hole at the top of each ornament Thread colorful ribbon through the holes to create loops for hanging Cut the ribbon to your desired length Tie a knot in the ribbon to secure it in place Hang your personalized ornaments on your Christmas tree or gift them to loved ones
Red Ugly Sweater Christmas Ornament with Sequins & Mini Decorations

Credit: @aubergine.create
It’s an ugly sweater Christmas ornament, but presented in the most adorable way imaginable, right? It’s decked out in sequins and tiny buttons, and it appears to be something you could whip up in a flash. These would make fantastic gifts and are just super enjoyable, totally falling into the category of DIY Christmas ornaments easy.
How to Make This Craft Snag an acrylic sweater blank, as a pre-cut shape is easiest Dig through your stash and find mini rhinestones and letter beads Using craft glue, go wild decorating the sweater to your heart’s content Spell out words or phrases with the letter beads, like LOVE or JOY Let the glue dry completely, preferably leaving it overnight Add a ribbon loop at the top for hanging using a hole punch and some sturdy string
Popsicle Stick Nutcracker Ornament Duo & Champagne Bottle

Credit: @brittanyshomestead
These are super cute choices for Christmas diy crafts! The handmade feel of the popsicle stick nutcrackers is deeply endearing, especially their tiny painted faces.
The glittered popsicle stick crowns add a dose of festive sparkle. Alongside them, the pink champagne bottle ornament with its glittery bow is a fun, wonderfully unexpected touch among the more traditional Christmas ornaments.
How to Make This Craft Paint several jumbo popsicle sticks with acrylic paint in a variety of colors Once dry, glue the popsicle sticks together to form a basic Nutcracker shape Cut a small piece of felt to create a hat and glue it to the top of the Nutcracker Use yarn or faux fur to create the Nutcracker’s beard Add details like buttons or painted accents for the jacket Use a fine-tipped marker to draw the facial features Attach a loop of string or ribbon to the back for hanging
Beaded Jellyfish Christmas Ornament: Iridescent Strands and Ocean Hues
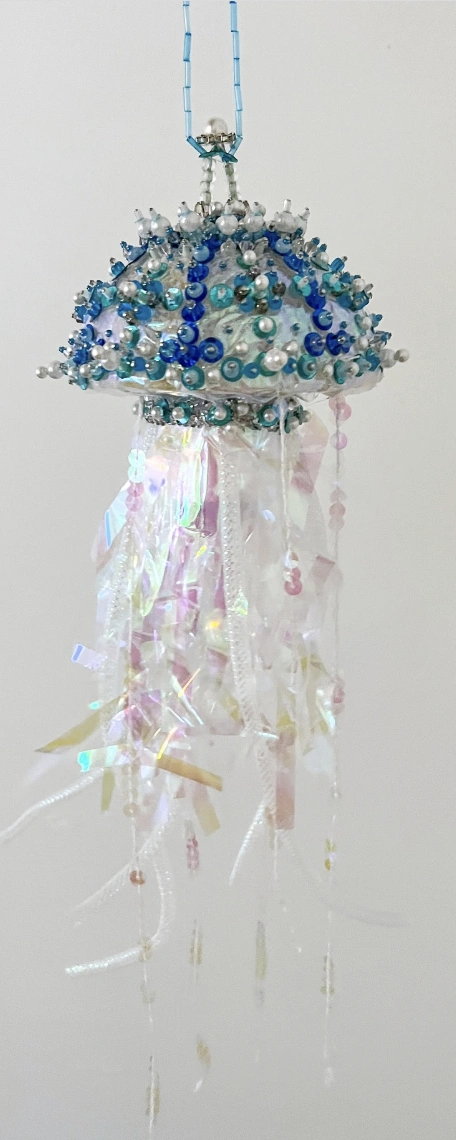
Credit: @lauraccoleco
Feeling weary of the same old generic Christmas decor? This ornament provides the perfect antidote.
The meticulously crafted jellyfish, adorned with blue beads and shimmering strands, feels truly special. It stands as a sophisticated piece within the vast landscape of Christmas ornaments ideas.
This creation offers a subtle, elegant nod to the sea, introducing a unique textural quality to any tree or holiday arrangement. The quality is immediately apparent, placing it a clear step above mass produced alternatives.
How to Make This Craft Start with a styrofoam ball or small bowl to serve as the jellyfish body Cover the body entirely with fabric or felt using glue Embellish the body with an assortment of beads, sequins, and faux pearls Use a hot glue gun to attach a variety of iridescent strands and ribbons Let the strands hang at varying lengths to create the jellyfish tentacles Add accent beads or sequins along the length of the strands Create a loop at the top of the body for hanging using jewelry wire
Adorable Felt Candy Cane Ornament with Holly Embellishment

Credit: @alicescrapswonderland
The hunt is always on for cute, unique holiday decor. This candy cane ornament is so much more appealing than the plastic ones sold in bulk.
Seriously, the detailed stitching and the tiny holly leaves truly elevate the design. The plan is to make these as DIY Christmas ornaments with the kids this year. Another major advantage is that felt is far less breakable than glass, which is a massive win in a busy household!
How to Make This Craft Download a candy cane pattern and cut two pieces of felt according to the template Use a blanket stitch to sew the two pieces together along the edges with embroidery floss Lightly stuff the ornament with fiberfill before you completely close the seam Cut felt strips for the candy cane stripes and adhere them using fabric glue Cut felt leaves and a small felt flower, then embellish them with French knots Arrange the leaves and flower at the base of the candy cane and glue them in place Attach a ribbon loop at the top for hanging
Popsicle Stick Nativity Scene Christmas Ornament
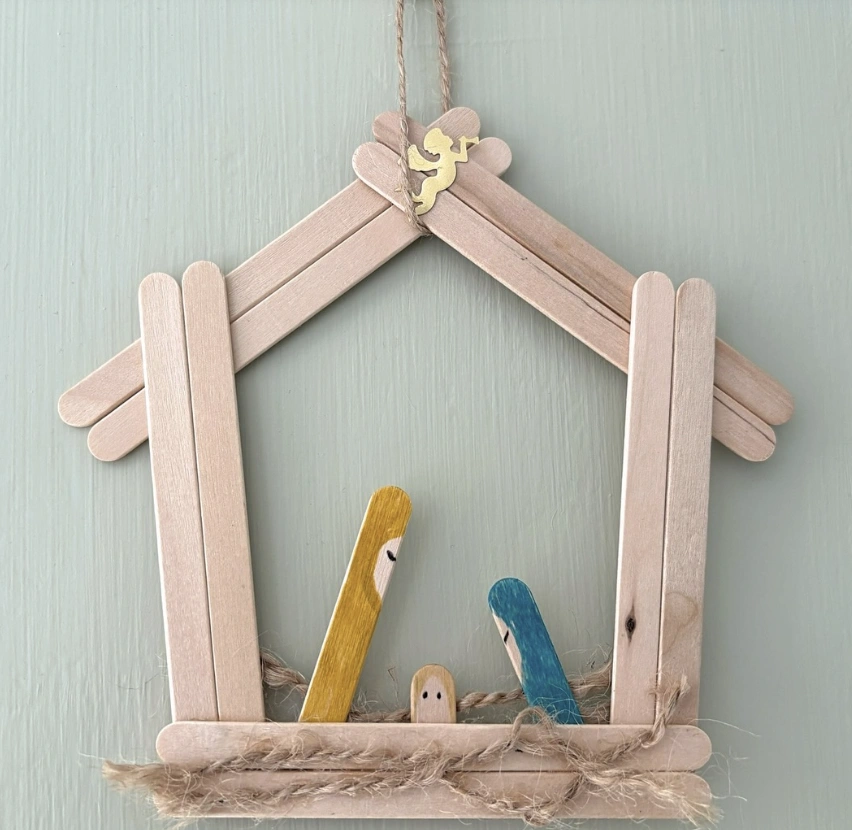
Credit: @christinescraftsuk
Honestly, this craft brings on all the warm, fuzzy feelings. It’s absolutely perfect for a cozy, intimate Christmas Eve gathering.
Can’t you just picture this hanging on a rustic, reclaimed wood wall, or perhaps gracing a sparsely decorated tree? A bit of twine, some thoughtfully placed popsicle sticks, and voila!
You have achieved an elevated paper ornaments diy project that feels surprisingly chic. It’s understated elegance with a beautiful touch of homemade charm.
How to Make This Craft Lay out popsicle sticks to form a stable house shape, gluing the ends together with craft glue Cut additional popsicle sticks to create the roof, attaching them at an angle Paint three more popsicle sticks with yellow, blue, and neutral tones, to represent Mary, Joseph and baby Jesus Glue the three painted popsicle sticks horizontally to the base Add twine to resemble a bed of hay Cut out a small angel shape from gold cardstock and glue it to the top Attach twine to the top of the house structure for hanging Reinforce all glue joints with extra craft glue Let it dry for at least 2 hours
Stacked Ribbon Christmas Tree Ornament with Rhinestones

Credit: @saacibo
Okay, this is a far cry from your typical, flat felt Christmas ornaments situation. Just look at the wonderful layered effect.
The alternating green shades of the ribbon create genuine depth and visual interest. And those tiny rhinestones?
They deliver a perfect touch of bling that catches the light beautifully. It has a delicate appearance, but honestly, it also seems quite sturdy and well made.
How to Make This Craft Cut fabric scraps into circles of varying sizes, approximately 2 to 5 inches in diameter Fold each circle into quarters, then gather it at the pointed end with a needle and thread Starting with the largest fabric piece, glue each folded and gathered fabric piece onto a styrofoam cone, overlapping slightly to build a layered effect Alternate fabric colors and textures as you go Apply hot glue liberally to ensure the fabric adheres firmly Add a line of faux gemstones or beads around the edge of each fabric tier using hot glue Cut a length of decorative gold cord for hanging Glue a bead and then the cord at the very top of the tree Let the glue dry completely before handling
Sweeten Up Your Tree with Felt Lollipop Ornaments!

Credit: @hattaralandia
If you’re diving into making your own homemade Christmas decorations this year, then you absolutely HAVE to add these to your list. Hang them on the tree, string them into a joyful garland, or even employ them as charming gift toppers.
They are so simple to personalize with different color combinations, and the red ribbon detail provides that flawless Christmas touch. Love it!
How to Make This Craft Cut two circles from different colors of felt, roughly 3 inches in diameter Sew the circles together around the edge using a blanket stitch, leaving a small opening for stuffing Lightly stuff the lollipop with fiberfill to give it a pleasing shape Sew the opening closed Cut thin strips of red and white felt, and wind them around the lollipop Glue the strips to secure them in place Cut a small bow from ribbon and glue it to the base of the lollipop Use a striped paper straw for the lollipop stick Glue it to the back of the lollipop Attach a loop of baker’s twine or ribbon to the top for hanging
Adorable DIY Gingerbread House Ornament with Gem Details

Credit: @aubergine.create
This gingerbread house ornament is simply calling out to be made! Picture a snow day with the kids bouncing off the walls, and a project is desperately needed to keep everyone occupied.
This could totally be recreated using all the random craft supplies that have been stashed away. A search is already underway for Christmas crafts ideas that use up leftover felt and those tiny pom-poms. This will keep little hands busy for at least an hour, right?
How to Make This Craft Use a template to cut gingerbread house shapes from an acrylic sheet Using super glue, carefully assemble the house shape Allow it to dry fully Using various sizes of rhinestones, decorate the house to look like a gingerbread creation Be sure to focus on the door, roof, and sides Once complete, attach a ribbon to the roof using super glue Let it dry fully and then admire your beautiful artwork
Pom-Pom Christmas Tree Ornament: Sparkly and Sweet
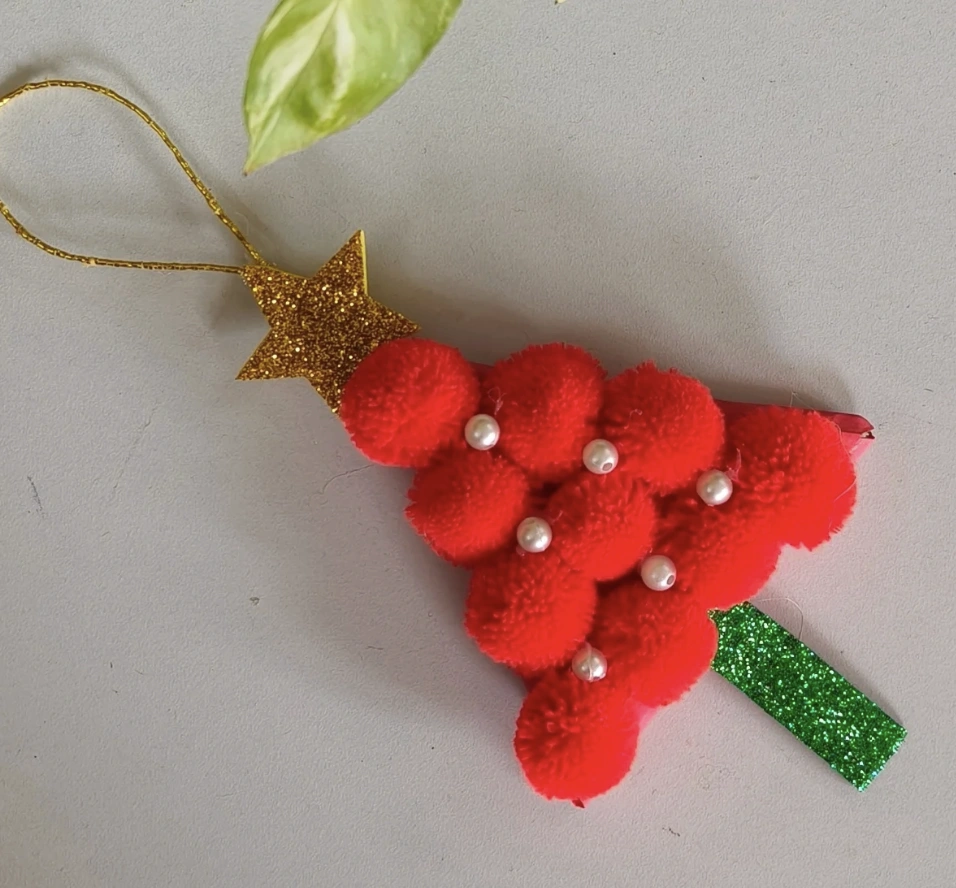
Credit: @shailee.s_crafts
This ornament is bursting with character. Crafted from red pom-poms, glittery details, and pearl accents, it promises to bring a truly special touch to your tree.
The most valuable part is the memories formed while creating such fun diy Christmas ornaments for kids. Let each child discover a special spot on the tree for the ornament they personally made. In the end, it’s all about the shared experience, not a pursuit of perfection.
How to Make This Craft Glue a series of pom-poms on top of each other in a triangular formation Ensure the pom-poms are glued together very securely Cut a star and a tree trunk from glitter foam Glue the star to the top of the pom-pom tree, and the tree trunk to the bottom Glue a few small beads sporadically onto the pom-pom tree to act as ornaments Let it dry fully and then secure a hanging loop
Final Thoughts
The process of making these ornaments has genuinely rekindled a profound Christmas spirit. Seeing these small expressions of creativity hanging on the tree brings a surge of pure happiness.
The brainstorming has already begun for next year’s projects, perhaps some paper ornaments DIY. The possibilities truly stretch out endlessly. What festive crafts are you dreaming up?