


The holiday season has arrived, and you’re probably scrambling to come up with present ideas.
Store-bought gifts serve their purpose, but there’s something deeply special about handing over something crafted by your own two hands, isn’t there? This year, skip the crowded shopping centers and embrace some creativity!
We’re diving into a collection of standout DIY Christmas presents guaranteed to spread pure cheer. Not to worry, there’s a little something for every single person on your list, including the tiniest helpers!
Prepare to discover cheerful Christmas crafts for kids alongside truly unique DIY Christmas ornaments.
Let’s transform this holiday into something unforgettable with heartfelt, handmade keepsakes!
Hand-Painted Wood Slice Christmas Ornaments with Twine Hangers

Credit: @michelemargotstudio
These ornaments are beautifully simple yet deeply thoughtful. They’re just right for a calm evening indoors, maybe with snow drifting down outside the window.
Crafting these brings back memories of slower days spent gathered together making special Christmas Crafts For Kids. They also double as an unforgettable present for a dear friend or family member, dangling from their tree like a token of a meaningful moment. These are the types of decorations you hold onto for decades.
How to Make This Craft Round up your wood slices, acrylic paints (green, white, brown), fine paintbrushes, and twine Start by painting miniature tree trunks in brown Use a slender brush for precision details Layer dabs of green paint to build up the shapes of the tree branches Tap on specks of white paint to mimic fresh snow settling on the boughs To form the wreath, paint tiny green leaves circling the edge of the wood slice Scatter miniature white dots among the leaves to suggest berries Let all the paint dry fully, this can take a couple of hours Bore a tiny hole close to the rim of each wood slice Snip lengths of twine and pull them through the holes to fashion hanging loops Tie the ends of the twine snugly
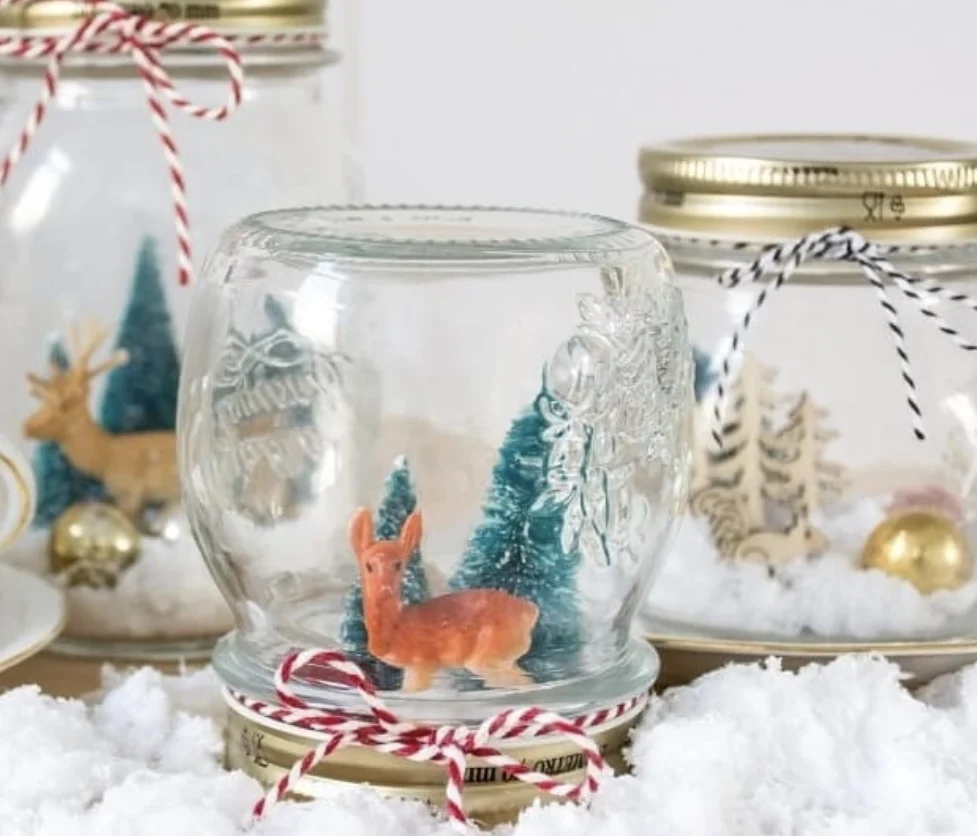
Christmas Snow Globes Made from Repurposed Mason Jars
Credit: @architectures_idea
These mason jar snow globes are total showstoppers. They’re absolutely perfect for anyone hunting for simple but intentional Homemade Gift Ideas.
Teachers, grandparents, even your neighborhood mail carrier would treasure one of these darling creations. Best of all, this project uses up those spare jars taking over your pantry shelves, so it’s truly a double victory.
How to Make This Craft Hunt down mason jars in a mix of sizes Pick out miniature figurines suited for a snowy landscape – deer, bottle brush trees, gold ornaments Secure the figurines to the interior side of the jar lid using a heavy-duty adhesive Spoon a generous amount of faux snow into the jar Carefully screw the lid, complete with its tiny scene, back onto the jar Adorn the neck of every jar with festive twine or decorative ribbon tied into a knot Flip the jar over and watch the faux snow tumble down into a magical display Double-check that the lid seals tightly to avoid leaks Apply a ring of hot glue around the glass and lid connection for a permanent seal
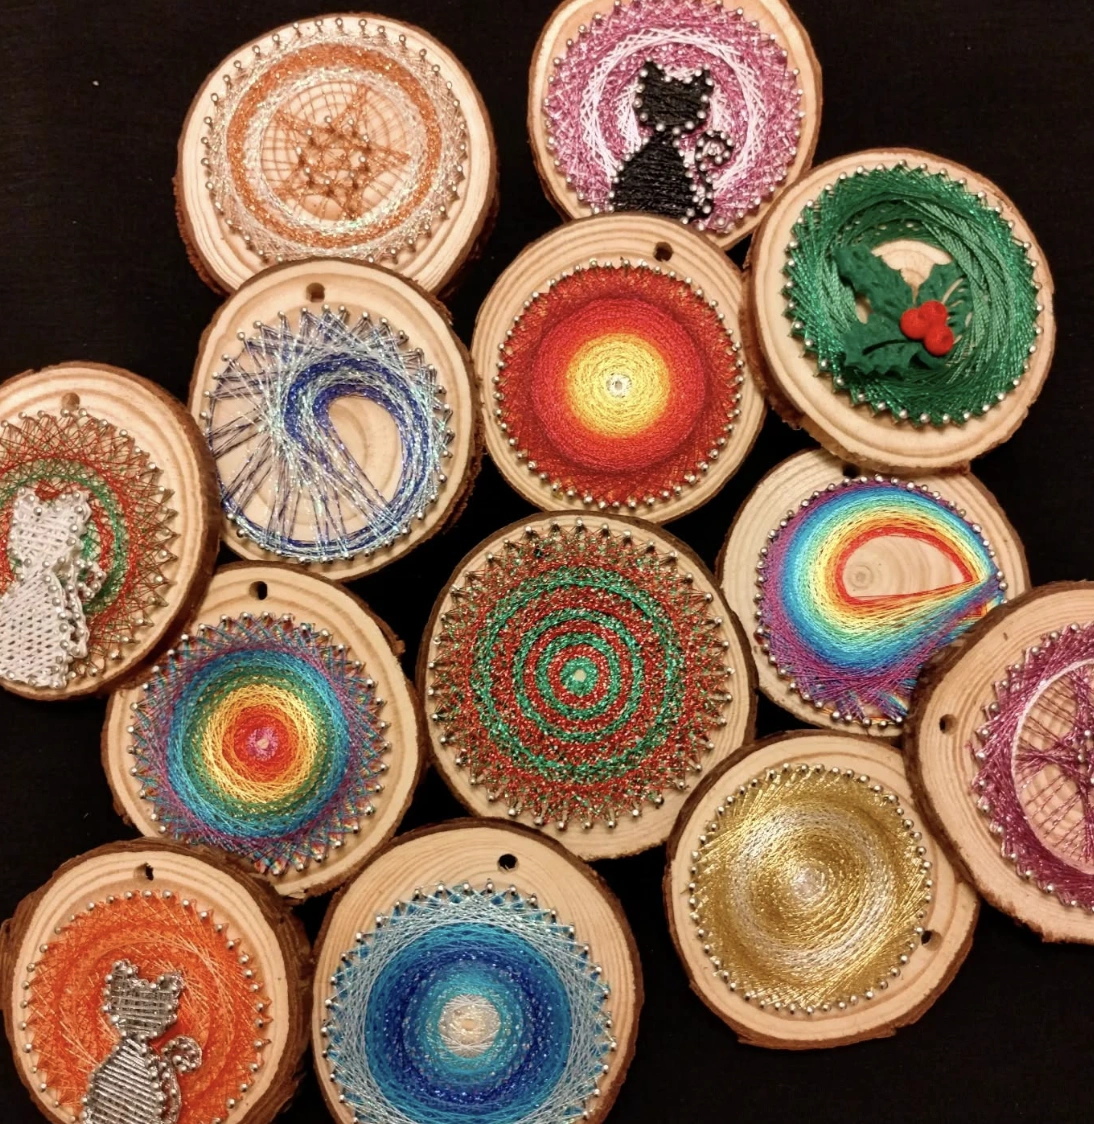
Handcrafted Wood Slice Ornaments: String Art Edition
Credit: @back2string.art
Remember the total craze around string art? It’s officially having a moment all over again.
These aren’t those basic summer camp projects your little sister made, though. Take your gifting game up a serious notch this season.
These custom wood slice ornaments completely nail that chic, handcrafted aesthetic. A thoroughly modern spin on Christmas crafts for adults, and truly, who wouldn’t want to receive one? Consider this peak cozy sophistication.
How to Make This Craft Get your hands on a solid wood slice, nails, an assortment of embroidery floss, a hammer, and a template if you like Gently sketch your chosen design onto the wood surface or tape down a printed template Hammer nails consistently around the outer edge of your pattern Keep every nail at the exact same height Knot the tail of your first thread color firmly onto one nail Start looping the thread around various nails, forming geometric lines and striking patterns Let your imagination run wild Switch thread colors whenever inspiration strikes, knotting off each hue onto a nail before moving on Keep weaving and stretching the thread until the interior of the design feels properly filled Once you’re happy, snip off any stray thread and check that all knots are pulled tight Think about adding a display loop by twisting in a small eye hook Repeat across multiple wood slices with fresh color combinations for maximum variety
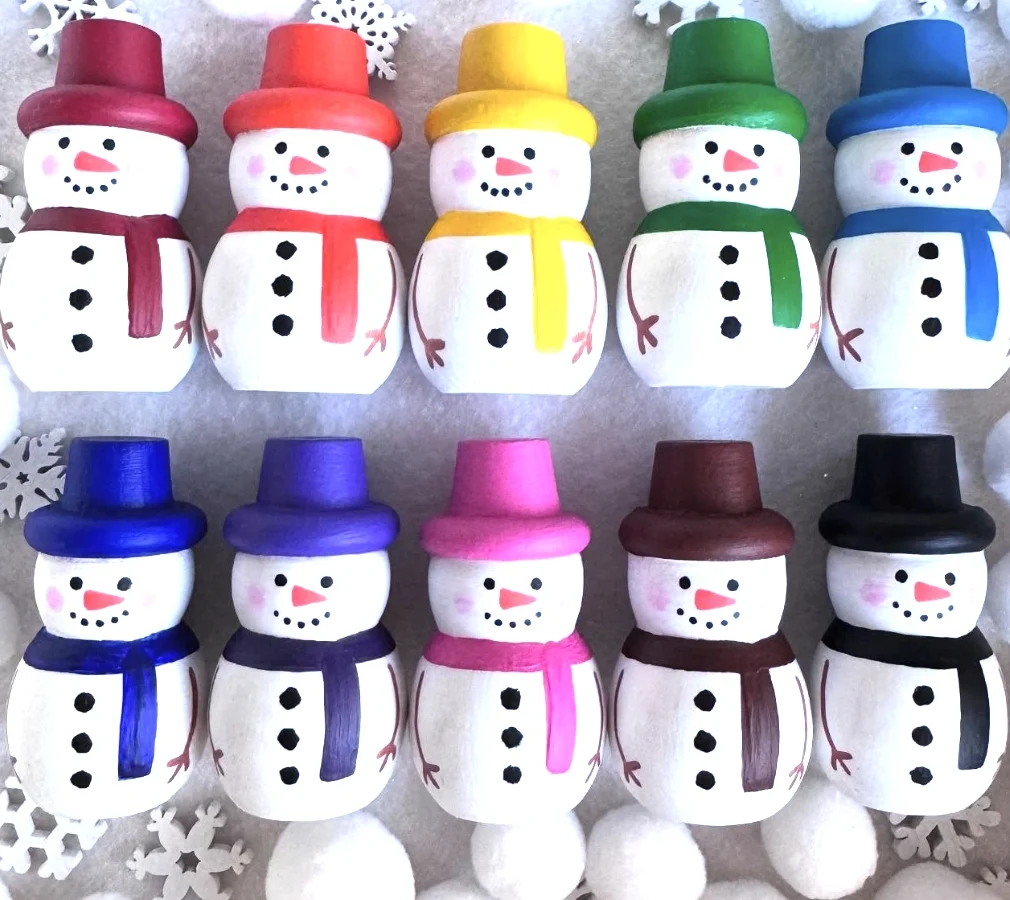
Row of Hand-Painted Wooden Snowmen with Colorful Hats and Scarves
Credit: @the_rural_headteacher
You’re probably already picturing the perfect spot to show off these adorable characters. Imagine them nestled along the mantel tucked between evergreen garlands, or maybe lined up as a ridiculously charming centerpiece for Christmas supper.
Seriously think about adding them to your collection of Christmas Basket Gift Ideas as well. They make wonderful surprises for co-workers or close friends. Where would you let them shine?
How to Make This Craft Snag some tiny wooden snowman silhouettes (unfinished), rainbow-colored acrylic paints, brushes, and small felt remnants Begin by coating each snowman body in bright white Apply 2 to 3 layers for a completely opaque coverage Pick a different vivid shade for each snowman’s hat and scarf Brush each hat and scarf in one single, solid color Allow everything to dry entirely Use a skinny black marker or paint to sketch simple dotted eyes and a stitched smile Add black dots marching down the belly for buttons Trim small rectangles from felt to craft scarves and snip the ends into fringe with scissors Glue the felt scarves snugly around the snowmen’s necks Brush on a clear protective topcoat to preserve your beautiful work Line up your rainbow snowman squad for a truly delightful display
Personalized Photo Ornament Diy Christmas Gifts in Basket

Credit: @alittlebirdiegifts
These transparent ornaments stuffed with snapshots and that crinkly paper fluff deliver such a distinctive touch. What a beautiful method for showcasing treasured memories, right?
These handmade treasures would absolutely slay as diy christmas gifts for grandparents. The gentle white ribbon tied on top provides a perfectly elegant finishing detail. If you lean toward the crafty side, absolutely put these on your must-make list.
How to Make This Craft Round up clear glass or plastic fillable ornament bulbs, printed family photos, scissors, faux snow, and decorative ribbon Gently pop the ornament caps off the bulbs Pick out your absolute favorite family pictures and trim them down to slide neatly inside the bulbs Roll each photo softly into a cylinder shape to slip it through the neck opening Once inside, let the photo unroll and nudge it into position so it faces outward through the glass Sprinkle a truly generous amount of faux snow into every bulb to build that wintry atmosphere Carefully press the ornament caps back into place, making certain they are fastened tightly Snip lengths of ribbon and tie them into elegant bows around the metal collar of each ornament Secure the bows right onto the ornament caps
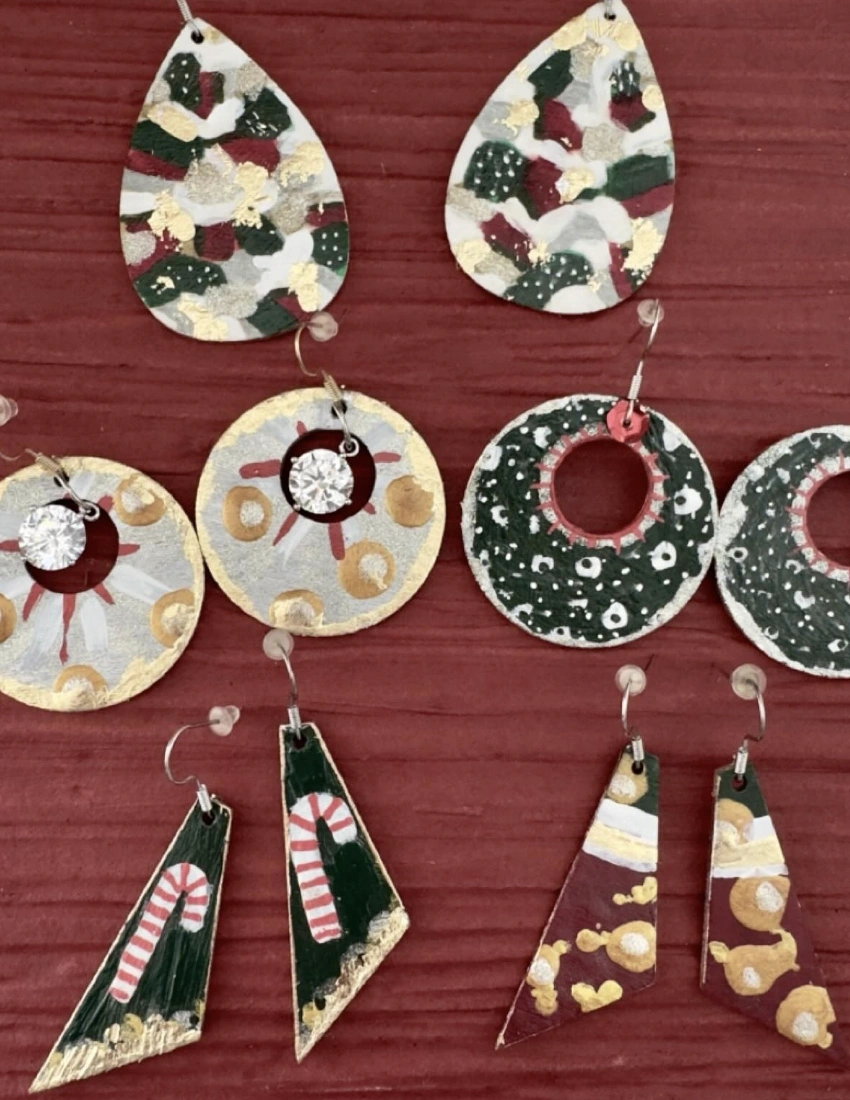
Festive Hand-Painted Christmas Earrings: Teardrop, Circle, and Triangle Styles
Credit: @lous_craftstuff
These earrings are completely adorable! They radiate serious DIY energy – you can almost feel the love poured into crafting them.
Picture your artsy cousin rocking these at the annual holiday get-together. She’s forever scouting unique, handmade accessories. The timing couldn’t be more perfect since she’s been craving fresh homemade Christmas gift ideas.
How to Make This Craft Collect thin wood slices, acrylic paints, gold leaf, and earring wires Buff the face of each wood slice with light sanding Brush on a base coat of your chosen color onto every slice Layer festive motifs using acrylic paints and ultra-fine detail brushes Press delicate gold leaf flakes onto the surface to create glint and dimension Seal the painted surface with a clear gloss varnish Drill a tiny hole at the top edge of each slice Hook on the earring wires using jewelry pliers Let everything cure completely before putting them on
Handmade Clay Christmas Ornaments with Red Detailing

Credit: @adriennalolabiart
These would be spot-on for that intimate office holiday party. Envision them strung across the break room, making the whole space feel instantly joyous.
They also shine as Christmas Gifts For Coworkers, especially for the ones who truly value a personal connection. You could even tie one or two onto a nice bottle of wine, a gesture that proves you invested real time, and they genuinely look lovely. Just keep in mind, they are on the delicate side.
How to Make This Craft Roll out air dry clay until it sits about ¼ inch thick Press cookie cutters into the clay to stamp out your favorite ornament silhouettes Use a drinking straw or similar tool to poke a clean hole for hanging threads Let the clay shapes dry completely, which usually takes about 24 to 48 hours Gently smooth any rough patches with fine grit sandpaper Mix a watery wash using red acrylic paint and a splash of water Grab a tiny paintbrush and apply folk art style motifs Let the paint set fully Brush on a coat of matte varnish for protection Loop twine or ribbon through the hole so you can hang them
Adorable Reindeer Caramel Popcorn Cone Christmas Gifts

Credit: @smartschoolhouse
Forget those predictable boxes of chocolate; these reindeer popcorn cones are on a completely different level. They’re so much more exciting for quick holiday gifting.
The real beauty lies in their simplicity, which is wonderful because the friend group is large, and every single person is receiving one as a christmas present. On the hunt for cute and affordable diy gift ideas? Definitely make a batch of these.
How to Make This Craft Stuff clear, cone-shaped plastic bags right up to the top with caramel popcorn Give the top of the bag a good twist to close it Tighten the closure with brown pipe cleaners bent into playful antler formations Knot a piece of black and white gingham ribbon around the twisted pipe cleaners Stick two googly eyes onto the front face of each bag Press a fluffy red pom pom onto the tip of the bag to form the nose Let all the glue set firmly Line up your finished reindeer treat pouches as a joyful display
Confection Wreath: Edible Christmas DIY Gift
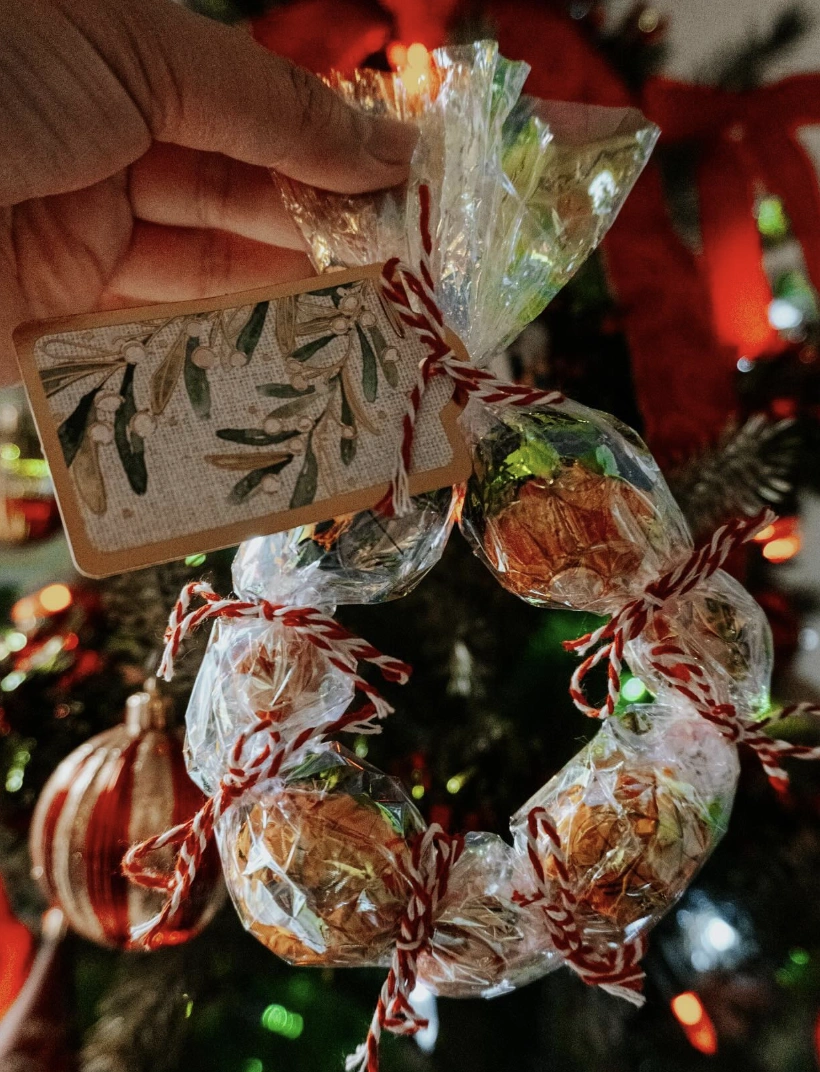
Credit: @festivebydesign
Frankly, the presentation is the star of the show here. A candy wreath?
Absolutely precious, and stringing this on the tree as decoration for your next holiday soirée would be brilliant. It channels the perfect mood for an elevated holiday brunch or even a cozy little gathering. This represents a completely charming way to show gratitude and a wonderfully thoughtful alternative to average Diy Holiday Gifts this season.
How to Make This Craft Assemble individually wrapped round chocolates Snip a substantial length of red and white baker’s twine Thread the chocolates onto the twine, tying a firm knot in between each piece Keep threading and knotting until the strand transforms into a full circular wreath form Fasten the two ends of the twine together with an extra tight knot Fashion a festive display tag using cardstock and holiday-themed graphics Punch a neat hole through the tag Attach the tag to the wreath using a shorter snippet of twine Dangle it from a tree branch or present it as a sugary edible treat
Hand-Painted Bell Ornaments with Snowflake Details

Credit: @honestlop
Sick of cookie-cutter, factory-made holiday trimmings? These hand-painted bell ornaments offer a breath of fresh air.
Those tiny imperfections and unexpected color shifts add undeniable warmth and personality to your tree. They slot perfectly into your growing collection of beloved holiday treasures. Choosing to craft your own means your Diy Christmas Ornaments become a true reflection of your personal style.
How to Make This Craft Begin with raw, unfinished wooden bell ornaments Drench each bell in a different vivid shade using acrylic paints Let the paint dry thoroughly Buff the edges of every bell lightly with sandpaper to achieve that worn, vintage patina Lay snowflake stencils flat across the bells Dab craft paint over the stencil to imprint the design cleanly Allow the paint to set Seal the surface with a matte clear coat for lasting protection Thread a loop of gold twine or ribbon through the top
Scrap Fabric Christmas Cones and Wreath with Wrapped Gift
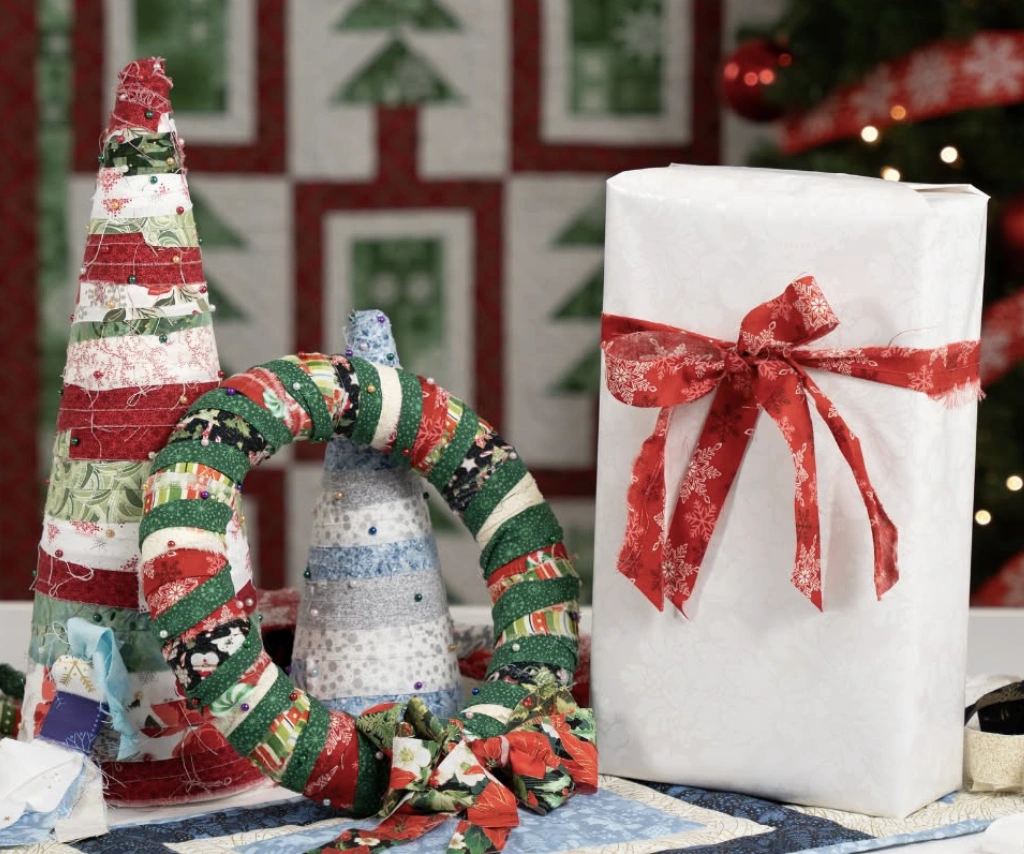
Credit: @fabriccafe
These diy christmas decorations don’t need to be flawless to radiate holiday spirit! The fabric-wrapped cones give you a brilliant excuse to burn through that stash of textile remnants you’ve been collecting.
The plush wreath stays completely kid-friendly with zero sharp pine needles poking out. The little ones could absolutely help wrap a foam cone, which might just turn into an annual family tradition.
How to Make This Craft Gather a heap of festive fabric scraps, quilt batting, and cardboard cones Slice the fabric into uniform strips, roughly 1 to 2 inches wide Starting at the bottom of the cone, wrap it in a layer of batting and glue it down firmly Overlap strips of fabric, sticking them down with hot glue as you spiral upward toward the tip Mimic the same overlapping method for the wreath by wrapping a foam ring form with fabric strips Jazz up the cone trees and wreath with beads, buttons, or leftover ribbon scraps Stitch the flat scraps together to build a dimensional tree ornament Arrange your finished scrap fabric creations, alongside a wrapped present, into a festive vignette Punch a hole and attach a string at the top point for hanging
Homemade Peppermint Bath Salt Ornaments with Festive Twine

Credit: @domesticallyspeaking
These leave standard store-bought baubles completely in the dust. They land on an entirely different plane since they’re packed with peppermint bath salts!
That beats plain glitter any day, right? The red and white twine delivers that perfect final pop of holiday flair.
These feel like absolutely perfect Christmas Gifts For Coworkers. Stupidly simple to DIY as well, which is always a huge plus.
How to Make This Craft Nab some clear, plastic or glass, fillable ornaments Grab both fine and coarse salt along with red food coloring Split the salt between two separate bowls Squeeze food coloring into one bowl, mixing relentlessly until the salt turns a uniform shade of red Spread the dyed salt on a baking sheet to dry completely so it avoids clumping Spoon the plain white salt carefully into the ornament Pour a layer of red salt directly on top of the white Keep building these alternating layers until the globe is packed full Press the ornament cap on securely Wrap twine around the neck of the ornament and tie a pretty bow Slip a tiny sprig of fresh evergreen under the twine Give the ornament a soft shake for dreamy swirled color effects
DIY Geometric Christmas Ornaments – Paper Craft

Credit: @gohlikim
Picture making a whole pile of these with the kids on a snowy afternoon. Once finished, you could tuck them into a cozy Christmas basket gift ideas bundle along with hot cocoa mix and marshmallows for the neighbors.
The shapes appear simple enough that even the tiniest hands can pitch in, and they contribute that sweet, homespun texture to the branches. Definitely worth carving out the time to create.
How to Make This Craft Fetch a template for a diamond-shaped ornament (easily searchable online) Print the template onto festive, double-sided cardstock slice out every ornament shape with precision Score firmly along all the interior fold guidelines to achieve sharp, crisp creases Fold along the scored lines to start building the diamond structure Dab a small amount of glue onto the designated assembly tabs Press the tabs firmly against the matching panels to lock the 3D diamond into shape Poke a tiny hole at the very top of the ornament Pull a length of baker’s twine through the hole and tie a knot to form a hanging loop Dress them up with glitter or sequins if the mood strikes
Felt Christmas Tree Ornament with Sequins and Embroidered Details

Credit: @i_am.innu
The way the green stitching builds that layered branch effect is pure obsession material. Check out those tiny sequins too, the light hits them just right.
This piece is seriously fueling inspiration for Christmas Crafts For Kids. You could absolutely imagine gathering the younger cousins to make these together. That simple brown twine loop adds a wonderfully rustic finishing note.
How to Make This Craft Kick things off by sketching a Christmas tree silhouette onto paper Snip two pieces of felt, one cream and one green, guided by your tree template Grab embroidery floss to work a variety of decorative stitches across the tree shape Secure sequins in the spaces between embroidery to scatter pops of reflective color Stitch a tiny trunk at the base using brown floss Trim the edges of the cream felt layer with pinking shears for a sweet scalloped border Join the two felt cutouts using a blanket stitch, pausing to leave a small gap at the peak Fill the ornament softly with a pinch of fiberfill Stitch the gap shut Fasten a loop of twine to the very top for dangling display
Rustic Mason Jar Christmas Wall Hanging with Holly and -Joy-

Credit: @craftingbythebay
Everyone seems to be cranking out those overly sweet painted signs, but this mason jar wall hanging nails the assignment properly. It doesn’t feel hastily thrown together; you can sense the intention behind every choice.
The subdued color palette feels far more refined than the ultra-bright, glitter-bombed alternatives. It stands as a quiet reminder that the finest things can indeed be crafted by hand, marking this as a top contender for some deeply personal Diy Gift Ideas this season.
How to Make This Craft Begin with a pre-cut wooden blank shaped like a mason jar Brush the jar form with white paint and let it dry fully Coat the jar lid portion with grey paint Arrange wooden letters spelling -JOY- across the face of the jar Glue the wooden letters, dried floral accents, and ribbon onto the jar front Use hot glue to anchor every single element in place Tuck sprigs of greenery alongside the ribbon to add depth and texture Apply a protective sealant coat over the painted surface Fix a small screw into the interior back of the wooden lid to anchor the hanging cord Tie a length of rustic jute twine to the top for hanging
Vintage-Style Christmas Ornaments with Antique Images
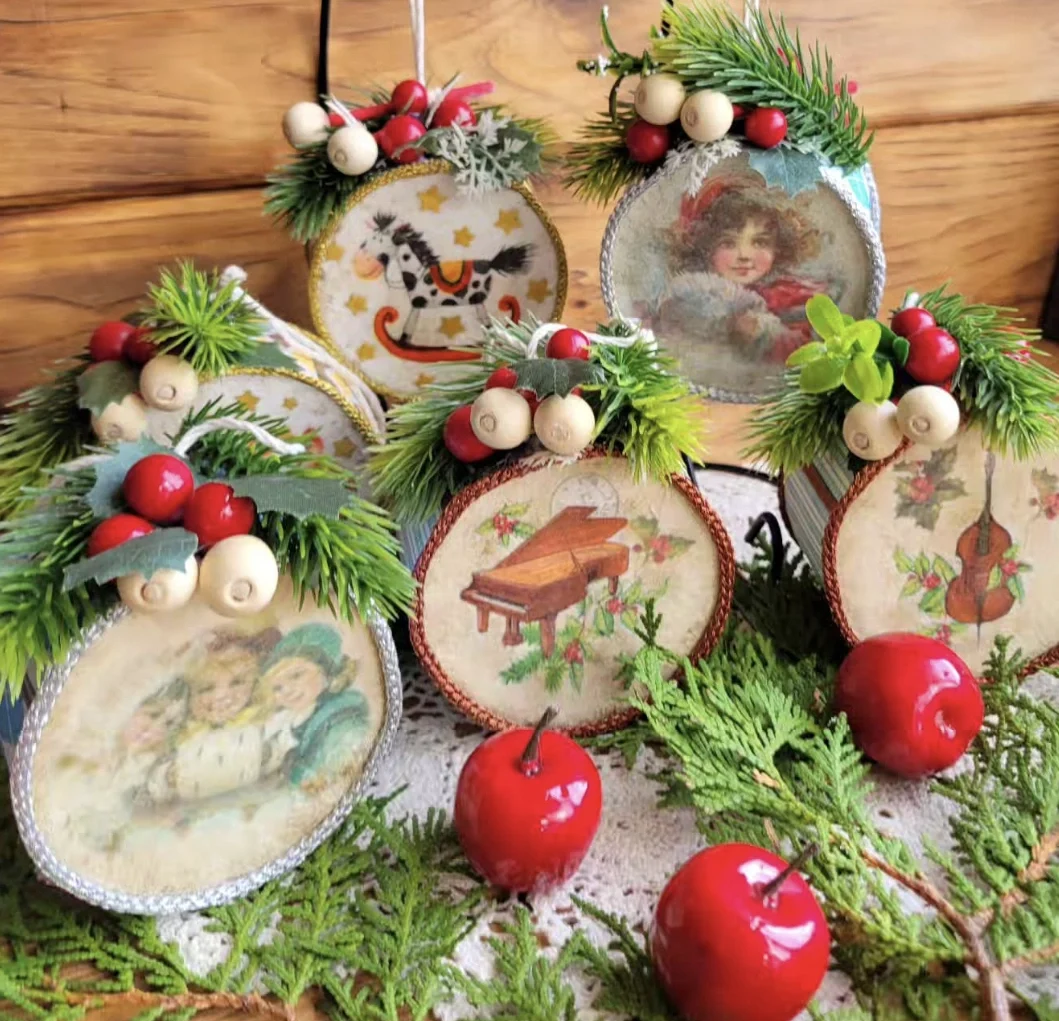
Credit: @nata.chique
The way they’ve incorporated what look like little crimson berries and wooden beads to trim the tops is simply brilliant. Did you notice the antique imagery on every single disc, like the old rocking horse and the grand piano?
Absolutely charming. If you find yourself hunting for Homemade Gift Ideas this holiday, you can totally replicate these beauties. It’s an obsession-worthy project.
How to Make This Craft Collect round wood slices, vintage image printouts, decoupage medium, tiny evergreen clippings, faux berries, wooden beads, twine, and scissors Snip out the vintage pictures and spread decoupage medium across the wood slices Set the images gently onto the wet glue and smooth them down to banish any bubbles Let them dry all the way, then brush a protective top layer of decoupage medium over the surface Decorate the top edge of each ornament with clusters of evergreen, faux berries, and wooden beads Use hot glue to fix all the decorative bits to the top of the ornaments Measure and cut pieces of twine, knotting them into hanging loops Attach the twine loops to the backside of each ornament with hot glue
Handcrafted Crochet Christmas Trees and Star Ornament
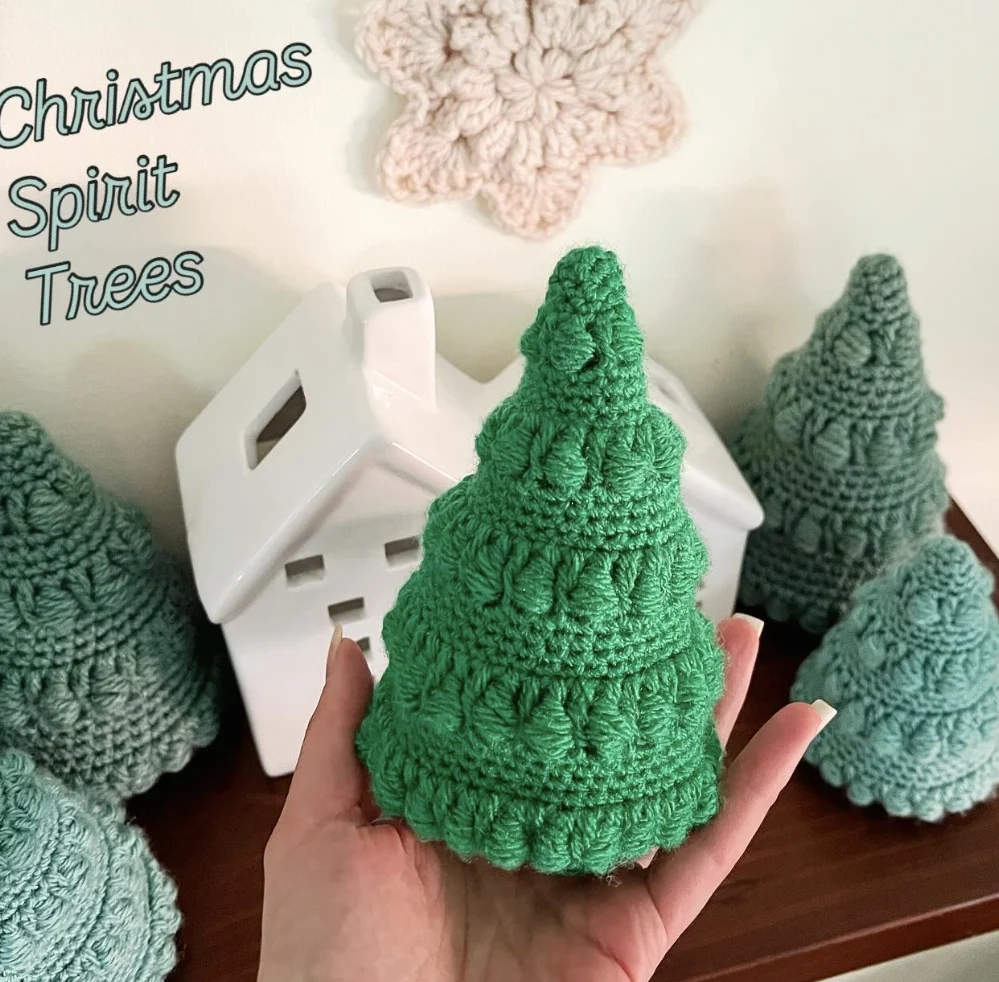
Credit: @thecrochetfix
The whole cottagecore movement is still charging forward, and these fit right into that world with ease. These miniature crochet trees and that little star are impossibly sweet.
They strike a perfect balance between timeless Christmas charm and that snuggly, handmade texture everyone craves right now. Looking for a genuinely enjoyable way to dress up your home this year?
Crafting your own diy christmas ornaments, just like these, is absolutely worth your consideration. The intricacy packed into each stitch is truly precious.
How to Make This Craft Start by crocheting a magic ring using green yarn Add stitches in each subsequent round to form a widening cone shape, relying on single crochet increases Transition into a textured stitch, like a bobble or puff stitch, for a few rows to inject visual depth Alternate between smooth single crochet rounds and those bumpy textured rounds Start reducing your stitch count to taper the top section of the tree Crochet a separate tiny star out of beige yarn Pack the interior of the tree firmly with fiberfill stuffing Shut the top of the tree securely using a few slip stitches Stitch the crocheted star onto the very peak of the tree Add a crocheted flat circle at the base for extra stability if you like
Hand-stitched Nativity Scene Ornament with Felt Holiday Designs
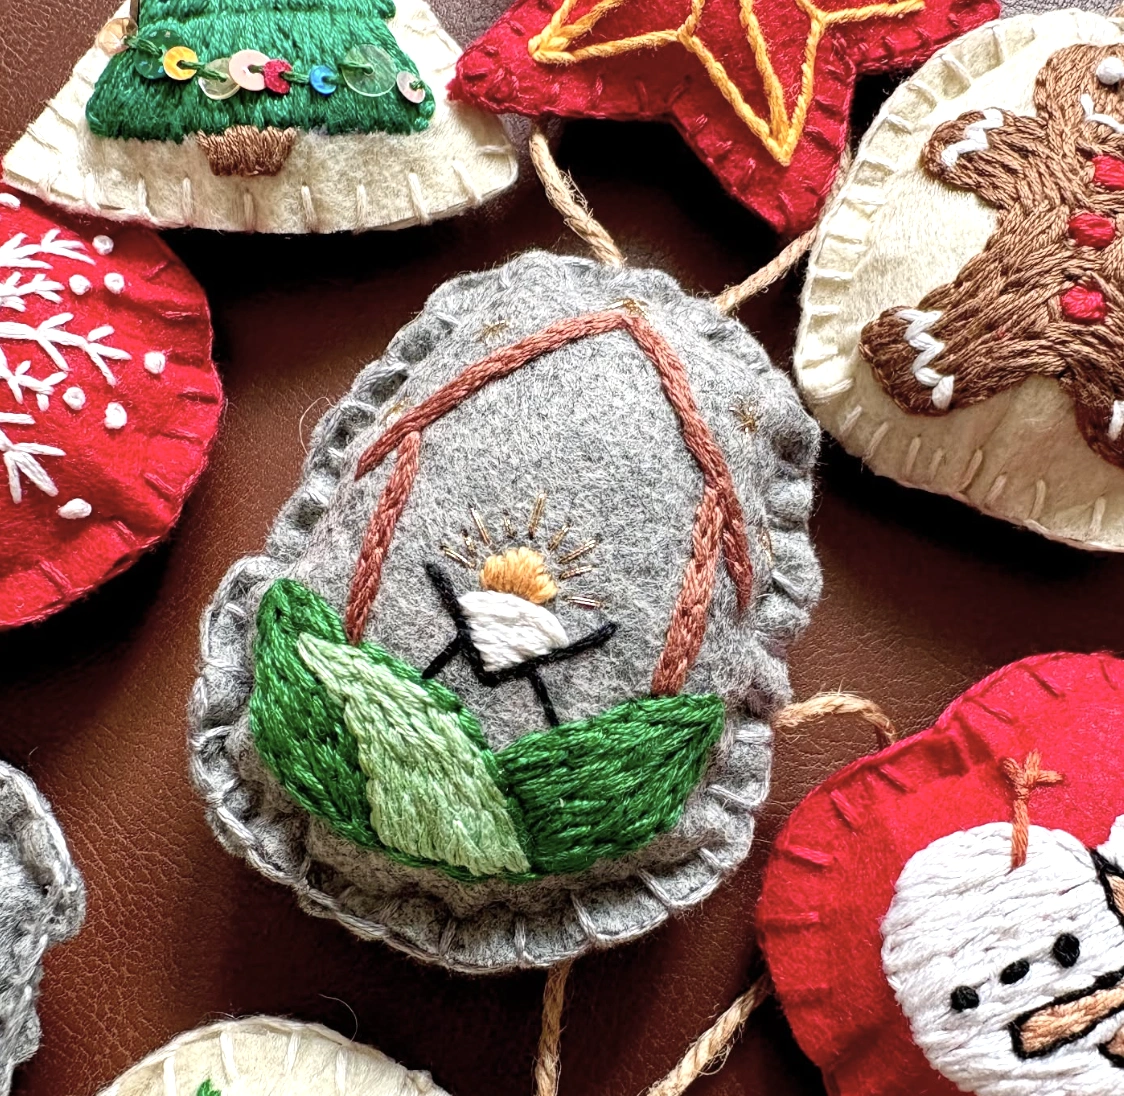
Credit: @i_am.innu
Every single one is meticulously hand-stitched, lending them a truly special, artisanal feel. These lean more toward heirloom quality territory.
Brainstorming fresh Diy Christmas Decorations brings such pure joy, and the wheels are already turning about which felt figures to dream up for next season. Because they’re crafted from felt, they also stay completely kid-safe and won’t explode into shards if someone gets clumsy.
How to Make This Craft Slice two oval foundation pieces from soft gray felt for the ornament base Cut leaf silhouettes out of rich green felt Embroider the leaf veins using green thread in a satin or stem stitch style Embroider the tiny manger using brown yarn and the infant figure in white and yellow yarn Arrange the stitched leaf and nativity scene layers on top of one of the gray felt ovals Set the second gray felt oval on top, covering the design completely Blanket stitch around the entire perimeter of the oval shape to secure all the layers Fasten a loop of twine to the top edge of the ornament for hanging Stuff it gently with fiberfill to reach your desired level of plumpness and firmness Get inventive adding different felt and yarn details to additional ornaments
Hand-Painted Gingerbread House Scene & Ornament Garland Set
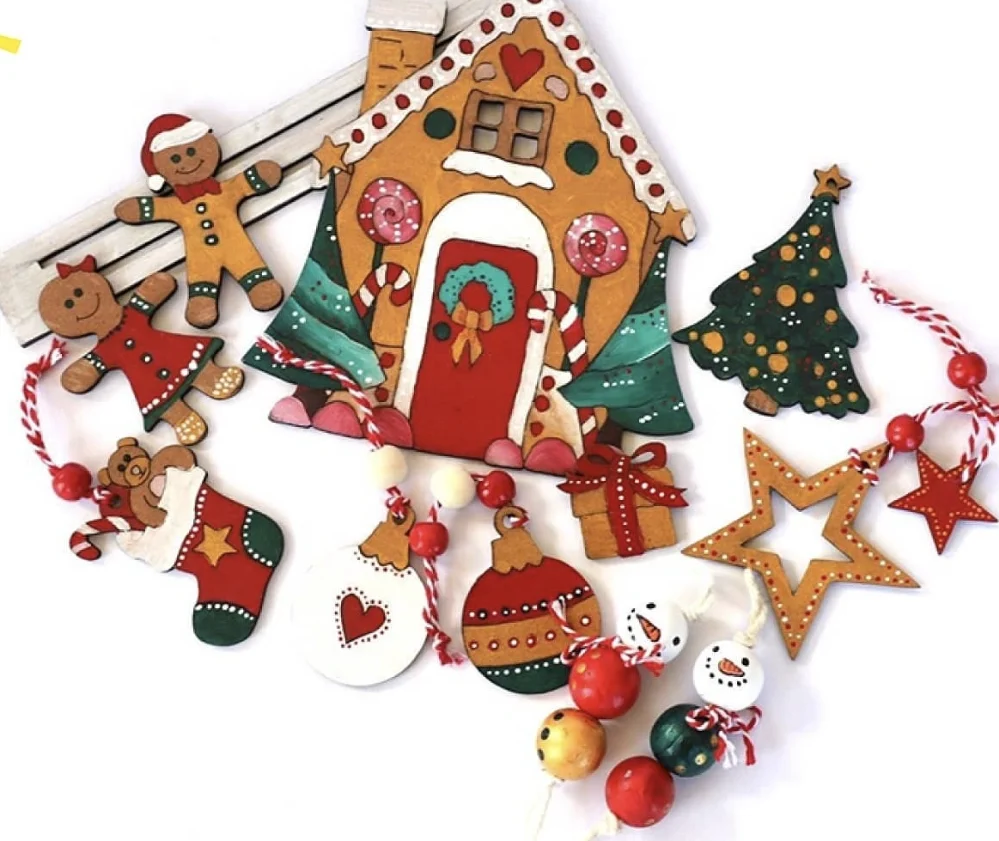
Credit: @presentdrop
These hand-painted wooden ornaments inject a dose of homespun sweetness into any room. The gingerbread house is a total fixation point and looks spectacular perched on a shelf.
Picture draping that beaded garland across a fireplace mantel or even winding it through the branches of a petite tree. The DIY spirit here speaks loudly, and frankly, these are precisely the type of distinctive Christmas Crafts For Adults that people genuinely treasure.
How to Make This Craft Buy pre-cut wooden ornament silhouettes, like a gingerbread house and trees, plus a bag of wooden beads Prime the raw wooden ornaments with a solid coat of white paint Once dry, decorate each ornament with festive acrylic paint hues, allowing them to dry Embellish the gingerbread cottage with tiny painted details like hearts, candy sticks, and wreaths Adorn the tree shapes with dots and dashed lines to simulate a garland effect Paint the wooden beads in alternating shades of red, green, and white String the painted beads and ornaments onto a length of twine or sturdy string Knot the garland ends firmly to stop everything from sliding off Tie an additional hanging loop onto each separate ornament
Red and White Knitted Mitten Christmas Ornament Garland

Credit: @marie.alexandrine
They are ridiculously cute and tailor-made for hanging on the tree. Total obsession material.
The impulse to slide them onto your fingers is real, but they’re far too tiny, sadly. Perhaps this is the year to get the children involved and craft a custom set for the family tree.
They’d rank among the best Diy Christmas Gifts ever. Let’s raid the yarn stash this weekend and whip up a batch.
How to Make This Craft Cast on 10 stitches using red and white yarn with needles suited to the yarn’s weight Knit in garter stitch, knitting every single row, for 4 rows while alternating red and white stripes Start building the thumb by adding stitches on one edge, then work those specific stitches apart from the main hand portion Continue knitting the hand part of the mitten in stockinette stitch, knitting one row and purling the next, while shaping the top curve Decrease the stitches to sculpt the rounded peak of the mitten Bind off every stitch and weave the loose ends neatly back into the fabric Produce a matching twin mitten to round out the pair Replicate steps 1 through 7 to churn out several mitten duos Thread a lengthy strand of twine through the peak of each mitten to assemble a garland Tie a knot at the top of each mitten to lock the spacing on the garland string
Handmade Poinsettia Christmas Card with Berries

Credit: @ecraftdesigns
This card sparks instant adoration. Anyone who treasures a handmade touch, from grandmothers to that one art-obsessed best friend, would absolutely lose their mind over this.
It radiates warmth and intentionality. The dimensional texture on those petals sits on another level entirely. Pondering the creation of some Diy Holiday Gifts this year, and slipping a card of this caliber into a gift basket would be a jaw-dropping addition.
How to Make This Craft Assemble your heavy cardstock, patterned paper sheets, and die-cutting templates Run the templates through your machine to slice the poinsettia petals in graduated sizes from red and pink cardstock Sculpt and curl the petals using a stylus or embossing tool Stack the petal layers, adhering them together with glue dots Snip holly foliage and twigs from green paper Press red decorative berries into place using craft glue Affix the finished poinsettia cluster and foliage arrangement to the front face of the card Print or stamp a ‘Merry Christmas’ message onto a small label and glue it to the composition Apply tiny pearl embellishments wherever they feel right Allow the glue to cure fully before gifting it
Resin Reindeer Ornament with Gold Flakes

Credit: @epodex_usa
This ornament possesses a surprisingly striking beauty when you see it up close. It slides effortlessly into a rustic Christmas scheme.
These would look phenomenal hanging on a compact tree set up in the dining area or serving as distinctive accents tied directly onto gift bags. When daydreaming about creative “Homemade Christmas Gift Ideas,” an item like this truly satisfies the craving. Since each one comes out slightly unique, they hold an inherently special aura.
How to Make This Craft Collect your chosen reindeer mold, two-part resin and hardener, gold leaf flakes, and sparkly glitter Blend the resin and hardener meticulously according to the instructions on the packaging Spill a thin transparent base layer of the mixture into the mold cavity Sprinkle fragmented bits of gold leaf and a dusting of glitter over the wet resin Top off the mold with the remaining resin mixture Permit the resin to cure completely for the exact duration specified by the brand Gently flex the mold to pop the hardened resin reindeer free Drill a petite hole through the top section of the deer Poke ribbon or cord through the hole to create the hanging mechanism Finish it with a UV protection spray to extend its lifespan
Mini Norfolk Pine Christmas Tree with Twig Ornaments
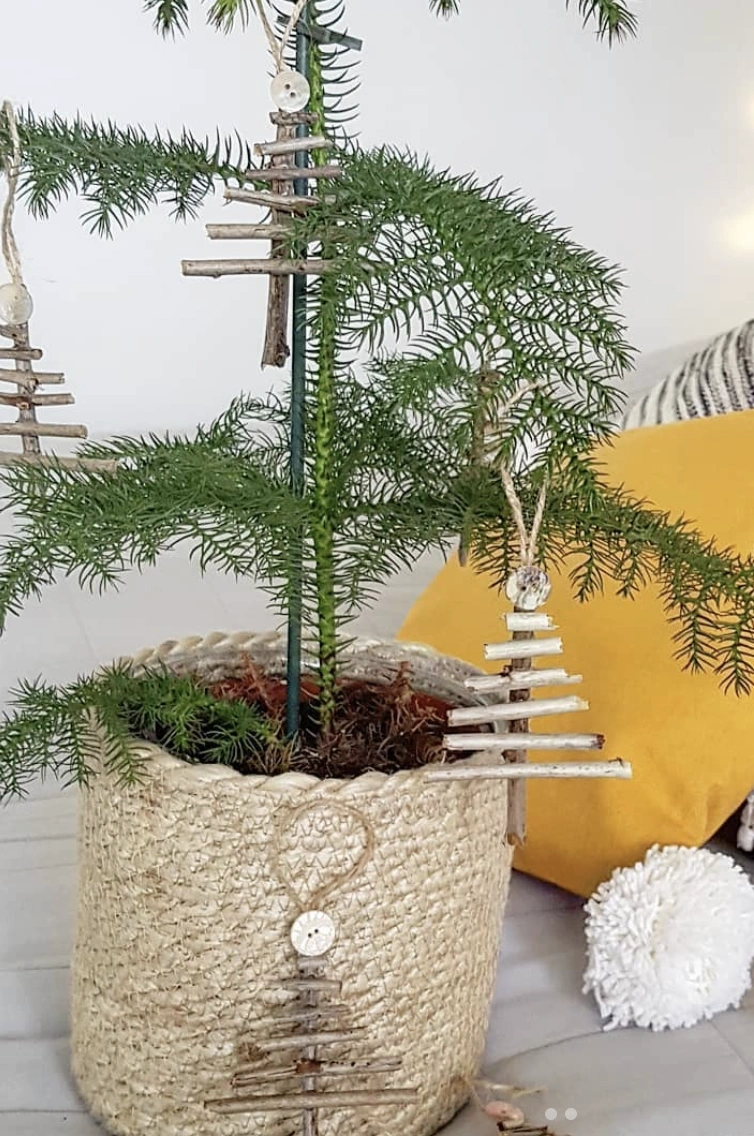
Credit: @homediyhomestyle
This aligns perfectly with a love for low-fuss, organic holiday aesthetics. A tiny norfolk pine tucked into a burlap pot is just ridiculously cute.
Even better, those simple twig star ornaments present the ultimate project for Christmas Crafts For Kids. The whole look leans toward an eco-conscious, rustic feel, which is incredibly trendy at the moment. Stealing this concept immediately feels like the only sensible reaction.
How to Make This Craft Gather skinny twigs of varying lengths, twine, hot glue, and a handful of buttons Snip the twigs into a sequence of gradually shorter segments Line up the twigs horizontally to rough out the silhouette of a Christmas tree Secure the twigs together at their center spine using hot glue Cut a short bit of twine to act as a hanger Adhere the twine loop onto the back of the twig tree Embellish the front by gluing buttons onto the twigs Let the glue set completely Dangle from a larger indoor tree or use as rustic wall décor
Hand-stitched Felt Ornament Gift Box: Mushroom, Santa, Gingerbread
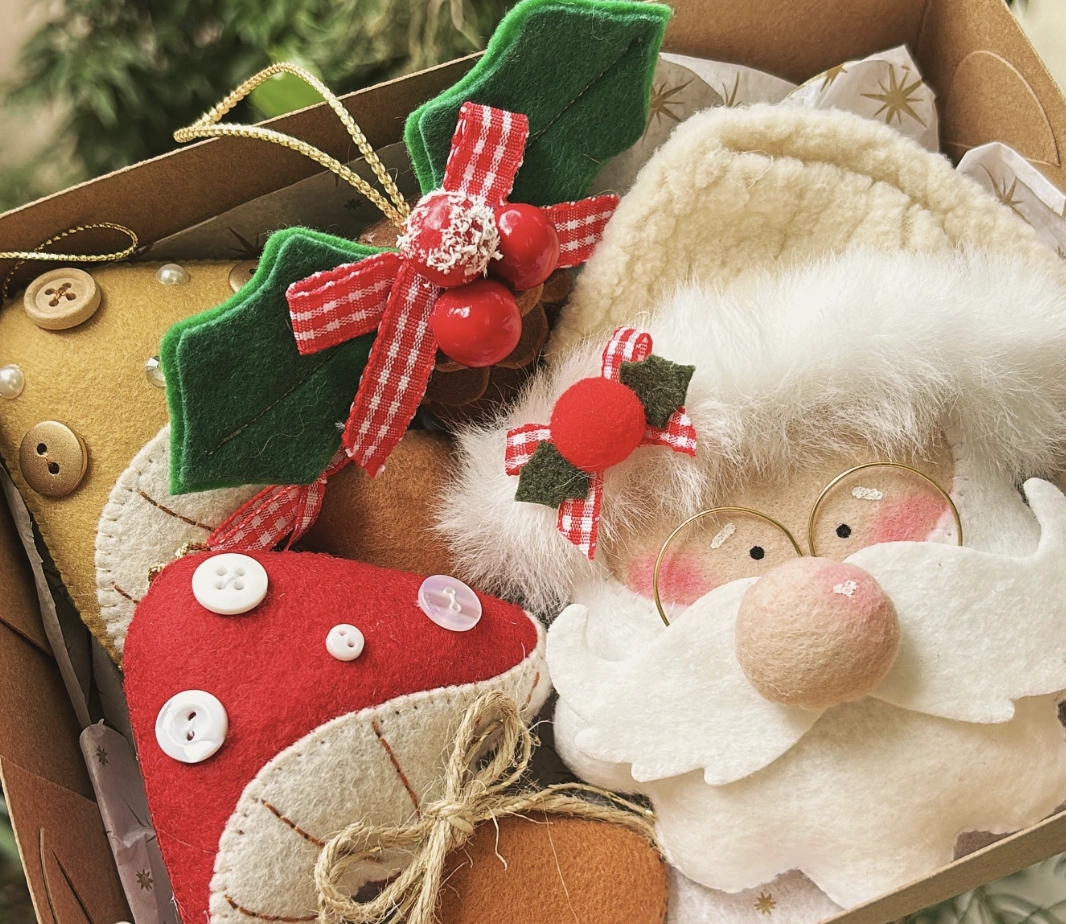
Credit: @paulamirandat
These felt ornaments distinguish themselves through their utterly charming handmade appeal. The detailing on the mushroom, especially those little pearl-like buttons, is ridiculously sweet, and the twine accent ties it all together.
This curated gift box proves that Homemade Gift Ideas don’t require machine-like precision; all they need is an infusion of love. The fluffy texture of the felt Santa’s beard adds just the right dash of playfulness. So incredibly thoughtful.
How to Make This Craft Pull out felt sheets in classic red, forest green, crisp white, warm brown, and metallic gold Slice out ornament shapes guided by templates for a Santa, a mushroom, and a holly sprig Sew the front and back pieces of every ornament shape together with matching thread Leave a tiny unstitched gap for the stuffing Fill each ornament with soft fiberfill until it puffs up perfectly Stitch the remaining opening completely shut Decorate each finished ornament with buttons, delicate ribbons, and embroidery floss details Secure ribbon loops to every ornament so they’re ready to hang Nestle the completed character ornaments inside a kraft paper gift box Finish it off with a layer of decorative paper or a silky ribbon tucked over the top
Adorable Crocheted Christmas Tree, Stocking, and Candy Cane Ornaments
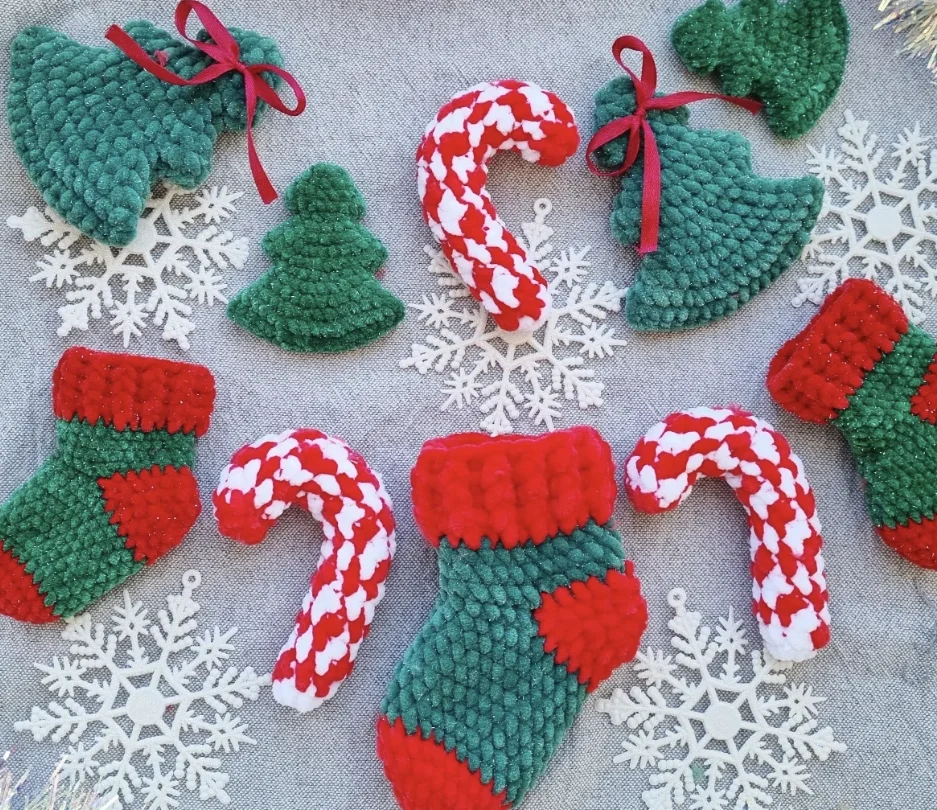
Credit: @lubava_crochetpattern
They’re ideal for anyone who holds a deep appreciation for handmade goods and enjoys getting a head start on the festive season. These would make for an amazing Diy Holiday Gifts project, being both thoughtful and highly personal.
Plus, just imagine how adorable these would look scattered across the branches of the tree. Simply look at that candy cane.
How to Make This Craft Select a super soft yarn in traditional red and green Search out crochet motifs for miniature stockings, swirly candy canes, Christmas trees, and jingle bells Stick to the patterns line by line to shape each miniature ornament Pack each finished crochet piece loosely with fiberfill stuffing Tuck every stray yarn tail back into the fabric Apply refined details such as the white diagonal stripes onto the candy canes Fasten petite red ribbon bows to the top of every completed ornament Lay out the finished ornaments in a tidy arrangement Spritz them lightly with starch to add a touch of crispness and durability
Hand-Painted Blue Bulb Ornament Christmas Tree Decoration

Credit: @kcl_dotdesigns
Hanging this ornament on the tree is a no-brainer. It delivers the perfect unexpected hit of color standing out against all that deep green.
Honestly, these could also look insanely cute strung together as a garland decorating a child’s room all year round, or pulled out as distinctive décor for a frosty winter-themed party. If you are brainstorming for unique Diy Gift Ideas for the holidays, these bulb ornaments might just be the magic answer. They’re beautiful, straightforward, and arrestingly eye-catching.
How to Make This Craft Grab a clear glass bulb, acrylic paints spanning multiple blue tones, and dotting tools in a range of sizes Wipe the bulb down with rubbing alcohol to strip away any lingering oils or dirt Coat the entire bulb in a foundation layer of deep navy acrylic paint and let it dry Take the biggest dotting tool and map out a pattern of large dots all around the bulb Switch to incrementally smaller dotting tools and fill the spaces within and surrounding the large dots, building dense layers Sculpt teardrop shapes by pulling a dotting tool downwards through still-wet paint Brush metallic paint onto the bulb’s silver metal base to elevate the overall aesthetic Apply a clear sealant spray to shield the paintwork from chips and scratches Clip an ornament hook onto the metal base to provide a hanging point Let the sealant completely dry before you suspend your ornament on the tree
Paper Christmas Tree with Intricate Snowflake Cutouts
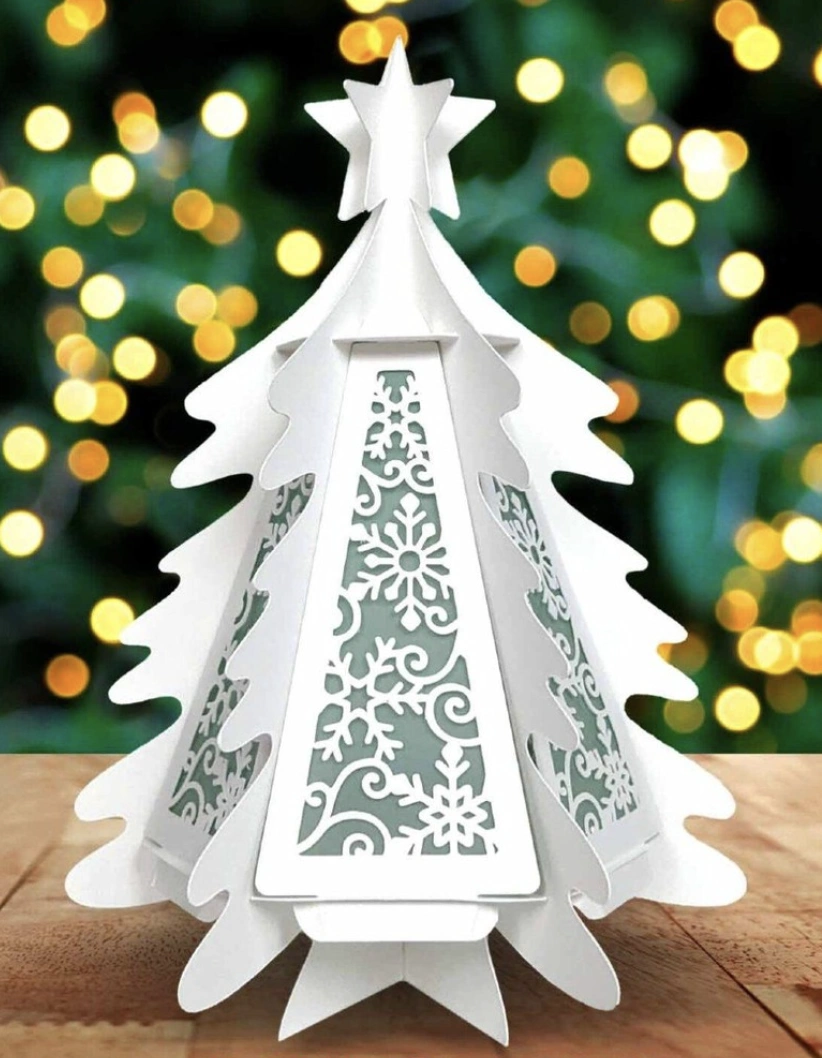
Credit: @jennifer.maker
If you’re brainstorming unique Christmas Gifts For Coworkers, this idea lands right on the mark. Skip the standard monogrammed mugs.
This paper Christmas tree carries a genuine element of surprise. This isn’t run-of-the-mill craft store fluff either; the snowflake cutwork reads as legitimately luxurious.
Take it up another level by shining a single spotlight directly on it, the shadows it casts will be absolutely stunning. Think about hiding a sachet of potpourri inside to release a delicate holiday fragrance that gently scents the workspace.
How to Make This Craft Download and run off a Christmas tree template onto heavy cardstock Trace the outline onto several sheets of white or soft cream cardstock Slice out the tree forms using a sharp craft knife or precision scissors Map out a layered geometric pattern within the inner body of the tree and cut it out with the craft knife Employ a scoring board and stylus to pre-crease every indicated fold line on the paper Build the outer tree structure by folding and gluing down the side tabs to make a sturdy 3D framework Adhere the inner layers featuring the lattice cutouts into the tree base to produce that open, multilevel aesthetic Build the topper by cutting two matching star outlines from cardstock and gluing them together Face to face Secure the assembled star onto the tree peak using hot glue or strong craft glue Place a battery-operated tea light inside the hollow tree base to make the ornate paper construction glow
Tiny Crochet Christmas Trees in Every Color!

Credit: @crochetwmin
These crochet trees are simply bursting with cuteness and vivid energy. Every single one explodes with miniature festive joy, and the fine details are pure obsession fuel.
Forget standard boring baubles. These would make brilliantly unexpected little surprises to nestle into your christmas basket gift ideas this year.
Picture them scattered throughout a snowy miniature winter village scene, too. The rainbow version specifically? The cuteness overload is simply impossible to process.
How to Make This Craft Pick out your preferred palette of yarn shades and the matching crochet hook size Launch into a magic ring and work 6 single crochet stitches directly into the ring Double the stitch count by increasing in each stitch to finish the second round with 12 single crochets Keep adding stitches evenly in the following rounds to craft a perfectly flat base circle Transition to your tree’s primary hue and work in continuous rounds, incorporating periodic decrease stitches to taper the shape into a cone Flip between colors every few rows to create that joyful multicolored stripe effect Crochet multiple rounds of single crochet, systematically dropping the stitch count per round to shape the pointy top of the tree Fasten off the yarn and weave the tail ends in securely to lock the stitches Build adorable tiny pom-poms from scrap yarn pieces and fix them to the tree body using glue or thread Fashion miniature decorative bows from ribbon and glue them to the very tip top of the tree
Hand-Knitted Wool Heart Ornaments: Red and Cream Holiday Decor

Credit: @hill_yarns
These petite, knitted heart decorations deliver such an intimate handmade touch. Crafting them stands out as a brilliant option for Christmas Crafts For Adults who want satisfying projects that won’t swallow up an entire weekend.
Suspend them solo on slender, wispy branches, or bundle a handful together to create a clean, powerful visual moment. The red against cream palette stays perfectly festive without ever tipping into cliché territory.
How to Make This Craft Gather red and white wool yarn, knitting needles suited to the yarn thickness, and a bag of fiberfill stuffing Cast 20 stitches onto your needle with the white yarn and churn out garter stitch, knitting every row, for 4 rows Initiate the heart’s upper curve by snipping one stitch at the start and finish of every row for multiple rows Swap to the red yarn and press onward, weaving a basic snowflake motif into the fabric using the Fair Isle colorwork method Keep knitting and now begin adding stitches back, bumping the count by one at each edge every row for several rows to mirror the other side Sculpt the bottom point of the heart with another set of decreases, culminating in 4 final rows of white garter stitch Bind off all live stitches and weave the yarn ends back into the fabric Fold the knitted panel in half with the right sides facing inward, and stitch the curved edges together, pausing to leave a gap for stuffing Flip the heart right-side out and pack it densely with fiberfill Whipstitch the stuffing gap closed and affix a yarn loop for hanging ease
Felt Moose Ornament with Holly Sprig and Heart Detail
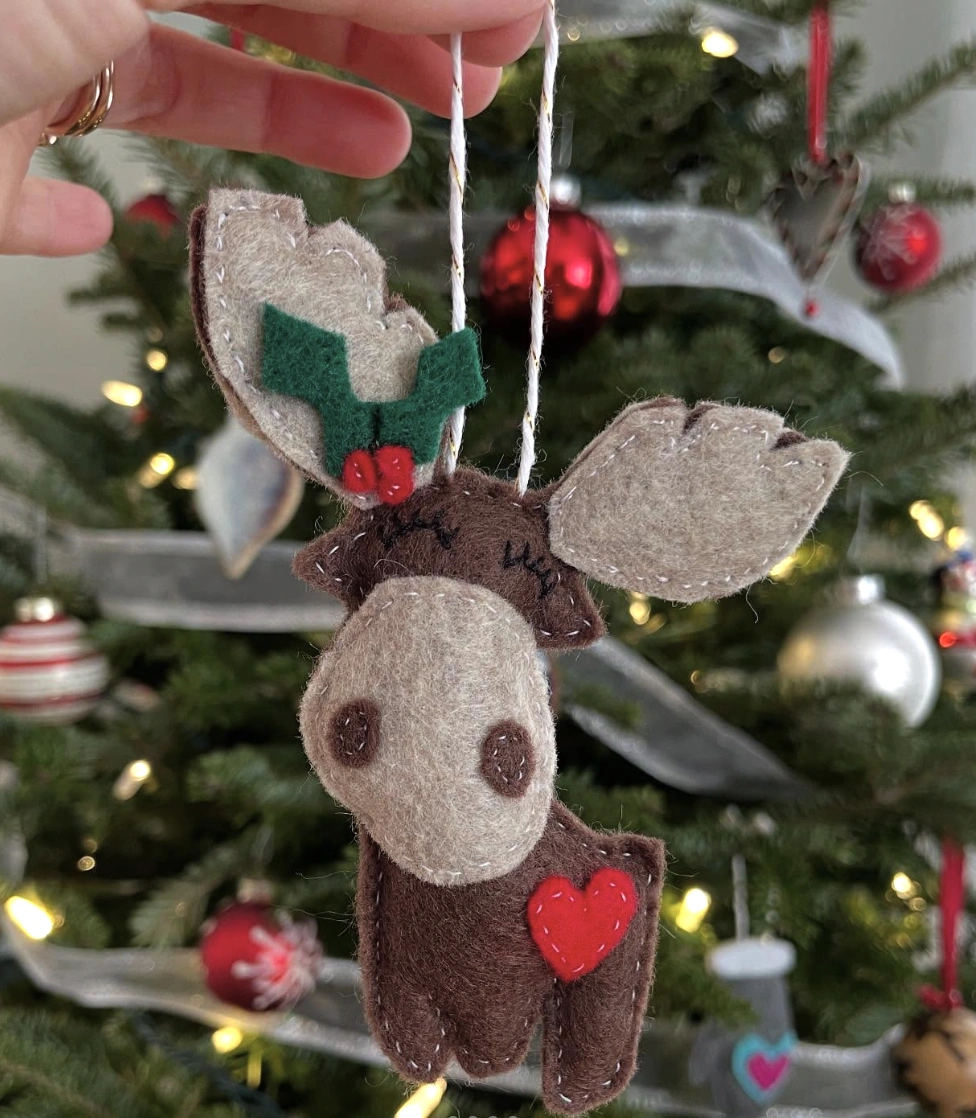
Credit: @do.it.yowself
The hand-sewn outlines tracing the felt pieces give this ornament its truly special character. That miniature sprig of holly fastened to a single antler is pure charm, and the little scarlet heart injects a perfect dose of cheer.
This represents one of those homemade Christmas gift ideas that actually delivers on visual appeal. It brims with personality and brings a big helping of down-home comfort.
How to Make This Craft Fetch and print a moose pattern including the body, noggin, antlers, heart, holly leaves, and berry clusters Cut apart the pattern shapes and trace them onto the appropriate felt tones, using brown for the main form and tan for the snout Snip out every felt piece following the traced lines with a sharp pair of shears Position the facial features onto the moose head and tack them down with tiny stitches, like a neat blanket stitch Sew the red heart onto the moose body with a straightforward running stitch Stack the holly leaf and berry components and stitch them firmly atop the moose’s head Align the moose front and back panels, match the outer edges, and begin stitching around the entire perimeter using a blanket stitch Leave a narrow opening near the top to accommodate the filling Pack the moose form rigidly with fiberfill Sew the filling gap shut with an invisible whip stitch Fasten a twine or ribbon loop to the crown of the moose’s head for hanging purposes
Retro Red and Silver Mirror Mosaic Diy Christmas Ornaments
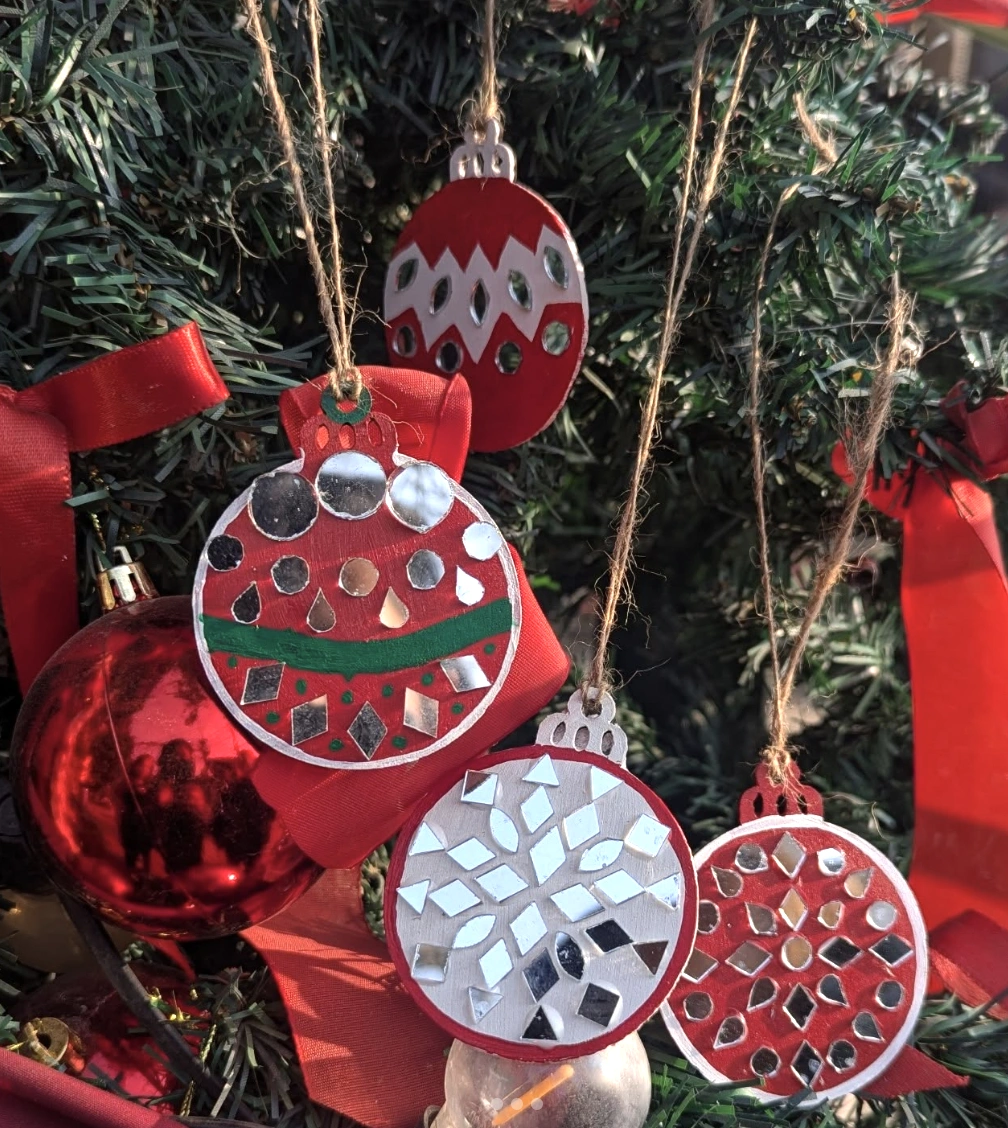
Credit: @banjaran_soul
A serious attachment to anything vintage-inspired is understandable, but store-bought retro pieces can be shockingly pricey. The goal was finding something distinct without draining the wallet.
These DIY Christmas ornaments come together so easily with basic craft cabinet staples. The best payoff?
Creating your own decorations carries infinitely more meaning. It’s an absolute game changer.
How to Make This Craft Gather pre-cut wooden ornament blanks in classic shapes Brush the ornaments with your selected acrylic paint colors Let the base paint dry entirely Spread a section of tacky craft glue onto the surface Gently press the fragmented mirror shards into the glued zones Let the glue cure thoroughly Coat the finished piece with a clear gloss varnish to maximize the shine Attach twine or sleek ribbon for hanging Show off your glittering, reflective masterpieces
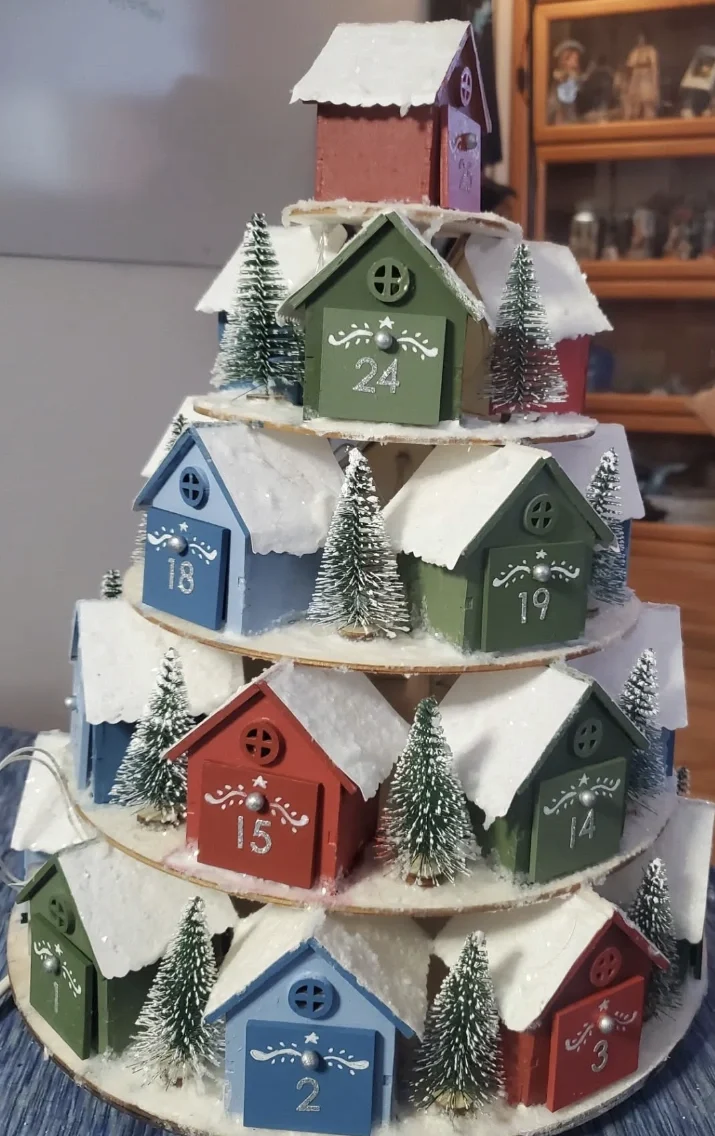
Tiered Advent Calendar with Mini Painted Houses and Snowy Roofs
Credit: @zutarabeliever
Standard advent calendars often feel like fleeting whispers of paper and cheap chocolate. This version operates on an entirely separate plane.
The hand-painted petite houses in varying shades of blue, green, and red summon a sense of artisanal wonder, each featuring a numbered drawer just begging to be filled. It transmutes a simple daily countdown into a genuine visual showpiece, easily making it the most substantial option among Diy Christmas Decorations.
How to Make This Craft Buy or construct a wooden tree-shaped shelf unit with multiple tiers Source miniature wooden house-shaped boxes with little drawers Coat every tiny house in a distinct holiday-inspired color scheme Inscribe or stencil consecutive numbers, from 1 to 25, prominently on each building Spread a layer of faux snow paste across every rooftop Secure miniature bottlebrush trees directly onto the shelves using a hot glue gun Load the interior of each house drawer with petite candies or trinkets Stage all the numbered houses across the tiered shelves Wind a strand of miniature fairy lights through the structure to add that magical holiday glow
Red & Gold Ornament Garland on Mantle

Credit: @thechristmaspalace
If your creative energy is running high, you could completely steal inspiration from this lush setup. Serious potential exists here for crafting some show-stopping diy christmas gifts.
Picture making scaled-down versions to serve as spectacular gift toppers or even as standalone mini ornaments for the tree branches. The combination of crimson and gold is undeniably striking, but swapping the palette to align with your specific aesthetic would be effortless. The overall effect reads as pure luxury.
How to Make This Craft Begin by draping a base layer of frosted faux garland Select artificial red floral blooms featuring gilded tips and accents Lash the flowers securely into the greenery using floral wire Weave in additional decorative foliage in red and gold metallic finishes Anchor large statement red ball ornaments throughout the garland structure Fluff and arrange all the components until the composition achieves visual harmony Tuck and hide any exposed wire with extra sprigs of foliage Sweep the entire arrangement across a fireplace mantel for jaw-dropping holiday décor
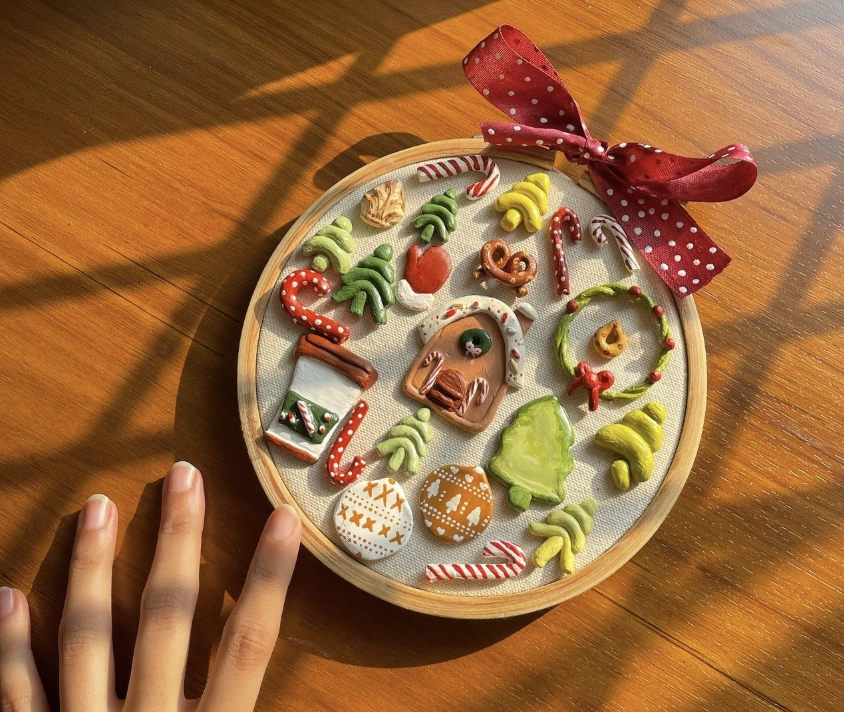
Clay Christmas Charms in Embroidered Hoop
Credit: @more_color_please
Think about displaying your creative flair front and center during this season’s festivities. These polymer clay Christmas charms snug inside an embroidery hoop could easily serve as a surprising focal vignette.
Visualize this resting on a slim console table during your swanky holiday cocktail party, absolutely guaranteed to spark conversation. It also serves as a subtle high-five to those who truly value Diy Christmas Gifts and the art of the handmade.
How to Make This Craft Roll out multiple hues of polymer clay into thin, smooth sheets Mold the pliable clay into miniature festive icons like trees, stars, and candy canes Harden the clay trinkets in the oven following the temperature and timing on the packaging Use hot glue to attach the baked clay charms onto a stretched canvas of fabric inside a wooden embroidery hoop Build the layout by layering the elements into a visually appealing quilt-like arrangement Tie a decorative ribbon into a bow at the top of the hoop Hang your joyous fabric and clay creation for a uniquely festive presentation
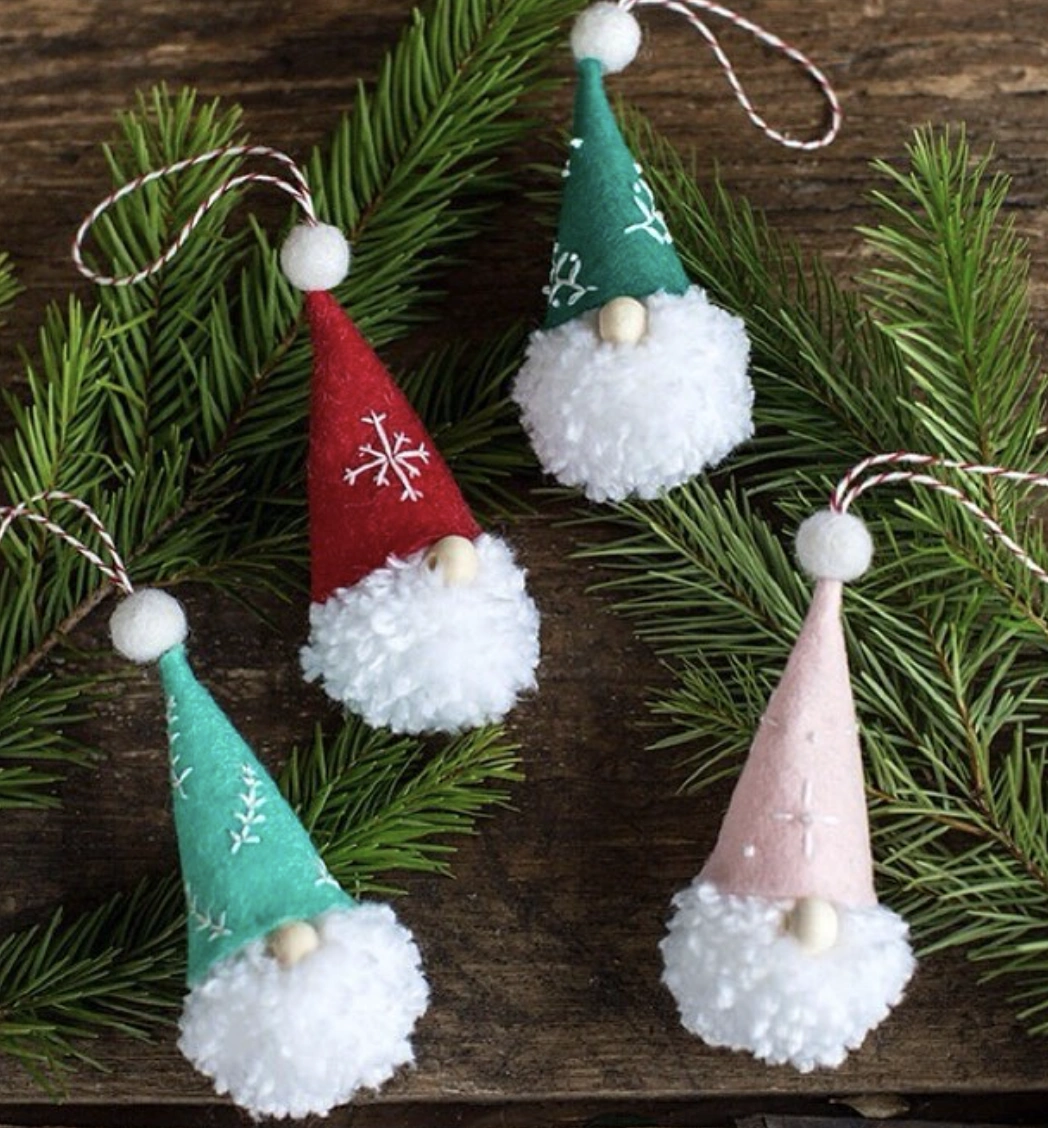
Felt Gnome Ornaments: Red, Green, Teal, and Pink DIY Christmas Decorations
Credit: @liagriffith
These felt gnomes possess a surprisingly captivating charm. The clean simplicity of their silhouettes is incredibly appealing.
That tiny wooden bead nose resting against the explosion of fluffy white beard fuzz is painfully adorable. The subtle restraint in the snowflake and stitched detailing on the hats feels just right. Crafting these kinds of Diy Christmas Decorations seems genuinely achievable and far less daunting compared to some of the intensely complicated craft projects floating around out there.
How to Make This Craft Slice felt sheets into neat cone shapes to form the gnome hats Stitch the flat edges of the felt cones together to make the structural hats Build fluffy pom-poms from yarn to serve as the beards and the round noses Glue the massive pom-pom beards to the bottom rim of the hats Attach the tiny pom-pom noses directly above the beard line Fix yarn loops onto the sharp tips of the hats Dress up the hats with stitched snowflake patterns or felt star cutouts Dangle them from your tree to infuse your décor with a dose of whimsical magic
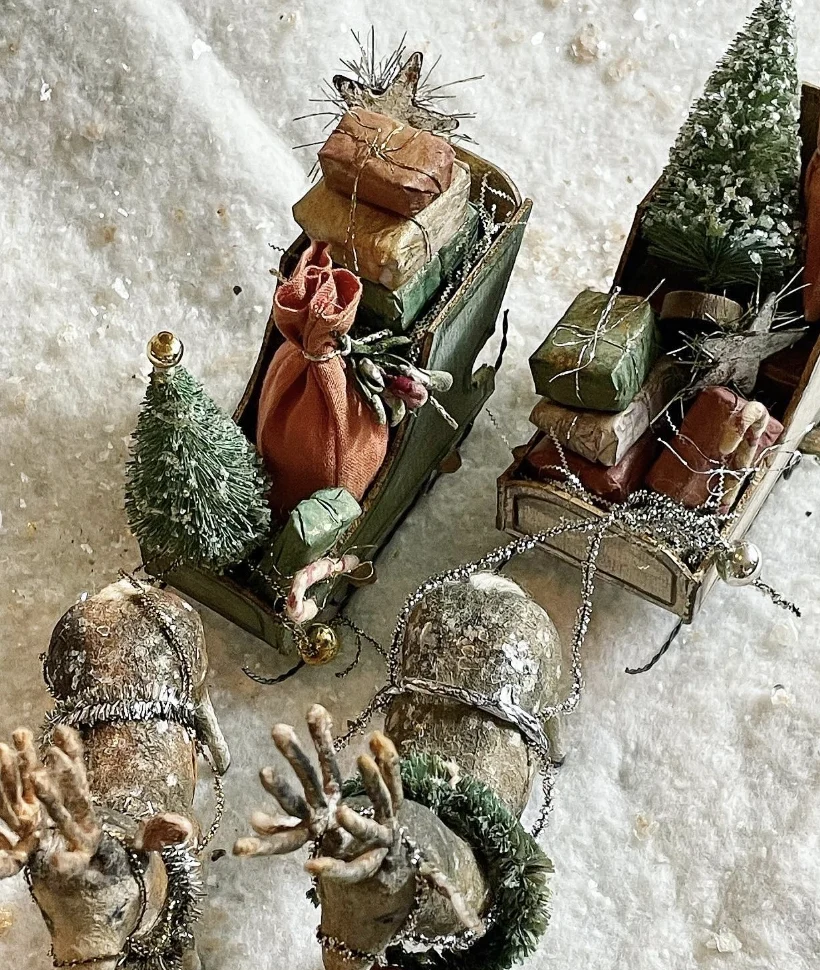
Miniature Reindeer-Pulled Sleighs with Wrapped Gifts & Trees
Credit: @fullmoonwares
This channels major vintage-chic Christmas energy, you feel it instantly. You could design an entire magical tablescape anchored by these diminutive reindeer sleighs.
The thought of constructing these as a holiday centerpiece is seriously taking hold. The hunt for unique diy gift ideas this year might finally be over because these just might be the ultimate find. They’d also photograph beautifully for the social feed and are ridiculously simple to personalize.
How to Make This Craft Track down small toy reindeer figurines and matching miniature wooden sleigh models Coat the sleighs in antique green acrylic paint and set them aside to dry Cocoon tiny boxes in brown kraft paper and tie them with rustic twine loops Craft petite bottle brush trees by dyeing natural bristle brushes vivid green Adhere the tiny presents and trees into the sleigh beds using glue Sprinkle fine silver tinsel strands into the sleigh for that retro shimmer Hook a fine silver-toned chain from the reindeer harness to the front curve of the sleigh Stage the entire setup atop a bed of fluffy artificial snow for a storybook display Drape a tiny wreath of greenery around the reindeer’s neck for the season
Painted Leaf Santa Ornaments: A Charming DIY Christmas Project
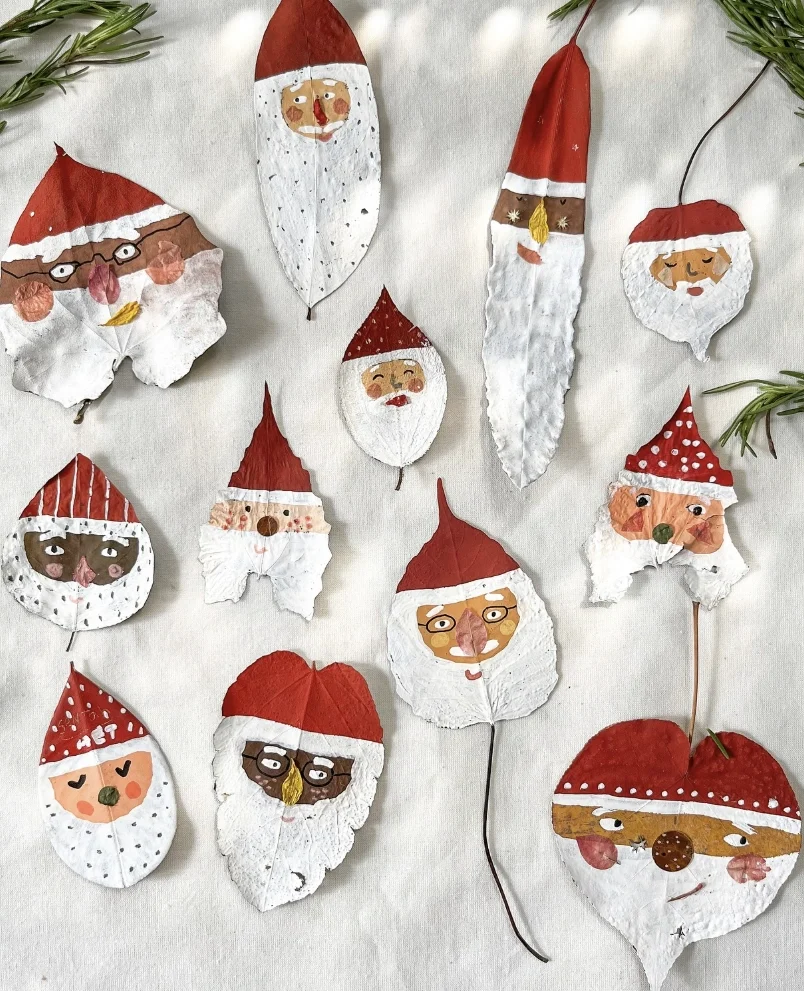
Credit: @margaretamiranti
These painted leaf Santa ornaments represent sheer genius. Envision an effortlessly stylish friend hosting her legendary annual holiday bash, pinning these onto an immaculately curated tree or tying them to gift bags for that extra dash of fanciful fun.
As a sustainable, deeply personal gesture, these simply can’t be outdone. This lands squarely in the category of things that populate the best Homemade Gift Ideas roundups. They’re just unbearably charming.
How to Make This Craft Collect fallen leaves of assorted dimensions and silhouettes Let the leaves dehydrate completely, pressing them flat between the pages of heavy books if necessary Paint the upper third section of each leaf a vivid cherry red to shape Santa’s cap Use bright white acrylic paint to sculpt Santa’s flowing beard across the lower portion of every leaf Sketch on the facial features like twinkling eyes, a round nose, and pink cheeks using fine-tipped markers or paint dabbers Toss in playful variations like different quirky eyeglass styles Secure a loop of string to the spine of each leaf with a dab of glue for hanging Arrange your jolly Santa leaves across a festive textile backdrop for display
Handmade Christmas Character Coasters: Santa, Snowman, Reindeer, and More.

Credit: @ the_crafted_rainbow
Set aside those bland, uninspired tile coasters because these handmade gems are simply EVERYTHING. They teem with far more personality than anything mass produced on a store shelf, wouldn’t you agree?
And infinitely more meaningful, too. This feels like an absolutely awesome christmas crafts for kids undertaking.
Picture churning out a stack of these as presents for the whole extended family, they’re that adorable. Figuring out the construction method just jumped to the top of the priority list.
How to Make This Craft Stretch a rectangle of monk’s cloth drum-tight over a punch needle frame Trace or freehand sketch your favorite Christmas character onto the fabric’s surface Thread a punch needle tool with your chosen yarn color Begin punching the needle through the fabric along the perimeter of your design Fill the interior of the silhouette with the corresponding yarn shades using the punch needle technique Once the face of the design is fully packed, snip the excess yarn tails on the back side Ease the finished monk’s cloth carefully off the wooden frame Glue a protective backing of felt onto the coaster’s reverse to shield tabletops Let the adhesive dry solidly before using them
Personalized Ceramic Ornament with Gingerbread Man Design

Credit: @sharebehappy
This approach makes the holiday season feel that much more intimate. The notion of letting the little ones paint a set is incredibly appealing, nothing elaborate, just a burst of colorful fun.
The grandparents would absolutely lose their minds over those. The goal is to attempt some easy Diy Holiday Gifts, and this reads as a super quick and breezy project to execute.
How to Make This Craft Whip up a digital graphic of a cheerful gingerbread man formatted for a sublimation printer Run your design off onto sublimation paper using specialized sublimation ink Position the printed sheet face down onto the flat surface of a white bisque ceramic ornament Lock the transfer paper against the ornament using heat-resistant tape Apply firm, even pressure with a heat press machine for the exact duration and temperature specified in the instructions Gently lift the hot ornament from the press and let the heat dissipate for a minute Peel back the sublimation paper to uncover the sealed, vibrant image Thread a length of natural jute twine through the hole at the top for hanging ease
The drive to dive into these homemade gift ideas is incredibly strong. There’s a profound satisfaction found in crafting something beautiful and functional entirely from scratch, fully aware it will light up someone’s face.
A modest dose of effort and a pile of love truly goes an astonishingly long distance. Hopefully, the inspiration to embrace your inner maker and share the magic of handmade treasures this season has truly taken hold.