


Sometimes the pull to step away from glowing screens and endless to-do lists becomes impossible to ignore. The best remedy often involves getting your hands busy with something tactile and imaginative.
A massive universe of crafts designed specifically for grown ups is just sitting there, ready to be explored.
Forget about childhood pasta art. Think about sophisticated, simple home accents or heartfelt, customized presents instead.
Ready to dive into some accessible DIY projects? Even the simplest creative tasks deliver a surprising amount of satisfaction and can melt stress away completely.
Quilled Paper Pumpkins: Fall Home Decor DIY

Credit: @miriamsquilling
Stumbling upon the most adorable way to sprinkle autumn energy around a room feels like a win. These paper pumpkins pack some serious charm.
Finding decorations that stand out from the usual seasonal stuff can be tricky, but these handmade gems solve that problem beautifully. This project ranks high among creative adult activities because it lets imagination run wild and ends with something genuinely cute.
How to Make This Craft
Cut orange, red, and brown paper into thin strips (1/8 inch wide)
Use a quilling tool to roll the orange strips into tight coils
Glue the ends to secure each coil
Gently shape each orange coil into a curved pumpkin section
Repeat steps 2 and 3 with red paper to make thinner coils to attach for an outline of each pumpkin
Glue the curved orange sections and red strips together to form the pumpkin shape
Roll brown paper strips into tight coils for the stem
Glue the end to secure
Glue the brown stem to the top of the pumpkin
Repeat steps 1-7 to create more pumpkins
Let the glue dry completely
Glue a small magnet to the back of each quilled pumpkin
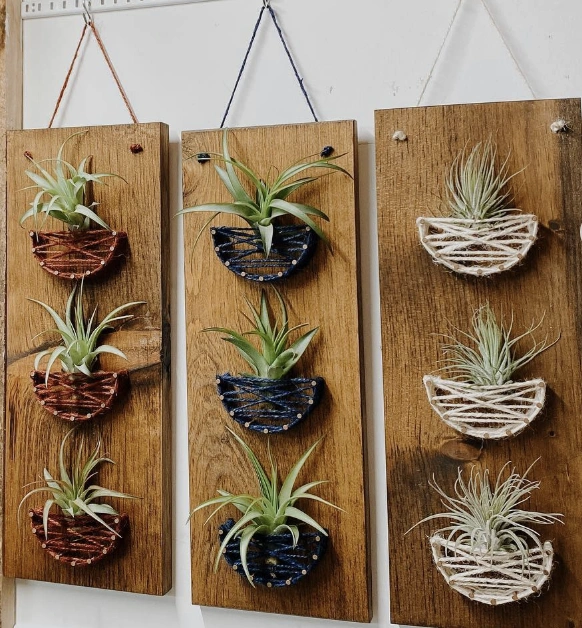
String Art Air Plant Hangers on Reclaimed Wood
Credit: @knotreallyart
Anyone drawn to rustic warmth with a touch of living greenery will fall hard for these. Picture them brightening up a sunlit kitchen window or a quiet home office corner.
These suit people who love clean, organic aesthetics and the deep satisfaction of making something lovely with their own hands. On the hunt for new creative crafts for adults? You just found a winner.
How to Make This Craft
Acquire a piece of reclaimed wood; size depends on preference
Sand the wood smooth and apply a sealant or stain if desired
Mark the points where you want to place the air plant holders
Hammer nails partially into the wood at the marked points, leaving enough space to wrap twine around them
Cut a length of twine – approximately 10-12 feet, depending on the desired size of the holder
Tie one end of the twine to a nail
Weave the twine around the nails, creating a basket-like shape
Securely tie off the twine once satisfied with the shape
Repeat steps 6 and 7 to create all the air plant holders on the wood piece
Attach a hanging mechanism (rope, wire, or D-rings) to the back of the wood
Gently place your air plants into the twine holders
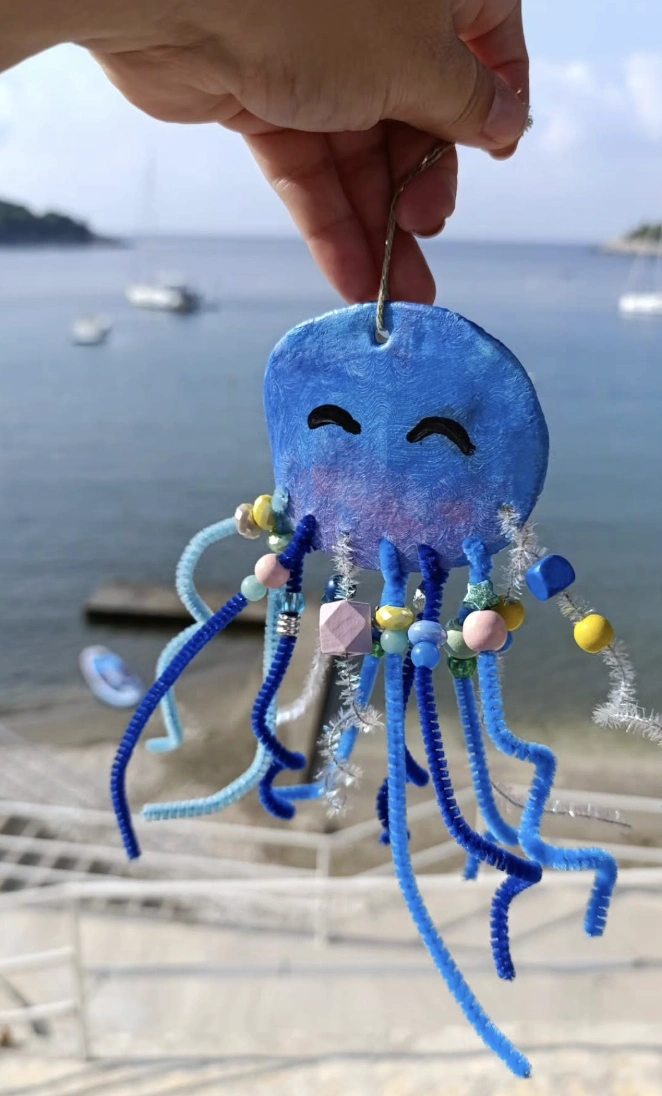
Blue Jellyfish Clay Ornament: Beachy DIY Charm
Credit: @katjakoselj
The playful dance between different textures and shades of blue steals the show here. Bead choices let your imagination go completely wild to match any palette you dream up.
Looking for a vacation activity? Plunge into some easy grown up crafting and whip up a few of these, the younger crowd will turn green with envy. Dangle it as a keychain, or let it float as simple wall art.
How to Make This Craft
Roll out blue polymer clay and cut a circle shape for the jellyfish body
Bake the clay according to the manufacturer’s instructions
Once cooled, paint the clay disc with a light blue shade, and add a touch of purple to the bottom half of the circle
Draw eyes and a cute smile on the jellyfish’s face using a black marker
Cut several pipe cleaners into varying lengths
Thread beads onto the pipe cleaner strands
Poke holes around the bottom edge of the clay disc
Insert the pipe cleaner tentacles through the holes and secure with glue
Add more beads to the outside of the base for an extra layer
Attach a string to the top of the jellyfish for hanging
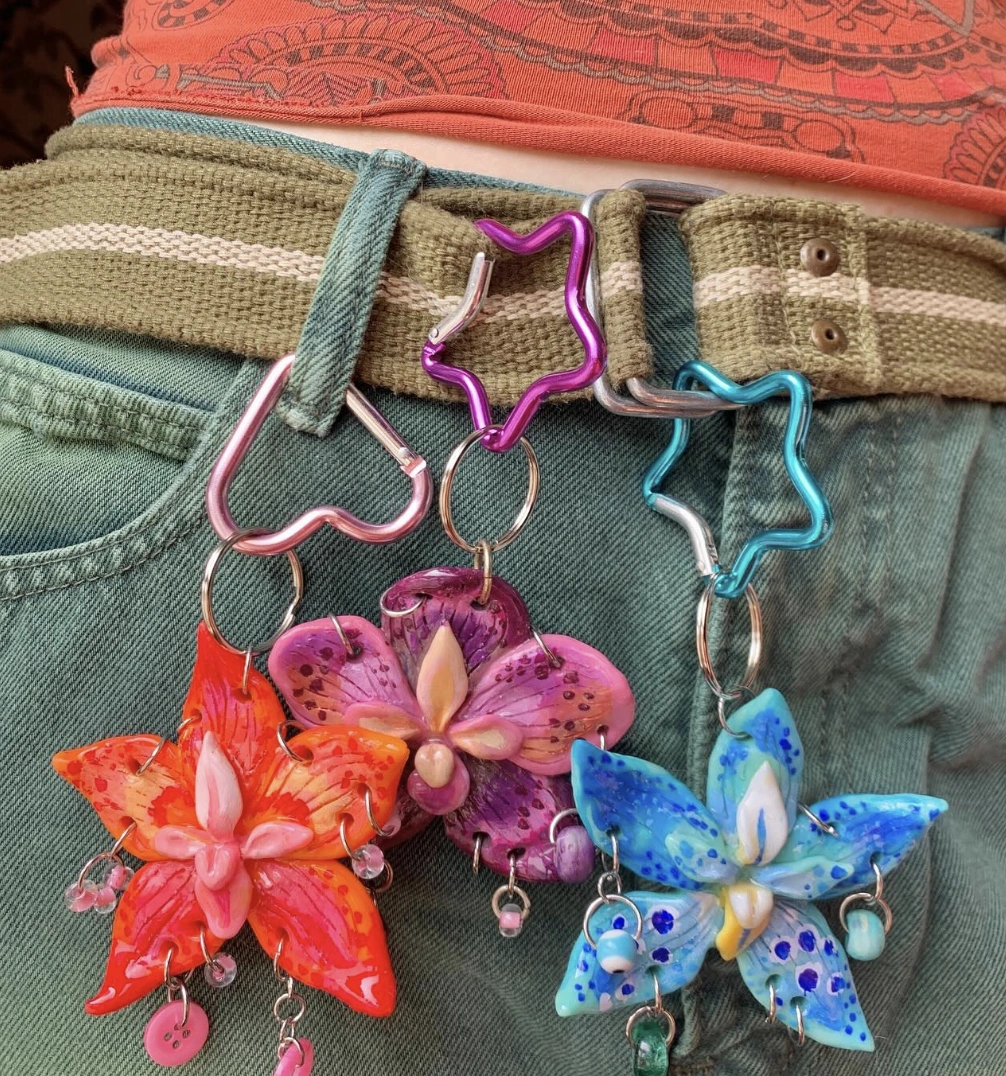
Flower Power! Polymer Clay Charms on a Belt
Credit: @cicamicu
These hand-formed polymer clay flower charms clip right onto your belt loops. The intricate details spark real obsession, channeling high end handmade energy that instantly elevates any outfit. Need these, right???
How to Make This Craft
Choose different colors of polymer clay for the flower petals and centers
Roll out the clay and shape the petals individually, then attach them to form a flower shape
Add a small ball of clay to the center of the flower and press gently
Bake the clay flowers according to the manufacturer’s instructions
Let the flowers cool completely
Paint the flowers with acrylic paints and add details such as dots and lines
Seal the flowers with a gloss varnish
Attach a small metal eye pin to the back of each flower using strong glue
Open the metal rings and attach the flowers to the rings
Clip the metal rings onto your belt
Intricate Beaded Stars and Spheres with Jewel Accents

Credit: @bluebeadlily
Someone you know would absolutely lose their mind over these. They would instantly recognize the patience and skill poured into making something this intricate. Every single bead lands with purpose, lifting what could be a basic activity into the realm of tiny, wearable art.
How to Make This Craft
Start by creating a sturdy base for the brooch using felt or stiff fabric
Cut out a circle or desired shape
Stitch a large crystal bead onto the center of the base
This will be the focal point of the brooch
Using seed beads, begin stitching around the crystal in concentric circles
Vary colors and sizes for visual interest
Create petal shapes around the central crystal using peyote stitch or another bead weaving technique
Attach smaller crystals or beads to the tips of the petals
Add layers of seed beads between the petals to create depth and texture
Continue adding beads and embellishments until the desired level of detail is achieved
Once the beadwork is complete, carefully trim any excess fabric around the edges
Secure a brooch back to the back of the piece using strong glue or by stitching it on
Polymer Clay Statement Earrings with Tassels

Credit: @theedinburghcraftclub
These earrings bring something entirely different to the table. The marbling effect on the clay pieces grabs attention immediately; it is a genius method for swirling hues together without turning them into mud.
Tassels inject a playful bounce and gorgeous movement. Anyone who adores standout jewelry and champions artists creating whimsical crafts needs to see these. The color pairings feel so joyful and surprising.
How to Make This Craft
Condition various colors of polymer clay by kneading until soft and pliable
Roll out each clay color into thin sheets, and cut into small, organic shapes
Arrange shapes in a mosaic pattern, gently pressing together to form a cohesive sheet
Use cookie cutters to create desired earring shapes from the clay mosaic
Bake clay according to manufacturer’s instructions on a baking sheet
Drill small holes at the bottom of clay pieces for tassel attachment
Assemble tassels by cutting yarn or embroidery floss to desired length, and fold in half, securing with a wrapped thread knot
Attach tassels to clay pieces using jump rings
Affix earring posts or hooks using strong adhesive or additional jump rings
Let the adhesive fully cure before wearing
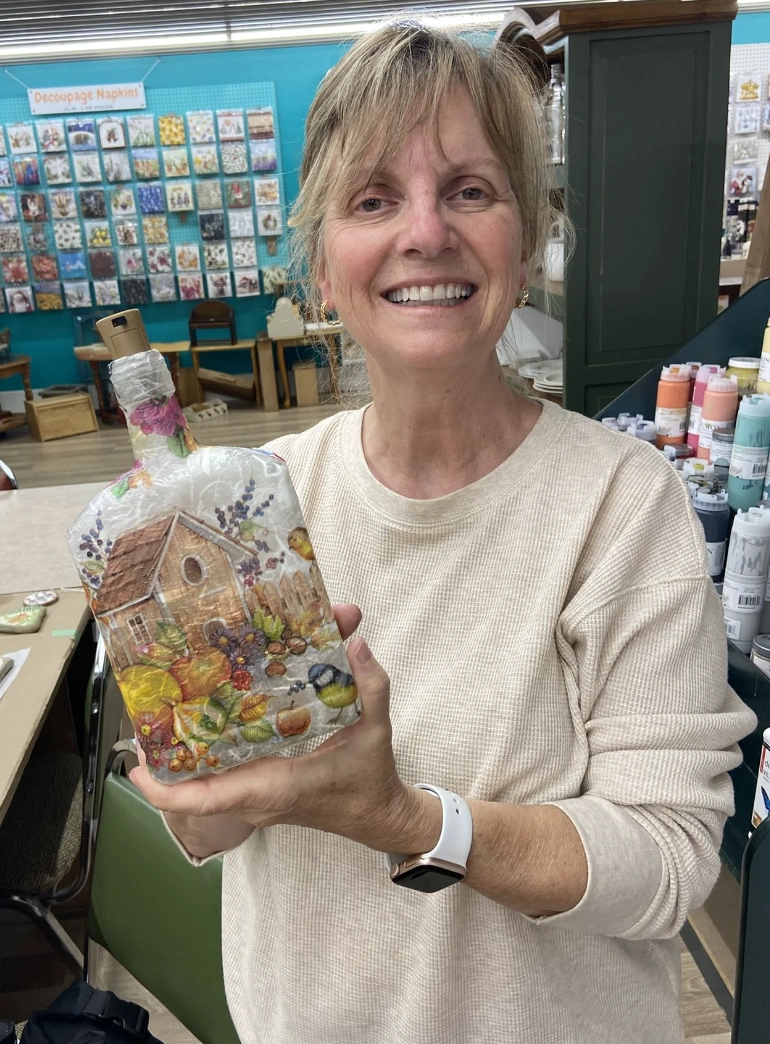
Decoupage Wine Bottle Autumn Birdhouse Scene
Credit: @ninnysnapkins
This decoupage bottle is pure fire. Talk about taking home decor to the next level, right?
The autumnal birdhouse design radiates serious cozy energy. Slip some fairy lights inside?
YES. This serves as huge inspiration for trying new DIY projects. It would also make the perfect gift for your bestie or your mom.
How to Make This Craft
Clean the glass bottle thoroughly with soap and water, then dry completely
Choose decorative napkins with a pattern you like
Separate the layers, keeping only the printed top layer
Apply a thin layer of decoupage glue (Mod Podge) to a small section of the bottle
Gently place the napkin piece over the glued area
Use a soft brush to smooth out any wrinkles or bubbles
Work from the center outwards
Repeat steps 3-5, overlapping the napkin pieces as needed to cover the entire bottle surface
Let the glue dry completely
This may take several hours
Apply a final layer of decoupage glue over the entire bottle to seal it
Once fully dry, if desired, add accents with acrylic paint or glitter
Insert a cork into the bottle’s opening
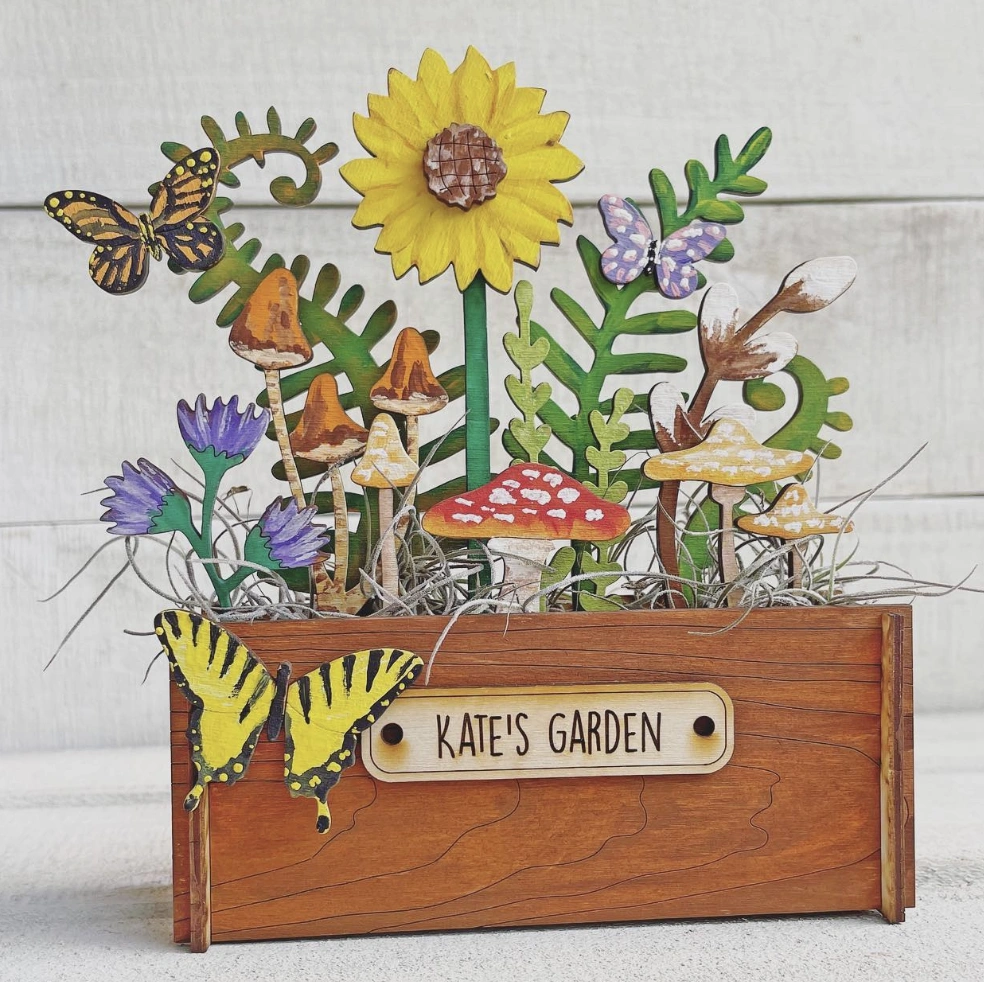
Laser Cut Wooden ‘Kate’s Garden’ Planter with Hand-Painted Details
Credit: @whiskerworks
Struggling to hunt down a genuinely distinctive present? Ditch the factory made stuff.
This laser cut wooden garden planter, affectionately dubbed Kate’s Garden, solves that dilemma. It represents the kind of personalized treasure that holds so much more meaning.
The hand-painted mushrooms, blooms, and butterflies add pure enchantment. This sets the stage perfectly for starting your own journey into arts and crafts for adults projects.
How to Make This Craft
Download or create laser-cut template for the garden scene elements (flowers, butterflies, mushrooms, leaves, box sides, etc
Cut all the pieces from thin plywood using a laser cutter
Lightly sand all pieces to remove any burn marks or splinters
Paint or stain each piece individually using acrylic paints or wood stains
Let dry completely
Assemble the wooden box using wood glue or small nails
Let glue dry thoroughly
Glue the flower stems and leaves into the box, arranging them to create a natural garden look
Attach the sunflower heads to the stems using glue
Add mushrooms around the base of the flowers and leaves
Attach the butterflies to the scene using glue or small wire
Attach nameplate to front of box with glue or small screws
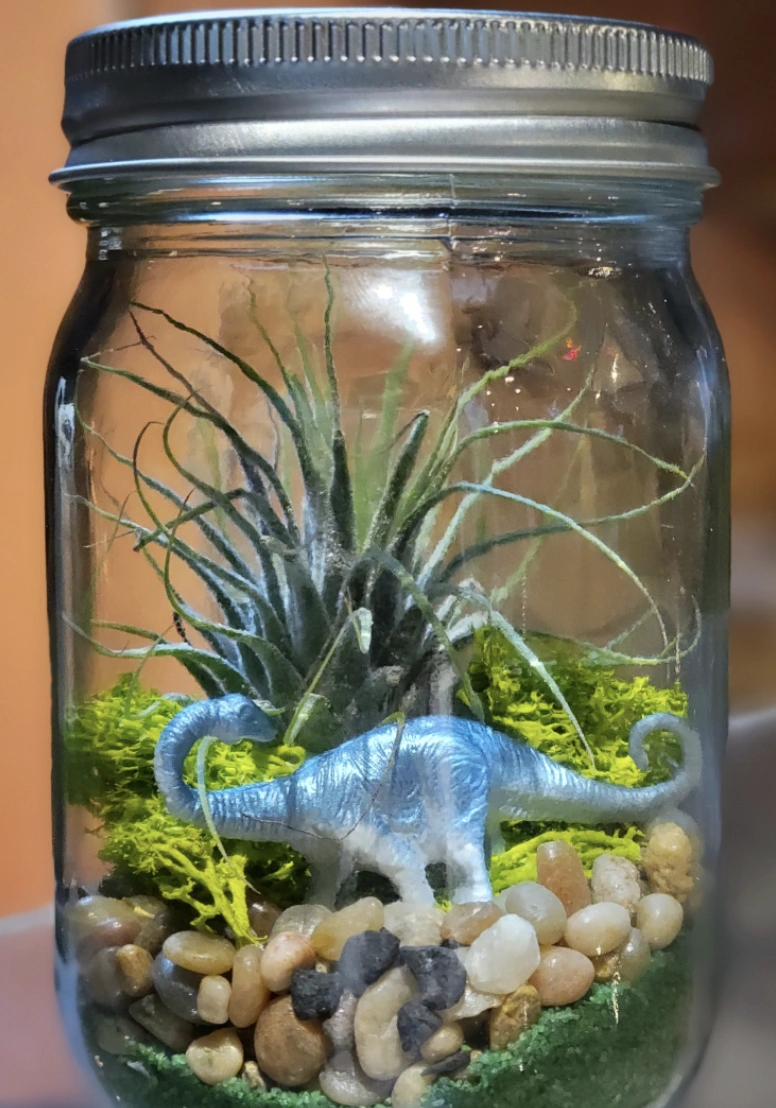
Dinosaur Terrarium in a Mason Jar: Easy DIY Project
Credit: @schielemuseum
This craft calls out to parents who desperately need a quick victory. It is ridiculously adorable, plus it occupies the little ones for a solid chunk of time.
Round up those forgotten mason jars, a handful of tiny pebbles, and a plastic dinosaur. Nestle in an air plant, and bam, instant cute decor. Honestly, if the goal involves easy and fast, fun crafts for adults don’t get any better than this.
How to Make This Craft
Select a clean, clear glass jar with a wide opening
Add a layer of small gravel or pebbles to the bottom of the jar for drainage
Cover the gravel with a layer of activated charcoal to help filter the water
Add a layer of decorative sand or colored pebbles on top of the charcoal
Place preserved moss or green decorative fillers over the sand layer
Gently nestle your air plant into the moss, ensuring its base is exposed to air
Add a small toy dinosaur to the terrarium, positioning it among the plants
Arrange decorative stones around the dinosaur and plants
Lightly mist the air plant with water 1-2 times per week, or when the leaves appear dry
Miniature Hand-Painted Potion Bottles: Magical Decor for Grown-Ups

Credit: @annick.jsn
Picture this arrangement: dim lights, haunting melodies, and these displayed artfully on a tiered serving tray right beside the appetizers. So wonderfully unique. You could also cluster them together on a bookshelf, or deploy these tiny crafts as shelf filler to show off your playful and quirky treasures.
How to Make This Craft
Gather small glass bottles with corks
Sketch design labels for each bottle, referencing potion names
Paint bottle with acrylics in a basecoat, then add detail
Outline the label with a fine tip paint pen
Secure the label edges with clear sealant or clear glue
Apply glue and sprinkle gold glitter around bottle neck for fancy touch
Cork the bottles tightly
Display completed potions on a shelf or use them for party decorations
Add more embellishments, beads, paint splatters as desired
Let all paints/embellishments dry fully before touching or handling
DIY Summer Vacation Countdown Paper Chain

Credit: @whiskerworks
Remember linking paper chains as a kid? This version has evolved into a much more polished design.
This craft idea puts a fun spin on nostalgia and gives you the perfect excuse to jump into some easy crafts for adults. It hits all the right notes: sentimental, adorable, and genuinely useful, unlike a lot of things floating around these days.
How to Make This Craft
Cut construction paper into 1 inch strips of various colors
Form each strip into a loop and glue or tape the ends together
Interlock each loop with the next to form a chain
Cut a wooden cloud shape from plywood with a jigsaw
Drill holes along the bottom edge of the wooden cloud
String the first chain through the holes
Create a sun shape from yellow yarn and glue to top of the cloud
Add the phrase Countdown to Summer Vacation using paint or vinyl letters
Punch a hole in the top and add the hanging string
Remove a link each day to count down days
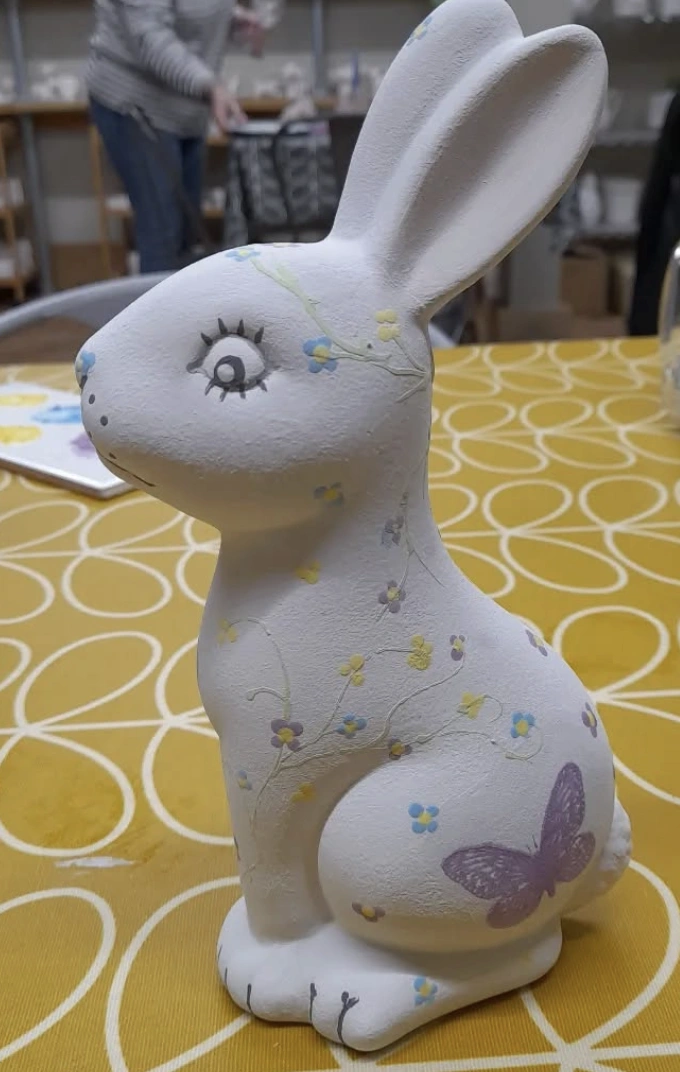
DIY Ceramic Bunny with Delicate Floral Accents
Credit: @jackandlaurascrafts
This ceramic bunny radiates pure spring energy from every angle. Look at those painted lashes.
The cuteness level is off the charts. And peep the tiny vines dotted with little yellow and blue blossoms winding up its side.
The large lilac butterfly resting on the back? Chef’s kiss.
This sits squarely in the sweet spot. Making things like this is simply the best.
How to Make This Craft
Purchase a bisque-fired ceramic rabbit at your local craft store or art store
Lightly sand rabbit using sandpaper to give the paint more traction
Apply a base coat of white acrylic paint
Let dry
Sketch simple floral designs using a pencil
Use acrylic paints to fill in the flowers, leaves, and butterfly with various colors
Use a thin paintbrush for fine details
Outline the eyes and other features with a fine black paint pen
Apply a layer of clear sealant to protect the design
Allow to dry completely
String of Decorative Pinecones: Natural and Wooden Fall Garland

Credit: @artcuts
This pinecone garland feels like a total upgrade, you know? Forget those flimsy plastic imitations.
This version weaves actual pinecones together with cut wooden ones. It radiates way more creativity.
The finished piece looks like something you would spot in a high end whimsical crafts boutique, but you can absolutely piece it together yourself. The mix of textures is phenomenal.
How to Make This Craft
Gather a variety of natural pinecones
Using scissors, remove any uneven scales or imperfections on the pinecones
Acquire pre-cut or create wooden pinecone shapes
Drill small holes at the top of each wooden shape
Cut a long length of twine or jute
Tie a knot at one end of the twine, creating a secure starting point
Thread the twine through the hole of the first wooden pinecone
Tie a knot to secure, leaving space for the next pinecone
String the real pinecones onto the twine, tying knots to secure them
Continue alternating wooden and natural pinecones to your desired length
Leave some extra length at the end for hanging
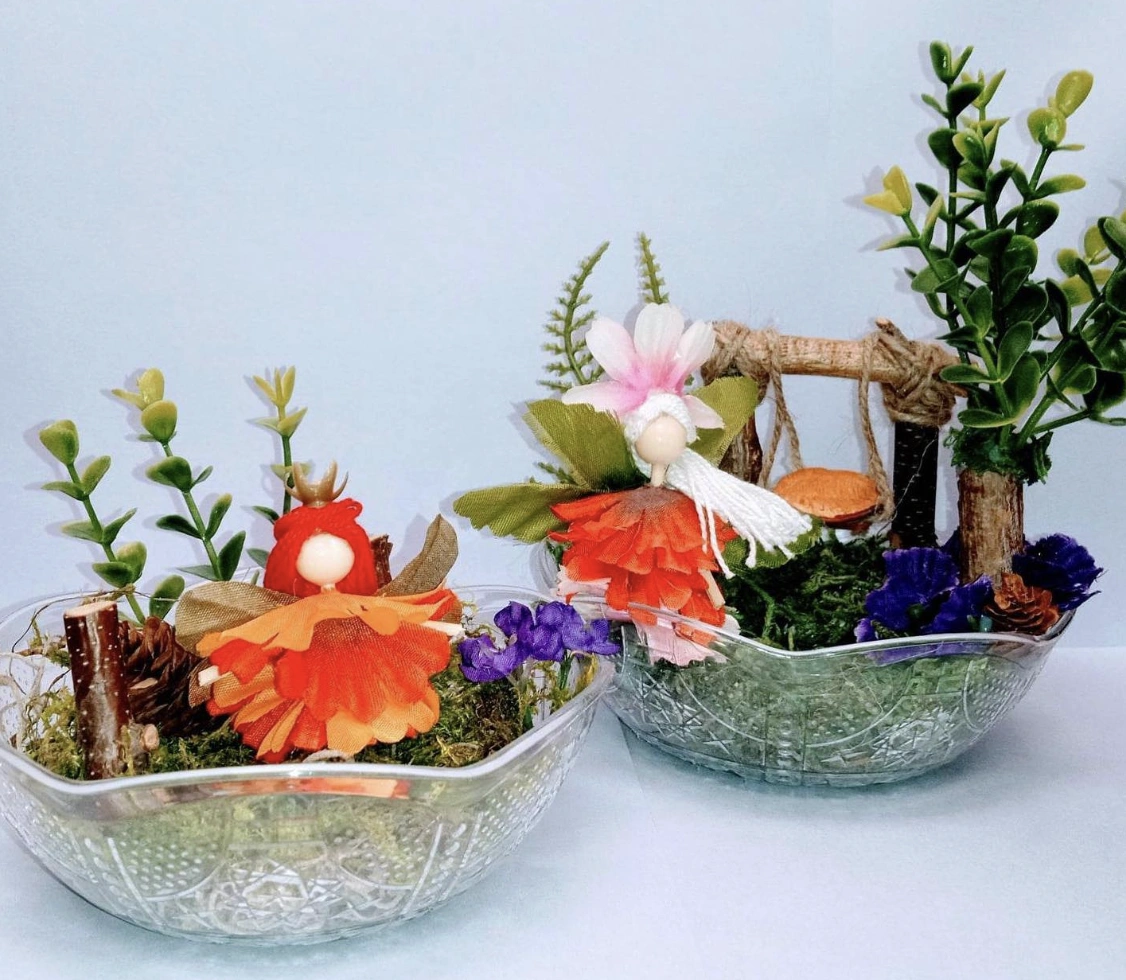
Miniature Fairy Garden Scene – DIY Craft
Credit: @hendersonlibraries
Picture scattering these handcrafted fairy gardens across tables as centerpieces for a whimsical brunch. They would also bring a sweet touch to a child’s bedroom.
Building them becomes a super fun group activity too; countless creative crafts for adults tutorials exist online to spark ideas. Experimenting with different color stories or weaving in more personal trinkets keeps things fresh.
How to Make This Craft
Select clear glass bowls
Spread a layer of moss inside each bowl
Arrange faux plants and small trees
Craft fairy figures using small wooden beads
Glue flower petals around the heads
Attach yarn hair to the wooden bead
Create miniature swings using twigs and twine
Add tiny pinecones
Arrange dried flowers in moss
Position fairy figures amongst plants
Place mushroom caps on the floor of the bowls
Hand-Painted Ceramic Tray with Assorted Mushroom Designs

Credit: @artbymissej
This mushroom tray is stop-you-in-your-tracks adorable. After all, who can resist a dash of whimsy?
It suits the friend who gravitates towards earthy things or your teen daughter cultivating those fairy core vibes. Even older children could probably tackle painting a tray like this if your goal is to find fun, quick crafts to conquer at home.
How to Make This Craft
Obtain a plain ceramic flower-shaped dish
Sketch various mushroom designs onto the dish with pencil
Select acrylic paint colors for mushroom caps
Apply a base coat to each mushroom
Use fine brushes to paint detailing, stems, and gills
Add spots on top of the mushroom caps
Paint tiny dots and crosses to fill the empty spaces
Allow paint to dry
Apply a clear sealant over entire dish for gloss
Seriously Cute Felt Mouse Witch Ornament for Spooky Season

Credit: @thewishingshed
This ornament achieves perfection because it feels festive while remaining undeniably artisanal. The obvious solution involves shopping for some homemade crafts.
The tiny hat and broom are simply irresistible. It is destined for a prime spot on the mantle, tbh. Definitely worth a browse.
How to Make This Craft
Cut felt pieces according to a mouse pattern, including body, ears, hat, and cloak
Sew body pieces together leaving a small opening for stuffing
Stuff the mouse body with fiberfill, then close opening
Sew on felt ears
Create witch hat by sewing felt cone shape
Decorate the witch hat
Attach the hat to the mouse’s head
Create felt cloak for the mouse
Glue or sew the cloak to the mouse’s body
Tie yarn to end of stick, creating the broom
Glue mouse onto broom
Affix a hanging loop at the top
Wooden Fall Garland with Hand-Painted Details
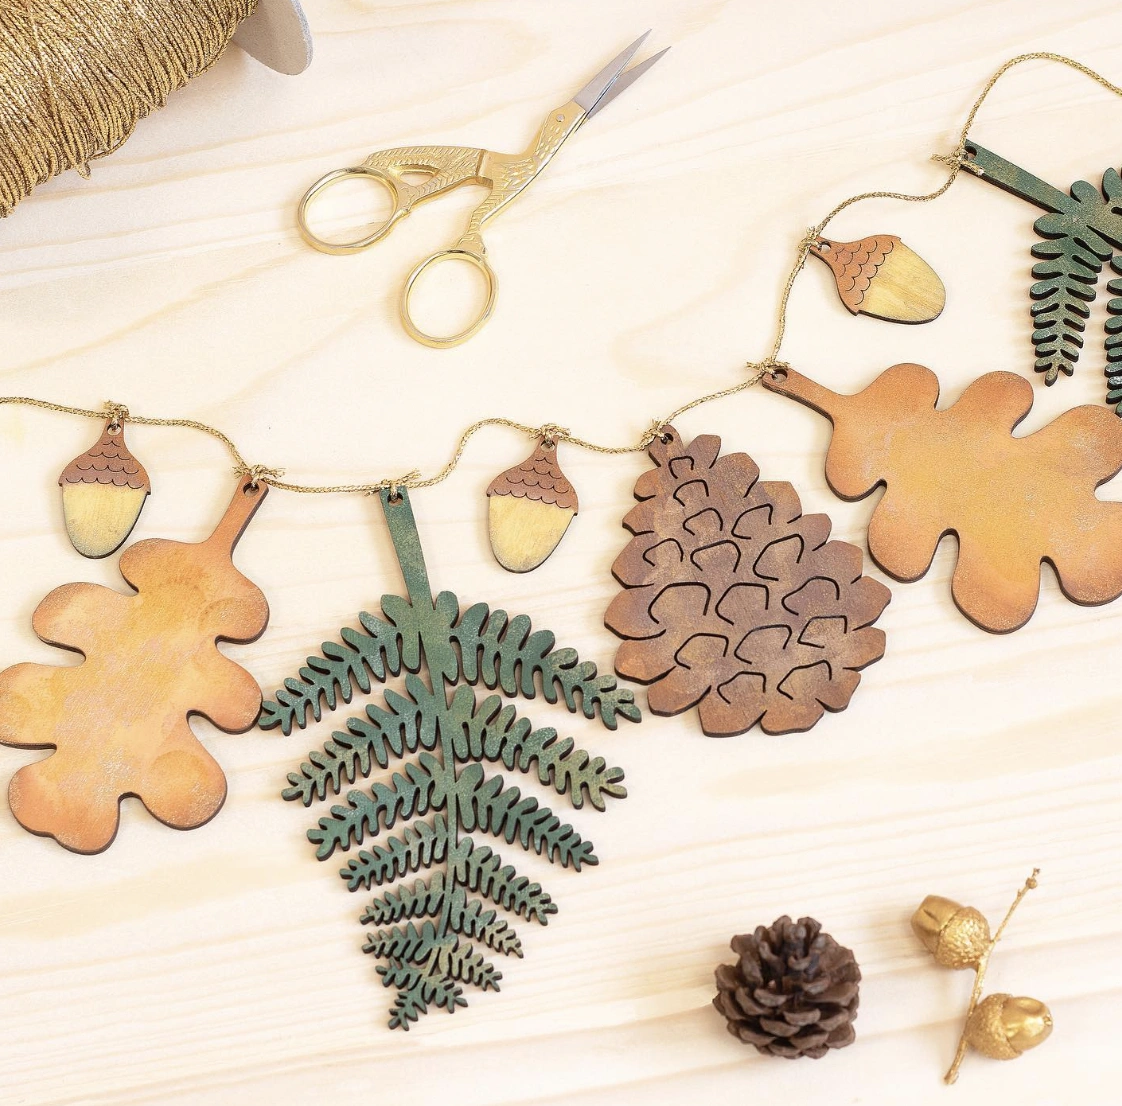
Credit: @artcuts
The magic of this piece lives in its beautiful simplicity. The delicate gold thread creates a stunning contrast against the rustic wooden tones.
Hand painted acorns deliver that custom feel which mass produced items could never replicate. When thinking about crafting, especially girly crafts, pieces that glide effortlessly from seasonal statement to everyday aesthetic interest hold the most value. It presents a breath of fresh air for autumn decor.
How to Make This Craft
Gather your laser-cut wood pieces: oak leaves, ferns, acorns, pinecone
Lightly paint the details with earthy tones using acrylic paint
Allow paint to completely dry before proceeding to next step
Using a thin drill bit, create small holes at the top of each wood piece
Cut about 5 feet of gold twine for the garland base
Begin stringing the wood shapes onto the twine in your preferred order
Tie small knots between each piece to keep them evenly spaced
Add a small dot of glue at each knot to secure the wooden pieces
Allow garland to dry completely before hanging and handling
Trim excess twine on each end of garland as needed
Floral Fabric-Covered Spheres & Miniature Fairy Houses

Credit: @naturemake.craft
How CUTE are these?! The cottagecore aesthetic is seriously vibing right now.
These textures seem to be popping up everywhere these days. If distinct arts and crafts for adults projects are what you seek, these floral fabric spheres and tiny fairy houses are absolutely the answer.
How to Make This Craft
Find wooden bases and small fabric scraps for the cottage roofs
Form spheres using foam or cotton batting for the base of the cottages
Cover the foam or batting spheres with printed fabric using glue or pins
Create the cottage walls by gluing or pinning wooden pieces to the fabric spheres
Cut roofing material to fit atop the cottage structures
Glue or affix roofing materials to the cottage frame
Embellish the doorways and windows with moss and dried flowers
Glue tiny flags atop the roofs for added whimsical flair
Arrange the cottages on a wooden surface or moss mat
Place more dried flowers to create an whimsical display
Spooky Halloween Painted Mason Jar Luminaries

Credit: @hendersonlibraries
Totally over the same boring, mass produced Halloween stuff? These hand painted mason jar luminaries provide the perfect antidote.
They scream unique from every angle. Instead of grabbing generic things off the shelf, dedicate an evening to creating these. Jumping into creative crafts for adults like these painted jars rewards you with a much deeper sense of accomplishment while making your space feel infinitely more curated.
How to Make This Craft
Thoroughly clean and dry two glass jars of different sizes
Paint the outside of each jar with a base coat of blue and purple acrylic paint
Once dry, use black acrylic paint to create haunted house and tree silhouettes on the jars
Create the illusion of a moon by painting a yellow circle onto one jar
Let the paint dry completely before proceeding
Wrap the top of one jar with jute twine, securing with hot glue
Add a protective layer of clear coat spray paint or mod podge
Allow to dry for at least 2-4 hours
Insert an LED tea light into each jar
DIY Rainbow Macrame Wall Hanging Project

Credit: @thecrafthouse805
Wouldn’t this look precious in a nursery? Gathering your crew together for an Adult Craft Night to knock these out while sipping wine and catching up sounds like a dream scenario.
It beats passively sitting in front of a screen any day. This would also look super cute hanging on the front door to welcome guests with cheerful energy.
How to Make This Craft
Cut rainbow-shaped arches from sturdy cardboard or wood
Wrap each arch individually with yarn in rainbow colors, securing with glue
Create fringe by cutting strands of cotton rope to desired length
Attach the fringe to the bottom of the rainbow arch using knotting techniques
Combine all rainbow arches using glue or by sewing edges together
Trim the ends of the fringe to create a uniform, polished appearance
Attach a hanging cord or loop to the top of the rainbow
Decorate the rainbow shape with small wooden beads as desired
Let the glue dry completely before hanging
Use an appropriate hanging nail or hook to properly display your rainbow
Woven Yarn Coaster Project with Blue-and-White Ceramic Mug
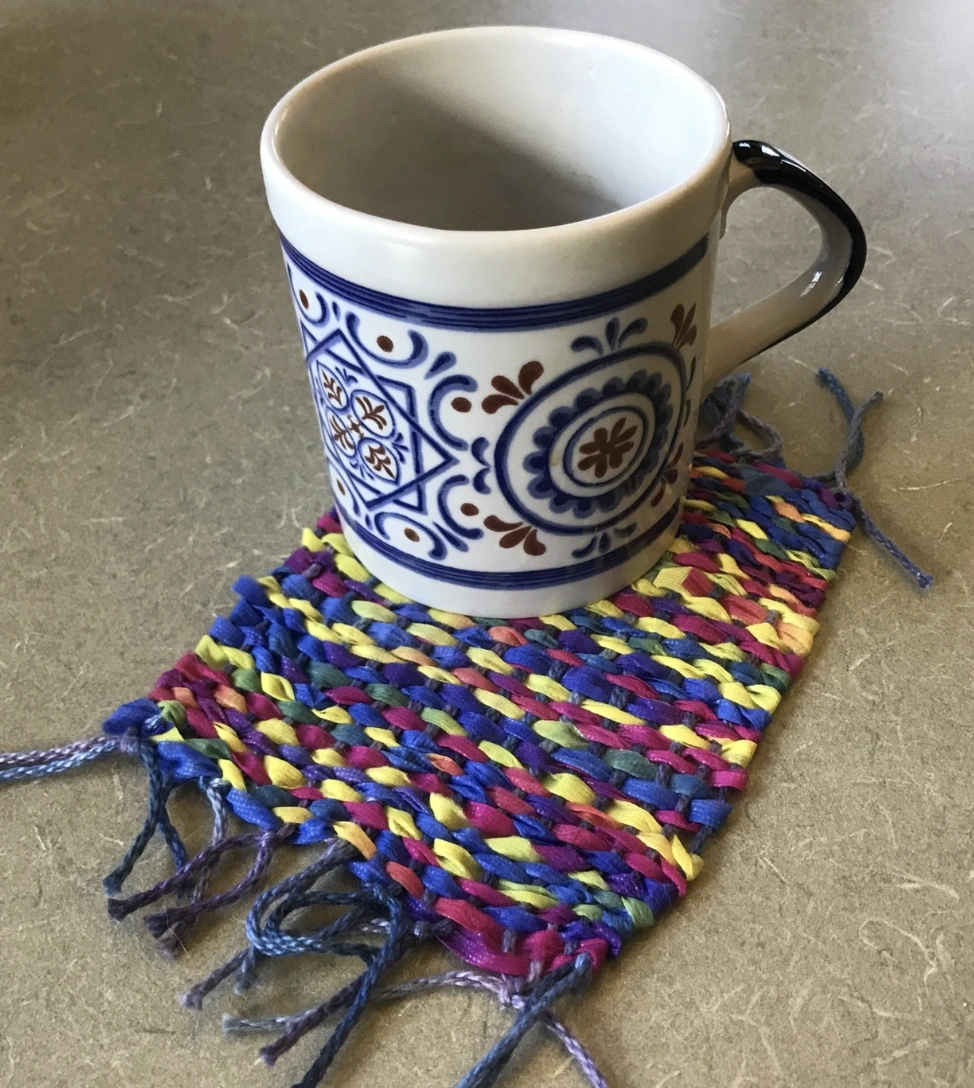
Credit: @manchesterlibrarybts
The search for a new hobby to fill your downtime might just end right here. Making these sometime soon should go straight to the top of your list.
It shapes up to be a wonderful weekend project, and who can say? Maybe those “girly crafts” could eventually blossom into a full side hustle.
How to Make This Craft
Gather yarn scraps in a variety of colors and textures
Cut cardboard to desired coaster size for a weaving loom base
Create warp threads across cardboard, securing with tape on the back
Weave different yarn colors through warp threads to create the coaster
Compact yarn threads in order to create a flat coaster surface
Once woven, remove the warp threads from the cardboard
Tie off the ends of the warp threads to secure the woven piece
Add additional fringe by attaching yarn strands around the edges as desired
Trim excess yarn ends to create a neat and uniform fringe
Miniature Jute Beehive with Honey Drip and Decorative Bees

Credit: @hendersonlibraries
This petite beehive speaks directly to people who treasure charming, handcrafted accents. Anyone on the hunt for satisfying and easy crafts for adults that deliver a sweet, fanciful result will fall head over heels making this. Leave complicated tutorials behind; the genuine beauty here stems from its wonderful simplicity.
How to Make This Craft
Find a cone shaped form, a plastic bottle will work great!
Secure the end of the jute twine at the base of the cone with hot glue
Slowly wrap the entire cone with twine, securing with hot glue every few inches
Create a round opening for the bees near the bottom of the beehive
Use polymer clay to mold small bees and bake according to package directions
Apply hot glue around the entrance of the hive to mimic dripping honey
Create a hanger by looping twine and gluing to the top of the cone
Decorate with faux flower and attach the bees with glue
Recycled Cardboard Owl Sculpture with Painted Witch Hat

Credit: @l8dyg0diva
The surprisingly chic nature of this upcycled owl is impossible to ignore. The magic is all in the details, dolls.
That distressed cardboard supplies a rough, organic texture, and those amber bead eyes? Absolute genius.
Trust the process, this sits at a whole different level. You can make this one of your own cherished DIY projects.
How to Make This Craft
Cut out various sized circles from cardboard
Roll up the circle pieces
Use hot glue to connect the rolled circles creating a spiral shape for the owl’s body
Cut out wing shapes and a beak from flat cardboard
Layer the wings onto each side of the owl
Attach a raffia bundle for wings
Glue on the buttons to create eyes
Craft a cone-shaped hat from cardboard and decorate
Glue hat on top and stand your owl on a wooden round
DIY String Art: Holly Berry Wooden Wall Decor for Beginners

Credit: @knotreallyart
String art is completely achievable, even if you feel totally craft challenged. You can pick up a handy pre made kit, or simply hammer small nails into a wooden board and crisscross them with colorful embroidery floss. Quick crafts like these suit holiday decorating so well because they feel personal instead of aiming for sterile perfection.
How to Make This Craft
Draw a holly leaf and berry design on a piece of paper
Tape the paper design to a piece of sanded wood
Hammer small nails along the outline of the design, about a quarter inch apart
Remove the paper template
Tie one end of green thread to a nail
String the thread randomly across the nails to fill in the holly leaves shape
Repeat the same process to fill in the holly berries using red thread
Personalized Yarn Rainbow Decor: A DIY Kit for Adults
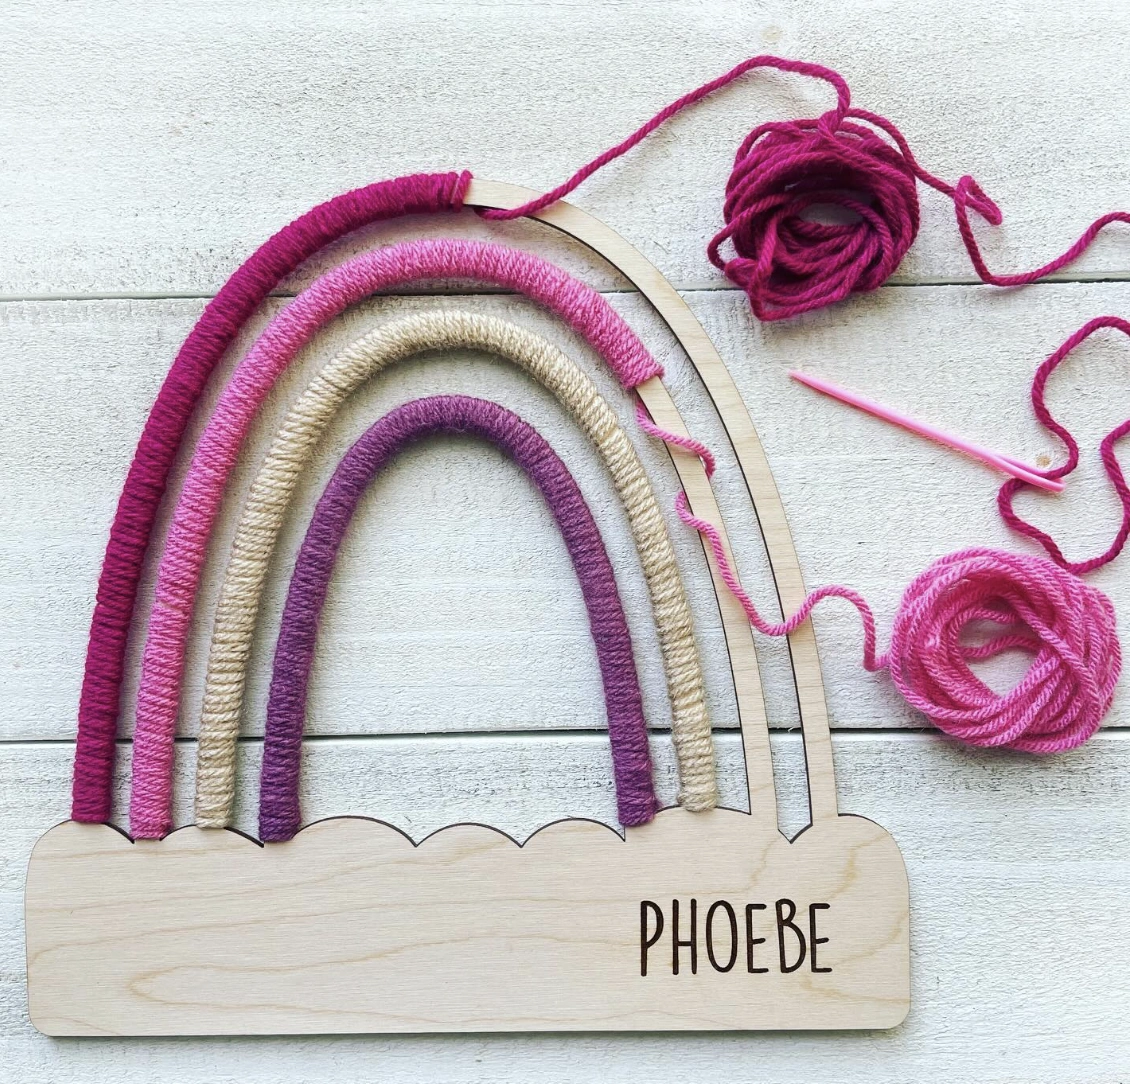
Credit: @whiskerworks
If you know someone completely OBSESSED with yarn, or simply head over heels for adorable room accents, this is IT. It strikes that flawless balance between cute and crafty, and personalizing it opens up endless possibilities.
Think about incorporating this into a kid’s room or even brightening up your own workspace. These types of whimsical crafts unleash your inner artist in the best possible way.
How to Make This Craft
Start with a rainbow-shaped wooden blank
Choose a variety of colorful yarns
Use a glue gun to adhere the yarn to the rainbow pieces, one color per layer
Trim excess yarn to create clean edges
Use a yarn needle to weave in any loose ends for a finished look
Attach cloud-shaped pieces on the bottom of rainbow with glue
Use a stencil to paint the name on the cloud
Unfinished Ceramic Ornaments: Gingerbread and Evergreen Shapes

Credit: @yeeshandmadetreasures_20
These are a far cry from those glitter drenched, mass produced ornaments shoved onto shelves. Unlike the gaudy choices lining the aisles, these shapes invite active participation and creativity into the process.
They arrive as blank slates hungry for personalization, which makes your holiday vibe feel truly authentic. Consider these shapes for your next round of refined homemade crafts, letting the pure quality shine through loudly.
How to Make This Craft
Combine flour, salt, and water to form clay dough
Roll the dough on a floured surface
Use cookie cutters to cut out shapes like gingerbread men and trees
Use a straw to create a hole at the top of each ornament for hanging
Bake at low temperature until hardened
Let cool completely
Paint and decorate the ornaments with acrylic paints or markers
Thread a piece of twine through the hole for hanging
Fuzzy Brown Yarn Owl with Button Eyes
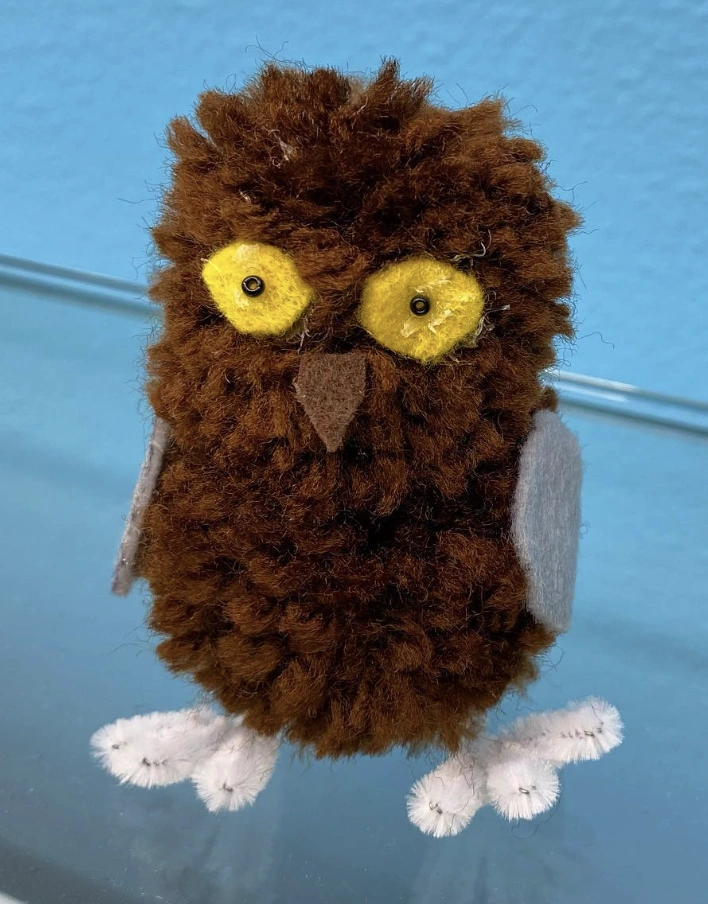
Credit: @hendersonlibraries
This creature hits cute in a wonderfully goofy sort of way. Your eye immediately locks onto the texture: that chunky, almost shaggy yarn demands to be touched.
And those little button eyes. They deliver this permanently startled expression that is utterly hilarious.
If you are browsing arts and crafts for adults projects, this makes a brilliant starting point. You could easily build an entire flock. Its imperfect nature is precisely what makes it so charming.
How to Make This Craft
First, create the body pom-pom using brown yarn and a pom-pom maker
Make two smaller, flatter pom-poms for the wings
Glue wings onto the sides of the larger pom-pom
Fashion two small yellow felt circles and attach small black beads for eyes
Attach eyes onto the front
Cut a small triangle from brown felt to create the beak
Glue the beak under the eyes
Cut two short lengths of white pipe cleaner for the feet and glue them to the base
Textured Yarn Tree Wall Hanging: DIY Pom-Pom Foliage

Credit: @creating.art.studio
Envision a gallery wall addition that brings a cheeky, hand made spirit into the mix. It works perfectly as a bold splash of color against a minimalist backdrop or as a present for that friend who is genuinely obsessed with all things artisanal.
This serves as solid proof that fun crafts for adults can be seriously chic. Imagine adding this warmth to your WFH space.
How to Make This Craft
Wrap the yarn around the canvas with a weaving frame behind the canvas
Hot glue a rope to create a tree trunk
Start wrapping the rope with yarn from one end to the other
Make pom-poms out of different colors of yarn
Attach the pom-poms to the top of the tree trunk to create leaves
Secure the yarn ends with glue, so the yarn does not unravel
Weave brown and white yarn together at the bottom
DIY Hanging Terrarium: Air Plant, Sand & Moss Magic!

Credit: @hendersonlibraries
This isn’t merely cute, it radiates an entire vibe. These would make perfect gifts, particularly after you customize them to be extra special.
Gathering together for some serious girly crafts action to put your own distinctive twist on these sounds ideal. Imagine adding cute charms or some sparkling glittery sand. Eek.
How to Make This Craft
Obtain a clear glass orb terrarium with an opening and hanging loop
Pour a layer of clean sand into the base of the orb
Arrange small pebbles and decorative stones on top of the sand
Add a small clump of moss to one side for a natural touch
Carefully place an air plant within the terrarium, nestling its base into the sand
Mist the air plant lightly with water once or twice a week
Hang in a bright, indirect light location
Feathered Macrame Earrings with Earth-Toned Beads

Credit: @craftsyhacks
Macrame earrings seem to be everywhere, yet these ones truly distinguish themselves from the crowd. They avoid that oversized, heavy statement piece energy. The natural cotton cord gives them an airy, breezy feel, while the subdued green beads alongside pale wood accents contribute a layer of quiet sophistication.
How to Make This Craft
Cut multiple strands of macrame cord and loop each strand through the earring finding
Begin knotting the strands in a downward spiral pattern, working around the base
Insert the wooden beads to create the center of the feathers
Continue with the spiral knot
After knotting, trim the bottom cords to resemble feathers
Use a fine comb to separate the cord, forming the fringe
Trim the fringe in the desired shape
Add earring hooks
Repurposed Holiday Card Wreath With Red Bow
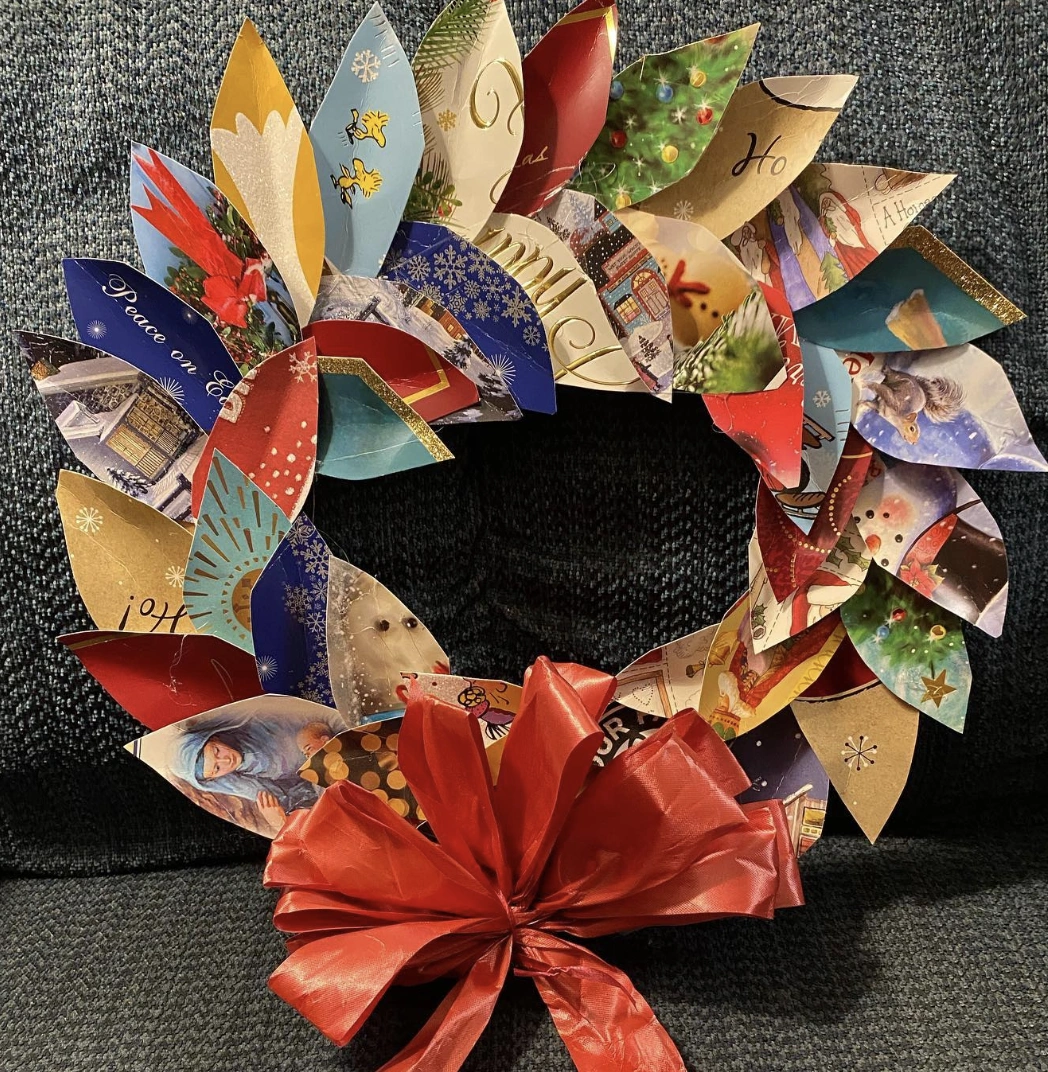
Credit: @digin905
Remember how upcycling is totally having a major moment right now? Well, feast your eyes on this wreath crafted from old holiday greeting cards.
It delivers major crafty energy in spades. Seriously.
Something similar probably popped up on Etsy just last week. Does this qualify as one of those adorable arts and crafts for adults projects?
How to Make This Craft
Gather old holiday cards – the more, the merrier!
Cut each card into petal-shaped pieces of varying sizes
Cut out cardboard as a base in a circular form for the wreath
Using a hot glue gun, attach the card petals to the cardboard base
Overlap the petals to create a full, layered look
Continue until the entire circle is covered, working layer by layer
Create a bow using wide ribbon, glue/tie it to the bottom
Let the glue cool and fully set before displaying or hanging
Attach a loop of ribbon to the back for easy hanging
Quirky Gnome Village: Handmade Felt and Yarn Figures

Credit: @pink.ladybird
These are not your grandma’s garden gnomes, darling. These felt and yarn characters speak to the person who collects moments, not dust.
Interior designers plotting that flawless shelfie or the cool aunt hunting for standout gifts will instantly recognize their value. Truly stylish individuals understand the power of singular statement pieces. These lovable gnomes will inspire absolutely anyone to explore their creative crafts for adults side.
How to Make This Craft
Cut felt into cone shapes for the gnome hats and sew along the edges
Stuff the hats lightly with fiberfill to give them shape
Create gnome bodies by wrapping yarn around a cardboard base, forming beards
Attach small wooden beads for noses using hot glue
Sew or glue felt arms and legs to the bodies
Decorate the hats with felt leaves, flowers, or wooden buttons
Cut wooden circles or slices to serve as bases for the gnomes
Hot glue the gnomes onto the wooden bases
Add small wooden accessories, like axes, walking sticks, or ladybugs
Complete Crochet Kit: “Waffles the Bear” Beginner Project
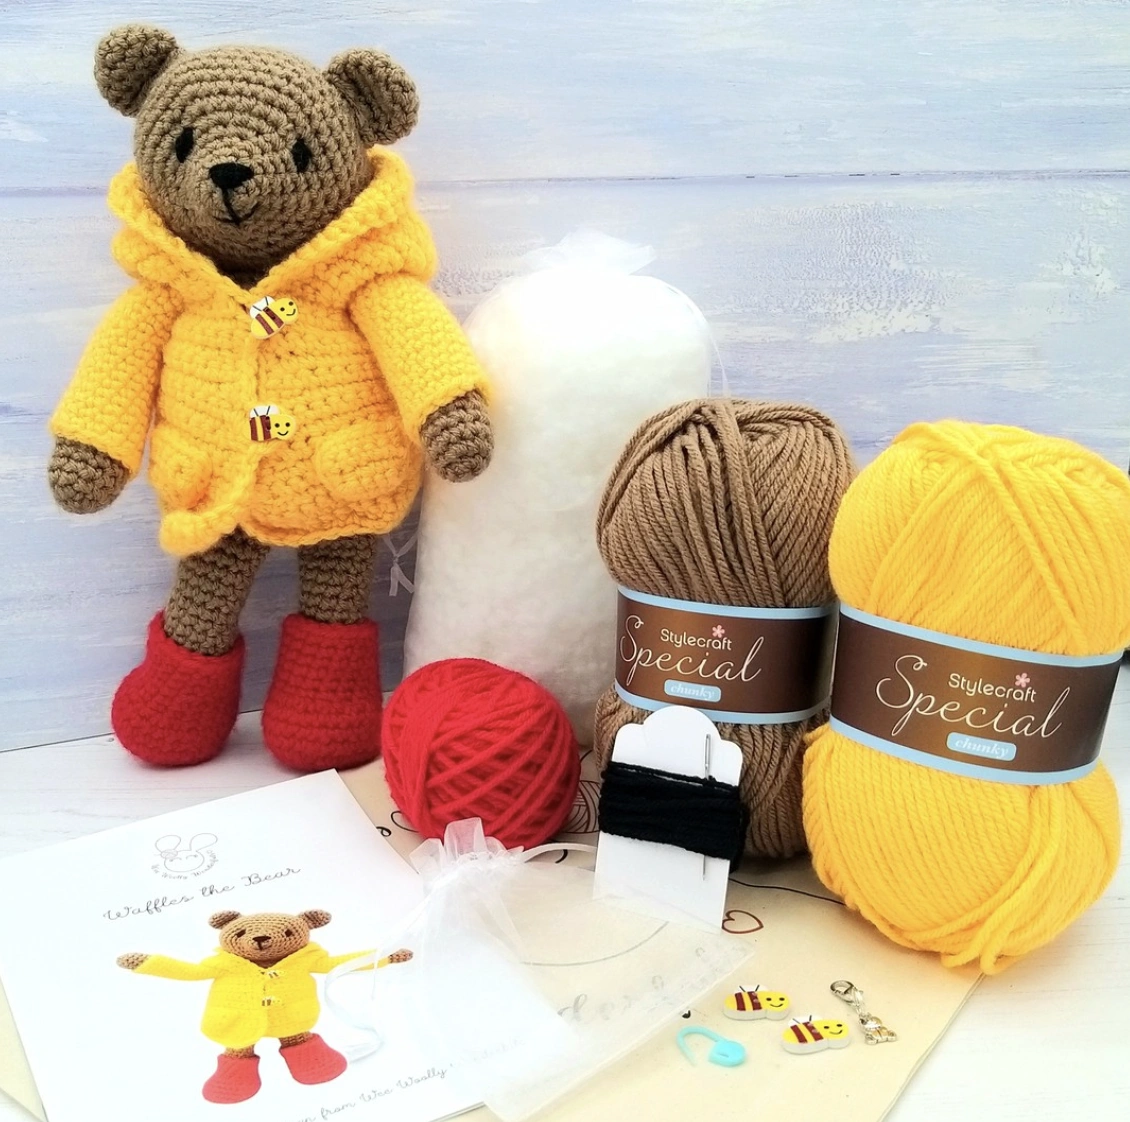
Credit: @weewoollywonderfuls
Feeling totally uninspired and craving a satisfying hands on activity? The best way to decompress sometimes simply involves making something from scratch.
This crochet bear kit presents the perfect mindful escape. Rather than doom scrolling into oblivion, following the guided instructions allows you to conjure an adorable, huggable companion out of thin air. Diving into simple DIY projects unlocks a completely new universe of relaxation and custom gift potential.
How to Make This Craft
Gather materials from the kit: yarn, crochet hook, stuffing, and pattern
Crochet the body of the bear using the brown yarn following the pattern instructions
Create the head and ears separately, stuffing as you go
Crochet the arms and legs, also stuffing them with fiberfill
Assemble the bear by sewing the head, arms, and legs to the body
Crochet the yellow hoodie and red boots according to the pattern
Dress the bear in the hoodie and boots
Embroider the eyes and nose with black yarn
Attach the bee button embellishments to the hoodie
Weave in all loose ends for a clean finish
Handcrafted Clay Butterfly and Sunflower Brooch
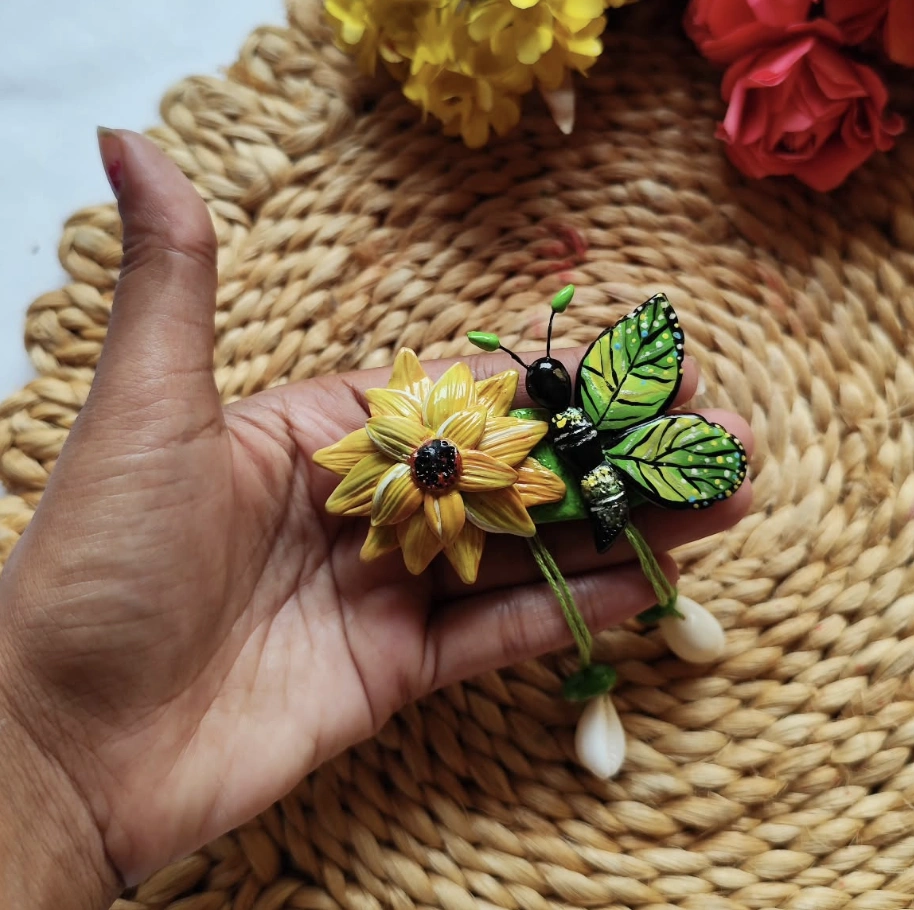
Credit: @ipriti_fy
When the goal involves injecting a little quirky charm into your daily outfits, this small clay brooch answers the call perfectly. It would look absolutely awesome pinned to a classic denim jacket or even accenting a plain canvas tote bag.
Anyone can genuinely tackle projects like this one. These serve as brilliant entry points if you happen to be browsing for easy crafts for adults.
How to Make This Craft
Condition polymer clay
Roll small balls and shape petals for the sunflower
Attach petals to a central clay disc
Create butterfly body and wings from separate clay pieces
Add details to the wings with paint
Bake clay pieces
Glue butterfly to the sunflower
Attach pin backing with strong adhesive
Add resin coat for shininess
Apply varnish for long lasting finish
Floral Globe Centerpiece: DIY Yarn Ball and Hat Decor
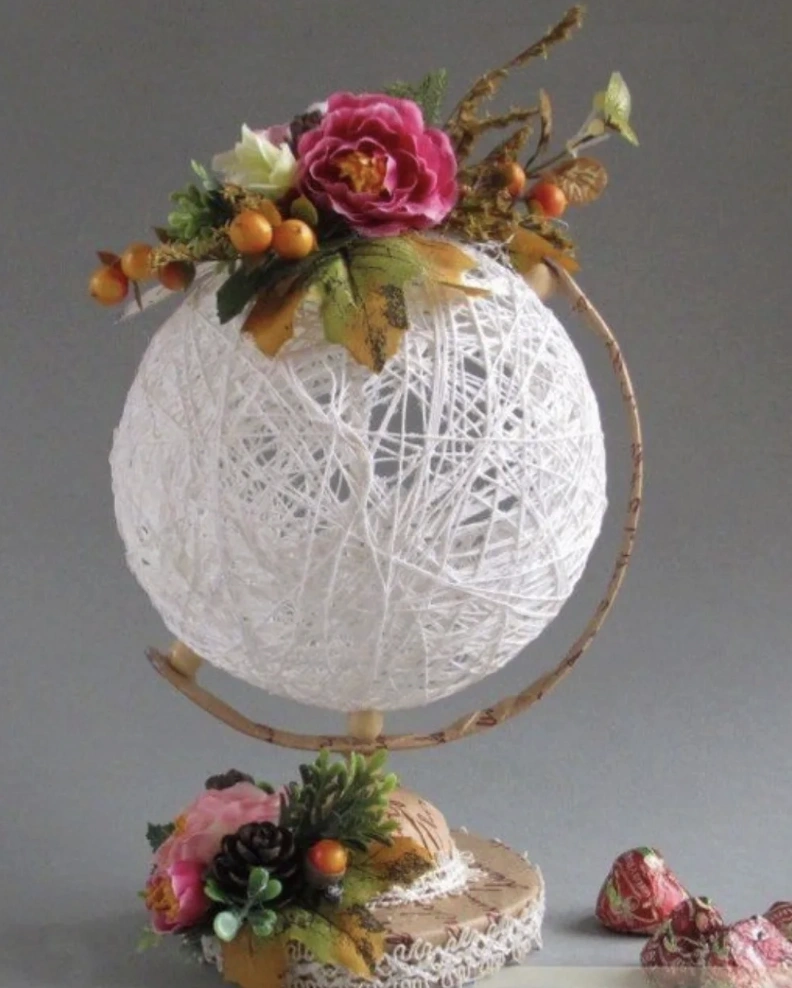
Credit: @ideas_of_craft
Prepare to have your mind blown by this insane craft. It is a globe constructed entirely from yarn, channeling the spirit of those extra extravagant homemade crafts tutorials from back in the day.
The best part sits right on top: the prettiest faux flowers resting on a tiny decorated hat. The intricate detail on the hat’s lace trim genuinely earns a chef’s kiss. This stands out as the perfect whimsical centerpiece for any gathering.
How to Make This Craft
Inflate a balloon to desired sphere size
Cover balloon with petroleum jelly as release
Soak yarn in white school glue thinned with water
Wrap glue-soaked yarn randomly around the balloon
Let dry completely, 24-48 hours
Pop the balloon and carefully remove it
Create a base using cardboard or a hat
Attach sphere to base with glue
Decorate with artificial flowers, berries, and leaves, using hot glue
Consider spray painting the base for a polished look
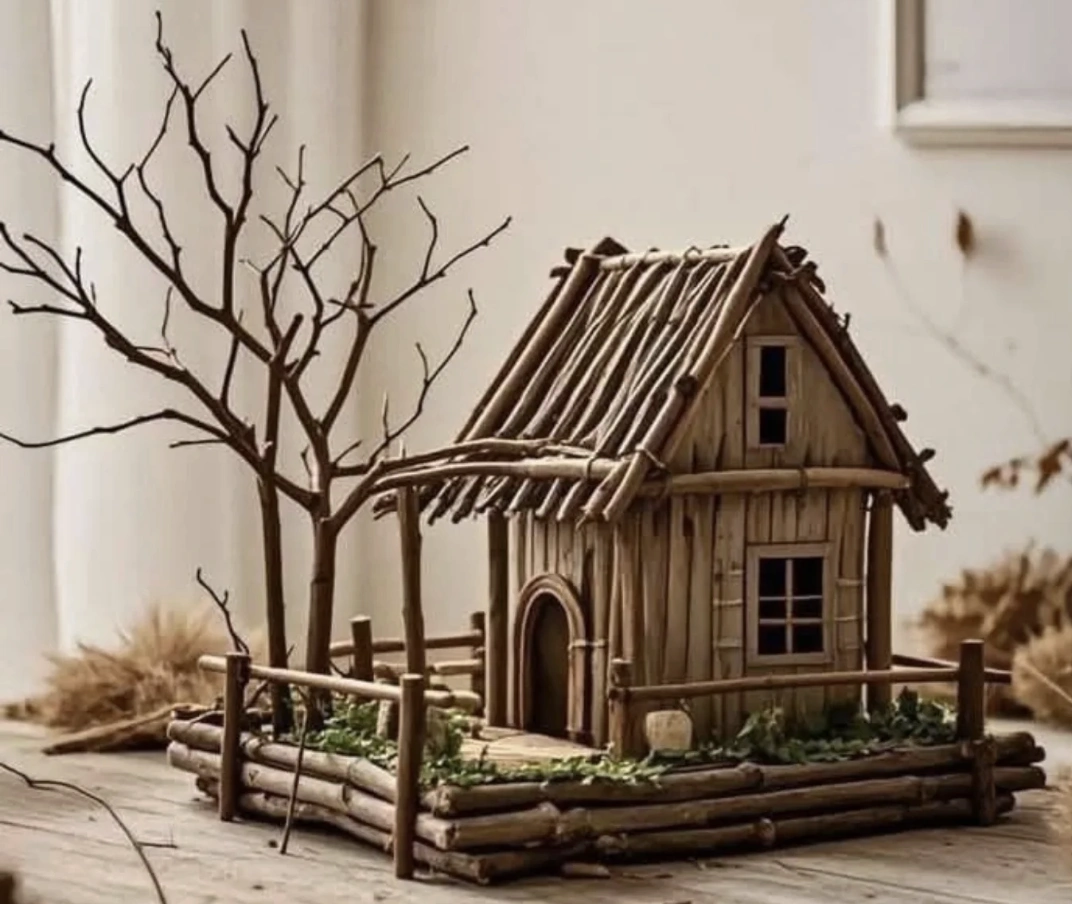
Miniature Rustic Log Cabin Kit with Bare Branch Tree and Fenced Yard Display
Credit: @ideas_of_craft
Someone clearly channeled a seriously skilled approach into whimsical crafts, conjuring this exquisite miniature log cabin scene. It stands leagues apart from your average hobbyist diorama and would look unbelievably cute perched on a display shelf.
Best of all, there is zero glitter cleanup required. Finally, adult crafts that refuse to look juvenile.
How to Make This Craft
Gather small twigs and branches of varying sizes
Cut the twigs to appropriate lengths for walls, roof, and fence
Construct the cabin frame by gluing twigs together
Add roof pieces, overlapping slightly
Build a small twig fence around the cabin base
Attach base to frame with adhesive
Craft tiny doors and windows from thin wood pieces
Position dry moss and small stones for ground cover
Add the dried out tree branch to the diorama
Upcycled Wine Bottle Vase with Faux Mirror Leaves

Credit: @enigmatixmedia
The finished result is completely obsession worthy. For styling, keep the florals neutral to really let the striking design pop.
Experimenting with different shades of paint could also unlock a completely different aesthetic. These kinds of quick crafts projects deliver peak satisfaction. Anybody can achieve this look; the secret lies purely in having fun and letting your creative side run wild.
How to Make This Craft
Clean the wine bottle thoroughly, removing label
Paint bottle with base color using acrylic paint
Apply mirror pieces in leaf pattern with craft glue
Draw vine outlines with puffy paint
Let glue and paint dry completely
Add another coat of paint if necessary
Seal the bottle with a clear varnish spray
Add more detail with markers or paints
Display as a decorative vase
Add some fake flowers to accentuate the project
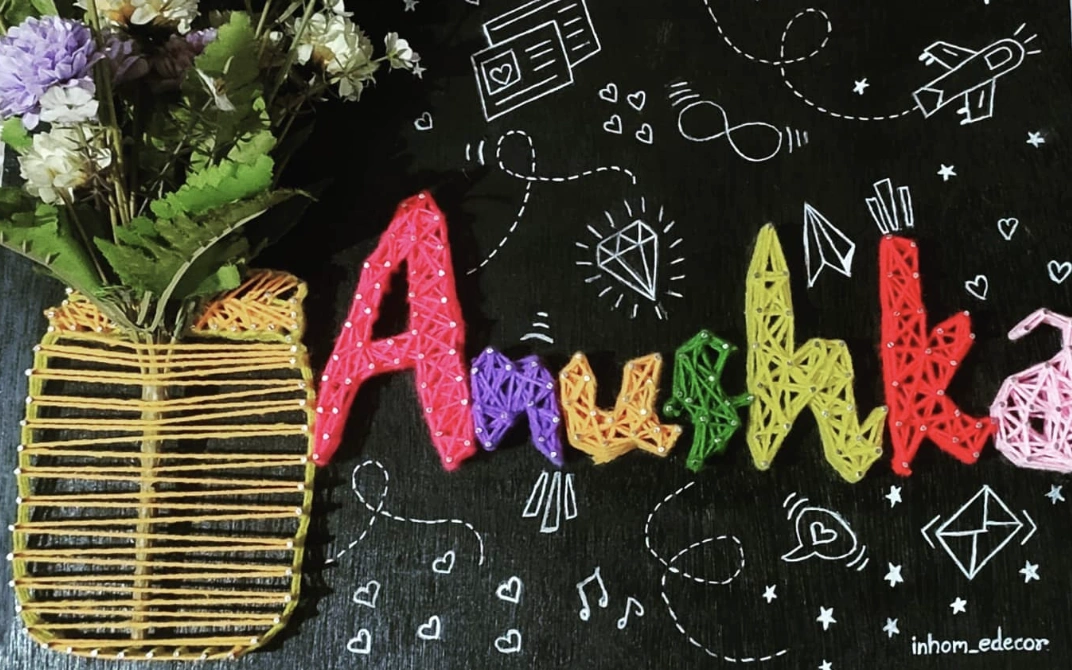
Personalized String Art: A Thoughtful DIY Décor Project
Credit: @inhom_edecor
This rises above being just another item to hang on the wall; it is deeply personal. It lands as the ideal, heartfelt present for a friend’s new baby girl or a singular statement piece for a teenager’s sanctuary.
This project targets those who truly savor the journey of making, cherishing the process as much as the final outcome. Anyone who genuinely admires unique girly crafts and craves an intriguing conversation starter will fall for this art piece.
How to Make This Craft
Sand and stain a wooden board
Print and transfer name template onto the wood
Hammer small nails along the outline of the name
Hammer nails around the vase outline
Wrap string around the nails for each letter, creating a filled-in look
Repeat the same steps for the vase outline
Erase visible pencil lines
Draw travel inspired drawings on the backboard
Add artificial flowers to the vase to complete the project
Attach hanging hardware to the back of the board
Hand-Stitched Felt Nativity Ornament Set: Mary, Joseph, Three Kings, Angel, and Animals

Credit: @pollychromecrafts
Okay, these pieces scream happy holiday at full volume. The handcrafted look dominates current trends because it signals authenticity and a deeply personal touch.
Step aside generic shiny baubles; it is the era of unique decor. Finding a better way to channel this energy than an Adult Craft Night centered on crafting these charming felt ornaments feels impossible.
Plus, ponder the Instagram story potential. Major win awaits.
How to Make This Craft
Download and print free nativity ornament templates
Cut out felt pieces using templates: bodies, heads, beards, clothing, accessories
Layer facial features and clothing, attaching with fabric glue or embroidery floss
Blanket stitch around the perimeter of each body piece
Stuff each felt figure lightly with polyester fiberfill
Cut small strips of ribbon for hanging loops
Stitch ribbon loop to the top of each ornament
Embellish with glitter, beads, and small crowns using hot glue
Attach each character to a backing piece of felt
Cut out the final shape for each character
Sew around the character to enclose the stuffing
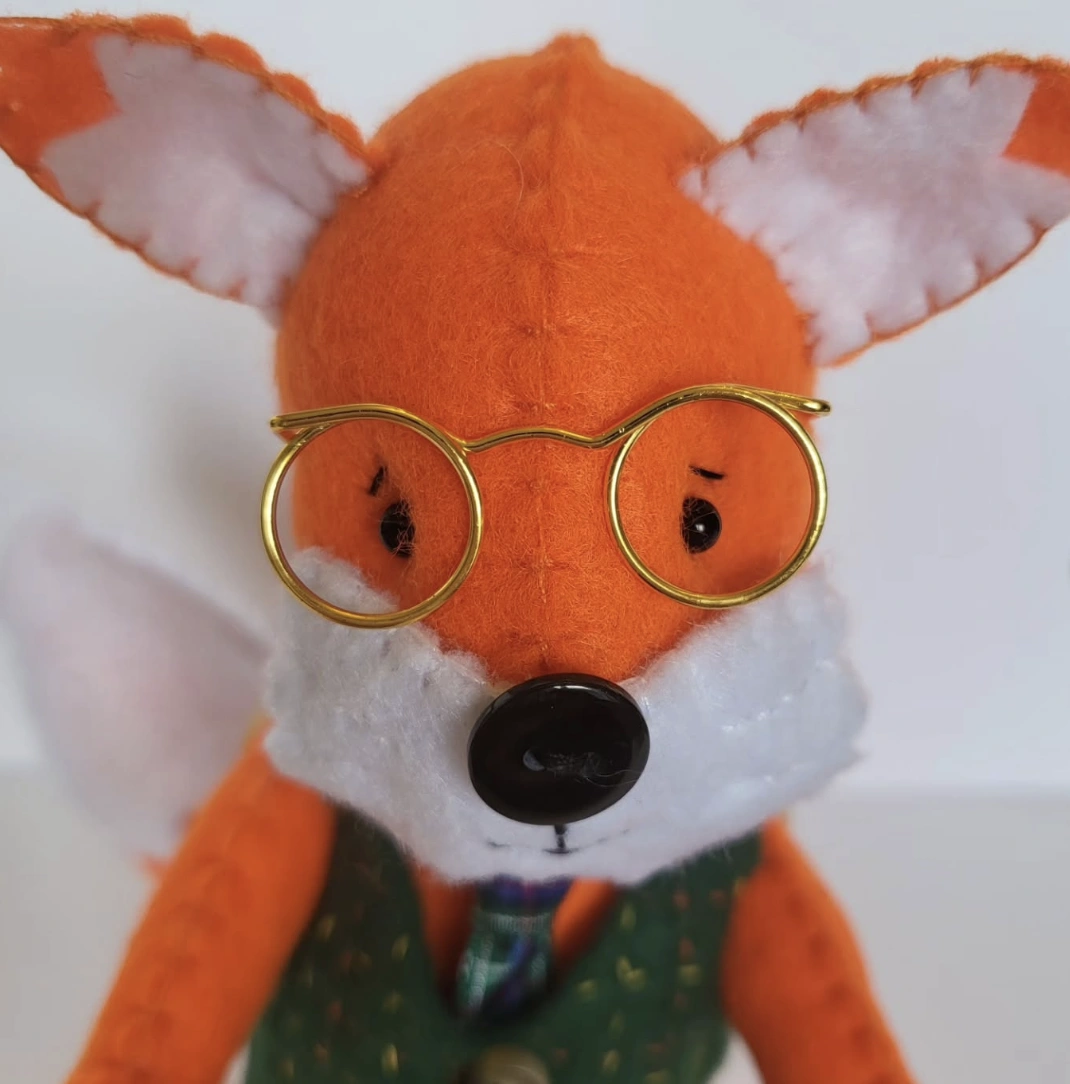
Dapper Fox Plushie: Felt Sewing Project with Tiny Glasses
Credit: @pink.ladybird
Those tiny gold wire glasses are completely slaying me; he channels total Professor Fox energy. And peep that dashing green tweed vest.
This is exactly what fun crafts for adults embodies. You could blissfully lose track of time perfecting the tiny details while stitching this little gentleman together. Placing him right on the desk guarantees instant bursts of cheer throughout the day.
How to Make This Craft
Acquire orange, white, green felt, plus miniature glasses, buttons and patterned fabric for the vest and tie
Draft or find a fox plush pattern online, cut out pattern pieces, and transfer them onto felt
Whip stitch the body pieces together, leaving an opening for stuffing
Turn the fox right side out and firmly stuff with poly-fil
Ladder stitch the opening closed
Cut vest pieces from green felt, and the tie from the patterned fabric
Sew the vest together and carefully slip it onto the fox
Hand-stitch the tie under the fox’s chin
Attach two small buttons to the front of the vest with thread
Carefully attach the miniature glasses to the fox’s nose with a dot of glue
Embroider eyes and nose with black thread, using satin stitch
Discovering the world of fun crafts for adults honestly transforms your free time into something magical. The results you can achieve with just a handful of basic supplies and a spark of imagination are truly stunning.
Why not set aside a single hour this week to experiment with something completely new? You might just amaze yourself with what you can bring to life.