


Have you noticed those miniature, irresistible trinkets swinging from backpacks and phone cases everywhere? The world is fully captivated by clay charms.
It is impossible to resist their appeal.
Making air dry clay charms by hand has become a full blown obsession lately.
There is a deep, soul soothing satisfaction in sculpting tiny creations, and the entire clay charms aesthetic sits right in that sweet spot of cute, eccentric, and completely one of a kind. Time for a creative session.
Quirky Handmade Air Dry Clay Charms: Pizza, Ghost, and More.
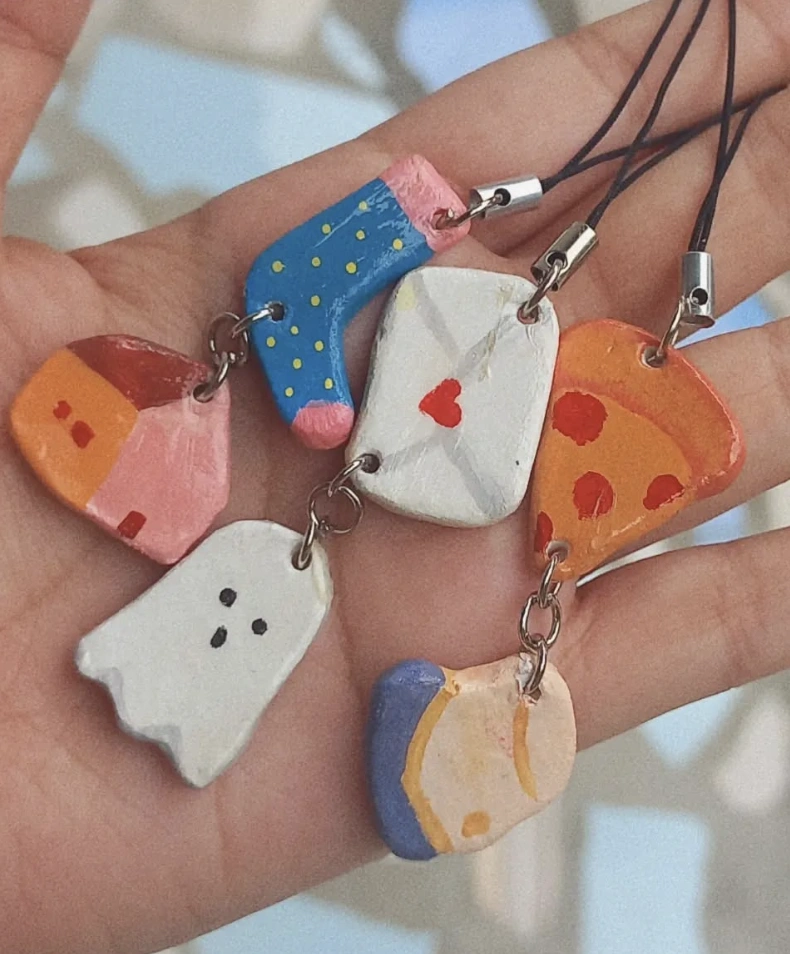
Credit: @telakotta
Alright, there is no denying the cuteness here. Swapping mass produced uniformity for these handmade Air Dry Clay Charms brings a distinct personal signature.
The assortment ranges from a pizza slice to a ghost and even a tiny envelope sealed with a heart. They radiate a playful, indie spirit that is absolutely dominating the scene right now. Anyone hunting for accessories with real personality needs to see these.
How to Make This: Soften polymer clay by working it with your hands. Mold the clay into chosen figures like a ghost, sock, or pizza slice. Cure the clay in the oven following the brand’s specific guidelines. Let the pieces cool down, then add decorative accents with acrylic paint. Coat with a sealing varnish for durability. Push an eye pin directly into the upper section of every charm. Secure jump rings onto those eye pins. Hook phone straps through the jump rings. Test the straps with a soft tug to confirm they hold firm. Arrange your collection of delightful new creations.
Strawberry Topped Bunny Girl Clay Charm
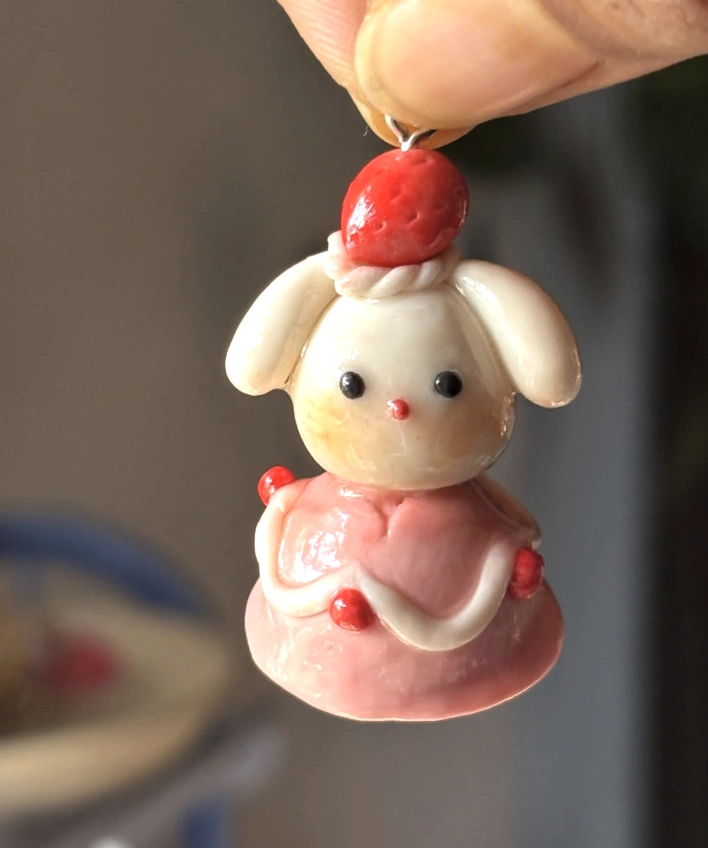
Credit: @minibloom.studio
Behold a hand sculpted bunny girl figurine wearing a strawberry right on her head. The level of adorable is off the charts.
This piece delivers the ultimate “clay charms aesthetic” energy, instantly imaginable dangling from a phone or swinging against a handbag. Say goodbye to boring accessories forever.
How to Make This: Prepare pink, red, and white polymer clay until pliable. Shape two white spheres for the main head and torso. Fashion tiny white ears and securely join them to the head. Flatten pink clay into the dress piece and add small textural details. Craft a red berry hat by rolling the clay into a sphere. Cure all the assembled parts in the oven following your clay’s instructions. Allow them to cool down, then connect the head to the torso. Use a black paint pen to dot on the facial features. Finish with a layer of gloss to enhance the charm.
Mailman Chick: Handmade Clay Charm with Satchel and Hat
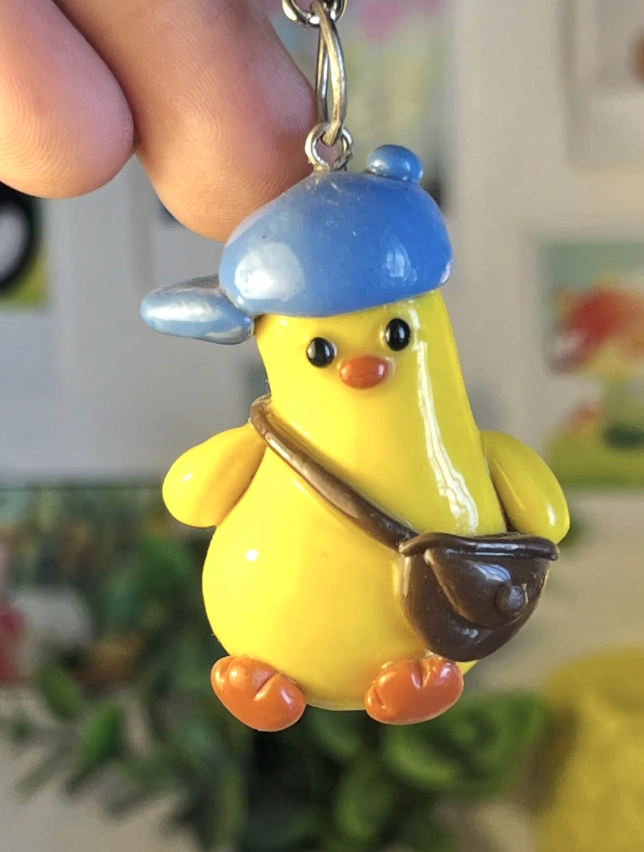
Credit: @craftedwithclay
A dash of whimsy is always a good idea. This eccentric little character, a handcrafted chick sporting a mailbag and cap, lands squarely in the zone of perfect quirky charm.
Envision this clipped onto a set of keys or fastened to a work tote. This particular brand of cute clay charms might not be everyone’s cup of tea, but seekers of playful, one of a kind treasures will absolutely find their new favorite thing here.
How to Make This: Start by conditioning blue, brown, orange, and yellow clay. Sculpt the chick’s torso and head using the yellow clay. Top the head with a blue cap shaped from the corresponding clay. Roll a long, thin brown piece to craft the satchel. Form tiny orange feet and attach them to the body. Cure the piece according to the clay maker’s directions. Wait for it to cool entirely. Paint the eyes. Thread a piece of sturdy wire through the satchel for hanging. Display your finished handiwork.
Baby Blue Penguin: Polymer Clay Figurine with Blush Cheeks
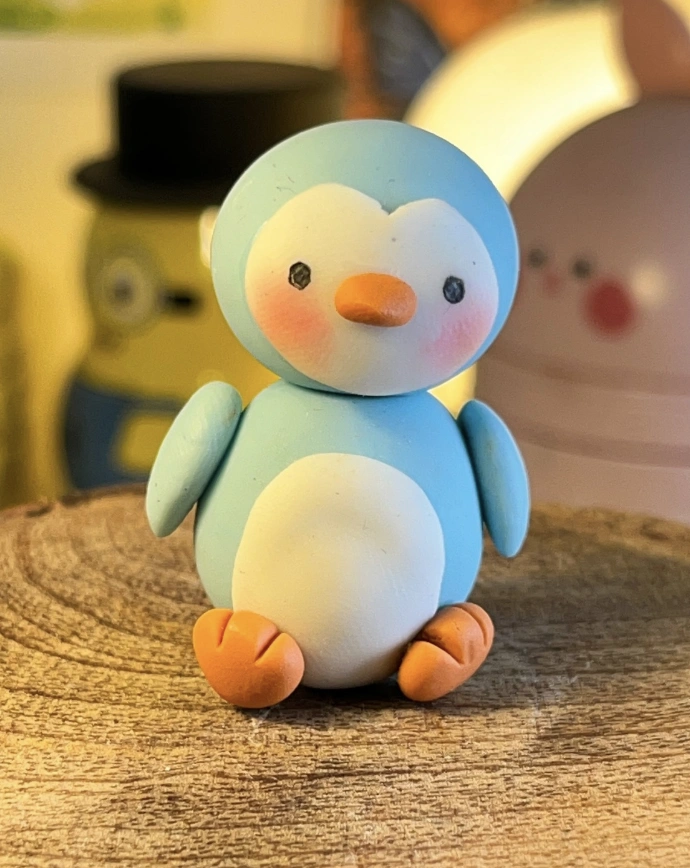
Credit: @craftedwithclay
Tiny charms are absolutely commanding the spotlight. They appear literally everywhere now, decorating phone cases, swinging from jewelry, and acting as bag ornaments.
This precious little penguin is a textbook example of that artisan, handmade quality everyone seems to crave. The real beauty hides in the subtle irregularities. Expectations point toward many more people experimenting with these “Small Clay Projects,” and honestly, the aesthetic deserves a warm welcome.
How to Make This: Begin by rolling light blue polymer clay into a ball. Mold it into the penguin’s plump, rounded shape. Flatten a piece of white clay into an oval for the belly and attach it to the front. Make small orange feet and fasten them to the bottom. Roll a tiny blue ball for the head and join it to the body. Use more orange clay to sculpt a tiny beak. Press two itty bitty black dots for the eyes. Cure the whole penguin per your clay’s directions. Paint the black eyes once it is cooled down. Enjoy the company of your new precious pet penguin.
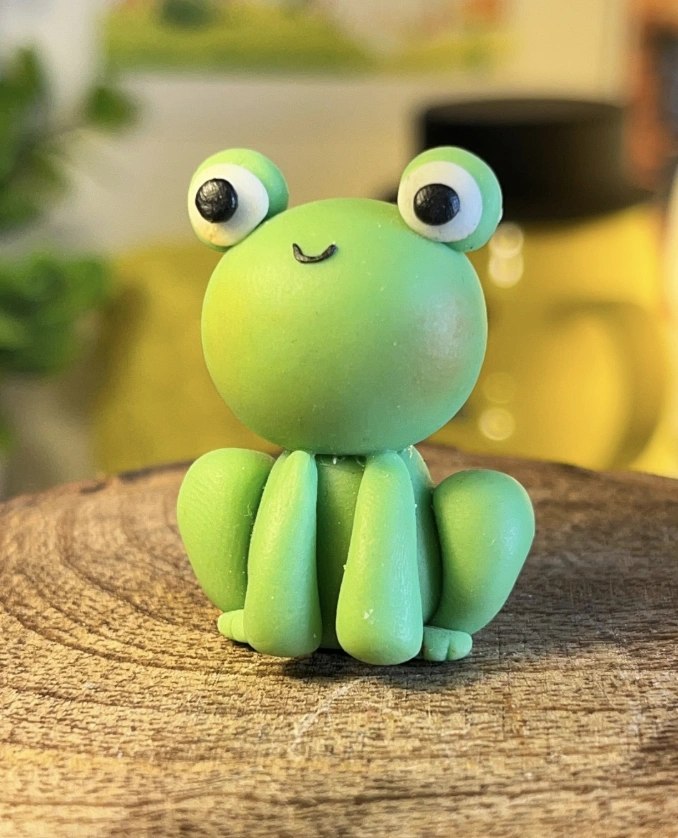
Light Green Froggy: Handmade Clay Charm Detail
Credit: @craftedwithclay
A cheerful clay charm delivers the perfect quirky punctuation mark for any casual look. These pieces feel impressively light yet surprisingly sturdy.
The compliments will arrive in droves. Anybody looking for a distinctive accessory should seriously consider this little amphibian friend.
How to Make This: Work green polymer clay until it moves with ease. Roll the clay into a larger sphere for the body and a smaller one for the head. Fuse the head and body together. Shape two stubby green cylinders for legs and attach them. Form two small balls for the eye bumps. Press tiny black dots into those eye balls. Mold two tiny green rectangles for the feet. Carve a delicate line across the face to create a smile. Cure the frog according to the clay instructions. Celebrate the arrival of a miniature new buddy.
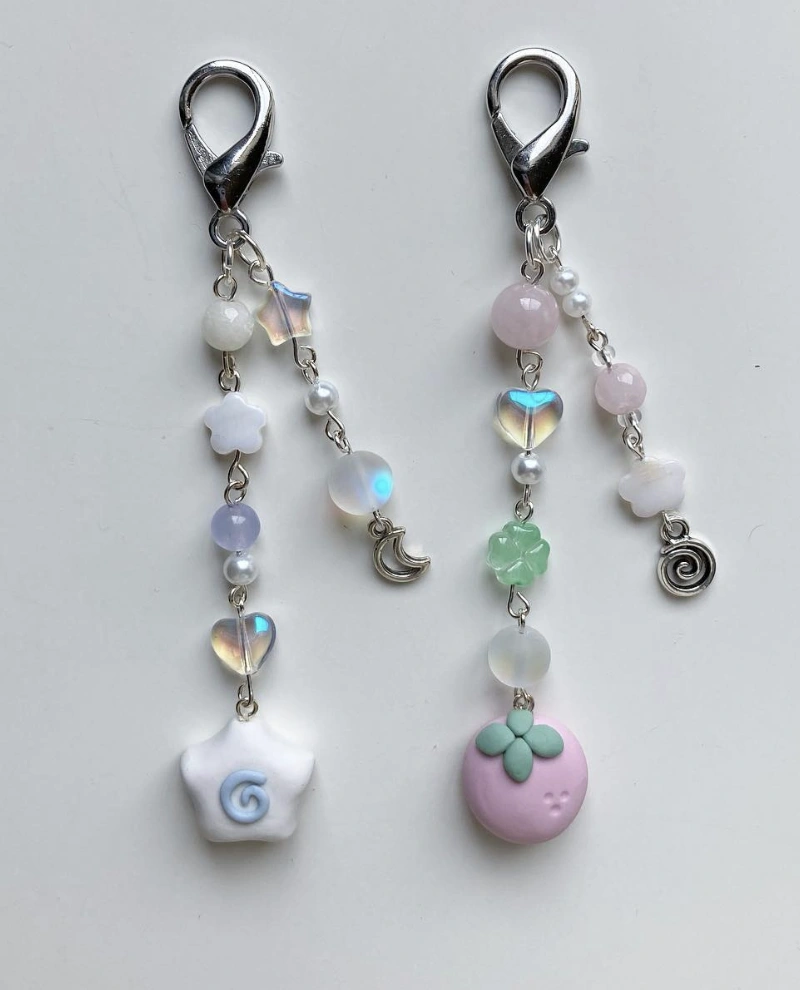
Delicate Clay Charms: Pastel Star and Pink Mochi
Credit: @stxrri_jewels
These are not run of the mill, mass produced trinkets. The handcrafted quality is obvious, with tiny imperfections that add a narrative layer.
Where other charms land with a flat, generic feel, these exude a refined “Clay Ideas Aesthetic”. Look closely at the distinct color mixes and silhouettes, specifically the hand molded star and that squishy mochi piece. Those details push them from simply simple to truly exceptional.
How to Make This: Collect small beads, charm shapes, jewelry wire, and lobster clasps. Measure and snip the wire to your preferred length using jewelry pliers. Twist one end into a loop and crimp it tightly. Thread beads and charms in a back and forth sequence onto the wire. Shape another loop on the other end and crimp it shut. Hook a lobster clasp onto one loop using a jump ring and pliers. Duplicate this action for a second charm. Make sure all crimps are secure. Test the hold before connecting to anything. Bask in the glow of your fanciful creation.
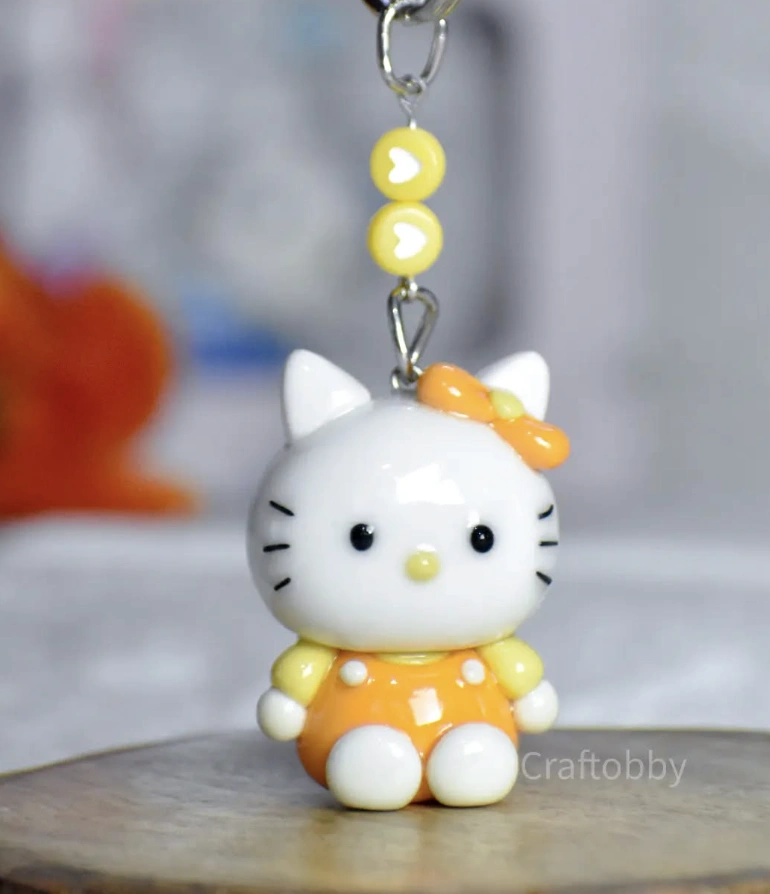
Hello Kitty Figurine Keychain with Yellow Heart Accents
Credit: @craftobby_
These tiny figurine keychains are everything right now. Clipping this one onto a backpack adds an instant flash of playfulness.
This look works brilliantly on a purse or even clipped directly to a key ring. They function as wonderfully thoughtful handmade gifts too.
The desire to amass an entire collection of varied Clay Charms styles is alarmingly strong. Consider it an official fixation.
How to Make This: Condition orange, yellow, and white polymer clay separately. Shape white clay into a sphere and then gently mold it into the distinctive head shape. Add small black clay bits for eyes and draw the whiskers. Sculpt an orange bow and attach it right to the head. Form the torso and arms using the yellow and orange clay. Cure the figures per the instructions on the clay package. Let them fully cool before you start detailing with acrylic paint. Apply a gloss varnish to seal and protect the paint job. Fix a metal keyring into the top of the head.
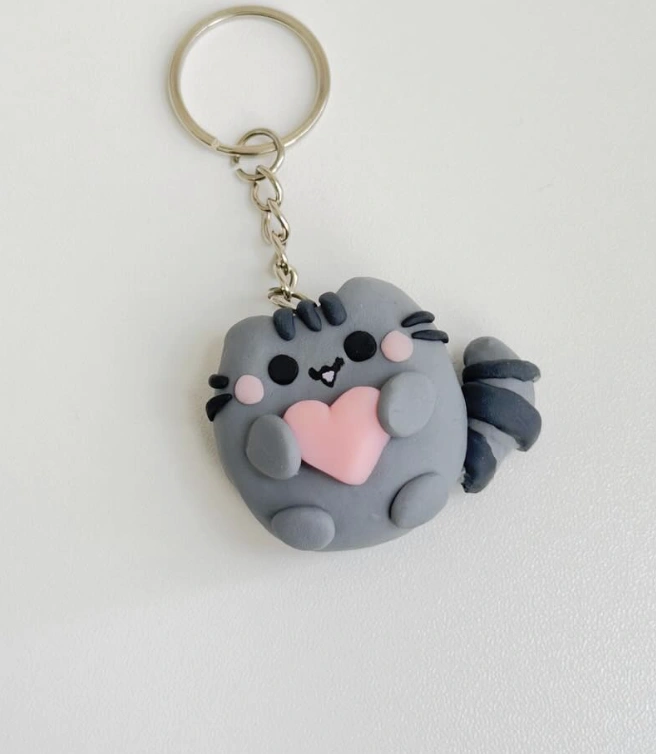
Chubby Gray Cat Keychain with Pink Heart
Credit: @whimsicore
This charm was made for those mornings when time slips away and a small reason to smile is required for survival. Dangling from car keys, this chunky little creature is completely impossible to overlook.
These Ceramic Charms function as an adorable, whimsical nudge not to take everyday life too seriously. The ideal tool for injecting a bit of magic into the ordinary.
How to Make This: Grab a chunk of gray polymer clay and condition it until it becomes soft. Shape it into a big, plump ball for the body. Sculpt tiny legs and fuse them securely to the body. Fashion a pink heart and press it gently onto the cat’s chest area. Make a tail and attach it to the back. Decorate the tail with stripes using a darker hue of gray clay. Cure the figure following the clay’s directions. Wait for it to reach room temperature. Paint the facial features using black paint. Coat the whole thing with a clear varnish for longevity. Fasten to a keyring via a screw eye and pliers.
Quirky Puppy Charm: Handcrafted Clay Figurine
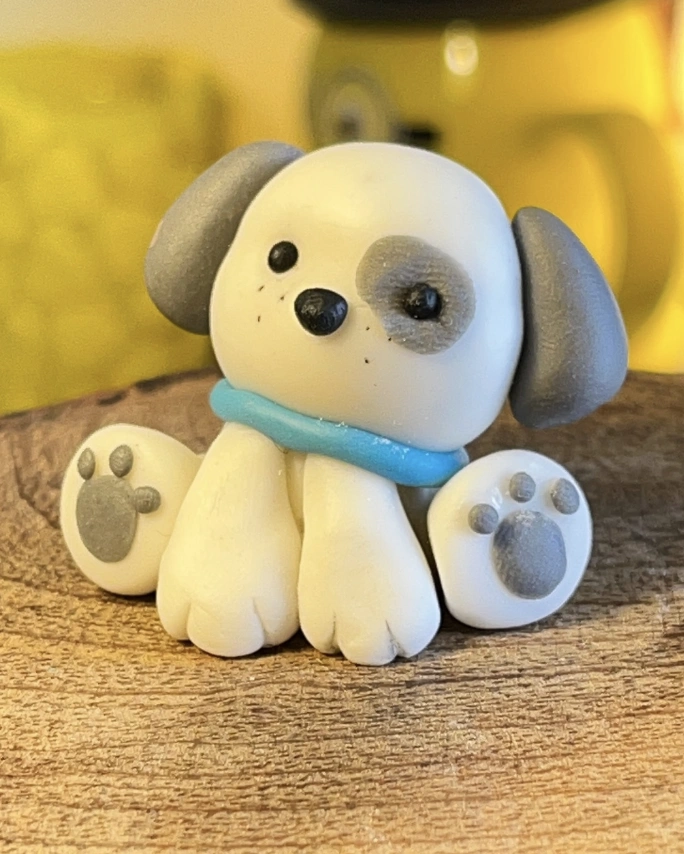
Credit: @craftedwithclay
This tiny pup is an absolute treasure. It recalls the Y2K jewelry craze but pushes it to a more refined level.
That same spirited playfulness now spills over into home decor, where these handcrafted clay trinkets pop up as prime specimens. This is not simply cute; the look is carefully put together.
Integrating these small, surprising pieces broadcasts a bold style statement. Pop this on a shelf or desk for an immediate splash of whimsy.
How to Make This: Mold white clay into a large, oblong shape for the main body. Sculpt a head and fasten it securely. Roll gray clay into two ear forms, fastening them onto the head. Make four legs, taking care to attach them firmly to the body. Wrap a thin roll of blue clay around the neck to make a collar. Use black clay for the nose, eyes, and a spot on the face. Press paw prints into the feet using a sculpting tool. Cure the entire figure based on the clay package directions. Let it cool down fully before adding paint details. Apply a varnish for a finished, glossy look.
Handmade Clay Charm Keychain: Reindeer, Bear, and Bow
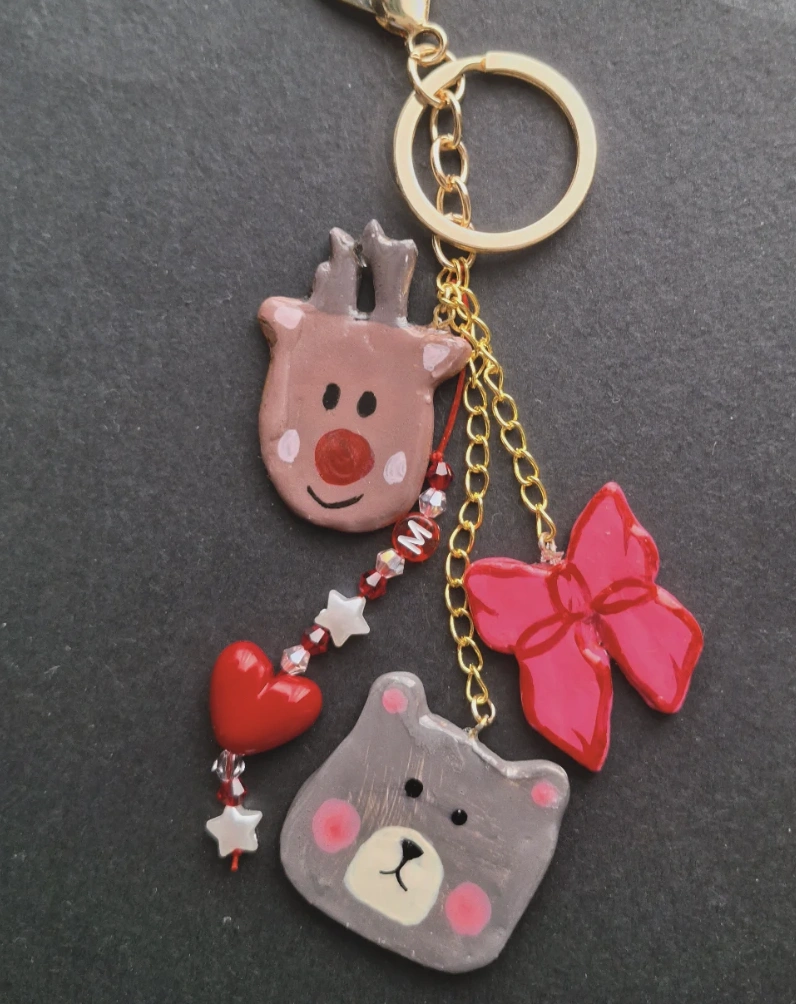
Credit: @polixrwmopagwni
The level of adorable here is extreme. A perfect find for anyone who loves giving handmade presents or simply craves a unique accent for their everyday keys.
These clay charms feel special and carry a clear sense of care, far removed from factory made goods. Looking to find some simple, cute mini clay ideas for a personal project? This keychain could genuinely spark the inspiration you need.
How to Make This: Roll out pink, gray, and brown clay into flat, even sheets. Punch out bow, bear, and reindeer forms with cookie cutters. Paint on tiny details like noses and eyes using white paint. Fashion the reindeer’s distinct red nose from a tiny red clay ball. Bake all the pieces per the package guidelines. Wait for them to cool before sealing with a protective varnish. Puncture a small hole near the top of each shape using a needle. Connect each charm to a chain using jump rings. Fasten the chain to the keyring. Inspect all connections twice and then spread that holiday joy.
Playful Monkey Holding Banana: Polymer Clay Charm
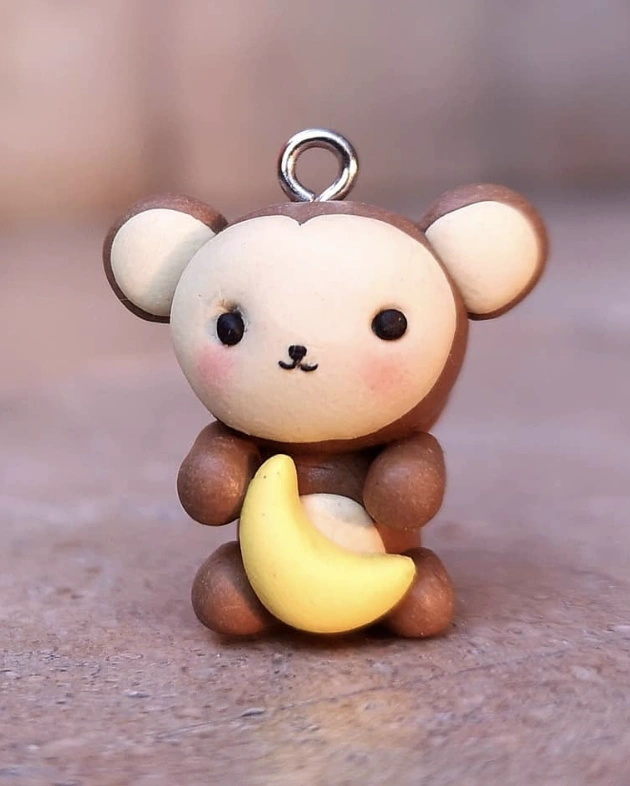
Credit: @artsy.amalia
A single, carefully selected pendant can speak louder than a whole jumble of trinkets. The mischievous monkey gripping a banana is the perfect anchor for anyone’s look.
A shorter chain brings a youthful energy, letting the clay necklace rest just above a plain t shirt. For a cleaner vibe, try suspending it from a fine silver chain instead.
How to Make This: Work cream, yellow, brown, and black polymer clay until soft. Mold the brown clay into the monkey’s torso, head, and limbs. Press cream clay onto the face, ears, and belly. Roll yellow clay into a banana shape and attach it into the hands carefully. Spot tiny black clay beads for the mouth and eyes. Use pink clay to create the flush on the cheeks. Cure at 275°F for 25 minutes. Allow to cool completely. Twist a screw eye into the skull. Connect the keyring to that screw eye. Apply a coat of polymer clay glaze to seal the deal.
Miffy Inspired Clay Charms: Black Trench vs! But here’s the thing, blue dress
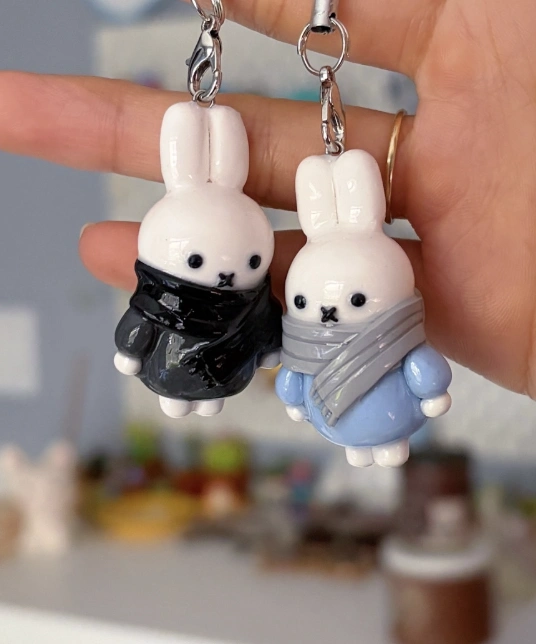
Credit: @caitbbqarts
They evoke a Miffy style but with a much cooler edge. Most standard clay charms can feel, well, pretty basic.
These break the mold entirely. The figure sporting the black trench coat radiates a chic, unexpected energy.
The companion piece wearing the blue dress outshines most usual finds in the cute department. The pull to dive headfirst into Small Clay Projects is serious; perhaps the results might even be half as striking as these.
How to Make This: Work white clay until it is buttery soft. Roll it into an oval shape for the body. Form two small cylinders to serve as ears. Fasten those ear shapes onto the top of the body. Use black clay to make a tiny “x” for the mouth and dots for the eyes. Employ black or blue clay to construct the jacket and gray clay for the scarf. Bake according to the clay package directions. Let the piece cool down fully. Fix an eye pin into the top of the charm. Loop the keyring attachment through it.
Tiny Handmade Minion Polymer Clay Charms
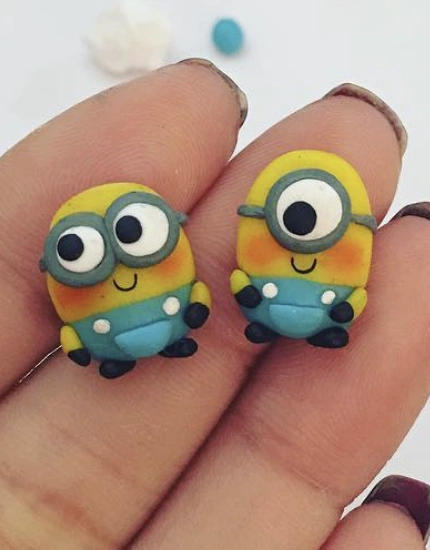
Credit: @childspaintground
These handmade minion charms radiate cheerful brightness and the exact right level of quirky fun. This “Clay Ideas Aesthetic” style pops up everywhere now, and the temptation is high because they are compact and effortless to rock on a dainty chain or to accessorize a minimalist bag. Simple and effective, right?
How to Make This: Soften blue and yellow polymer clay. Sculpt the main body silhouette using the yellow clay. Apply blue clay to form the iconic overall details. Construct the goggles with black and white clay. Add precise facial features with black clay. Cure based on the clay’s specific instructions. Wait for them to cool completely. Fix earring backings into place. Cover with a protective gloss.
Ghost Dog in a Traffic Cone Hat Cute Clay Charm
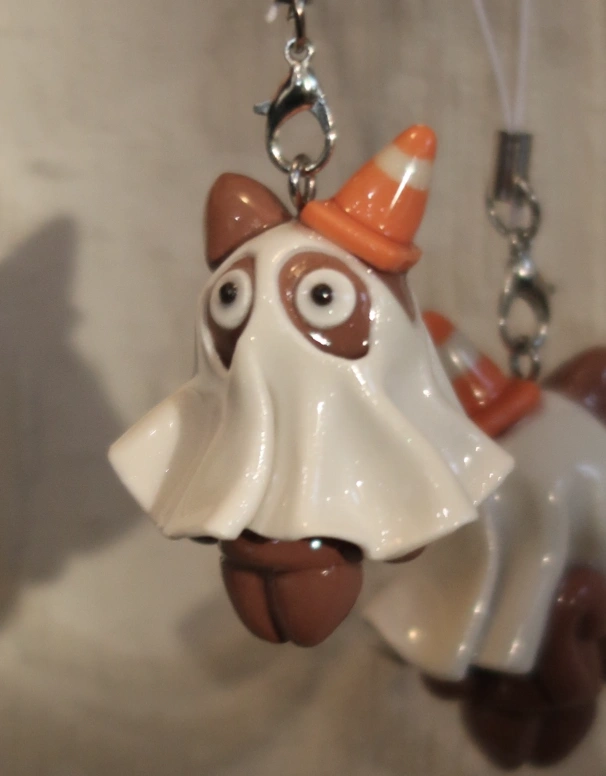
Credit: @bons.bakehouse
The absolute showstopper here is the traffic cone hat, a completely unexpected twist that somehow works so perfectly. The glossy finish amplifies the color vibrancy without ever feeling heavy handed.
The tiny ghost sheet looks caught in a gentle breeze, frozen mid billow. This style might not normally be a top pick, but these Cute Clay Charms are making a seriously persuasive argument.
How to Make This: Blend white clay for the flowing ghost sheet. Form the pup silhouette beneath using brown and white clay. Drape the ghost sheet over the dog shape carefully. Add tiny facial features to the pup peeking out. Sculpt a cone structure using orange clay. Secure the cone to the very top of the head. Bake according to the instructions. Allow it to reach room temperature. Bore a tiny hole into the piece. Install a screw eye and keyring. Brush on a layer of protective varnish.
Pink Bunny Clay Charm with Headset
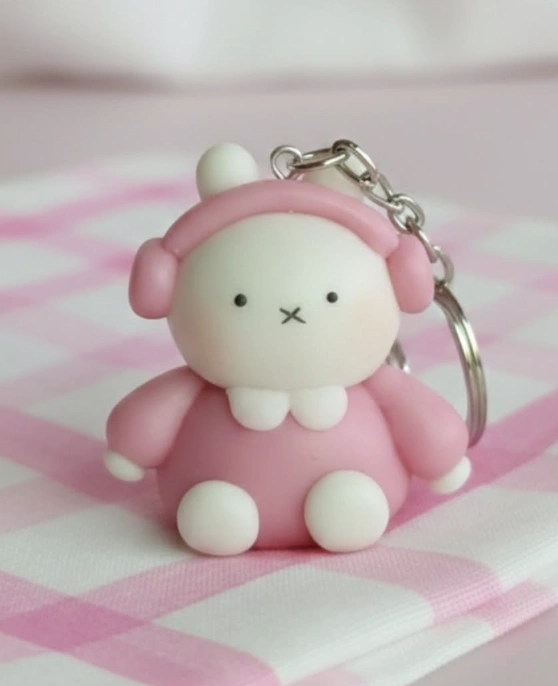
Credit: @sweetcafecharms_
Look closely at those blushed cheeks; they are undeniably the sweetest touch imaginable. And the tiny “x” marking the mouth is a complete obsession trigger.
This piece is a major inspiration injection for anyone hunting for new Mini Clay Ideas to bring to life. Throw in the bubblegum pink attire and the headset punctuated with crisp white accents, and the result is a total mood.
How to Make This: Condition pink and white polymer clay. Roll a sphere of white clay for the head and another for the body. Press pink clay onto the figure to form the outfit. Make small white clay spheres for the little hands and feet. Sculpt pink headphones and fasten them encircling the head. Carve a tiny “x” for the mouth detail. Bake in a preheated oven per the clay instructions. Cool entirely before moving on. Insert the eye pin with care. Lock the keyring loop into place.
Big Hero 6 Inspired Baymax Clay Charm with Red Heart
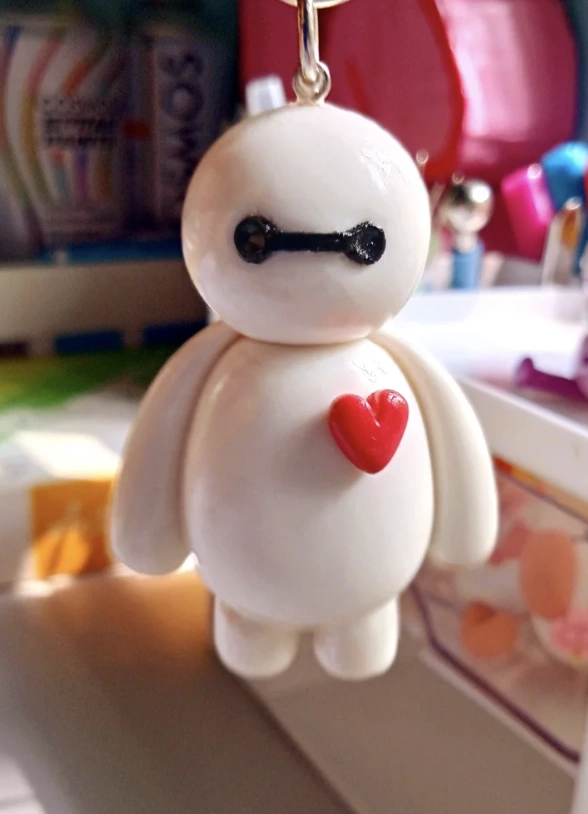
Credit: @_claydiaries_
The charm here is a super cute Baymax figure. That tiny red heart makes it absolutely sing.
This piece looks perfect clipped onto a backpack. Anybody seriously into DIY projects could easily pull this off, especially those already vibing hard with the broader Clay Charms Aesthetic. The result is completely original and a little bit geek chic.
How to Make This: Sculpt white clay into a substantial sphere for the torso. Roll a smaller sphere for the head and fuse it to the body. Shape two stubby logs for arms and attach them securely. Roll black clay into a hair thin rope and form the eye lines. Cure the clay following the manufacturer’s guidelines. Roll a tiny red clay heart and bond it using liquid clay or strong glue. Connect the chain and keyring to the top of the head. Let it cool down entirely before use.
Handmade Polymer Clay Candy Corn Keychain
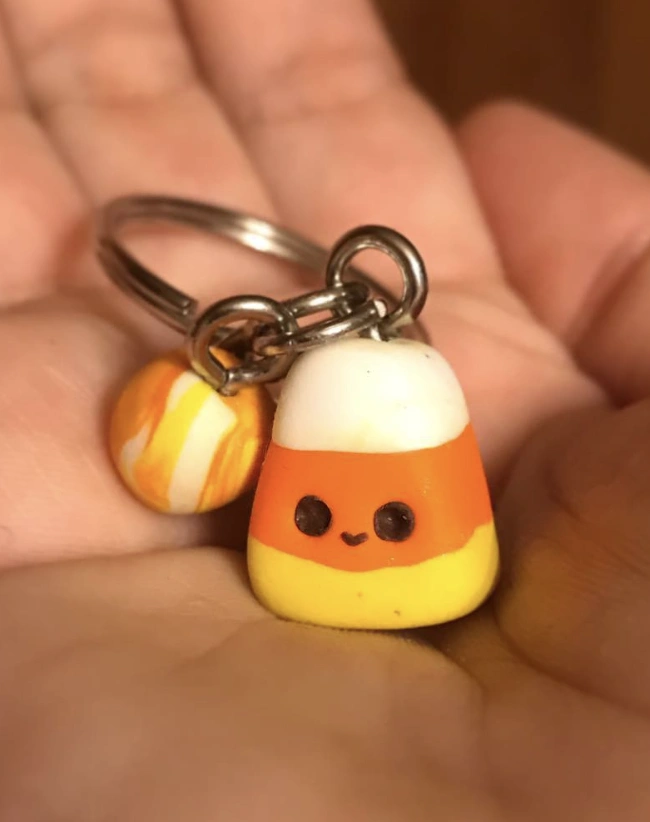
Credit: @maria.maack1519
Never underestimate how these seemingly straightforward Clay Trinkets can completely transform an entire look. Hook this handcrafted candy corn keychain onto a daily use tote bag to inject a spark of playfulness, or fasten it to a backpack strap.
The way these details reinvent a basic outfit is truly an obsession waiting to happen. Expect a flood of compliments.
How to Make This: Condition orange, yellow, and white polymer clay. Flatten the yellow clay and sculpt the candy base foundation. Layer the orange clay segment directly on top. Cap it all off with white clay at the peak. Smooth out the seams with blending tools. Bake as directed on the packaging. Use a fine tipped marking pen to ink the little face. Attach a baked bead and chain to complete the piece.
Orange Turtle Clay Charms – Adorable DIY
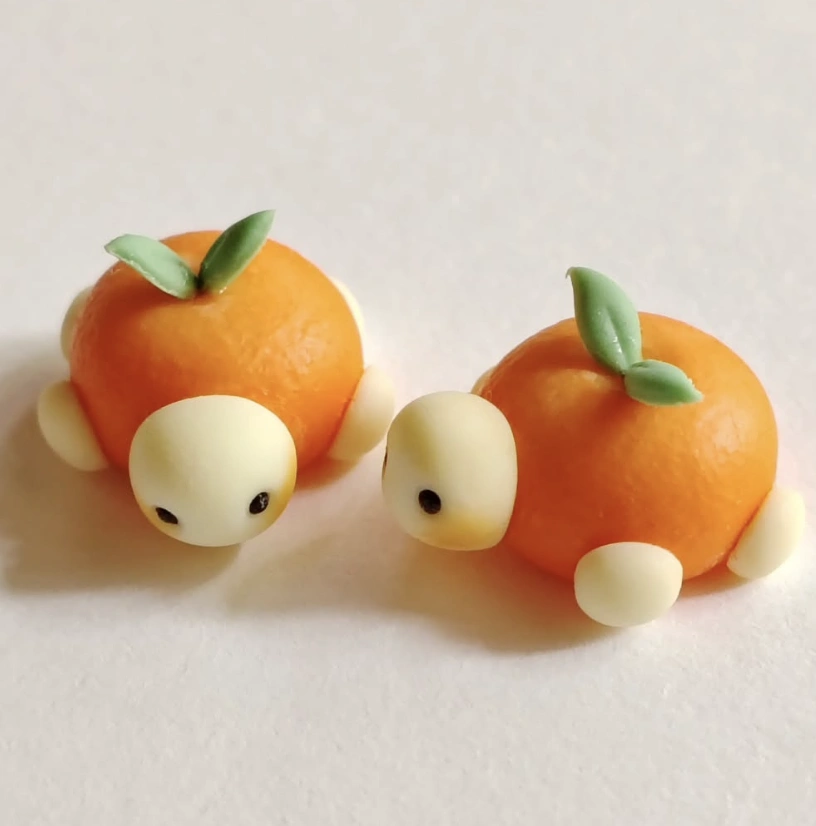
Credit: @croodle.world
The cuteness factor of these tiny turtles is no joke. The cottagecore aesthetic seems to blanket everything right now, and these fit seamlessly into that world.
Crafting personal Clay Charms is a genuinely meditative experience. These orange turtles would be a total blast to sculpt and gift to friends. They look miniature in scale, but the details, especially those miniature leaves, truly make the design stand out.
How to Make This: Form two round spheres from orange clay. Shape ivory clay into one little round ball for the head and four tiny ovals for the legs. Fix the head and legs onto the orange shell body. Roll two specks of dark clay into eyes and press them on. Pinch green clay into teardrop leaf shapes and fasten them to the shell. Cure the clay, following the package directions. Let it cool entirely before picking it up.
Purple-Haired Clay Figure with Miniature Coffee Set
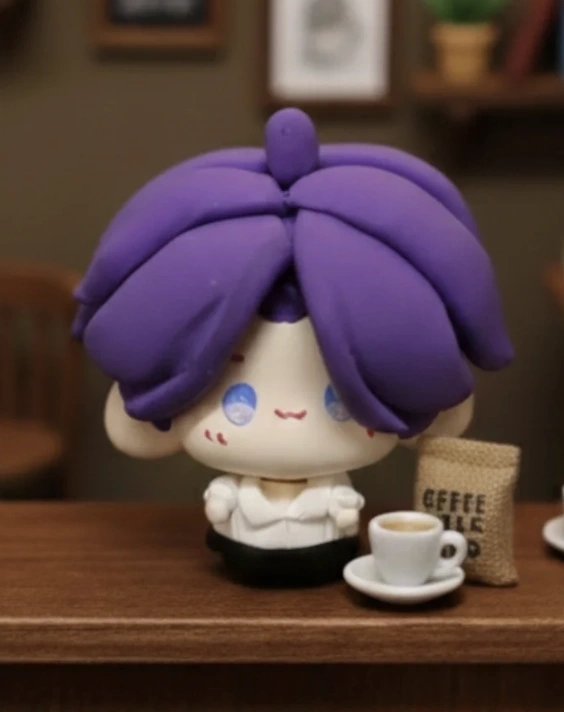
Credit: @gia_clayworkshop
The mental image of this tiny figure chilling right on the work desk is instant. This purple haired cutie has the perfect energy to brighten up a workspace.
The teeny tiny coffee set dials the level of detail up to ten. Collecting tiny trinkets like these striking Ceramic Charms is a shared obsession for good reason. The quest to find the perfect spot for this piece is already underway.
How to Make This: Shape white clay into the character’s head and main body block. Build up details like the tiny shirt collar using extra white clay. Roll vivid purple clay to mold the layered hair shape. Press dark clay onto the figure to form the pants. Cure the separate clay parts according to the package directions. Wait for them to cool, then glue the character onto a small table base. Sculpt and fire a tiny coffee mug. Arrange the mug right next to the character.
Moon and Star Air Dry Clay Charms with Kawaii Faces
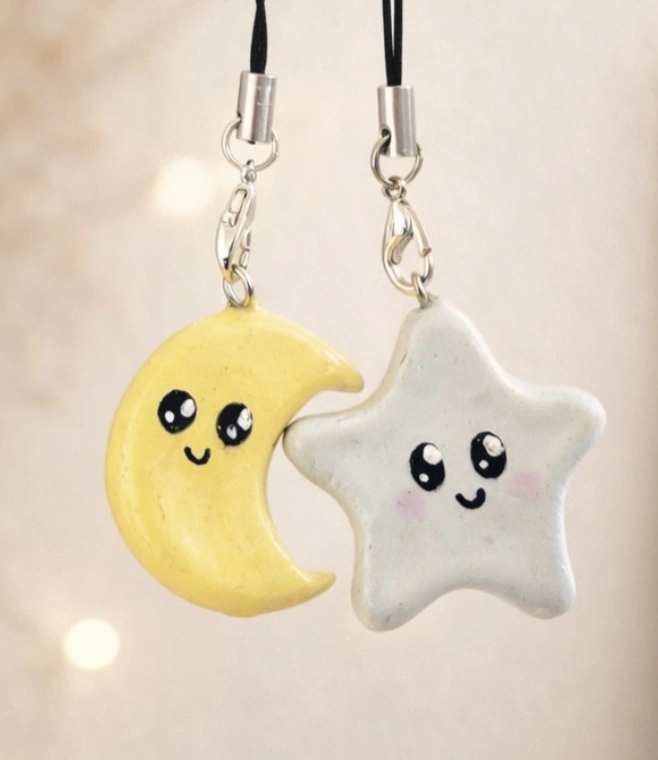
Credit: @the.artful_soul
These particular Air Dry Clay Charms seem built right for the Gen Z crowd navigating the late night boba run scene. It is a look that conjures the spirit of Dua Lipa colliding with Harajuku street fashion.
A whole unique aesthetic wave. Clip one charm onto a bag and the other onto a key set for an instant cute factor upgrade.
The look is playful and just the right amount of extra for a curated Insta feed. This trend is on the verge of a major explosion, so do not sleep on it.
How to Make This: Soften white and yellow clay. Sculpt the yellow clay into a graceful crescent moon form. Mold the white clay into a chunky, five pointed star. Use a fine tipped tool to delicately inscribe the sleeping eyes. Carefully bake following the clay packaging guidelines. Apply blush onto the cheeks of the moon and star using chalk pastels. Fix a keychain loop and chain to the top. Reinforce the keychain connection with superglue for security.
Tiny Axolotl Charms: Handcrafted Polymer Clay Trinkets
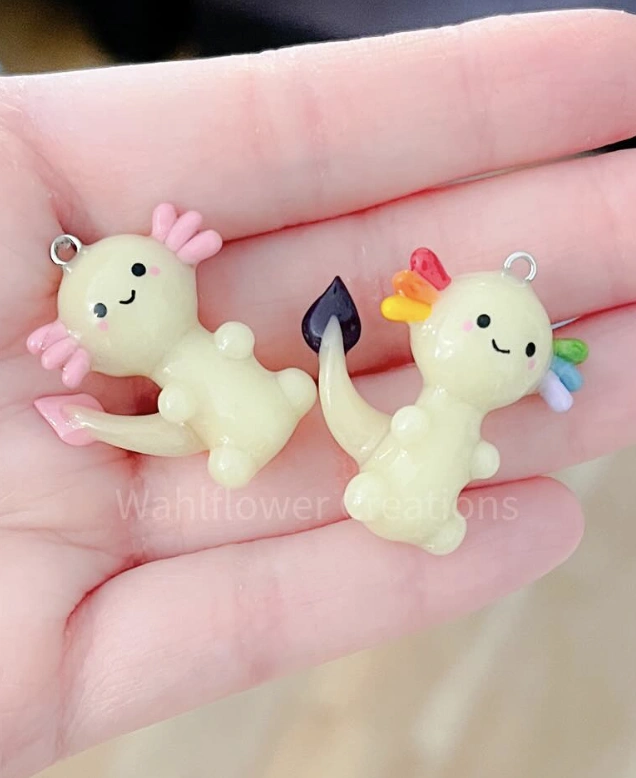
Credit: @wahlflowercreations
First, that soft, buttery creamy yellow base color makes them undeniably precious. But then the real show begins as the details emerge, the rainbow hued gills on one figure and that gleaming little black tail on the other.
Cutesy things might not normally be on the radar, but there is a real need for these clay trinkets clipped onto a keychain right now. They serve as undeniable, instant mood boosters.
How to Make This: Work the cream colored polymer clay until it is soft and stretchy. Roll it into a chunky log shape to start forming the body. Craft tiny pink frilly bits to create the signature gills, attaching them around the head. Use small pinches of black clay to fix the eyes and a little smile. Sculpt a tiny dark tail and fuse it onto the torso. Create a rainbow gill effect by pressing together extremely narrow strips of multiple colors. Cure the charm following the clay’s package instructions. Let it reach room temperature after baking and then paint on a glossy varnish. Secure an eye pin into the top before the baking stage for a sturdy attachment point. Slip a jump ring through the eye pin to hook it onto anything you like.
Miniature Snowman: Polymer Clay Charm with Striped Scarf
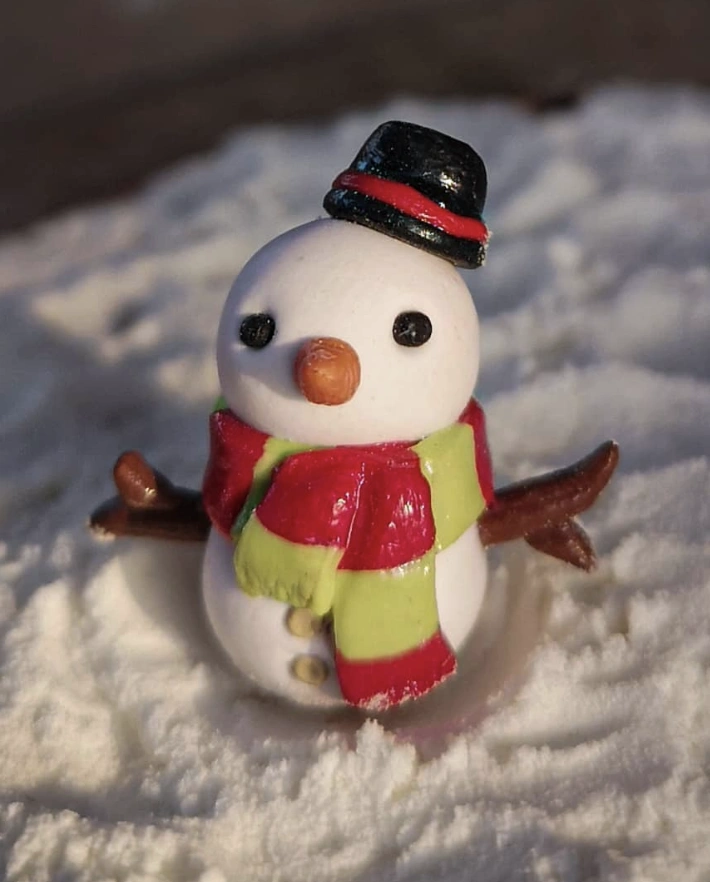
Credit: @artsy.amalia
This piece stands apart from factory made trinkets by feeling genuinely thoughtful in its construction. The careful craftsmanship of the scarf and tiny hat lifts it far above standard seasonal stocking stuffers.
It is refreshing to encounter handcrafted cute clay charms that skip the overly polished machine finish. The appreciation for the subtle textures and the singular charm it injects into a space is high, presenting a welcome shift away from typical store bought holiday decor.
How to Make This: Begin by sizing three white polymer clay balls from small to large. Gently press the balls together to stack the snowman’s frame. Roll an itty bitty orange cone for the nose. Shape minuscule black spheres for the eyes. Press tiny black balls down the belly to serve as buttons. Fashion a thin striped snake by twisting red and green clay for the scarf. Build a tiny black top hat accented with a red stripe. Insert tiny brown twig shapes for the arms. Bake at 275F for 15 minutes. Brush on a clear protective sealant once the figure has fully cooled.
Pastel Colored Animal Clay Charms – Koala, Panda, Frog and More
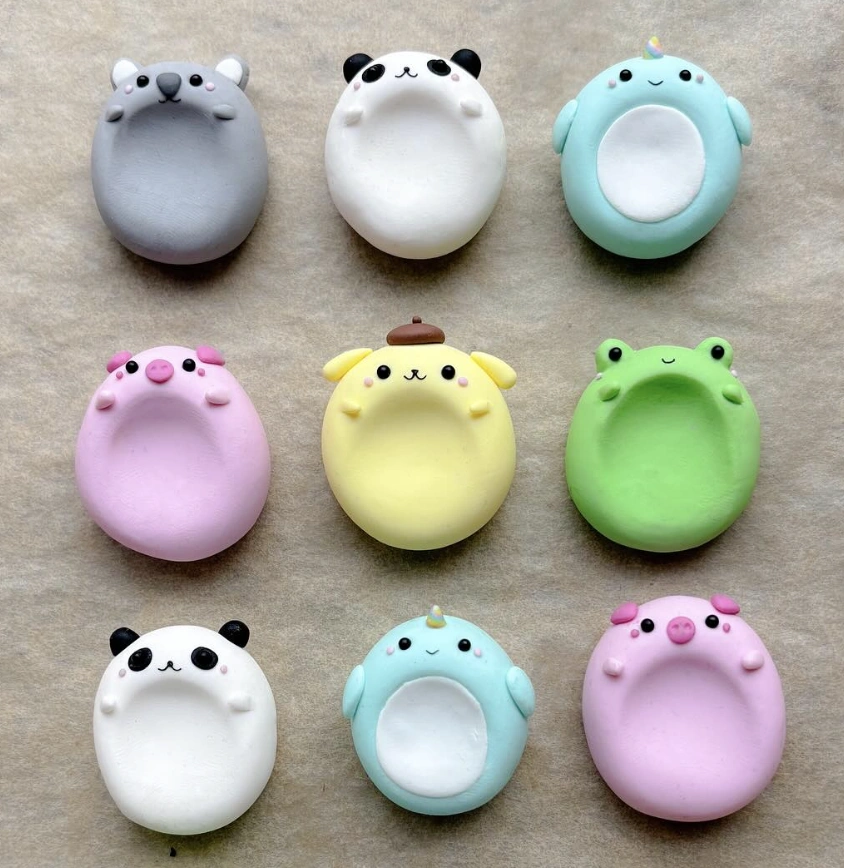
Credit: @lynniepopsicle
These sweet little creations look perfect clinging to a child’s backpack, realistically speaking. But stepping past that, these cute, puffy clay charms arrive right on time for anyone simply needing a tiny dose of happy sprinkled into the daily routine.
The charm of that squat little yellow pudding shaped creature is impossible to deny. They serve as ideal pops of color against a plain bag or even as an embellishment attached to a handmade greeting card, instantly amping up the wow factor.
How to Make This: Pick your desired animal silhouette, be it a bear, frog, or panda. Flatten the clay out to a solid, medium thickness. Punch out a softly rounded shape for the main body. Mold tiny ears, eyes, and other distinguishing elements from clay in the proper colors. Stick these detail pieces onto the body base with care. Gently burnish the seams where all the features meet the main body. Cure at 275F for 15 to 20 minutes based on the clay packet. Let the clay cool entirely. Fix a strong craft magnet to the back with super glue. Verify the magnet holds firm against a metal surface before use.
Kawaii Duck Charm with Froggy Hat
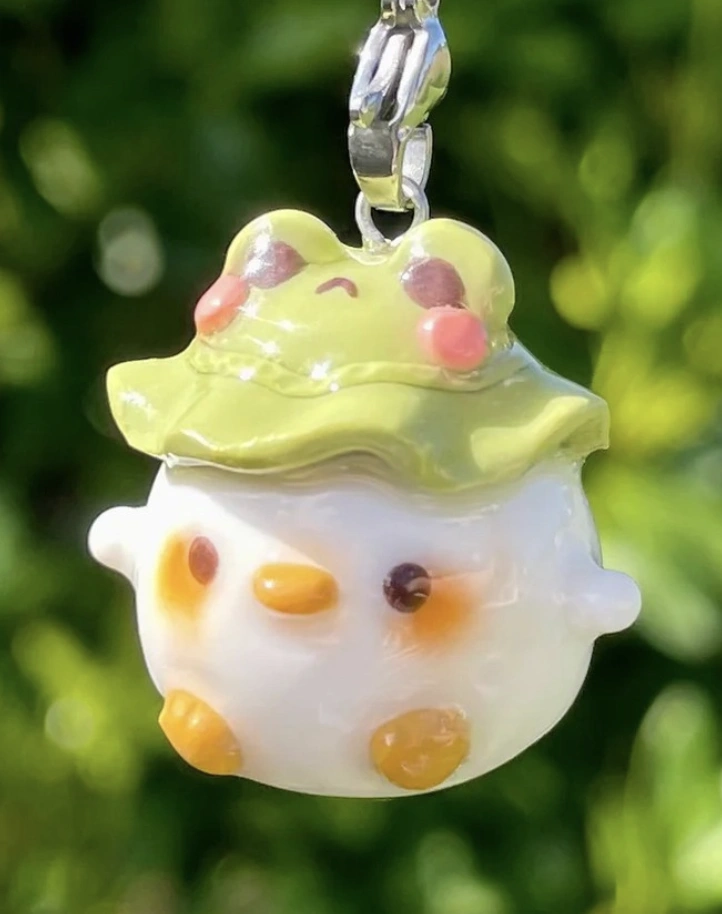
Credit: @yuebun.co
The plan to clip this onto a bag is already locked in. That frog hat sitting on its head is an absolute stroke of genius.
The entire design broadcasts “Clay Ideas Aesthetic” at maximum volume. The combination hits the sweet spot of cute and singular, exactly what the search was targeting all along.
How to Make This: Start by rolling white clay into a rounded ball for the duck’s form. Shape the rounded body, carefully pinching out the tiny wing accents. Use orange clay for the beak and flat little feet. Press brown clay in for the eyes. Flatten green clay to sculpt the hat. Mold it into a distinct frog like face. Pinch out two minuscule pink cheeks to add to the hat. Press the hat tenderly onto the duck’s head. Push an eye pin into the hat’s peak. Cure the charm at 275F per the clay’s instructions. Once cooled, attach a charm clasp and a jump ring through the loop.
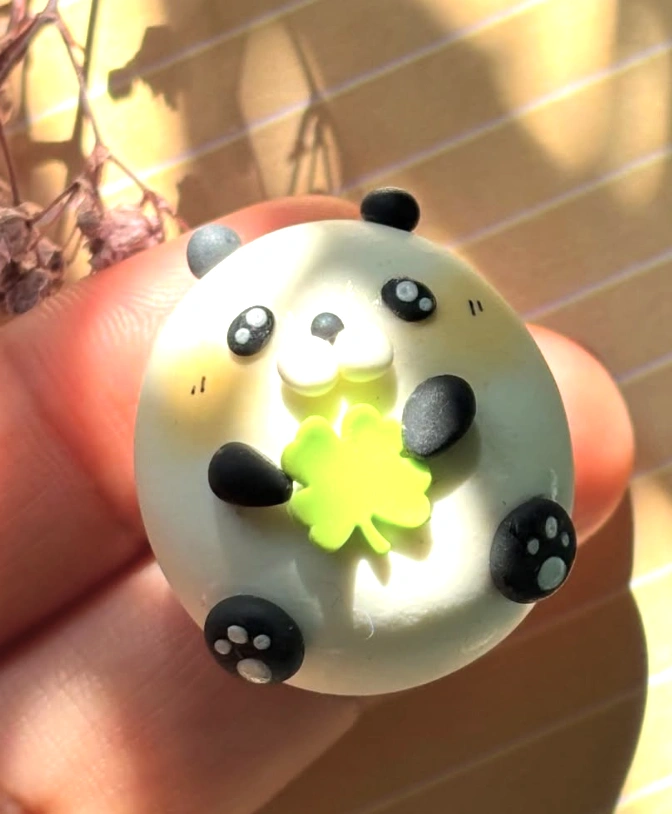
Lucky Panda: Adorable Air Dry Clay Charm
Credit: @tulip_paws_charms_
The panda variation is the clear standout favorite. It has a perfect roundness and tenderly clutches a tiny clover.
Envision this hanging from a phone strap, a zipper pull, or even dangling from a plain silver chain as a pendant. The urge to launch straight into a personal crafting session is overwhelmingly strong.
It promises a truly personal touch. What color palette would feel right? Which shades would you reach for first?
How to Make This: Start by forming a round sphere from white polymer clay. Fix black clay patches to build the panda’s characteristic ear shapes and eye spots. Create small paw pad details and attach them to the body. Roll a miniature white snout and fix a black nose and set of eyes onto it. Use small white clay pieces to puff out the cheeks. Sculpt a tiny green four leaf clover. Transfer the clover into the panda’s waiting hands. Push an eye pin into the top crown for hanging. Cure according to the instructions listed on the clay pack. Let it fully cool down, then brush on a varnish for a shielded finish.
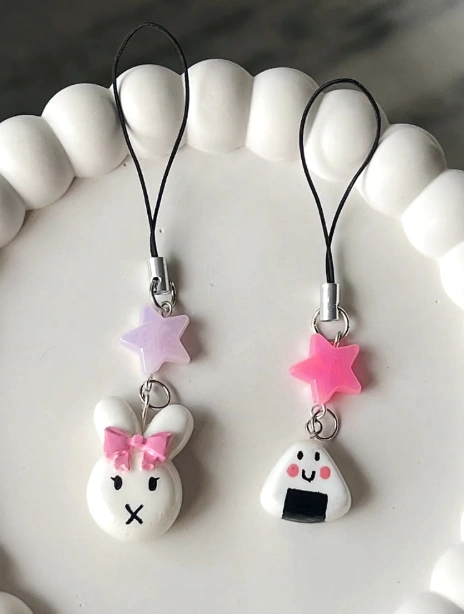
Handmade Clay Charm Phone Straps: Bunny and Onigiri
Credit: @vrindaqala
A current wave marks the return of hand fabricated goods, a clear departure from generic mass production. These handmade phone straps perfectly bottle up that exact feeling.
One strap displays a sugary sweet bunny topped with a pink bow, while the partner piece is a beaming onigiri rice ball. Both are surrounded by pastel star beads to sprinkle in some fantasy. They embody the lively “Clay Charms Aesthetic” sweeping the scene right now, reading as minimal yet incredibly chic.
How to Make This: Prepare white polymer clay by working it with your hands until soft and pliable. Mold two distinct shapes: a rounded bunny head silhouette and a firm triangle for the onigiri. Cure the clay figures based on the package instructions. Use a fine tipped brush and acrylic paint to add the facial expressions to the cooled charms. Sculpt a microscopic pink bow from clay and stick it to the bunny’s head. Bore a tiny hole into the top of each figure using a pin vise. Construct jump rings with jewelry pliers and hook on a resin star bead plus the charm itself. Link the finished assembly to the designated phone straps. Check the hold and tension of the phone straps. Allow the painted features to dry fully and completely.
Final Thoughts
Sculpting these cute clay charms has evolved into the absolute favorite way to unwind and decompress. The process is deeply calming, and the final reward is a completely one of a kind item to show off. The hunt for fresh inspiration never ends, so consider this an open call: what design concepts should take shape next?
Leave a Comment
Your email address will not be published. Required fields are marked *
Type here..
Email*
Website